UnrealEngine4 PBR Shading Model 概述
虽然是概述,但内容并还是有些多,写上一篇PBR概念概述后,也在考虑怎么继续下去,最后还是觉得先多写一些东西再慢慢总结,所以还是尽量把这些年PBR相关的Paper精粹沉淀下来吧。
因为UE4开源的缘故,所以一开始还从它入手。相关的ppt和notebook可以从下面的链接下载,同期的黑色行动2(black op2)的PBR使用也是很有参考价值的,加上本文里也有OP2的IBL近似方法的介绍,如果没看过那也很值得下载的。
UE4的paper里的PBR介绍包括三部分:Shading Model ,Lighitng Model ,Material Model,这篇就先从Shading Model,也就是使用的BRDF开始吧,但要满足一个游戏的所有渲染效果,靠一个通用的BRDF也是无法达到的,所以也只能算是个概述吧,随着使用和学习的应用,也会继续补完Shading Model的介绍的。
首先,PBR最大的特点还是引入了微平面概念

着色平面不再是一个完美的反射平面,而是想象成更多微小的反射平面组成。所以也就有了粗糙度的概念
Diffuse BRDF
可以选择简单的Lambert或支持Microfacet的Oren-Nayar
UE4默认使用的是Lambert

Specular BRDF
支持微平面概念的 Cook-Torrance Microfacet BRDF ,在直接照明和间接照明的Shading Model里使用

由Fresnel项,NDF(Normal Distribution Function)项 Geometry Factor项来组成,以获得更加物理的效果
F D G项会根据设备性能选择最适合的公式
暂定 F是 Schlick’的近似

F0是垂直入射时的反射率(法线方向的Specular Reflectance),一般也就是存在Specular Color map里的数值了。
NDF(Normal Distribution Function) GGX


 这个是能量守恒因子( normalization factor ),用来保证出射光 < 入射光的,具体的求导会放在另外一篇里一同解说。
Geometry Factor GGX
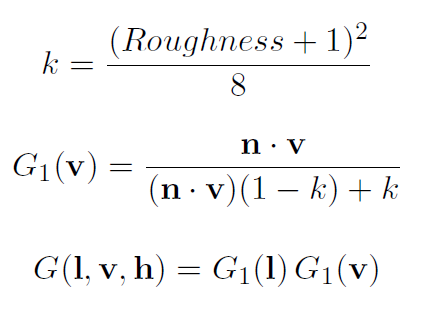
直接光照还是比较简单的,将公式和需要的参数直接套入现有的渲染管线就可以了。Forward Rendering还好,多加几个参数也没有影像,如果是Deferred Rendering的话,就需要把F0(Specular Color)放入到Gbuffer了。但这样对于以前CE那种Gbuffer还是有影响的。
孤岛危机2 Deferred Lighting Slim G-Buffer
§A8B8G8R8
World Space BF Normals 24bpp + Glossiness 8bpp RT1
§Readback
D24S8 Depth + Stencil bits for tagging indoor surfaces 8pp RT0
孤岛危机3 Hybrid Deferred Rendering Thin G-Buffer 2.0 只传入Specular Color的灰度值

罗马之子 Deferred Shading , PBR需要完整的Specular Color

而UE4是提供了forward rendering和Deferred Shading两种方案,因为Computrer Shader可以在TBDR(Tile Based Deferred Rendering)上的应用,所以Deferred lighting这种方法基本上到PBR上已经基本没有什么优势了。基本上一个比较完整的GBuffer+TBDR管线算是现在的主流设计方式了。这些到了后面PBR渲染管线设计时再具体描述吧。
Image Based Lighting
使用预处理的环境光贴图来做光源的间接照明方案。
原始公式IBL公式,u是入射光方向,v是视点方向,Li是每一个入射光,也就是Environment Map的信息,f是我们前面提到的BRDF着色模型

重要度采样(Importance Sampling)
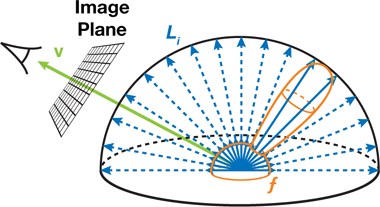
原始公式是要对周围光照做一个均匀的随机Sampling(Hammersley 随机采样),但像光滑材质上,大量的光会聚集在Specular方向上(镜面反射方向),均匀采样无法获得准确的结果。在无法改变采用分布的情况下,使用PDF(probability density function 概率采样函数)是一个近似解决的方法,把PDF(p)在公式里作为分母使用,PDF是0~1的一个浮点数,在接近Specular方向,这种采样数需要较高的地方,PDF值会变得较低,提高了最后采样的数值(间接来说就是提升了次数),相反,在采样数较低的地方,PDF值会更高,间接减少采样次数 。也就有了下面这个公式的近似。

float3 ImportanceSampleGGX( float2 Xi, float Roughness , float3 N )
{
    float a = Roughness * Roughness;
    float Phi = 2 * PI * Xi.x;
    float CosTheta = sqrt( (1 - Xi.y) / ( 1 + (a*a - 1) * Xi.y ) );
    float SinTheta = sqrt( 1 - CosTheta * CosTheta );
    float3 H;
    H.x = SinTheta * cos( Phi );
    H.y = SinTheta * sin( Phi );
    H.z = CosTheta;
    float3 UpVector = abs(N.z) < 0.999 ? float3(0,0,1) : float3(1,0,0);
    float3 TangentX = normalize( cross( UpVector , N ) );
    float3 TangentY = cross( N, TangentX );
    // Tangent to world space
    return TangentX * H.x + TangentY * H.y + N * H.z;
}
float3 SpecularIBL( float3 SpecularColor , float Roughness , float3 N, float3 V )
{
    float3 SpecularLighting = 0;
    const uint NumSamples = 1024;
    for( uint i = 0; i < NumSamples; i++ )
   {
        float2 Xi = Hammersley( i, NumSamples );
        float3 H = ImportanceSampleGGX( Xi, Roughness , N );
        float3 L = 2 * dot( V, H ) * H - V;
        float NoV = saturate( dot( N, V ) );
        float NoL = saturate( dot( N, L ) );
        float NoH = saturate( dot( N, H ) );
        float VoH = saturate( dot( V, H ) );
        if( NoL > 0 )
        {
            float3 SampleColor = EnvMap.SampleLevel( EnvMapSampler , L, 0 ).rgb;
            float G = G_Smith( Roughness , NoV, NoL );
            float Fc = pow( 1 - VoH, 5 );
            float3 F = (1 - Fc) * SpecularColor + Fc;
            // Incident light = SampleColor * NoL
            // Microfacet specular = D*G*F / (4*NoL*NoV)
            // pdf = D * NoH / (4 * VoH)
            SpecularLighting += SampleColor * F * G * VoH / (NoH * NoV);
        }
    }
    return SpecularLighting / NumSamples;
}
上面是计算Specular间接光的shader 伪代码,1024次对实时的GPU来说还是很难的,需要对公式做拆分

把上面的公式拆分成两部分,而第1个部分和环境光贴图相关的,可以一起进行预计算,也是下面要说到的Pre-Filtered Environment Map
Pre-Filtered Environment Map
而UE4在拆分时还是做了一些额外的改动,那就是第1个部分里的除了采样环境光外,为了更多预计算,把第2部分里基于GGX的PDF也放到了预处理里,PDF公式里需要的V(视口向量)和N(法线),所以这里只能就只能假设n = v = r了。
-
float3 PrefilterEnvMap( float Roughness , float3 R )
{
    float3 N = R;
    float3 V = R;
    float3 PrefilteredColor = 0;
    const uint NumSamples = 1024;
    for( uint i = 0; i < NumSamples; i++ )
    {
        float2 Xi = Hammersley( i, NumSamples );
        float3 H = ImportanceSampleGGX( Xi, Roughness , N );
        float3 L = 2 * dot( V, H ) * H - V;
        float NoL = saturate( dot( N, L ) );
        if( NoL > 0 )
        {
            PrefilteredColor += EnvMap.SampleLevel( EnvMapSampler , L, 0 ).rgb * NoL;
            TotalWeight += NoL;
        }
    }
    return PrefilteredColor / TotalWeight;
}
PrefilterEnvMap生成部分的shader代码。
而后面的部分,我们可以通过Schlick近似的Fresnel公式来进行拆分。


这个时候,我们可以把方程看成是F0 * Scale + Offset的形式了,F0也就是Spcecualr Color可以从材质获取,也就是说,我们把Scale和Offest预计算出来。并通过roughness和NdotV,也就是costheta作为LUT的查找项
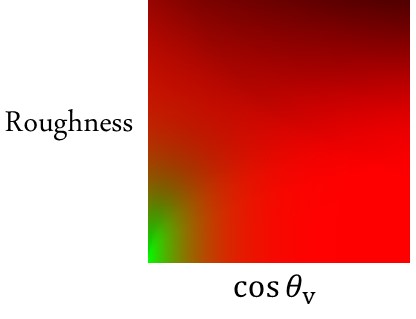
这样就可以把公式重新组合起来:
float2 IntegrateBRDF( float Roughness , float NoV )
{
    float3 V;
    V.x = sqrt( 1.0f - NoV * NoV ); // sin
    V.y = 0;
    V.z = NoV; // cos
    float A = 0;
    float B = 0;
    const uint NumSamples = 1024;
    for( uint i = 0; i < NumSamples; i++ )
   {
        float2 Xi = Hammersley( i, NumSamples );
        float3 H = ImportanceSampleGGX( Xi, Roughness , N );
        float3 L = 2 * dot( V, H ) * H - V;
        float NoL = saturate( L.z );
        float NoH = saturate( H.z );
        float VoH = saturate( dot( V, H ) );
        if( NoL > 0 )
        {
            float G = G_Smith( Roughness , NoV, NoL );
            float G_Vis = G * VoH / (NoH * NoV);
            float Fc = pow( 1 - VoH, 5 );
            A += (1 - Fc) * G_Vis;
            B += Fc * G_Vis;
        }
    }
    return float2( A, B ) / NumSamples;
}
最后把第一部分pre-fileter的cubemap和第2部分计算的部分相乘,就都出IBL的最终结果了
float3 ApproximateSpecularIBL( float3 SpecularColor , float Roughness , float3 N, float3 V )
{
    float NoV = saturate( dot( N, V ) );
    float3 R = 2 * dot( V, N ) * N - V;
    float3 PrefilteredColor = PrefilterEnvMap( Roughness , R );
    float2 EnvBRDF = IntegrateBRDF( Roughness , NoV );
    return PrefilteredColor * ( SpecularColor * EnvBRDF.x + EnvBRDF.y );
}
这里需要注意一点 : EPIC在ppt里提供的shader代码,并不是实际运行的代码,也就是说PrefilterEnvMap和 IntegrateBRDF这两个函数还是ALU方式的实现,而实际上是应该用LUT的方式来替换的。也就是下面的shader代码
half3 EnvBRDF( half3 SpecularColor, half Roughness, half NoV )
{
    // Importance sampled preintegrated G * F
    float2 AB = Texture2DSampleLevel( PreIntegratedGF, PreIntegratedGFSampler, float2( NoV, Roughness ), 0 ).rg;
    // Anything less than 2% is physically impossible and is instead considered to be shadowing
    float3 GF = SpecularColor * AB.x + saturate( 50.0 * SpecularColor.g ) * AB.y;
    return GF;
}
PreIntegratedGF就是我们前面提到的那张红绿的LUT图,这里最后算得的结果,才是UE4最终选择的近似方案,也是

里后面的部分,而前面部分则保存在AmbientCubemap里,对AmbientCubemap采样
-
floatMip=ComputeCubemapMipFromRoughness(GBuffer.Roughness,AmbientCubemapMipAdjust.w );
float3SampleColor=TextureCubeSampleLevel(AmbientCubemap,AmbientCubemapSampler, R,Mip).rgb;

SpecularContribution+=SampleColor*EnvBRDF(GBuffer.SpecularColor,GBuffer.Roughness,NoV);
再把结果相乘,就得到了最终的Specular的颜色。
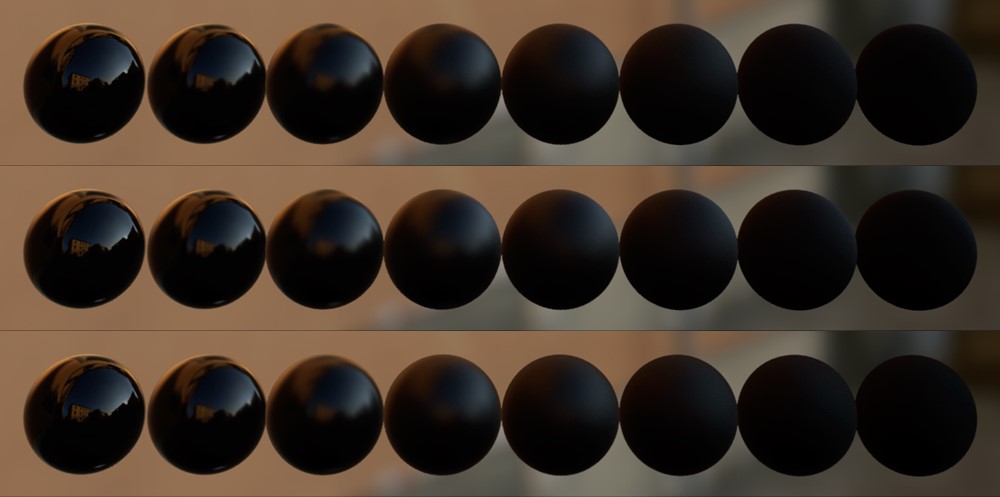
不同精度条件下的渲染效果
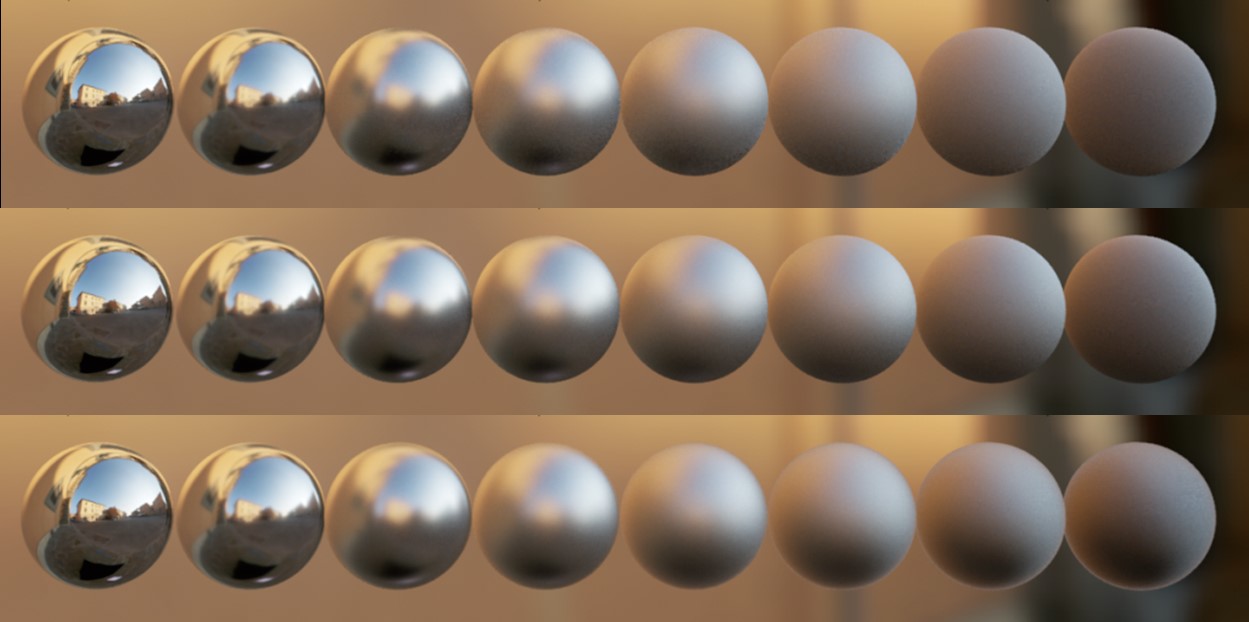
上一排是完全在shader里计算的,中间是按正规拆分后近似的结果(PDF在shader里计算),下面则是完全近似的方法(PDF放在了Pre-Filtered EnvMap里,假设r = n = v)
同样的近似方法,在非金属(绝缘体)上的效果比较
PS:最后这里还是想注释一下,也就是PrefilterEnvMap具体的生成算法,以及如何根据不同的粗糙度生成mip,ue4的ppt里并没有涉及,这个我想会在以后的文章里具体介绍吧。
另外,在GLES2.0的移动设备上,因为texutre sample最高只有8张,UE4为了节省LUT,还提供另外一种更加近似的方式,应该是参考了黑色行动2(后面简称ops2吧)里的方法,
在他们的paper里把这个叫做“ground truth”
这里还是是想介绍一下这种方法,这里我们可以看到ops2里也做了和ue4类似的拆分。
ground truth的近似

前面部分是Pre-filtered Environment map,后面则是Environment BRDF,不过他这并没有PDF,而是直接把D项(Normal Distribution Function)放到前面去预计算了。
然后再说后面部分的拆分,前面提到,UE4是通过把Fresnel公式的F0提出来,做成F0 * Scale + Offset的方式,再Scale和Offset索引的存到了一张2D LUT上。靠roughness和NoV(N dot V)来查找
而ops2的方法,也一样是从Schlick的Fresnel公式入手来拆分(这里rf0和F0是一样的)。

这里是从加法这里做拆分

大概就变成了 rf0 * a1+ (1-rf0) * a0的形式,这个公式很容易理解为一个关于rf0的一个线性插值公式。所以只要能计算出a1 (rf0 = 1)和a0(rf0 = 0),就可以通过线性公式求出任意rf0情况下的结果了。
接下来就是想办法来近似出a0和a1的曲线函数了
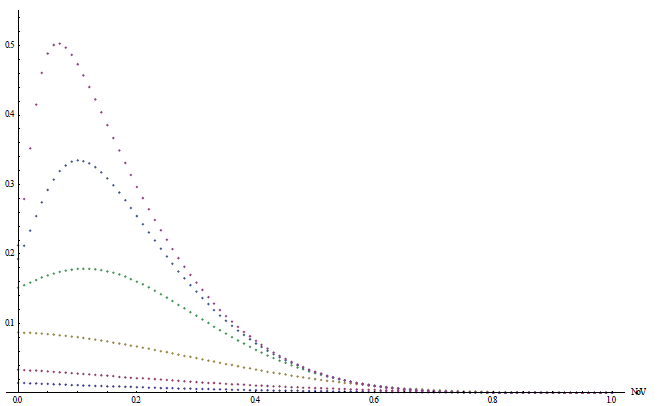
ground truth rf0 = 0 的曲线
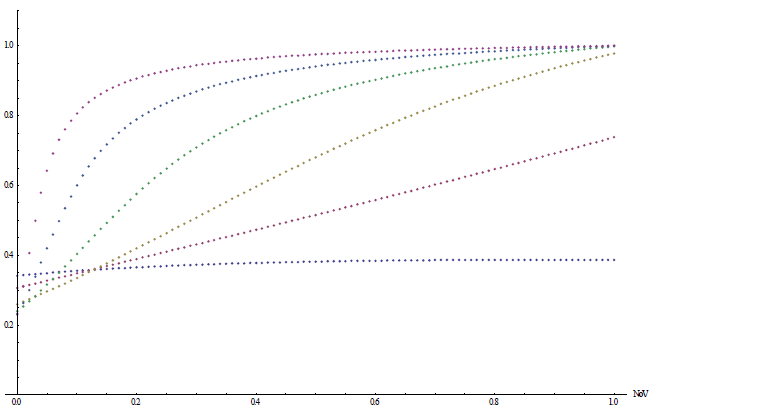
ground truth rf0 = 1 的 曲线
然后他们整出两个近似的曲线函数出来
float a0( float g, float NoV )
{
    float t1 = 11.4 * pow( g, 3 ) + 0.1;
    float t2 = NoV + ( 0.1 – 0.09 * g );
    return (1 – exp( -t1 * t2 ) ) * 1.32 * exp2( -10.3 * NoV );
}

float a1( float g, gloat NoV )
{
    float t1 = max( 1.336 – 0.486 * g, 1);
    float t2 = 0.06 + 3.25 * g + 12.8 * pow( g, 3 );
    float t3 = NoV + min( 0.125 – 0.1 * g, 0.1 );
    return min( t1 – exp2( -t2 * t3 ), 1 );
}
并进一步的做优化
-
float a0f( float g, float NoV )
{
    float t1 = 0.095 + g * ( 0.6 + 4.19 * g );
    float t2 = NoV + 0.025;
    return t1 * t2 * exp2( 1 – 14 * NoV );
}
float a1f( float g, float NoV )
{
    float t1 = 9.5 * g * NoV;
    return 0.4 + 0.6 * (1 – exp2( -t1 ) );
}
![]()
-
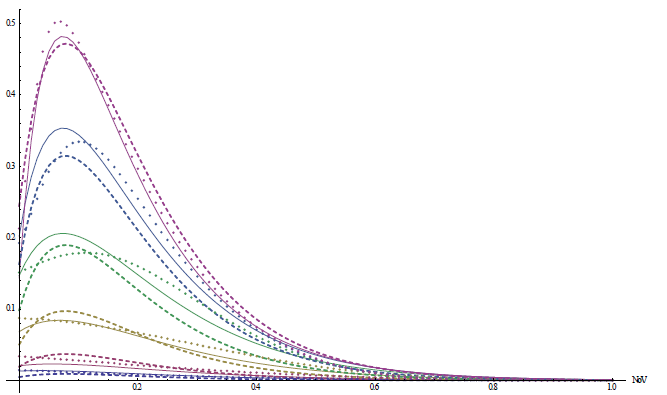
rf0(ground truth)是点线,a0是实线,a0f是线段
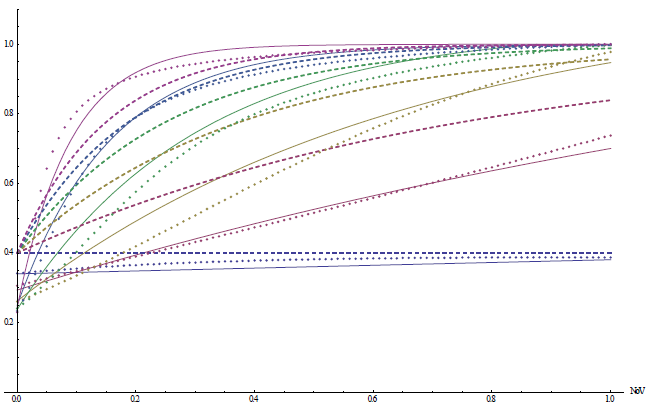
rf1(ground truth)是点线,a1是实线,a1f是线段
但这个曲线被美术人员反映环境光反射效果过亮,特别是dielectric(电介质/绝缘体/非金属)和gloss低的情况。所以就把rf0 = 0.04这个对非金属比较通用的值,作为求a0的参数
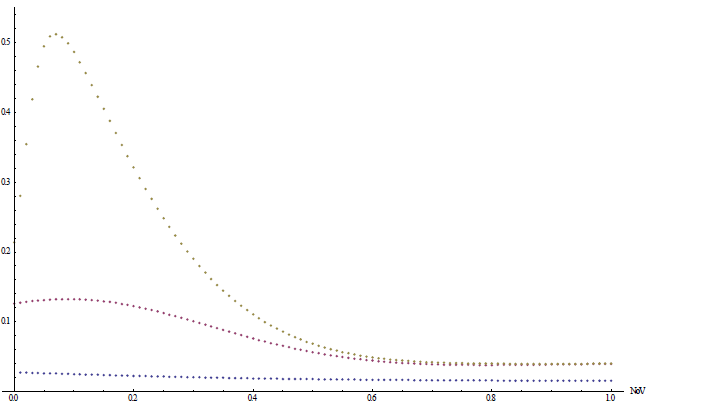
ground truth rf0 = 0.04的 曲线 不在是a0曲线,而叫a004曲线了- -
那么,拟合出来的更廉价的a004曲线的公式
-
float a004( float g, float NoV )
{
    float t = min( 0.475 * g, exp2( -9.28 * NoV ) );
    return ( t + 0.0275 ) * g + 0.015;
}
![]()
-
ground truth rf0 =0.04是点线 a004是实线
另外,因为在游戏里,金属的使用情况并不多,也就是说a1(rf0 = 1)在实际计算插值时,贡献的参数并不是那么占主要的,所以,可以做a1f做进一步粗糙近似成a1vf
float a1vf( float g )
{
    return 0.25 * g + 0.75;
}
再用a004和a1vf算出新的a0r
-
float a0r( float g, float NoV )
{
    return ( a004( g, NoV ) - a1vf( g ) * 0.04 ) / 0.96;
}
至此,a0和a1的最终近似版本也完成了,前面我们提到实际计算就是关于rf0的插值运算
这里我们把rf0提出来
rf0 * a1+ (1-rf0) * a0 = rf0 (a1 - a0) + a0 ,那么最后的Environment BRDF近似公式
-
float3 EnvironmentBRDF( float g, float NoV, float3 rf0 )
{
    float4 t = float4( 1/0.96, 0.475, (0.0275 - 0.25 * 0.04)/0.96, 0.25 );
    t *= float4( g, g, g, g );
    t += float4( 0, 0, (0.015 - 0.75 * 0.04)/0.96, 0.75 );
    float a0 = t.x * min( t.y, exp2( -9.28 * NoV ) ) + t.z;
    float a1 = t.w;
    return saturate( a0 + rf0 * ( a1 - a0 ) );
}
OP2的近似方法就先讲到这里了,PPT的公式推导还是太简单,建议还是看notebook的吧,如果有问题可以留言给我讨论
UE4的mobile PBR
接下来继续说UE4,他的近似公式也是照抄op2的,
材质为金属时的近似公式
-
half3 EnvBRDFApprox( half3 SpecularColor, half Roughness, half NoV )
{
    const half4 c0 = { -1, -0.0275, -0.572, 0.022 };
    const half4 c1 = { 1, 0.0425, 1.04, -0.04 };
    half4 r = Roughness * c0 + c1;
    half a004 = min( r.x * r.x, exp2( -9.28 * NoV ) ) * r.x + r.y;
    half2 AB = half2( -1.04, 1.04 ) * a004 + r.zw;
    return SpecularColor * AB.x + AB.y;
}
材质为非金属时的近似公式
-
half EnvBRDFApproxNonmetal( half Roughness, half NoV )
{
    // Same as EnvBRDFApprox( 0.04, Roughness, NoV )
    const half2 c0 = { -1, -0.0275 };
    const half2 c1 = { 1, 0.0425 };
    half2 r = Roughness * c0 + c1;
    return min( r.x * r.x, exp2( -9.28 * NoV ) ) * r.x + r.y;
}
在非金属的情况下,Specular没有颜色而只是一个亮度,这里就假设为0.04了
然后还可以进一步优化,就是在roughness = 1的时候,不在运行上面的拟合函数,而是直接给出一个拟合结果就可以了
DiffuseColor+=SpecularColor*0.45;
SpecularColor=0;
下面是和使用黑色行动2里的拟合方式的对比效果

使用LUT的

移动平台,用ALU拟合替代LUT的
最后还有一个 Directional Light的近似,不过感觉还是光照模式说完再写好一些。
就暂时到此为止了,如果有错误还请留言或直接联系我,这里先感谢了



 浙公网安备 33010602011771号