

一、Ansible概述
Ansible简介
Ansible是一款类Unix系统开发的自由开源的配置和自动化工具。
它用Python写成,类似于saltstack和Puppeet,但是有一个不同的优点是我们不需要在节点中安装任何客户端
它使用ssh来和节点进行通信。Ansible基于Python paramiko开发,分布式、无需客户端、轻量级,配置语法使用yaml及Jinja2模板语言,更强的远程命令来执行操作。
Ansible官方网站
Ansible特点
1、部署简单、没有客户端,只需在主控端部署Ansible环境,被控端无需做任何操作
2、模块化:调用特定的模块,完成特定任务
3、默认是用SSH协议对设备进行管理
4、主从集中化管理
5、配置简单、功能强大、扩展性强
6、支持API及自定义模块,可通过Python轻松扩展
7、通过Playbooks来定制强大的配置、状态管理
8、对云计算、大数据都有很好的支持
9、具有幂等性:一个操作在一个主机执行一遍和执行N遍的结果是一样的
Ansible是基于模块工作的,本身没有批量部署的能力。真正具有批量部署的是Ansible所运行的模块,Ansible只是提供一种框架。
Ansible框架主要包括:
- 连接插件connection plugins:负责和被监控端实现通信;
- host inventory:指定操作的主机,是一个配置文件里面定义监控的主机
- 各种模块核心模块、command模块、自定义模块
- 将诶主语插件完成记录日志邮件等功能
- playbook:剧本执行多个任务时,非必需可以让节点一次性运行多个任务
Ansible架构
Ansible在管理节点将Ansible模块通过SSH协议推送到被管理端执行,执行完之后自动删除,可以使用SVN等来管理自定义模块及编排。
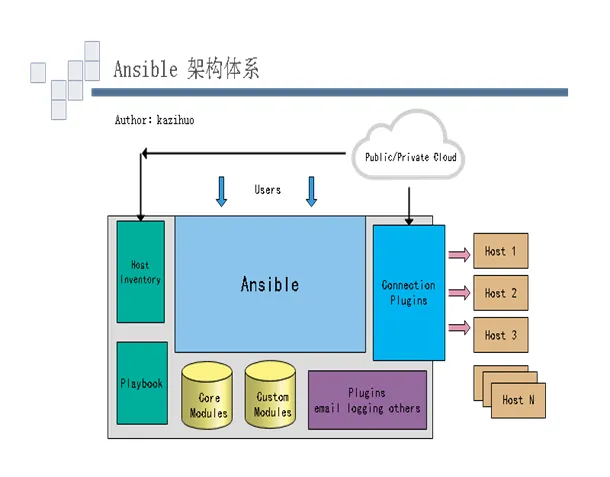
Ansible主要由以下模块组成:
- Ansible:ansible的核心程序
- Host Inventory:记录由Ansible管理的主机信息,包括端口、密码、ip等
- Playbooks:ansible的剧本,yaml格式文件,多个任务定义在一个文件中,定义主机需要调用哪些模块来完成的功能
- Core Modules:核心模块,主要操作是通过调用核心模块来完成管理任务
- Custom Modules:自定义模块,完成核心模块无法完成的功能,支持多种语言
- Connection Plugins:连接插件,用于与被管控主机之间基于SSH建立连接关系
- Plugins:其他插件,包括记录日志等
Ansible任务执行
Ansible任务执行模式
Ansible系统由控制主机对被管控节点的操作方式可分为两类:adhoc和playbook:
-
ad-hoc模式(点对点模式)
使用单个模块,支持批量执行单条命令。ad-hoc命令是一种可以快速输入的命令,而且是不需要保存起来的命令。相当于bash中的一条shell指令
-
playbook模式(剧本模式)
是Ansible主要管理方式,也是Ansible功能强大的关键所在。playbook通过多个task集合完成一类功能,如Web服务的安装部署、数据库服务器的批量备份等。可以简单地把playbook理解为通过组合多条ad-hoc操作的配置文件
Ansible执行流程
Ansible在运行时,首先读取ansible.cfg中的配置,根据规则获取Inventory中的管理主机列表,并行在这些主机中执行配置的任务,最后等待执行返回的结果。
Ansible命令执行过程
- 加载自己的配置文件,默认
/etc/ansible/ansible.cfg - 查找对应的主机配置文件,找到要执行的主机或组
- 加载自己对应的模块文件,如command
- 通过Ansible将模块或命令生成对应的临时py文件,并将该文件传输至远程服务器
- 对应执行用户的家目录的
.ansible/tmp/xxx/xxx.py文件 - 给文件赋予执行权限
- 执行并返回结果
- 删除临时py文件,sleep 0退出
Ansible是导演,受控机器列表(inventory)为演员列表,开发者则是编剧。开发者只要把剧本(palybook.yml)写好,Ansible拿着剧本与inventory对上号,演员就会按照剧本如实表演,不会有任何个人发挥。
二、Ansible配置详解
Ansible安装
centos系统
#由于Ansible不在yum仓库中,需要先安装epel仓库 [root@aliyun ~]# yum install -y epel-release #安装Ansible [root@aliyun ~]# yum install -y ansible #查看Ansible版本 [root@aliyun ~]# ansible --version ansible 2.9.27 config file = /etc/ansible/ansible.cfg configured module search path = [u'/root/.ansible/plugins/modules', u'/usr/share/ansible/plugins/modules'] ansible python module location = /usr/lib/python2.7/site-packages/ansible executable location = /usr/bin/ansible python version = 2.7.5 (default, Nov 16 2020, 22:23:17) [GCC 4.8.5 20150623 (Red Hat 4.8.5-44)]
Ansible程序结构
安装目录如下(yum安装):
- 配置文件目录:
/etc/ansible - 执行文件目录:
/usr/bin - Lib库依赖目录:
/usr/lib/pythonX.X/site-package/ansible - Help文档目录:
/usr/share/doc/ansible-X.X.X - Man文档目录:
/usr/share/man/man1
Ansible配置文件查找顺序
Ansible与我们其他的服务在这一点上有很大不同,这里的配置文件查找是从多个地方找的,顺序如下:
- 检查环境变量
ANSIBLE_CONFIG指向的路径文件(export ANSIBLE_CONFIG=/etc/ansible.cfg) ~/.ansible.cfg,检查当前目录下的ansible.cfg配置文件/etc/ansible.cfg,检查etc目录的配置文件
Ansible配置文件
Ansible的配置文件为/etc/ansible/ansible.cfg,ansible有许多参数,下面列出一些常见的参数:
- inventory = /etc/ansible/hosts #这个参数表示资源清单inventory文件的位置
- library = /usr/share/ansible #指向存放ansible模块的目录,支持多个目录,只要用冒号(:)隔开即可
- forks = 5 #并发连接数,默认为5
- sudo_user = root #设置默认执行命令的用户
- remote_port = 22 #指定连接被管节点的管理端口,默认为22端口,建议修改,能够更加安全
- host_key_checking = False #设置是否检查ssh主机的密钥,值为True/False。关闭后第一次连接不会提示配置示例
- timeout = 60 #设置SSH连接的超时时间,单位为秒
- log_path = /var/log/ansible.log #指定一个存储ansible日志的文件(默认不记录日志)
Ansible主机清单
在配置文件中,我们提到了资源清单,这个清单就是我们的主机清单,里面保存的是一些Ansible需要连接管理的主机列表。
[root@aliyun ansible]# cat hosts # This is the default ansible 'hosts' file. # # It should live in /etc/ansible/hosts # # - Comments begin with the '#' character # - Blank lines are ignored # - Groups of hosts are delimited by [header] elements # - You can enter hostnames or ip addresses # - A hostname/ip can be a member of multiple groups # Ex 1: Ungrouped hosts, specify before any group headers. ## green.example.com ## blue.example.com ## 192.168.100.1 ## 192.168.100.10 # Ex 2: A collection of hosts belonging to the 'webservers' group ## [webservers] ## alpha.example.org ## beta.example.org ## 192.168.1.100 ## 192.168.1.110 # If you have multiple hosts following a pattern you can specify # them like this: ## www[001:006].example.com # Ex 3: A collection of database servers in the 'dbservers' group ## [dbservers] ## ## db01.intranet.mydomain.net ## db02.intranet.mydomain.net ## 10.25.1.56 ## 10.25.1.57 # Here's another example of host ranges, this time there are no # leading 0s: ## db-[99:101]-node.example.com
三、Ansible常用命令
Ansible命令集
#Ansible AD-Hoc临时命令执行工具,常用于临时命令的执行 /usr/bin/ansible #Ansible模块功能查看工具 /usr/bin/ansible-doc #下载/上传优秀代码或Roles模块的官方平台 /usr/bin/ansible-galaxy #Ansible定制自动化的任务集编排工具 /usr/bin/ansible-playbook #Ansible远程执行命令的工具,拉取配置而非推送配置(使用较少,海量机器时使用,对运维的架构能力要求较高) /usr/bin/ansible-pull #Ansible文件加密工具 /usr/bin/ansible-vault #Ansible基于Linux Consoble界面可与用户交互的命令执行工具 /usr/bin/ansible-console
其中比较常用的是:/usr/bin/ansible和/usr/bin/ansible-playbook
ansible-doc命令
ansible-doc命令常用于获取模块信息及其使用帮助,一般用法如下:
#获取全部模块信息 [root@aliyun ~]# ansible-doc -l #获取指定模块的使用帮助 [root@aliyun ~]# ansible-doc -s MOD_NAME #查看ansible-doc的用法 [root@aliyun ~]# ansible-doc usage: ansible-doc [-h] [--version] [-v] [-M MODULE_PATH] [--playbook-dir BASEDIR] [-t {become,cache,callback,cliconf,connection,httpapi,inventory,lookup,netconf,shell,module,strategy,vars}] [-j] [-F | -l | -s | --metadata-dump] [plugin [plugin ...]] plugin documentation tool positional arguments: plugin Plugin optional arguments: --metadata-dump **For internal testing only** Dump json metadata for all plugins. --playbook-dir BASEDIR Since this tool does not use playbooks, use this as a substitute playbook directory.This sets the relative path for many features including roles/ group_vars/ etc. --version show program's version number, config file location, configured module search path, module location, executable location and exit -F, --list_files Show plugin names and their source files without summaries (implies --list) -M MODULE_PATH, --module-path MODULE_PATH prepend colon-separated path(s) to module library (def ault=~/.ansible/plugins/modules:/usr/share/ansible/plu gins/modules) -h, --help show this help message and exit -j, --json Change output into json format. -l, --list List available plugins -s, --snippet Show playbook snippet for specified plugin(s) -t {become,cache,callback,cliconf,connection,httpapi,inventory,lookup,netconf,shell,module,strategy,vars}, --type {become,cache,callback,cliconf,connection,httpapi,inventory,lookup,netconf,shell,module,strategy,vars} Choose which plugin type (defaults to "module"). Available plugin types are : ('become', 'cache', 'callback', 'cliconf', 'connection', 'httpapi', 'inventory', 'lookup', 'netconf', 'shell', 'module', 'strategy', 'vars') -v, --verbose verbose mode (-vvv for more, -vvvv to enable connection debugging) See man pages for Ansible CLI options or website for tutorials https://docs.ansible.com #实验,以mysql为例 [root@aliyun ~]# ansible-doc -l |grep mysql azure_rm_mysqlfirewallrule_info Get Azure MySQL Firewall Rule facts azure_rm_mysqlconfiguration_info Get Azure MySQL Configuration facts mysql_info Gather information about MySQL servers mysql_db Add or remove MySQL databases from a remote host azure_rm_mysqlserver_info Get Azure MySQL Server facts azure_rm_mysqldatabase_info Get Azure MySQL Database facts mysql_variables Manage MySQL global variables mysql_user Adds or removes a user from a MySQL database proxysql_backend_servers Adds or removes mysql hosts from proxysql admin interface azure_rm_mysqlconfiguration Manage Configuration instance azure_rm_mysqlfirewallrule Manage MySQL firewall rule instance azure_rm_mysqlserver Manage MySQL Server instance mysql_replication Manage MySQL replication proxysql_mysql_users Adds or removes mysql users from proxysql admin interface azure_rm_mysqldatabase Manage MySQL Database instance #查看具体的模块mysql_user [root@aliyun ~]# ansible-doc -s mysql_user - name: Adds or removes a user from a MySQL database mysql_user: append_privs: # Append the privileges defined by priv to the existing ones for this user instead of overwriting existing ones. ca_cert: # The path to a Certificate Authority (CA) certificate. This option, if used, must specify the same certificate as used by the server. check_implicit_admin: # Check if mysql allows login as root/nopassword before trying supplied credentials. client_cert: # The path to a client public key certificate. client_key: # The path to the client private key. config_file: # Specify a config file from which user and password are to be read. connect_timeout: # The connection timeout when connecting to the MySQL server. encrypted: # Indicate that the 'password' field is a `mysql_native_password` hash. host: # The 'host' part of the MySQL username. host_all: # Override the host option, making ansible apply changes to all hostnames for a given user. This option cannot be used when creating users. login_host: # Host running the database. login_password: # The password used to authenticate with. login_port: # Port of the MySQL server. Requires `login_host' be defined as other than localhost if login_port is used. login_unix_socket: # The path to a Unix domain socket for local connections. login_user: # The username used to authenticate with. name: # (required) Name of the user (role) to add or remove. password: # Set the user's password.. priv: # MySQL privileges string in the format: `db.table:priv1,priv2'. Multiple privileges can be specified by separating each one using a forward slash: `db.table:priv/db.table:priv'. The format is based on MySQL `GRANT' statement. Database and table names can be quoted, MySQL-style. If column privileges are used, the `priv1,priv2' part must be exactly as returned by a `SHOW GRANT' statement. If not followed, the module will always report changes. It includes grouping columns by permission (`SELECT(col1,col2') instead of `SELECT(col1',SELECT(col2))). sql_log_bin: # Whether binary logging should be enabled or disabled for the connection. state: # Whether the user should exist. When `absent', removes the user. update_password: # `always' will update passwords if they differ. `on_create' will only set the password for newly created users. (END)
Ansible命令详解
使用ansible -h可查看ansible如何使用
[root@aliyun ~]# ansible -h usage: ansible [-h] [--version] [-v] [-b] [--become-method BECOME_METHOD] [--become-user BECOME_USER] [-K] [-i INVENTORY] [--list-hosts] [-l SUBSET] [-P POLL_INTERVAL] [-B SECONDS] [-o] [-t TREE] [-k] [--private-key PRIVATE_KEY_FILE] [-u REMOTE_USER] [-c CONNECTION] [-T TIMEOUT] [--ssh-common-args SSH_COMMON_ARGS] [--sftp-extra-args SFTP_EXTRA_ARGS] [--scp-extra-args SCP_EXTRA_ARGS] [--ssh-extra-args SSH_EXTRA_ARGS] [-C] [--syntax-check] [-D] [-e EXTRA_VARS] [--vault-id VAULT_IDS] [--ask-vault-pass | --vault-password-file VAULT_PASSWORD_FILES] [-f FORKS] [-M MODULE_PATH] [--playbook-dir BASEDIR] [-a MODULE_ARGS] [-m MODULE_NAME] pattern Define and run a single task 'playbook' against a set of hosts positional arguments: pattern host pattern optional arguments: --ask-vault-pass ask for vault password --list-hosts outputs a list of matching hosts; does not execute anything else --playbook-dir BASEDIR Since this tool does not use playbooks, use this as a substitute playbook directory.This sets the relative path for many features including roles/ group_vars/ etc. --syntax-check perform a syntax check on the playbook, but do not execute it --vault-id VAULT_IDS the vault identity to use --vault-password-file VAULT_PASSWORD_FILES vault password file --version show program's version number, config file location, configured module search path, module location, executable location and exit -B SECONDS, --background SECONDS run asynchronously, failing after X seconds (default=N/A) -C, --check don't make any changes; instead, try to predict some of the changes that may occur -D, --diff when changing (small) files and templates, show the differences in those files; works great with --check -M MODULE_PATH, --module-path MODULE_PATH prepend colon-separated path(s) to module library (def ault=~/.ansible/plugins/modules:/usr/share/ansible/plu gins/modules) -P POLL_INTERVAL, --poll POLL_INTERVAL set the poll interval if using -B (default=15) -a MODULE_ARGS, --args MODULE_ARGS module arguments -e EXTRA_VARS, --extra-vars EXTRA_VARS set additional variables as key=value or YAML/JSON, if filename prepend with @ -f FORKS, --forks FORKS specify number of parallel processes to use (default=5) -h, --help show this help message and exit -i INVENTORY, --inventory INVENTORY, --inventory-file INVENTORY specify inventory host path or comma separated host list. --inventory-file is deprecated -l SUBSET, --limit SUBSET further limit selected hosts to an additional pattern -m MODULE_NAME, --module-name MODULE_NAME module name to execute (default=command) -o, --one-line condense output -t TREE, --tree TREE log output to this directory -v, --verbose verbose mode (-vvv for more, -vvvv to enable connection debugging) Privilege Escalation Options: control how and which user you become as on target hosts --become-method BECOME_METHOD privilege escalation method to use (default=sudo), use `ansible-doc -t become -l` to list valid choices. --become-user BECOME_USER run operations as this user (default=root) -K, --ask-become-pass ask for privilege escalation password -b, --become run operations with become (does not imply password prompting) Connection Options: control as whom and how to connect to hosts --private-key PRIVATE_KEY_FILE, --key-file PRIVATE_KEY_FILE use this file to authenticate the connection --scp-extra-args SCP_EXTRA_ARGS specify extra arguments to pass to scp only (e.g. -l) --sftp-extra-args SFTP_EXTRA_ARGS specify extra arguments to pass to sftp only (e.g. -f, -l) --ssh-common-args SSH_COMMON_ARGS specify common arguments to pass to sftp/scp/ssh (e.g. ProxyCommand) --ssh-extra-args SSH_EXTRA_ARGS specify extra arguments to pass to ssh only (e.g. -R) -T TIMEOUT, --timeout TIMEOUT override the connection timeout in seconds (default=10) -c CONNECTION, --connection CONNECTION connection type to use (default=smart) -k, --ask-pass ask for connection password -u REMOTE_USER, --user REMOTE_USER connect as this user (default=None) Some modules do not make sense in Ad-Hoc (include, meta, etc)
以下列出一些比较常用的选项,并解释其含义
| 选项 | 描述 |
|---|---|
| -a MODULE_ARGS | 模块的参数,如果执行默认command的模块,即是命令参数,如:date,pwd等等 |
| -k, --ask-pass | 登陆密码,提示输入SSH密码而不是假设基于密钥的验证 |
| -i INVENTORY | 指定主机清单的路径 |
| -B SECONDS | 后台运行超时时间 |
| -C, --check | 模拟运行环境并进行预运行,可进行查错测试 |
| -c CONNECTION | 连接类型使用 |
| -f FORKS | 并发任务数,默认为5 |
| --list-hosts | 查看有哪些主机组 |
| -m MODULE_NAME | 执行模块的名字,默认使用command模块。所以如果只执行单一命令,可以不使用-m参数 |
| -o, --one-line | 压缩输出,尝试将所有结果在一行输出,一般针对收集工具使用 |
| -T TIMEOUT | 指定ssh默认超时时间,默认为10s,也可在配置文件中修改 |
| -u REMOTE_USER | 远程用户,默认为root用户 |
| -v, --verbose | 查看详细信息 |
Ansible配置公私钥
#主控机器生成私钥 [root@server ~]# ssh-keygen #向受控机发送私钥 [root@server ~]# ssh-copy-id root@192.168.37.122 [root@server ~]# ssh-copy-id root@192.168.37.133
四、Ansible常用模块
主机连通性测试
#在/etc/ansible/hosts文件中添加受控主机列表 [root@k8s-master ansible]# vim hosts ··· # Here's another example of host ranges, this time there are no # leading 0s: ## db-[99:101]-node.example.com [k8s] 192.168.133.11 192.168.133.12 #测试连通性 [root@k8s-master ansible]# ansible k8s -m ping 192.168.133.11 | SUCCESS => { "ansible_facts": { "discovered_interpreter_python": "/usr/bin/python" }, "changed": false, "ping": "pong" #pong表示连通成功 } 192.168.133.12 | SUCCESS => { "ansible_facts": { "discovered_interpreter_python": "/usr/bin/python" }, "changed": false, "ping": "pong" }
command模块
此模块可以直接在远程主机上执行命令,并将结果返回本主机
[root@k8s-master ~]# ansible k8s -m command -a "ss -ntl" 192.168.133.12 | CHANGED | rc=0 >> State Recv-Q Send-Q Local Address:Port Peer Address:Port LISTEN 0 100 127.0.0.1:25 *:* LISTEN 0 128 127.0.0.1:10248 *:* LISTEN 0 128 127.0.0.1:10249 *:* LISTEN 0 128 127.0.0.1:9099 *:* LISTEN 0 128 127.0.0.1:41999 *:* LISTEN 0 128 *:111 *:* LISTEN 0 8 *:179 *:* LISTEN 0 128 *:22 *:* LISTEN 0 100 [::1]:25 [::]:* LISTEN 0 128 [::]:10250 [::]:* LISTEN 0 128 [::]:111 [::]:* LISTEN 0 128 [::]:10256 [::]:* LISTEN 0 128 [::]:22 [::]:* 192.168.133.11 | CHANGED | rc=0 >> State Recv-Q Send-Q Local Address:Port Peer Address:Port LISTEN 0 8 *:179 *:* LISTEN 0 128 *:22 *:* LISTEN 0 100 127.0.0.1:25 *:* LISTEN 0 128 127.0.0.1:10248 *:* LISTEN 0 128 127.0.0.1:46632 *:* LISTEN 0 128 127.0.0.1:10249 *:* LISTEN 0 128 127.0.0.1:9099 *:* LISTEN 0 128 *:111 *:* LISTEN 0 128 [::]:22 [::]:* LISTEN 0 100 [::1]:25 [::]:* LISTEN 0 128 [::]:10250 [::]:* LISTEN 0 128 [::]:111 [::]:* LISTEN 0 128 [::]:10256 [::]:*
命令模块接受命令名称,后面是空格分隔的列表参数。给定的命令将在所有选定的节点上执行。它不会通过shell进行处理,比如$HOME和操作符如:<、>、|、&等(需使用shell模块才能实现)。注意:该命令不支持管道命令:|
以下是该模块下常用的几个命令
- chdir:在执行命令之前,先切换到该目录
- executable:切换shell来执行命令,需要使用命令的绝对路径
- free_form:要执行的Linux指令,一般使用Ansible的-a参数代替
- creates:一个文件名,当这个文件存在,则该命令不执行,可以用来做判断
- removes:一个文件名,当文件不存在,则该命令不执行
#测试 #切换目录并查看该目录下的内容 [root@k8s-master ~]# ansible k8s -m command -a "chdir=/root ls" 192.168.133.12 | CHANGED | rc=0 >> anaconda-ks.cfg k8s-images-v1.20.4.tar.gz 192.168.133.11 | CHANGED | rc=0 >> anaconda-ks.cfg k8s-images-v1.20.4.tar.gz #事先在192.168.133.11中创建/root/111.txt文件 [root@k8s-node1 ~]# touch 111.txt #如果/root/111.txt存在,则不执行ls命令 [root@k8s-master ~]# ansible k8s -m command -a "creates=/root/111.txt ls" 192.168.133.12 | CHANGED | rc=0 >> anaconda-ks.cfg k8s-images-v1.20.4.tar.gz 192.168.133.11 | SUCCESS | rc=0 >> skipped, since /root/111.txt exists #如果/root/111.txt存在,则执行ls命令 [root@k8s-master ~]# ansible k8s -m command -a "removes=/root/111.txt ls" 192.168.133.11 | CHANGED | rc=0 >> 111.txt anaconda-ks.cfg k8s-images-v1.20.4.tar.gz 192.168.133.12 | SUCCESS | rc=0 >> skipped, since /root/111.txt does not exist
shell模块
shell模块可以在远程主机上调用shell解释器来运行命令,支持shell的各种功能
[root@k8s-master ~]# ansible k8s -m shell -a "ps -aux | grep kube | grep -v grep" 192.168.133.12 | CHANGED | rc=0 >> root 923 1.1 5.5 1385644 55136 ? Ssl 15:19 0:31 /usr/bin/kubelet --bootstrap-kubeconfig=/etc/kubernetes/bootstrap-kubelet.conf --kubeconfig=/etc/kubernetes/kubelet.conf --config=/var/lib/kubelet/config.yaml --network-plugin=cni --pod-infra-container-image=registry.aliyuncs.com/google_containers/pause:3.2 root 3023 0.0 2.3 743584 23368 ? Ssl 15:21 0:00 /usr/local/bin/kube-proxy --config=/var/lib/kube-proxy/config.conf --hostname-override=k8s-node2 polkitd 3985 0.0 2.6 740488 26104 ? Ssl 15:21 0:00 /usr/bin/kube-controllers 192.168.133.11 | CHANGED | rc=0 >> root 921 1.2 5.7 1467572 57068 ? Ssl 15:19 0:34 /usr/bin/kubelet --bootstrap-kubeconfig=/etc/kubernetes/bootstrap-kubelet.conf --kubeconfig=/etc/kubernetes/kubelet.conf --config=/var/lib/kubelet/config.yaml --network-plugin=cni --pod-infra-container-image=registry.aliyuncs.com/google_containers/pause:3.2 root 3261 0.0 2.1 743584 21084 ? Ssl 15:21 0:00 /usr/local/bin/kube-proxy --config=/var/lib/kube-proxy/config.conf --hostname-override=k8s-node1
copy模块
此模块的作用是:将文件复制到远程主机,同时支持给定内容生成文件和修改权限等,其相关选项如下:
- src:将主机中的文件复制到远程主机,可以是绝对路径,也可以是相对路径。如果路径是一个目录,则会递归复制,用法类似于rsync
- content:用于替换src,可以直接指定文件的值
- dest:必选项,将源文件复制到远程主机的哪个路径,此路径为绝对路径
- backup:当文件内容发生改变后,在覆盖之前将源文件备份,备份文件包含时间信息
- directory_mode:递归设定目录的权限,默认为系统默认权限
- force:当目标主机包含该文件,但内容不同时,设为“yes”,表示强制覆盖;设为“no”,表示目标主机的目标位置不存在该文件时才复制。默认为yes
- others:所有的file模块中的选项可以在这里使用
#复制文件 [root@k8s-master ~]# ansible k8s -m copy -a "src=./hello.txt dest=/home/hello.txt" 192.168.133.11 | CHANGED => { "ansible_facts": { "discovered_interpreter_python": "/usr/bin/python" }, "changed": true, "checksum": "22596363b3de40b06f981fb85d82312e8c0ed511", "dest": "/home/hello.txt", "gid": 0, "group": "root", "md5sum": "6f5902ac237024bdd0c176cb93063dc4", "mode": "0644", "owner": "root", "size": 12, "src": "/root/.ansible/tmp/ansible-tmp-1653553381.48-115490-67144649980806/source", "state": "file", "uid": 0 } 192.168.133.12 | CHANGED => { "ansible_facts": { "discovered_interpreter_python": "/usr/bin/python" }, "changed": true, "checksum": "22596363b3de40b06f981fb85d82312e8c0ed511", "dest": "/home/hello.txt", "gid": 0, "group": "root", "md5sum": "6f5902ac237024bdd0c176cb93063dc4", "mode": "0644", "owner": "root", "size": 12, "src": "/root/.ansible/tmp/ansible-tmp-1653553381.56-115492-162691615569451/source", "state": "file", "uid": 0 } #文件已复制成功 [root@k8s-node1 home]# ll 总用量 4 -rw-r--r-- 1 root root 12 5月 26 16:23 hello.txt #给定内容生成文件,并指定权限 [root@k8s-master ~]# ansible k8s -m copy -a "content='雷子锅' dest=/home/111.txt mode=700" 192.168.133.11 | CHANGED => { "ansible_facts": { "discovered_interpreter_python": "/usr/bin/python" }, "changed": true, "checksum": "d3ddd0c4bc75549fc810543f9fe1450011c1b739", "dest": "/home/111.txt", "gid": 0, "group": "root", "md5sum": "67b24789ccd15daa7dc6d9bcd4596886", "mode": "0700", "owner": "root", "size": 9, "src": "/root/.ansible/tmp/ansible-tmp-1653553527.88-120148-183008755365152/source", "state": "file", "uid": 0 } 192.168.133.12 | CHANGED => { "ansible_facts": { "discovered_interpreter_python": "/usr/bin/python" }, "changed": true, "checksum": "d3ddd0c4bc75549fc810543f9fe1450011c1b739", "dest": "/home/111.txt", "gid": 0, "group": "root", "md5sum": "67b24789ccd15daa7dc6d9bcd4596886", "mode": "0700", "owner": "root", "size": 9, "src": "/root/.ansible/tmp/ansible-tmp-1653553527.89-120150-177029078281199/source", "state": "file", "uid": 0 } #验证 [root@k8s-node1 home]# ll 总用量 8 -rwx------ 1 root root 9 5月 26 16:25 111.txt -rw-r--r-- 1 root root 12 5月 26 16:23 hello.txt [root@k8s-node1 home]# cat 111.txt 雷子锅 #覆盖备份 [root@k8s-master ~]# ansible k8s -m copy -a "content='雷子锅666' backup=yes dest=/home/111.txt mode=700" 192.168.133.11 | CHANGED => { "ansible_facts": { "discovered_interpreter_python": "/usr/bin/python" }, "backup_file": "/home/111.txt.117882.2022-05-26@16:28:02~", "changed": true, "checksum": "f02a1a9239ee5ca965dd62094efd84744356dc6e", "dest": "/home/111.txt", "gid": 0, "group": "root", "md5sum": "5be6f09789e8a48c5b3f3522ee3672e2", "mode": "0700", "owner": "root", "size": 12, "src": "/root/.ansible/tmp/ansible-tmp-1653553681.57-124779-212378984215513/source", "state": "file", "uid": 0 } 192.168.133.12 | CHANGED => { "ansible_facts": { "discovered_interpreter_python": "/usr/bin/python" }, "backup_file": "/home/111.txt.124358.2022-05-26@16:28:02~", "changed": true, "checksum": "f02a1a9239ee5ca965dd62094efd84744356dc6e", "dest": "/home/111.txt", "gid": 0, "group": "root", "md5sum": "5be6f09789e8a48c5b3f3522ee3672e2", "mode": "0700", "owner": "root", "size": 12, "src": "/root/.ansible/tmp/ansible-tmp-1653553681.57-124781-36212787773143/source", "state": "file", "uid": 0 } #验证,看到之前111.txt文件已进行备份 [root@k8s-master ~]# ansible k8s -m shell -a "ls -al /home" 192.168.133.11 | CHANGED | rc=0 >> 总用量 12 drwxr-xr-x. 2 root root 81 5月 26 16:28 . dr-xr-xr-x. 17 root root 244 2月 19 17:18 .. -rwx------ 1 root root 12 5月 26 16:28 111.txt -rwx------ 1 root root 9 5月 26 16:25 111.txt.117882.2022-05-26@16:28:02~ -rw-r--r-- 1 root root 12 5月 26 16:23 hello.txt 192.168.133.12 | CHANGED | rc=0 >> 总用量 12 drwxr-xr-x. 2 root root 81 5月 26 16:28 . dr-xr-xr-x. 17 root root 244 2月 19 17:18 .. -rwx------ 1 root root 12 5月 26 16:28 111.txt -rwx------ 1 root root 9 5月 26 16:25 111.txt.124358.2022-05-26@16:28:02~ -rw-r--r-- 1 root root 12 5月 26 16:23 hello.txt #查看111.txt的文件内容 [root@k8s-master ~]# ansible k8s -m shell -a "cat /home/111.txt" 192.168.133.11 | CHANGED | rc=0 >> 雷子锅666 192.168.133.12 | CHANGED | rc=0 >> 雷子锅666
file模块
该模块主要用于设置文件的属性,如创建文件、创建链接文件、删除文件等,常用命令如下:
- force:需要在两种情况下强制创建软连接,一种是源文件不存在,但之后会建立的情况下;另一种是目标软链接已存在,需要先取消之前的软链接,然后创建新的软链接,有两个选项:yes|no
- group:定义文件/目录的属组。后面可加上mode用于定义文件/目录的权限
- owner:定义文件/目录的属主。后面必须跟上path来指定文件/目录的路径
- recurse:递归设置文件的属性,只对目录有效,后面可以跟上src:被链接的源文件路径,只应用于state=link的情况
- state:状态,有以下选项:
- directory:如果目录不存在,就创建目录
- file:即使文件不存在,也不会被创建
- link:创建软链接
- hard:创建硬链接
- touch:如果文件不存在,则会创建一个新的文件,如果文件或目录已存在,则只更新其最后修改时间
- absent:删除目录、文件或者取消链接文件
#创建目录 [root@k8s-master ~]# ansible k8s -m file -a "path=/home/test state=directory" 192.168.133.11 | CHANGED => { "ansible_facts": { "discovered_interpreter_python": "/usr/bin/python" }, "changed": true, "gid": 0, "group": "root", "mode": "0755", "owner": "root", "path": "/home/test", "size": 6, "state": "directory", "uid": 0 } 192.168.133.12 | CHANGED => { "ansible_facts": { "discovered_interpreter_python": "/usr/bin/python" }, "changed": true, "gid": 0, "group": "root", "mode": "0755", "owner": "root", "path": "/home/test", "size": 6, "state": "directory", "uid": 0 } #验证 [root@k8s-master ~]# ansible k8s -m shell -a "ls -al /home" 192.168.133.12 | CHANGED | rc=0 >> 总用量 12 drwxr-xr-x. 3 root root 93 5月 26 17:05 . dr-xr-xr-x. 17 root root 244 2月 19 17:18 .. -rwx------ 1 root root 12 5月 26 16:28 111.txt -rwx------ 1 root root 9 5月 26 16:25 111.txt.124358.2022-05-26@16:28:02~ -rw-r--r-- 1 root root 12 5月 26 16:23 hello.txt drwxr-xr-x 2 root root 6 5月 26 17:05 test #目录已创建 192.168.133.11 | CHANGED | rc=0 >> 总用量 12 drwxr-xr-x. 3 root root 93 5月 26 17:05 . dr-xr-xr-x. 17 root root 244 2月 19 17:18 .. -rwx------ 1 root root 12 5月 26 16:28 111.txt -rwx------ 1 root root 9 5月 26 16:25 111.txt.117882.2022-05-26@16:28:02~ -rw-r--r-- 1 root root 12 5月 26 16:23 hello.txt drwxr-xr-x 2 root root 6 5月 26 17:05 test #创建软链接文件 [root@k8s-master ~]# ansible k8s -m file -a "path=/home/222.txt src=111.txt state=link" 192.168.133.11 | CHANGED => { "ansible_facts": { "discovered_interpreter_python": "/usr/bin/python" }, "changed": true, "dest": "/home/222.txt", "gid": 0, "group": "root", "mode": "0777", "owner": "root", "size": 7, "src": "111.txt", "state": "link", "uid": 0 } 192.168.133.12 | CHANGED => { "ansible_facts": { "discovered_interpreter_python": "/usr/bin/python" }, "changed": true, "dest": "/home/222.txt", "gid": 0, "group": "root", "mode": "0777", "owner": "root", "size": 7, "src": "111.txt", "state": "link", "uid": 0 } #验证 [root@k8s-master ~]# ansible k8s -m shell -a "ls -al /home" 192.168.133.12 | CHANGED | rc=0 >> 总用量 12 drwxr-xr-x. 3 root root 108 5月 26 17:15 . dr-xr-xr-x. 17 root root 244 2月 19 17:18 .. -rwx------ 1 root root 12 5月 26 16:28 111.txt -rwx------ 1 root root 9 5月 26 16:25 111.txt.124358.2022-05-26@16:28:02~ lrwxrwxrwx 1 root root 7 5月 26 17:15 222.txt -> 111.txt -rw-r--r-- 1 root root 12 5月 26 16:23 hello.txt drwxr-xr-x 2 root root 6 5月 26 17:05 test 192.168.133.11 | CHANGED | rc=0 >> 总用量 12 drwxr-xr-x. 3 root root 108 5月 26 17:15 . dr-xr-xr-x. 17 root root 244 2月 19 17:18 .. -rwx------ 1 root root 12 5月 26 16:28 111.txt -rwx------ 1 root root 9 5月 26 16:25 111.txt.117882.2022-05-26@16:28:02~ lrwxrwxrwx 1 root root 7 5月 26 17:15 222.txt -> 111.txt -rw-r--r-- 1 root root 12 5月 26 16:23 hello.txt drwxr-xr-x 2 root root 6 5月 26 17:05 test #可以看到,222.txt文件已创建 #删除文件 [root@k8s-master ~]# ansible k8s -m file -a "path=/home/222.txt state=absent" 192.168.133.11 | CHANGED => { "ansible_facts": { "discovered_interpreter_python": "/usr/bin/python" }, "changed": true, "path": "/home/222.txt", "state": "absent" } 192.168.133.12 | CHANGED => { "ansible_facts": { "discovered_interpreter_python": "/usr/bin/python" }, "changed": true, "path": "/home/222.txt", "state": "absent" } #验证 [root@k8s-master ~]# ansible k8s -m shell -a "ls -al /home" 192.168.133.11 | CHANGED | rc=0 >> 总用量 12 drwxr-xr-x. 3 root root 93 5月 26 17:17 . dr-xr-xr-x. 17 root root 244 2月 19 17:18 .. -rwx------ 1 root root 12 5月 26 16:28 111.txt -rwx------ 1 root root 9 5月 26 16:25 111.txt.117882.2022-05-26@16:28:02~ -rw-r--r-- 1 root root 12 5月 26 16:23 hello.txt drwxr-xr-x 2 root root 6 5月 26 17:05 test 192.168.133.12 | CHANGED | rc=0 >> 总用量 12 drwxr-xr-x. 3 root root 93 5月 26 17:17 . dr-xr-xr-x. 17 root root 244 2月 19 17:18 .. -rwx------ 1 root root 12 5月 26 16:28 111.txt -rwx------ 1 root root 9 5月 26 16:25 111.txt.124358.2022-05-26@16:28:02~ -rw-r--r-- 1 root root 12 5月 26 16:23 hello.txt drwxr-xr-x 2 root root 6 5月 26 17:05 test #可以看到,文件已经删除了
fetch模块
该模块用于从远程某主机获取(复制)文件到本地,有两个选项:
- dest:用于存放文件的目录
- src:在远程拉取的文件,并且只能是文件,不能是目录
[root@k8s-master ~]# ansible k8s -m fetch -a "src=/home/111.txt dest=/home" 192.168.133.11 | CHANGED => { "changed": true, "checksum": "f02a1a9239ee5ca965dd62094efd84744356dc6e", "dest": "/home/192.168.133.11/home/111.txt", "md5sum": "5be6f09789e8a48c5b3f3522ee3672e2", "remote_checksum": "f02a1a9239ee5ca965dd62094efd84744356dc6e", "remote_md5sum": null } 192.168.133.12 | CHANGED => { "changed": true, "checksum": "f02a1a9239ee5ca965dd62094efd84744356dc6e", "dest": "/home/192.168.133.12/home/111.txt", "md5sum": "5be6f09789e8a48c5b3f3522ee3672e2", "remote_checksum": "f02a1a9239ee5ca965dd62094efd84744356dc6e", "remote_md5sum": null } #验证 [root@k8s-master ~]# cd /home/192.168.133.11/home/ [root@k8s-master home]# ls 111.txt [root@k8s-master home]# pwd /home/192.168.133.11/home
注意:文件保存的路径在我们设置的接收目录下的被管控主机IP目录下
corn模块
该模块适用于管理cron计划任务的
其使用的语法和我们crontab文件中的语法一种,同时,可以指定以下选项:
- day=:日期
- hour=:小时
- minute=:分钟
- month=:月份
- weekday=:周
- job=:指明运行的命令
- name=:定时任务描述
- reboot:任务在重启时运行,不建议使用,建议使用special_time
- special_time:特殊的时间范围,参数:reboot(重启时)、annually(每年)、monthly(每月)、weekly(每周)、daily(每天)、hourly(每小时)
- state:指明状态,present:添加定时任务(默认设置)、absent:删除定时任务
- user:以哪个用户的身份执行、
ps:
1、crontab文件格式:
* * * * * command minute hour day month week
- minute:表示分钟,可以是0~59之间的任何整数
- hour:表示小时,可以是0~23之间的任何整数
- day:表示日期,可以是从1~31之间的任何整数
- month:表示月份,可以是从1到12之间的任何整数
- week:表示星期几,可以是从0~7之间的任何整数,这里的0或7代表周日
- command:要执行的命令,可以是系统命令,也可以是自己编写的脚本文件
2、特殊字符:
星号(*):代表所有可能的值,例如month字段如果是星号,则表示在满足其他字段的制约条件后每月都执行该命令操作
逗号(,):可以用逗号隔开的值指定一个列表范围,如“1,2,5,7,8,9”
中划线(-):可以用整数之间的中划线表示一个整数范围,如“2-6”表示“2,3,4,5,6”
正斜线(/):可以用正斜线指定时间的间隔频率,例如“0-23/2”表示每两个小时执行一次;同时正斜线可以和星号一起使用,如:*/10
#添加定时任务 [root@k8s-master home]# ansible k8s -m cron -a "name='ntp update every 5 min' minute=*/5 job='/sbin/ntpdate 172.17.0.1 &> /dev/null'" 192.168.133.11 | CHANGED => { "ansible_facts": { "discovered_interpreter_python": "/usr/bin/python" }, "changed": true, "envs": [], "jobs": [ "ntp update every 5 min" ] } 192.168.133.12 | CHANGED => { "ansible_facts": { "discovered_interpreter_python": "/usr/bin/python" }, "changed": true, "envs": [], "jobs": [ "ntp update every 5 min" ] } #验证 [root@k8s-master home]# ansible k8s -m shell -a "crontab -l" 192.168.133.12 | CHANGED | rc=0 >> * */1 * * * /usr/sbin/ntpdate cn.pool.ntp.org #Ansible: ntp update every 5 min */5 * * * * /sbin/ntpdate 172.17.0.1 &> /dev/null 192.168.133.11 | CHANGED | rc=0 >> * */1 * * * /usr/sbin/ntpdate cn.pool.ntp.org #Ansible: ntp update every 5 min */5 * * * * /sbin/ntpdate 172.17.0.1 &> /dev/null ###可以看到计划任务已经提交成功了 #删除定时任务 [root@k8s-master home]# ansible k8s -m cron -a "name='ntp update every 5 min' minute=*/5 job='/sbin/ntpdate 172.17.0.1 &> /dev/null' state=absent" 192.168.133.12 | CHANGED => { "ansible_facts": { "discovered_interpreter_python": "/usr/bin/python" }, "changed": true, "envs": [], "jobs": [] } 192.168.133.11 | CHANGED => { "ansible_facts": { "discovered_interpreter_python": "/usr/bin/python" }, "changed": true, "envs": [], "jobs": [] } #验证 [root@k8s-master home]# ansible k8s -m shell -a "crontab -l" 192.168.133.12 | CHANGED | rc=0 >> * */1 * * * /usr/sbin/ntpdate cn.pool.ntp.org 192.168.133.11 | CHANGED | rc=0 >> * */1 * * * /usr/sbin/ntpdate cn.pool.ntp.org ###可以看到刚刚添加的定时任务已经删除了
yum模块
该模块主要用于软件的安装,其选项如下:
- name:所安装的包的名称
- state:
- present:安装
- latest:安装最新的
- absent:卸载软件
- update_cache:强制更新yum缓存
- conf_file:指定远程yum安装时所依赖的配置文件(安装本地已有的包)
- disable_pgp_check:是否禁止GPG checking,只用于
present或者latest - disablerepo:临时禁止使用yum库。只用于安装或更新时
- enablerepo:临时使用yum库。只用于安装或更新时
#安装 [root@k8s-master ~]# ansible k8s -m yum -a "name=htop state=latest" 192.168.133.11 | CHANGED => { "ansible_facts": { "discovered_interpreter_python": "/usr/bin/python" }, "changed": true, "changes": { "installed": [ "htop" ], "updated": [] }, "msg": "warning: /var/cache/yum/x86_64/7/epel/packages/htop-2.2.0-3.el7.x86_64.rpm: Header V3 RSA/SHA256 Signature, key ID 352c64e5: NOKEY\nImporting GPG key 0x352C64E5:\n Userid : \"Fedora EPEL (7) <epel@fedoraproject.org>\"\n Fingerprint: 91e9 7d7c 4a5e 96f1 7f3e 888f 6a2f aea2 352c 64e5\n Package : epel-release-7-11.noarch (@extras)\n From : /etc/pki/rpm-gpg/RPM-GPG-KEY-EPEL-7\n", "rc": 0, "results": [ "Loaded plugins: fastestmirror\nLoading mirror speeds from cached hostfile\n * base: mirrors.aliyun.com\n * epel: mirrors.njupt.edu.cn\n * extras: mirrors.aliyun.com\n * updates: mirrors.aliyun.com\nResolving Dependencies\n--> Running transaction check\n---> Package htop.x86_64 0:2.2.0-3.el7 will be installed\n--> Finished Dependency Resolution\n\nDependencies Resolved\n\n================================================================================\n Package Arch Version Repository Size\n================================================================================\nInstalling:\n htop x86_64 2.2.0-3.el7 epel 103 k\n\nTransaction Summary\n================================================================================\nInstall 1 Package\n\nTotal download size: 103 k\nInstalled size: 218 k\nDownloading packages:\nPublic key for htop-2.2.0-3.el7.x86_64.rpm is not installed\nRetrieving key from file:///etc/pki/rpm-gpg/RPM-GPG-KEY-EPEL-7\nRunning transaction check\nRunning transaction test\nTransaction test succeeded\nRunning transaction\n Installing : htop-2.2.0-3.el7.x86_64 1/1 \n Verifying : htop-2.2.0-3.el7.x86_64 1/1 \n\nInstalled:\n htop.x86_64 0:2.2.0-3.el7 \n\nComplete!\n" ] } 192.168.133.12 | CHANGED => { "ansible_facts": { "discovered_interpreter_python": "/usr/bin/python" }, "changed": true, "changes": { "installed": [ "htop" ], "updated": [] }, "msg": "http://hk.mirrors.thegigabit.com/epel/7/x86_64/Packages/h/htop-2.2.0-3.el7.x86_64.rpm: [Errno 12] Timeout on http://hk.mirrors.thegigabit.com/epel/7/x86_64/Packages/h/htop-2.2.0-3.el7.x86_64.rpm: (28, 'Operation too slow. Less than 1000 bytes/sec transferred the last 30 seconds')\nTrying other mirror.\nhttp://my.mirrors.thegigabit.com/epel/7/x86_64/Packages/h/htop-2.2.0-3.el7.x86_64.rpm: [Errno -1] Package does not match intended download. Suggestion: run yum --enablerepo=epel clean metadata\nTrying other mirror.\nhttps://download.nus.edu.sg/mirror/epel/7/x86_64/Packages/h/htop-2.2.0-3.el7.x86_64.rpm: [Errno -1] Package does not match intended download. Suggestion: run yum --enablerepo=epel clean metadata\nTrying other mirror.\nwarning: /var/cache/yum/x86_64/7/epel/packages/htop-2.2.0-3.el7.x86_64.rpm: Header V3 RSA/SHA256 Signature, key ID 352c64e5: NOKEY\nImporting GPG key 0x352C64E5:\n Userid : \"Fedora EPEL (7) <epel@fedoraproject.org>\"\n Fingerprint: 91e9 7d7c 4a5e 96f1 7f3e 888f 6a2f aea2 352c 64e5\n Package : epel-release-7-11.noarch (@extras)\n From : /etc/pki/rpm-gpg/RPM-GPG-KEY-EPEL-7\n", "rc": 0, "results": [ "Loaded plugins: fastestmirror\nLoading mirror speeds from cached hostfile\n * base: mirrors.aliyun.com\n * epel: mirrors.tuna.tsinghua.edu.cn\n * extras: mirrors.aliyun.com\n * updates: mirrors.aliyun.com\nResolving Dependencies\n--> Running transaction check\n---> Package htop.x86_64 0:2.2.0-3.el7 will be installed\n--> Finished Dependency Resolution\n\nDependencies Resolved\n\n================================================================================\n Package Arch Version Repository Size\n================================================================================\nInstalling:\n htop x86_64 2.2.0-3.el7 epel 103 k\n\nTransaction Summary\n================================================================================\nInstall 1 Package\n\nTotal download size: 103 k\nInstalled size: 218 k\nDownloading packages:\nPublic key for htop-2.2.0-3.el7.x86_64.rpm is not installed\nRetrieving key from file:///etc/pki/rpm-gpg/RPM-GPG-KEY-EPEL-7\nRunning transaction check\nRunning transaction test\nTransaction test succeeded\nRunning transaction\n Installing : htop-2.2.0-3.el7.x86_64 1/1 \n Verifying : htop-2.2.0-3.el7.x86_64 1/1 \n\nInstalled:\n htop.x86_64 0:2.2.0-3.el7 \n\nComplete!\n" ] }
service模块
该模块用于服务程序的管理。其主要选项如下:
- arguments:命令行提供额外的参数
- enabled:设置开机启动
- name:服务名称
- runlevel:开机启动的级别,一般不用指定
- sleep:在重启服务的过程中,是否等待。如在服务关闭以后等待2秒再启动。(定义在剧本中)
- state:有四种状态,分别为:
- started:启动服务
- stopped:停止服务
- restarted:重启服务
- reloaded:重载配置
#开启服务并设置自启动 [root@server ~]# ansible web -m service -a 'name=nginx state=started enabled=true' 192.168.37.122 | SUCCESS => { "changed": true, "enabled": true, "name": "nginx", "state": "started", …… } 192.168.37.133 | SUCCESS => { "changed": true, "enabled": true, "name": "nginx", "state": "started", …… } #验证,查看端口是否打开 [root@server ~]# ansible web -m shell -a 'ss -ntl' 192.168.37.122 | SUCCESS | rc=0 >> State Recv-Q Send-Q Local Address:Port Peer Address:Port LISTEN 0 128 *:80 *:* 192.168.37.133 | SUCCESS | rc=0 >> State Recv-Q Send-Q Local Address:Port Peer Address:Port LISTEN 0 128 *:80 *:* ###可以看出我们的80端口已经打开。 #关闭服务 [root@server ~]# ansible web -m service -a 'name=nginx state=stopped' 192.168.37.122 | SUCCESS => { "changed": true, "name": "nginx", "state": "stopped", …… } 192.168.37.133 | SUCCESS => { "changed": true, "name": "nginx", "state": "stopped", …… } #验证 [root@server ~]# ansible web -m shell -a 'ss -ntl | grep 80' 192.168.37.122 | FAILED | rc=1 >> 192.168.37.133 | FAILED | rc=1 >> ###可以看出,我们已经没有80端口了,说明我们的nginx服务已经关闭了。
user模块
该模块主要用于管理用户账号,其主要选项如下:
- comment:用户的描述信息
- createhome:是否创建家目录
- force:在使用state=absent时,执行与userdel-force一致
- group:指定基本组
- groups:指定附加组,如果指定为(groups=)表示删除所有组
- home:指定用户家目录
- move_home:如果设置为home=时,试图将用户主目录移动到指定的目录
- name:指定用户名
- non_unique:该选项允许改变非唯一的用户ID值
- password:指定用户密码
- remove:在使用state=absent时,行为是与userdel-remove一致
- shell:指定默认shell
- state:设置账号状态,不指定则表示创建,指定值为absent表示删除
- system:当创建一个用户,设置这个用户是系统用户。这个设置不能更改现有用户
- uid:指定用户的uid
#添加一个用户并指定其uid [root@k8s-master ~]# ansible k8s -m user -a "name=test uid=11111" 192.168.133.12 | CHANGED => { "ansible_facts": { "discovered_interpreter_python": "/usr/bin/python" }, "changed": true, "comment": "", "create_home": true, "group": 11111, "home": "/home/test", "name": "test", "shell": "/bin/bash", "state": "present", "stderr": "useradd:警告:此主目录已经存在。\n不从 skel 目录里向其中复制任何文件。\n", "stderr_lines": [ "useradd:警告:此主目录已经存在。", "不从 skel 目录里向其中复制任何文件。" ], "system": false, "uid": 11111 } 192.168.133.11 | CHANGED => { "ansible_facts": { "discovered_interpreter_python": "/usr/bin/python" }, "changed": true, "comment": "", "create_home": true, "group": 11111, "home": "/home/test", "name": "test", "shell": "/bin/bash", "state": "present", "stderr": "useradd:警告:此主目录已经存在。\n不从 skel 目录里向其中复制任何文件。\n", "stderr_lines": [ "useradd:警告:此主目录已经存在。", "不从 skel 目录里向其中复制任何文件。" ], "system": false, "uid": 11111 } #验证:查看用户是否已添加 [root@k8s-master ~]# ansible k8s -m shell -a "cat /etc/group | grep test" 192.168.133.12 | CHANGED | rc=0 >> test:x:11111: 192.168.133.11 | CHANGED | rc=0 >> test:x:11111: [root@k8s-master ~]# ansible k8s -m shell -a "cat /etc/passwd | grep test" 192.168.133.11 | CHANGED | rc=0 >> test:x:11111:11111::/home/test:/bin/bash 192.168.133.12 | CHANGED | rc=0 >> test:x:11111:11111::/home/test:/bin/bash #删除用户 [root@k8s-master ~]# ansible k8s -m user -a "name=test uid=11111 state=absent" 192.168.133.12 | CHANGED => { "ansible_facts": { "discovered_interpreter_python": "/usr/bin/python" }, "changed": true, "force": false, "name": "test", "remove": false, "state": "absent" } 192.168.133.11 | CHANGED => { "ansible_facts": { "discovered_interpreter_python": "/usr/bin/python" }, "changed": true, "force": false, "name": "test", "remove": false, "state": "absent" } #验证,查看用户是否已删除 [root@k8s-master ~]# ansible k8s -m shell -a "cat /etc/passwd | grep test" 192.168.133.12 | FAILED | rc=1 >> non-zero return code 192.168.133.11 | FAILED | rc=1 >> non-zero return code
group模块
该模块主要用于添加或删除组,常用的选项如下:
- gid=:设置组的GID号
- name=:指定组的名称
- state=:指定组的状态,默认为创建,设置值为absent表示删除
- system=:设置值为yes,表示创建系统组
#创建组 [root@k8s-master ~]# ansible k8s -m group -a "name=sanguo gid=22222" 192.168.133.11 | CHANGED => { "ansible_facts": { "discovered_interpreter_python": "/usr/bin/python" }, "changed": true, "gid": 22222, "name": "sanguo", "state": "present", "system": false } 192.168.133.12 | CHANGED => { "ansible_facts": { "discovered_interpreter_python": "/usr/bin/python" }, "changed": true, "gid": 22222, "name": "sanguo", "state": "present", "system": false } #验证:查看组是否存在 [root@k8s-master ~]# ansible k8s -m shell -a "cat /etc/group | grep sanguo" 192.168.133.11 | CHANGED | rc=0 >> sanguo:x:22222: 192.168.133.12 | CHANGED | rc=0 >> sanguo:x:22222: #删除组 [root@k8s-master ~]# ansible k8s -m group -a "name=sanguo gid=22222 state=absent" 192.168.133.12 | CHANGED => { "ansible_facts": { "discovered_interpreter_python": "/usr/bin/python" }, "changed": true, "name": "sanguo", "state": "absent" } 192.168.133.11 | CHANGED => { "ansible_facts": { "discovered_interpreter_python": "/usr/bin/python" }, "changed": true, "name": "sanguo", "state": "absent" } #验证,查看组是否以删除 [root@k8s-master ~]# ansible k8s -m shell -a "cat /etc/group | grep sanguo" 192.168.133.12 | FAILED | rc=1 >> non-zero return code 192.168.133.11 | FAILED | rc=1 >> non-zero return code
script模块
该模块用于将本机的脚本在被管控主机上执行。该模块直接指定脚本的执行路径即可
#在主机上添加一个test.sh脚本 [root@k8s-master ~]# vim test.sh [root@k8s-master ~]# cat test.sh #!/bin/bash echo "Hello Torres" #给test.sh脚本添加权限 #ansible执行 [root@k8s-master ~]# ansible k8s -m script -a "/root/test.sh" 192.168.133.11 | CHANGED => { "changed": true, "rc": 0, "stderr": "Shared connection to 192.168.133.11 closed.\r\n", "stderr_lines": [ "Shared connection to 192.168.133.11 closed." ], "stdout": "Hello Torres\r\n", "stdout_lines": [ "Hello Torres" ] } 192.168.133.12 | CHANGED => { "changed": true, "rc": 0, "stderr": "Shared connection to 192.168.133.12 closed.\r\n", "stderr_lines": [ "Shared connection to 192.168.133.12 closed." ], "stdout": "Hello Torres\r\n", "stdout_lines": [ "Hello Torres" ] }
setup模块
该模块主要用于收集信息,是通过调用facts组件来实现的。facts组件是Ansible用于采集被管控主机信息的一个功能,可以使用setup模块查看机器的所有facts信息,可以使用filter来查看指定信息。整个facts信息被包装在一个json格式的数据结构中,ansible_facts是最上层的值。
facts就是变量,内建变量。每个主机的各种信息,cpu颗数、内存大小等。会存在facts中的某个变量中。调用后返回很多对应主机的信息。
#查看信息 #查看内存 [root@k8s-master ~]# ansible k8s -m setup -a "filter='*mem*'" 192.168.133.12 | SUCCESS => { "ansible_facts": { "ansible_memfree_mb": 67, "ansible_memory_mb": { "nocache": { "free": 518, "used": 454 }, "real": { "free": 67, "total": 972, "used": 905 }, "swap": { "cached": 0, "free": 0, "total": 0, "used": 0 } }, "ansible_memtotal_mb": 972, "discovered_interpreter_python": "/usr/bin/python" }, "changed": false } 192.168.133.11 | SUCCESS => { "ansible_facts": { "ansible_memfree_mb": 61, "ansible_memory_mb": { "nocache": { "free": 529, "used": 443 }, "real": { "free": 61, "total": 972, "used": 911 }, "swap": { "cached": 0, "free": 0, "total": 0, "used": 0 } }, "ansible_memtotal_mb": 972, "discovered_interpreter_python": "/usr/bin/python" }, "changed": false } #验证,查看内存大小是否一致 [root@k8s-master ~]# ansible k8s -m shell -a "free -m" 192.168.133.11 | CHANGED | rc=0 >> total used free shared buff/cache available Mem: 972 411 69 14 491 406 Swap: 0 0 0 192.168.133.12 | CHANGED | rc=0 >> total used free shared buff/cache available Mem: 972 422 64 14 485 395 Swap: 0 0 0 #保存信息 ###setup模块还有一个很好用的功能就是可以保存我们所筛选的信息至我们的主机上,同时,文件名为我们被管制的主机的IP,这样方便我们知道是哪台机器出的问题 [root@k8s-master ~]# ansible k8s -m setup -a "filter='*mem*'" --tree /tmp/facts 192.168.133.11 | SUCCESS => { "ansible_facts": { "ansible_memfree_mb": 67, "ansible_memory_mb": { "nocache": { "free": 528, "used": 444 }, "real": { "free": 67, "total": 972, "used": 905 }, "swap": { "cached": 0, "free": 0, "total": 0, "used": 0 } }, "ansible_memtotal_mb": 972, "discovered_interpreter_python": "/usr/bin/python" }, "changed": false } 192.168.133.12 | SUCCESS => { "ansible_facts": { "ansible_memfree_mb": 70, "ansible_memory_mb": { "nocache": { "free": 517, "used": 455 }, "real": { "free": 70, "total": 972, "used": 902 }, "swap": { "cached": 0, "free": 0, "total": 0, "used": 0 } }, "ansible_memtotal_mb": 972, "discovered_interpreter_python": "/usr/bin/python" }, "changed": false } #验证:查看主机上对应目录下的内容 [root@k8s-master ~]# cd /tmp/facts/ [root@k8s-master facts]# ls 192.168.133.11 192.168.133.12 [root@k8s-master facts]# ll 总用量 8 -rw-r--r-- 1 root root 311 5月 27 11:08 192.168.133.11 -rw-r--r-- 1 root root 311 5月 27 11:08 192.168.133.12 [root@k8s-master facts]# cat 192.168.133.11 {"ansible_facts": {"ansible_memfree_mb": 67, "ansible_memory_mb": {"nocache": {"free": 528, "used": 444}, "real": {"free": 67, "total": 972, "used": 905}, "swap": {"cached": 0, "free": 0, "total": 0, "used": 0}}, "ansible_memtotal_mb": 972, "discovered_interpreter_python": "/usr/bin/python"}, "changed": false}


【推荐】国内首个AI IDE,深度理解中文开发场景,立即下载体验Trae
【推荐】编程新体验,更懂你的AI,立即体验豆包MarsCode编程助手
【推荐】抖音旗下AI助手豆包,你的智能百科全书,全免费不限次数
【推荐】轻量又高性能的 SSH 工具 IShell:AI 加持,快人一步
· 震惊!C++程序真的从main开始吗?99%的程序员都答错了
· 【硬核科普】Trae如何「偷看」你的代码?零基础破解AI编程运行原理
· 单元测试从入门到精通
· 上周热点回顾(3.3-3.9)
· winform 绘制太阳,地球,月球 运作规律