
每天学习亿点点Day9.12: direct 3d 12 初始化window源码解析
首先这个文章只是写给已经做过Direct9相关开发并且想快速跳到Direct12的同学的,文章应该会比较长,但我希望我能讲清楚吧,其中一些机制我希望也能说的好懂点,比方说那个fence机制, 以及command list,command queue, RTV, descriptor等一些概念的区别
当然一些C++基础概念我就不解释了哈,自己理解.
1. 首先看懂整个demo的文件结构

2. 然后我们再一个一个类的看源码解释吧?
DXSample:

我们在讲解这种类的时候,一般只说说不太容易看懂的细节,很容易看懂的就略过吧
GetAssetFullPath
这里稍微岔开一下看看这个函数是怎么实现的,

难道就这么简单嘛?
当然不是,m_assetsPath是在构造函数里进行初始化的

用到了里面的一个helper函数: GetAssetsPath();

这里的逻辑是先找到module也即是可执行文件.exe的目录,eg:D:\eeee\ddd\xxx.exe
因为GetModuleFileName的第一个参数是null的话就会返回当前运行的exe的路径
wcsrchr这个函数的function就是去寻找最后一个指定字符
lastSlash其实就是指向最后一个’\\’的位置的指针,然后再lasSlash+1的位置放0, 截断路径,然后就变成了D:\eeee\ddd\
这个时候asset的路径就是这个路径D:\eeee\ddd\+资源名称了。
GetHardwareAdapter
我们要知道,d3d12里面adaptor有很多个独立显卡和一个集显(warpadaptor是很常见的事情),
而每个显卡绘制的monitor有可能有很多个,每个monitor支持的输出格式也很多(1920x1080, 2560x1440 etc).
接下来讲解一下这个函数的做法
入参(1. PFactory 这个是大家都熟悉的用来查询各种基本信息的interface,2. ppAdaptor很明显是一个out参数,会把adaptor的信息传出去 3. 是否使用高性能的独立显卡)
后面的逻辑就很好理解了
首先就是查询有没有factory6这个id的接口
这里的IID_PPV_ARGS宏其实就是通过传入一个智能指针的地址来返回智能指针内部的raw pointer. 这个宏主要是为了防止某些编码错误,因为编码者可能并不知道raw pointer的type到底是什么.
成功了之后,就把获取到的信息填到factory6这个接口里
然后就可以开始遍历了

这个便利看起来蛮复杂的,其实就是一个一个index遍历每个adaptor
EnumAdapterByGpuPreference
这个函数第一个参数就是指定当前想看的是哪个编号的显卡,假如第二个参数写了DXGI_GPU_PREFERENCE_HIGH_PERFORMANCE
函数将会从0(最强显卡)到n依次排列.
我们再看内部是怎么写的

既然进到for循环内部,那么说明肯定是查到某个存在的adaptor了, 这里就是获取desc就是得到描述信息,然后看FLAG是不是和DXGI_ADAPTER_FLAG_SOFTWARE一致,如果一致了那么就说明当前adaptor是软件模拟的不是我们需要的
运行到下一个if就说明该adaptor不是软件模拟的集显,这个时候就要看这个显卡支不支持创建d3d12, 如果能创建那就说明没啥问题,可以用,这个时候就break把adaptor返回就行
adaptor拿到之后,先检查是不是空,如果是空又要继续循环一次,这次就只能随便找一个能创建d3d12device的显卡了, 简而言之就是要求不能太高hhhhhhh

终于
拿到adaptor之后就要传出了,但此时我们新建了一个adpaptor的智能指针, detach这个函数的作用其实就是把这个智能指针和IDXGIAdapter1类型的指针解除关系. 返回的是IDXGIAdapter1类型的指针.
IID_PPV_ARGS
发现它是一个宏,一个参数转化成两个
__uuidof():
The expression can be a type name, pointer, reference, or array of that type, a template specialized on these types, or a variable of these types. The argument is valid as long as the compiler can use it to find the attached GUID.
A special case of this intrinsic is when either 0 or NULL is supplied as the argument. In this case, __uuidof will return a GUID made up of zeros.
Use this keyword to extract the GUID attached to:
简单来讲就是返回一个GUID即global unique identification card
IID_PPV_ARGS_Helper宏:
这个简而言之就是返回void **指针而已.
__is_base_of:
编译阶段提供的traits工具
ParseCommandLineArgs

_wcsnicmp(wchar* str1, wchar* str2, int count )
做用就是比较两个字符串的count宽度的子串是不是一样
是一样的就返回0
所以这个函数的用处就是看命令里面有木有强制使用warpDevice (集显)的.
SetCustomWindowText

作用就是给你额外的机会能去修改窗口的名字而已
D3D12的渲染准备的基本流程
1. Create the ID3D12Device using the D3D12CreateDevice function.
2. Create an ID3D12Fence object and query descriptor sizes.
3. Check 4X MSAA quality level support.
4. Create the command queue, command list allocator, and main command list.
5. Describe and create the swap chain.
6. Create the descriptor heaps the application requires.
7. Resize the back buffer and create a render target view to the back buffer.
8. Create the depth/stencil buffer and its associated depth/stencil view.
9. Set the viewport and scissor rectangles.
以上内容请在
Introduction to 3D Game Programming with DirectX 12 by Frank Luna
这本书里进行查看
D3D12HelloWindow:

其实对于我们在很久之前就学过d3d9的同学来说渲染的套路都是一样的,都是初始化然后loop地渲染,直到退出条件出现结束渲染.
所以我们先来看成员数据变量
我打算一个一个注释
static const UINT FrameCount = 2; //一个backbuffer一个frontbuffer
// Pipeline objects. //渲染管线的一些object
ComPtr<IDXGISwapChain3> m_swapChain; //控制两个buffer的swap chain
ComPtr<ID3D12Device> m_device; // 喜闻乐见的device interface
ComPtr<ID3D12Resource> m_renderTargets[FrameCount]; //其实就是两份内存,两个buffer frame啦
ComPtr<ID3D12CommandAllocator> m_commandAllocator; //跟STL的allocator作用一样把分配内存的工作交给一个独立的类去做实现分离
ComPtr<ID3D12CommandQueue> m_commandQueue; // 向GPU提交指令的队列
ComPtr<ID3D12DescriptorHeap> m_rtvHeap; //render target HEAP 专门用来存储rtv的
ComPtr<ID3D12PipelineState> m_pipelineState; //描述管线状态的object
ComPtr<ID3D12GraphicsCommandList> m_commandList; //命令列表
UINT m_rtvDescriptorSize; //rtv描述object的尺寸大小
// Synchronization objects. //用来同步GPU和CPU的
UINT m_frameIndex; //frame索引
HANDLE m_fenceEvent; //fence_event是指时间到了该做啥
ComPtr<ID3D12Fence> m_fence; // fence object
UINT64 m_fenceValue; //fence value 其实就是为了同步而设置的关键玩意,这个机制等会再说
OnInit:
这个函数没干啥就调用了private 的load pipeline 和LoadAssets
LoadPipeline:
直接上源代码吧, 草,我全部注释一遍
// 这里主要是做上面的9步工作为绘制做一个准备工作
void D3D12HelloWindow::LoadPipeline()
{
//先把FactoryFlag置0
UINT dxgiFactoryFlags = 0;
// 如果debug模式的话就enable debug _DEBUG是预编译的时候编辑器根据你的编译选项加进去的
#if defined(_DEBUG)
// Enable the debug layer (requires the Graphics Tools "optional feature").
// NOTE: Enabling the debug layer after device creation will invalidate the active device.
{
ComPtr<ID3D12Debug> debugController; //创建debugcontroller并开启debug layer
if (SUCCEEDED(D3D12GetDebugInterface(IID_PPV_ARGS(&debugController))))
{
debugController->EnableDebugLayer();
// Enable additional debug layers.
dxgiFactoryFlags |= DXGI_CREATE_FACTORY_DEBUG; // 开启了的话就把这个标志位加上去
}
}
#endif
ComPtr<IDXGIFactory4> factory; // 创建基本的工厂类4
ThrowIfFailed(CreateDXGIFactory2(dxgiFactoryFlags, IID_PPV_ARGS(&factory)));
//用2号创建方法创建
if (m_useWarpDevice)
{
// 如果用集显的话就直接enumWarpadaptor进行遍历然后得到adaptor进行创建device
ComPtr<IDXGIAdapter> warpAdapter; // warpAdaptor就要用IDXGIAdapter类型的进行获取
ThrowIfFailed(factory->EnumWarpAdapter(IID_PPV_ARGS(&warpAdapter)));
ThrowIfFailed(D3D12CreateDevice(
warpAdapter.Get(),
D3D_FEATURE_LEVEL_11_0,
IID_PPV_ARGS(&m_device)
));
}
else
{
//独立显卡的话就需要用adaptor1来进行创建
ComPtr<IDXGIAdapter1> hardwareAdapter;
GetHardwareAdapter(factory.Get(), &hardwareAdapter); //如果不是就调用
ThrowIfFailed(D3D12CreateDevice(
hardwareAdapter.Get(),
D3D_FEATURE_LEVEL_11_0,
IID_PPV_ARGS(&m_device)
));
//1.adaptor 2. feature macro 3. m_device地址
}
// 描述并创建D3D12的命令queue
D3D12_COMMAND_QUEUE_DESC queueDesc = {};
queueDesc.Flags = D3D12_COMMAND_QUEUE_FLAG_NONE; //flag none
queueDesc.Type = D3D12_COMMAND_LIST_TYPE_DIRECT; // list的type还有一种bundle, 但是目前不太需要
// 1. desc 2. queue地址
ThrowIfFailed(m_device->CreateCommandQueue(&queueDesc, IID_PPV_ARGS(&m_commandQueue)));
// Describe and create the swap chain.
DXGI_SWAP_CHAIN_DESC1 swapChainDesc = {};
swapChainDesc.BufferCount = FrameCount; // 一个back一个front buffer
swapChainDesc.Width = m_width;
swapChainDesc.Height = m_height;
swapChainDesc.Format = DXGI_FORMAT_R8G8B8A8_UNORM; //32位全真彩pixel, oh yeah!
swapChainDesc.BufferUsage = DXGI_USAGE_RENDER_TARGET_OUTPUT; //主要是指定pipeline往哪里渲染
swapChainDesc.SwapEffect = DXGI_SWAP_EFFECT_FLIP_DISCARD; //swap的效果, 不保证不丢弃backbuffer,sequential保证不丢掉, d3d12 已经全面使用flip不用之前的啦
swapChainDesc.SampleDesc.Count = 1; // 这里的sample desc count指的是为一个每个pixel的subpixel的个数
ComPtr<IDXGISwapChain1> swapChain;
ThrowIfFailed(factory->CreateSwapChainForHwnd(
m_commandQueue.Get(), // Swap chain needs the queue so that it can force a flush on it.
Win32Application::GetHwnd(),
&swapChainDesc,
nullptr,
nullptr,
&swapChain
));
// This sample does not support fullscreen transitions.
//Make association 就是用来调节是否支持全屏的
ThrowIfFailed(factory->MakeWindowAssociation(Win32Application::GetHwnd(), DXGI_MWA_NO_ALT_ENTER));
//这一句代码是把获取的swap chain交给类成员数据
ThrowIfFailed(swapChain.As(&m_swapChain));
//获取当前的backbuffer的index, 知道了就可以把渲染的东西扔进去了
m_frameIndex = m_swapChain->GetCurrentBackBufferIndex();
//descripto和view指的是一件东西
// Create descriptor heaps.
{
// Describe and create a render target view (RTV) descriptor heap.
D3D12_DESCRIPTOR_HEAP_DESC rtvHeapDesc = {};
rtvHeapDesc.NumDescriptors = FrameCount;
rtvHeapDesc.Type = D3D12_DESCRIPTOR_HEAP_TYPE_RTV; //render target view
rtvHeapDesc.Flags = D3D12_DESCRIPTOR_HEAP_FLAG_NONE;
//1. desc, 2.m_rtvHeap pointer
ThrowIfFailed(m_device->CreateDescriptorHeap(&rtvHeapDesc, IID_PPV_ARGS(&m_rtvHeap)));
//每个view的size这个主要是用来到时候查找某个index的descriptor的时候能正确从void指针内存中获取到我们需要的信息,其实就是指针跳的步长
m_rtvDescriptorSize = m_device->GetDescriptorHandleIncrementSize(D3D12_DESCRIPTOR_HEAP_TYPE_RTV);
//其中一种descriptor基本就是一样的大小,所以需要在class里记录这个值
}
// Create frame resources.
{
//其实在这里就开始2个render target的资源创建了,实际上就是内存创建, 分配内存区域往上面画画了.
CD3DX12_CPU_DESCRIPTOR_HANDLE rtvHandle(m_rtvHeap->GetCPUDescriptorHandleForHeapStart()); //这里其实就是获得堆的descriptor的其实位置, 然后一个一个遍历并为其创建资源
// Create a RTV for each frame.
for (UINT n = 0; n < FrameCount; n++)
{
// 把render target的resource位置赋予swapchain的那2个内存的地址, 即从m_renderTargets这个数组也能快速访问到back和front buffer
ThrowIfFailed(m_swapChain->GetBuffer(n, IID_PPV_ARGS(&m_renderTargets[n])));
//在resource里又添加如何看待这块内存的信息,即descriptor
m_device->CreateRenderTargetView(m_renderTargets[n].Get(), nullptr, rtvHandle);
//descriptor移动到下一个
rtvHandle.Offset(1, m_rtvDescriptorSize);
}
}
//创建command allocator即用来给之后新建的command list分配内存的分配器 ThrowIfFailed(m_device->CreateCommandAllocator(D3D12_COMMAND_LIST_TYPE_DIRECT, IID_PPV_ARGS(&m_commandAllocator)));
}
LoadAssets:
这个函数必然是读取所有数据的函数: 贴图, vertex, shader的
void D3D12HelloWindow::LoadAssets()
{
// Create the command list.
// 创建一批命令的list但是目前没有命令加入
ThrowIfFailed(m_device->CreateCommandList(0, D3D12_COMMAND_LIST_TYPE_DIRECT, m_commandAllocator.Get(), nullptr, IID_PPV_ARGS(&m_commandList)));
// Command lists are created in the recording state, but there is nothing
// to record yet. The main loop expects it to be closed, so close it now.
// 记住干别的事之前一定要close, 有点像文件的读写一样
ThrowIfFailed(m_commandList->Close());
// Create synchronization objects.
{
//创建fence object
ThrowIfFailed(m_device->CreateFence(0, D3D12_FENCE_FLAG_NONE, IID_PPV_ARGS(&m_fence)));
m_fenceValue = 1;
// Create an event handle to use for frame synchronization.
// 创建m_fenceEvent就是为了处理,在等待上一frame超时之后应该做什么.
m_fenceEvent = CreateEvent(nullptr, FALSE, FALSE, nullptr);
if (m_fenceEvent == nullptr)
{
ThrowIfFailed(HRESULT_FROM_WIN32(GetLastError()));
}
}
}
PopulateCommandList:
在渲染之前我得告诉显卡我要干啥吧?即要把命令写好
void D3D12HelloWindow::PopulateCommandList()
{
//command list 的内存分配器只能在相关联的command list全部关闭了的情况下才能reset把内存清零,给下次的command list填充的空间, 所以app应该用fence来管理GPU的运行进度
ThrowIfFailed(m_commandAllocator->Reset());
//但是command list随时也必须在重新录入新的命令之前进行重置
ThrowIfFailed(m_commandList->Reset(m_commandAllocator.Get(), m_pipelineState.Get()));
//加上一个transiton命令,也就是一个barrier, 告诉你present的render target在之后变为render target,即可以往里面写渲染出来的数据
m_commandList->ResourceBarrier(1, &CD3DX12_RESOURCE_BARRIER::Transition(m_renderTargets[m_frameIndex].Get(), D3D12_RESOURCE_STATE_PRESENT, D3D12_RESOURCE_STATE_RENDER_TARGET));
// 获取当前的frame index所指的descriptor的handle,即当前的back buffer的, 然后
CD3DX12_CPU_DESCRIPTOR_HANDLE rtvHandle(m_rtvHeap->GetCPUDescriptorHandleForHeapStart(), m_frameIndex, m_rtvDescriptorSize);
//输入命令
const float clearColor[] = { 0.0f, 0.2f, 0.4f, 1.0f };
//即在command list上 进行当前backbuffer的clearscene操作
m_commandList->ClearRenderTargetView(rtvHandle, clearColor, 0, nullptr);
// Indicate that the back buffer will now be used to present.
//再加上一个命令使得当前的backbuffer的index变成present即present
m_commandList->ResourceBarrier(1, &CD3DX12_RESOURCE_BARRIER::Transition(m_renderTargets[m_frameIndex].Get(), D3D12_RESOURCE_STATE_RENDER_TARGET, D3D12_RESOURCE_STATE_PRESENT));
//跟d3d9的endscene很类似
ThrowIfFailed(m_commandList->Close());
}
OnRender:
一切准备完毕那就要来渲染了哈
void D3D12HelloWindow::OnRender()
{
// Record all the commands we need to render the scene into the command list.
//清理command allocator的内存,清理command list内容, 把当前backbuffer变为可以绘制进去的,然后添加绘制命令,然后又增加一个barrier把backbuffer变成present状态
PopulateCommandList();
// Execute the command list.
ID3D12CommandList* ppCommandLists[] = { m_commandList.Get() };
m_commandQueue->ExecuteCommandLists(_countof(ppCommandLists), ppCommandLists);
// Present the frame.
//这里的present函数的第一个参数1是指在1个vertical blank之后进行presentation同步
//第二个参数是指不管现在presentation的内容还有多久的时间,直接丢弃掉换下一个即backbuffer上场
ThrowIfFailed(m_swapChain->Present(1, 0));
//等待上一帧渲染完
WaitForPreviousFrame();
}
WaitForPreviousFrame
void D3D12HelloWindow::WaitForPreviousFrame()
{
// WAITING FOR THE FRAME TO COMPLETE BEFORE CONTINUING IS NOT BEST PRACTICE.
// This is code implemented as such for simplicity. The D3D12HelloFrameBuffering
// sample illustrates how to use fences for efficient resource usage and to
// maximize GPU utilization.
// Signal and increment the fence value.
const UINT64 fence = m_fenceValue;
//这里其实是添加了一条命令,即把m_fence的值换成当前的fence值1
ThrowIfFailed(m_commandQueue->Signal(m_fence.Get(), fence));
m_fenceValue++;
//m_fence的初始值是0的
// Wait until the previous frame is finished.
if (m_fence->GetCompletedValue() < fence)
{
//如果还没完成就设置一个等待完成事件
ThrowIfFailed(m_fence->SetEventOnCompletion(fence, m_fenceEvent));
// 永远的阻塞下去直到完成
WaitForSingleObject(m_fenceEvent, INFINITE);
}
//到了这里就说明已经渲染完了
m_frameIndex = m_swapChain->GetCurrentBackBufferIndex();
// 这个时候就更新当前的backbufferindex在下一个渲染list里能够使用
}
OnDestroy:
void D3D12HelloWindow::OnDestroy()
{
//把之前没渲染完的工作全部做完,然后
WaitForPreviousFrame();
// 关闭handle
CloseHandle(m_fenceEvent);
}
Win32Application:
实际进行windows窗口创建的,这部分就不讲了,d3d9里面一摸一样的流程...
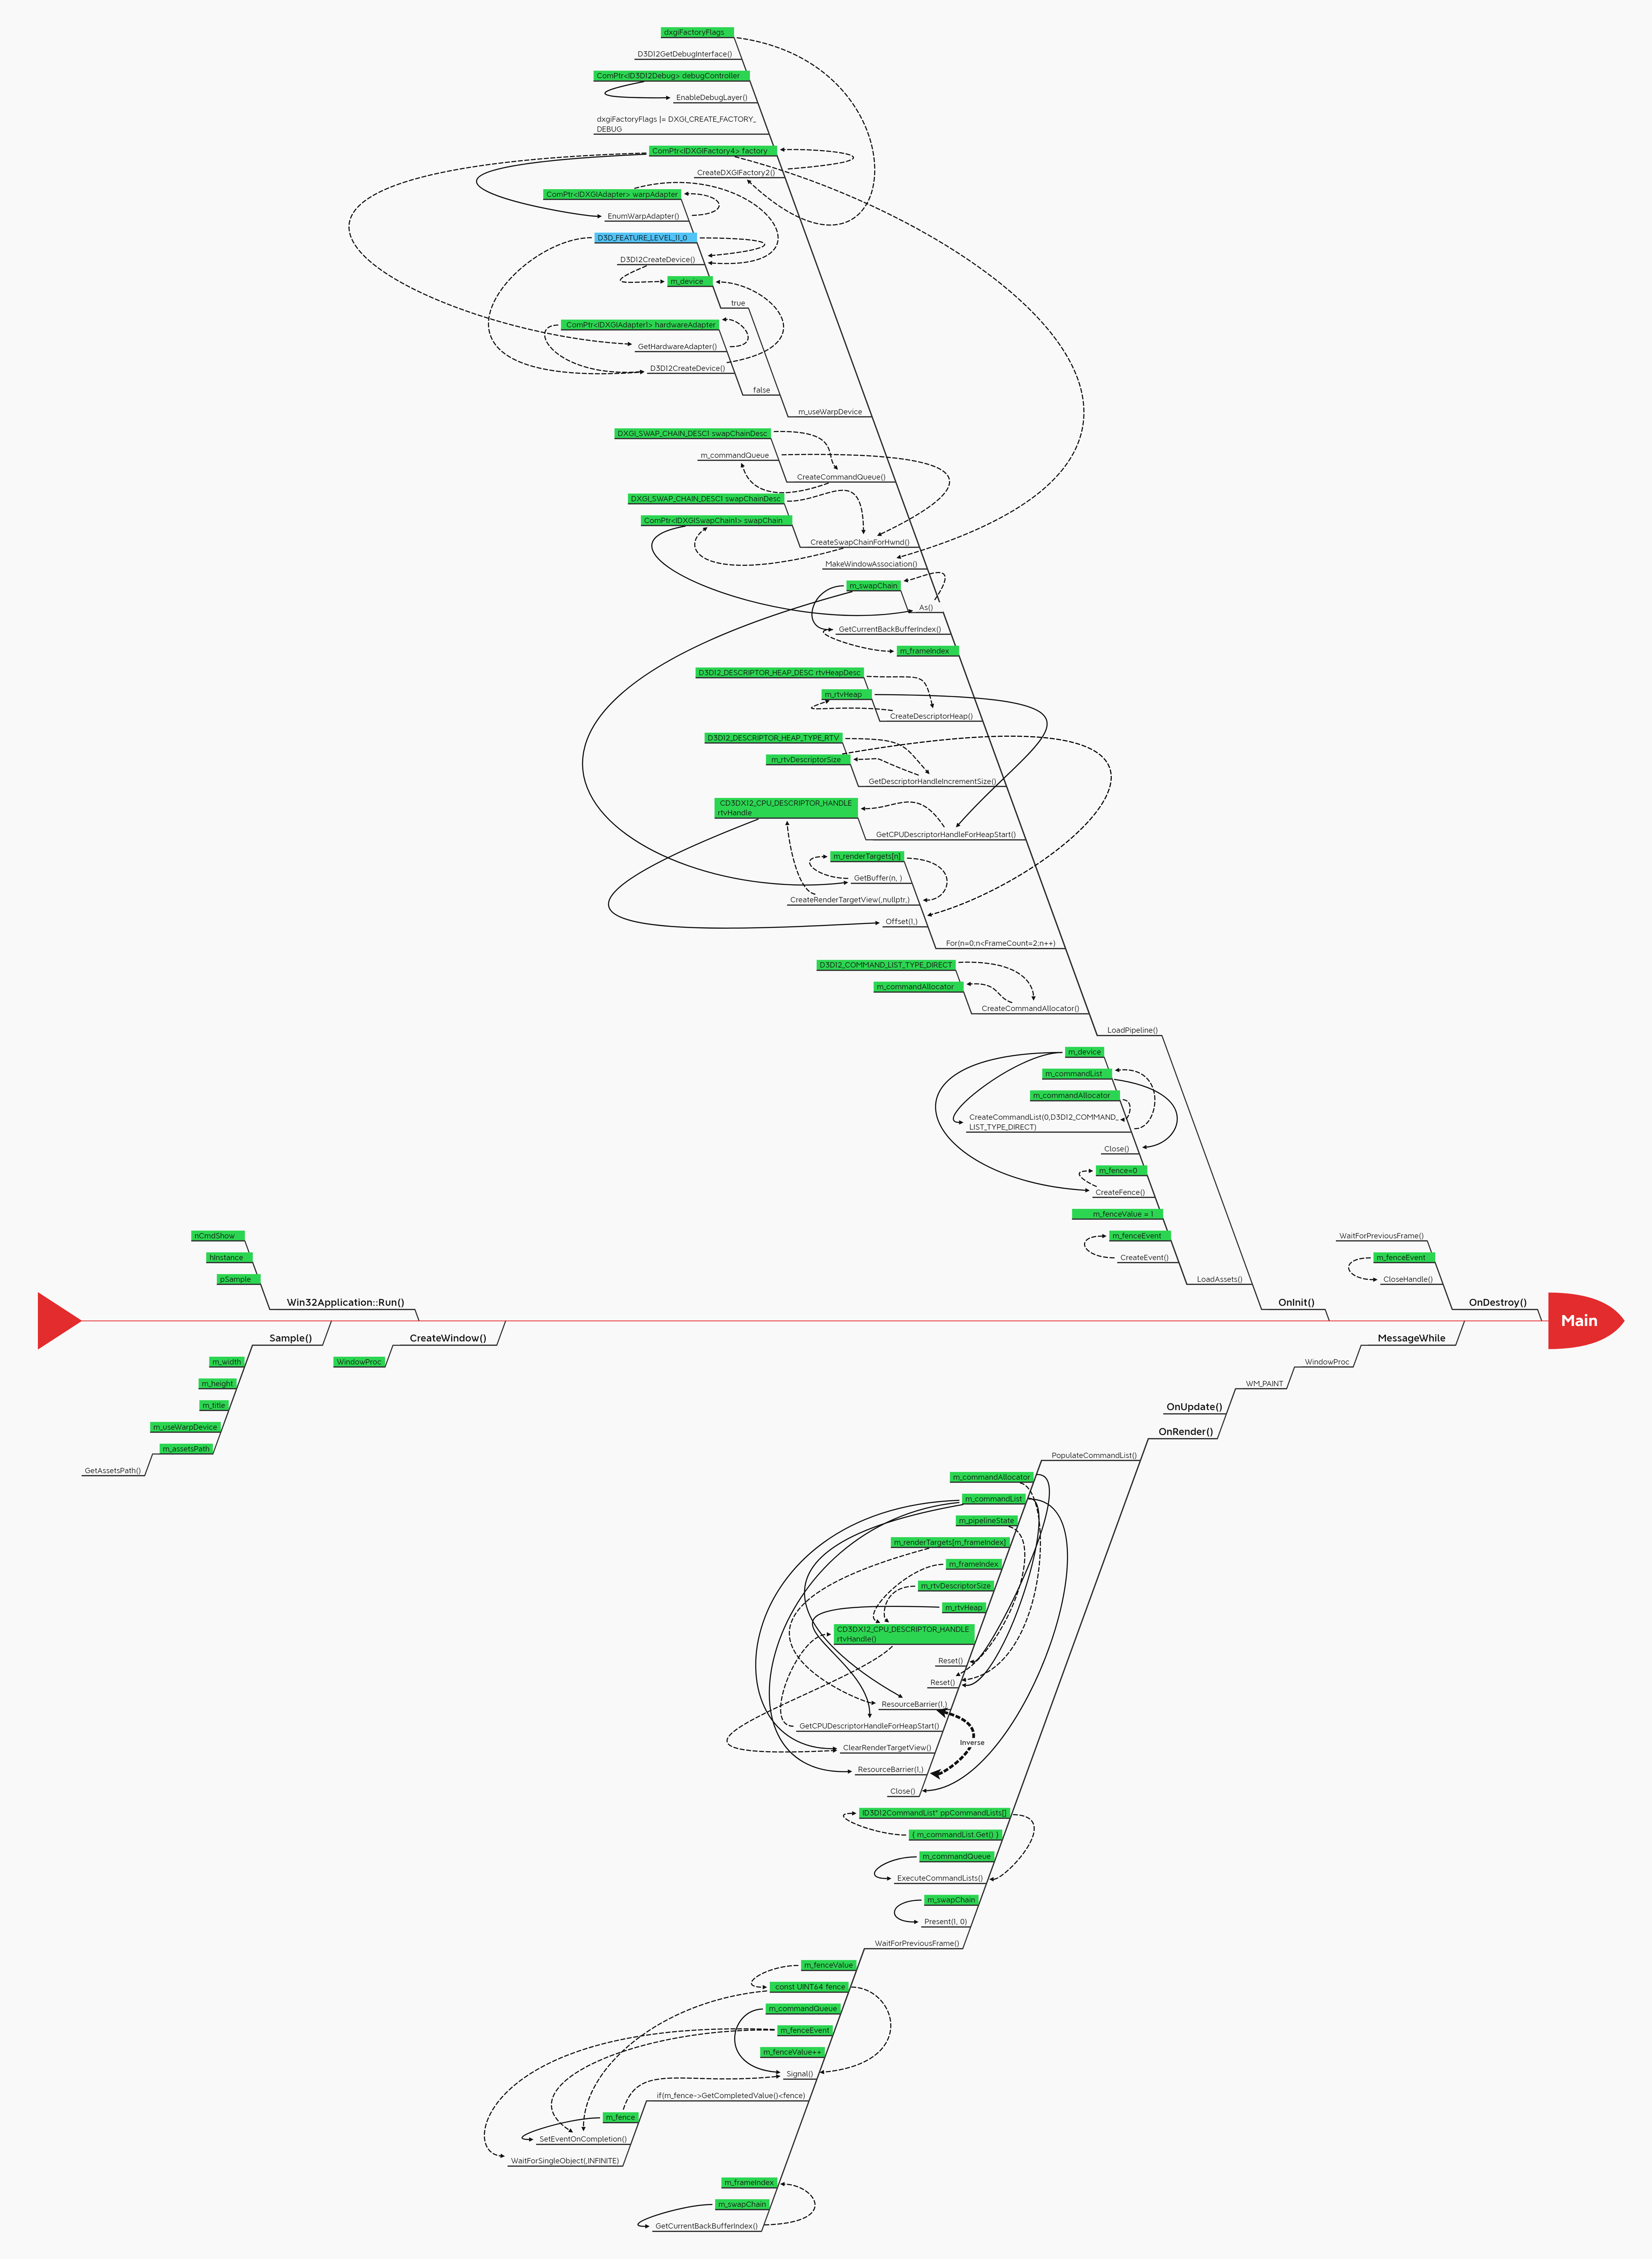
3. 详细流程图 (绝对让你看得懂!)
4. Fence机制讲解

fence的做法真的太聪明了,
简单来讲就是,m_fence可以通过调用函数GetCompletedValue()来获取当前的m_fence内部运行到的fence值.
其中, m_fenceValue是实际你要运行到的fence值.
每次flush command的时候,m_fenceValue就会加1,此时调用signal函数可以在command queue顶部加上最后一条命令,就是把m_fence内部运行到的fence值覆盖为fence+1,但是GPU没执行到这一条命令之前,是不可能让fence到fence+1, 所以if条件句就会等待,直到执行到最后一条命令+1, 此时就完成了同步
其实只要你看出来Signal函数实际就是往command queue里又加了一条指令就会看穿这个机制了.

