物联网微消息队列MQTT介绍-EMQX集群搭建以及与SpringBoot整合
项目全部代码地址:https://github.com/Tom-shushu/work-study.git (mqtt-emqt 项目)
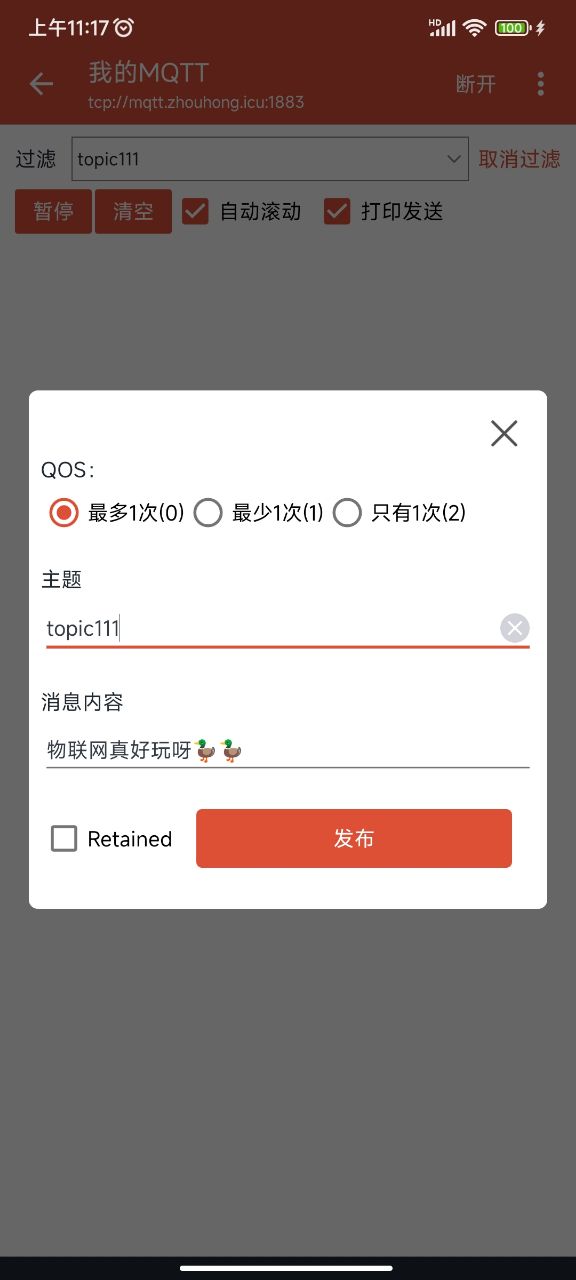
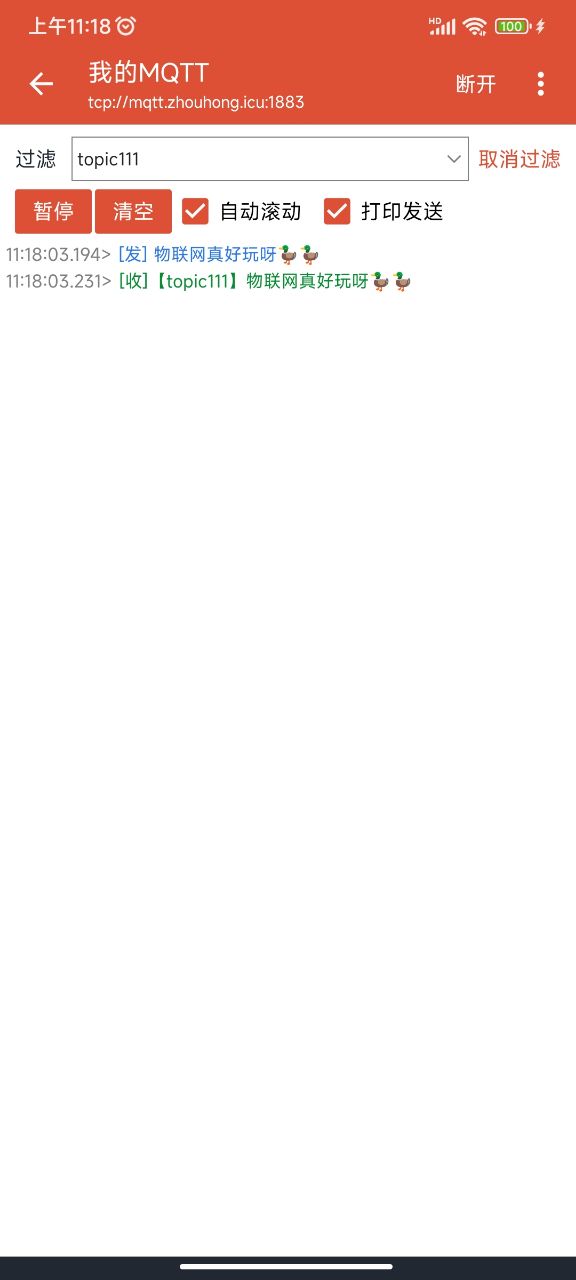
先看我们最后实现的一个效果
1.手机端向主题 topic111 发送消息,并接收。(手机测试工具名称:MQTT调试器)


2.控制台打印

MQTT基本简介
MQTT 是用于物联网 (IoT) 的 OASIS 标准消息传递协议。它被设计为一种极其轻量级的发布/订阅消息传输,非常适合连接具有小代码足迹和最小网络带宽的远程设备。
MQTT协议简介
MQTT 是客户端服务器发布/订阅消息传输协议。它重量轻、开放、简单,并且易于实施。这些特性使其非常适合在许多情况下使用,包括受限制的环境,例如机器对机器 (M2M) 和物联网 (IoT) 环境中的通信,其中需要小代码足迹和/或网络带宽非常宝贵。
该协议通过 TCP/IP 或其他提供有序、无损、双向连接的网络协议运行。其特点包括:
· 使用发布/订阅消息模式,提供一对多的消息分发和应用程序的解耦。
· 与有效负载内容无关的消息传输。
· 消息传递的三种服务质量:
o “最多一次”,根据操作环境的最大努力传递消息。可能会发生消息丢失。例如,此级别可用于环境传感器数据,其中单个读数是否丢失并不重要,因为下一个读数将很快发布。
o “至少一次”,保证消息到达但可能出现重复。
o “Exactly once”,保证消息只到达一次。例如,此级别可用于重复或丢失消息可能导致应用不正确费用的计费系统。
· 最小化传输开销和协议交换以减少网络流量。
· 发生异常断开时通知相关方的机制。
EMQX简介
通过开放标准物联网协议 MQTT、CoAP 和 LwM2M 连接任何设备。使用 EMQX Enterprise 集群轻松扩展到数千万并发 MQTT 连接。
并且EMQX还是开源的,又支持集群,所以还是一个比较不错的选择
EMQX集群搭建
前期准备:
1.两台服务器:我的两个服务器一台是腾讯云、一台是阿里云的(不要问为什么,薅羊毛得来的)咱们暂且叫他们 mqtt_service_aliyun和
安装开始
1.分别在两台服务器上执行以下操作进行安装(如果是单机:只需要进行下面1、2操作就安装完成了)
## 1.下载
wget https://www.emqx.com/zh/downloads/broker/4.4.4/emqx-4.4.4-otp24.1.5-3-el8-amd64.rpm
## 2.安装
sudo yum install emqx-4.4.4-otp24.1.5-3-el8-amd64.rpm
## 3.修改配置文件
vim /etc/emqx/emqx.conf
## 4.修改以下内容
## 注意node.name是当前这台服务器名称
node.name = mqtt_service_txyun@xxx.xx.xxx.xx
cluster.static.seeds = mqtt_service_txyun@xxx.xx.xxx.xx,mqtt_service_aliyun@xxx.xx.xxx.xx
cluster.discovery = static
cluster.name = my-mqtt-cluster
2.分别启动两台服务器的EMQX
sudo emqx start
3.到浏览器输入 http://xxx.xx.xxx.xxx:18083/ 查看(随便一台都可以,默认账号admin 密码public),注意打开18083,1883 安全组

4.nginx负载均衡
nginx搭建很简单略过,大家只需要修改以下nginx.conf里面的内容即可
stream {
  upstream mqtt.zhouhong.icu {
      zone tcp_servers 64k;
      hash $remote_addr;
      server xxx.xx.xxx.xx:1883 weight=1 max_fails=3 fail_timeout=30s;
      server xxx.xx.xxx.xx:1883 weight=1 max_fails=3 fail_timeout=30s;

  }

  server {
      listen 8883 ssl;
      status_zone tcp_server;
      proxy_pass mqtt.zhouhong.icu;
      proxy_buffer_size 4k;
      ssl_handshake_timeout 15s;
      ssl_certificate     /etc/nginx/7967358_www.mqtt.zhouhong.icu.pem;
      ssl_certificate_key /etc/nginx/7967358_www.mqtt.zhouhong.icu.key;
  }
}
与SpringBoot集成并实现服务器端监控对应topic下的消息
1.项目搭建
-
引入MQTT相关jar包
        <dependency>
            <groupId>org.springframework.integration</groupId>
            <artifactId>spring-integration-stream</artifactId>
        </dependency>
        <dependency>
            <groupId>org.springframework.integration</groupId>
            <artifactId>spring-integration-mqtt</artifactId>
        </dependency>
-
yml配置文件 (单机可以直接使用IP)
server:
  port: 8080

mqtt:
 ## 单机版--只需要把域名改为ip既可
  hostUrl: tcp://mqtt.zhouhong.icu:1883
  username: admin
  password: public
  ## 服务端 clientId (发送端自己定义)
  clientId: service_client_id
  cleanSession: true
  reconnect: true
  timeout: 100
  keepAlive: 100
  defaultTopic: topic111
  qos: 0
-
属性配置
/**
 * description:
 * date: 2022/6/16 15:51
 * @author: zhouhong
 */
@Component
@ConfigurationProperties("mqtt")
@Data
public class MqttProperties {

    /**
     * 用户名
     */
    private String username;

    /**
     * 密码
     */
    private String password;

    /**
     * 连接地址
     */
    private String hostUrl;

    /**
     * 客户端Id,同一台服务器下,不允许出现重复的客户端id
     */
    private String clientId;

    /**
     * 默认连接主题
     */
    private String topic;

    /**
     * 超时时间
     */
    private int timeout;

    /**
     * 设置会话心跳时间 单位为秒 服务器会每隔1.5*20秒的时间向客户端
     * 发送个消息判断客户端是否在线,但这个方法并没有重连的机制
     */
    private int keepAlive;

    /**
     * 设置是否清空session,这里如果设置为false表示服务器会保留客户端的连
     * 接记录,这里设置为true表示每次连接到服务器都以新的身份连接
     */
    private Boolean cleanSession;

    /**
     * 是否断线重连
     */
    private Boolean reconnect;

    /**
     * 连接方式
     */
    private Integer qos;
}
-
发送消息回调
/**
 * description: 发生消息成功后 的 回调
 * date: 2022/6/16 15:55
 *
 * @author: zhouhong
 */
@Component
@Log4j2
public class MqttSendCallBack implements MqttCallbackExtended {

    /**
     * 客户端断开后触发
     * @param throwable
     */
    @Override
    public void connectionLost(Throwable throwable) {
        log.info("发送消息回调: 连接断开,可以做重连");
    }

    /**
     * 客户端收到消息触发
     *
     * @param topic       主题
     * @param mqttMessage 消息
     */
    @Override
    public void messageArrived(String topic, MqttMessage mqttMessage) throws Exception {
        log.info("发送消息回调:  接收消息主题 : " + topic);
        log.info("发送消息回调:  接收消息内容 : " + new String(mqttMessage.getPayload()));
    }

    /**
     * 发布消息成功
     *
     * @param token token
     */
    @Override
    public void deliveryComplete(IMqttDeliveryToken token) {
        String[] topics = token.getTopics();
        for (String topic : topics) {
            log.info("发送消息回调:  向主题:" + topic + "发送消息成功!");
        }
        try {
            MqttMessage message = token.getMessage();
            byte[] payload = message.getPayload();
            String s = new String(payload, "UTF-8");
            log.info("发送消息回调:  消息的内容是:" + s);
        } catch (MqttException e) {
            e.printStackTrace();
        } catch (UnsupportedEncodingException e) {
            e.printStackTrace();
        }
    }

    /**
     * 连接emq服务器后触发
     *
     * @param b
     * @param s
     */
    @Override
    public void connectComplete(boolean b, String s) {
        log.info("--------------------ClientId:"
                + MqttAcceptClient.client.getClientId() + "客户端连接成功!--------------------");
    }
}
-
接收消息回调
/**
 * description: 接收消息后的回调
 * date: 2022/6/16 15:52
 *
 * @author: zhouhong
 */
@Component
@Log4j2
public class MqttAcceptCallback implements MqttCallbackExtended {

    @Resource
    private MqttAcceptClient mqttAcceptClient;

    /**
     * 客户端断开后触发
     *
     * @param throwable
     */
    @Override
    public void connectionLost(Throwable throwable) {
        log.info("接收消息回调:  连接断开,可以做重连");
        if (MqttAcceptClient.client == null || !MqttAcceptClient.client.isConnected()) {
            log.info("接收消息回调:  emqx重新连接....................................................");
            mqttAcceptClient.reconnection();
        }
    }

    /**
     * 客户端收到消息触发
     *
     * @param topic       主题
     * @param mqttMessage 消息
     */
    @Override
    public void messageArrived(String topic, MqttMessage mqttMessage) throws Exception {
        log.info("接收消息回调:  接收消息主题 : " + topic);
        log.info("接收消息回调:  接收消息内容 : " + new String(mqttMessage.getPayload()));
    }

    /**
     * 发布消息成功
     *
     * @param token token
     */
    @Override
    public void deliveryComplete(IMqttDeliveryToken token) {
        String[] topics = token.getTopics();
        for (String topic : topics) {
            log.info("接收消息回调:  向主题:" + topic + "发送消息成功!");
        }
        try {
            MqttMessage message = token.getMessage();
            byte[] payload = message.getPayload();
            String s = new String(payload, "UTF-8");
            log.info("接收消息回调:  消息的内容是:" + s);
        } catch (MqttException e) {
            e.printStackTrace();
        } catch (UnsupportedEncodingException e) {
            e.printStackTrace();
        }
    }

    /**
     * 连接emq服务器后触发
     *
     * @param b
     * @param s
     */
    @Override
    public void connectComplete(boolean b, String s) {
        log.info("--------------------ClientId:"
                + MqttAcceptClient.client.getClientId() + "客户端连接成功!--------------------");
        // 以/#结尾表示订阅所有以test开头的主题
        // 订阅所有机构主题
        mqttAcceptClient.subscribe("topic111", 0);
    }
}
-
发消息
/**
 * description: 发送消息
 * date: 2022/6/16 16:01
 *
 * @author: zhouhong
 */
@Component
public class MqttSendClient {

    @Autowired
    private MqttSendCallBack mqttSendCallBack;

    @Autowired
    private MqttProperties mqttProperties;

    public MqttClient connect() {
        MqttClient client = null;
        try {
            String uuid = UUID.randomUUID().toString().replaceAll("-","");
            client = new MqttClient(mqttProperties.getHostUrl(),uuid , new MemoryPersistence());
            MqttConnectOptions options = new MqttConnectOptions();
            options.setUserName(mqttProperties.getUsername());
            options.setPassword(mqttProperties.getPassword().toCharArray());
            options.setConnectionTimeout(mqttProperties.getTimeout());
            options.setKeepAliveInterval(mqttProperties.getKeepAlive());
            options.setCleanSession(true);
            options.setAutomaticReconnect(false);
            try {
                // 设置回调
                client.setCallback(mqttSendCallBack);
                client.connect(options);
            } catch (Exception e) {
                e.printStackTrace();
            }
        } catch (Exception e) {
            e.printStackTrace();
        }
        return client;
    }

    /**
     * 发布消息
     * 主题格式: server:report:$orgCode(参数实际使用机构代码)
     *
     * @param retained    是否保留
     * @param pushMessage 消息体
     */
    public void publish(boolean retained, String topic, String pushMessage) {
        MqttMessage message = new MqttMessage();
        message.setQos(mqttProperties.getQos());
        message.setRetained(retained);
        message.setPayload(pushMessage.getBytes());
        MqttClient mqttClient = connect();
        try {
            mqttClient.publish(topic, message);
        } catch (MqttException e) {
            e.printStackTrace();
        } finally {
            disconnect(mqttClient);
            close(mqttClient);
        }
    }

    /**
     * 关闭连接
     *
     * @param mqttClient
     */
    public static void disconnect(MqttClient mqttClient) {
        try {
            if (mqttClient != null) {
                mqttClient.disconnect();
            }
        } catch (MqttException e) {
            e.printStackTrace();
        }
    }

    /**
     * 释放资源
     *
     * @param mqttClient
     */
    public static void close(MqttClient mqttClient) {
        try {
            if (mqttClient != null) {
                mqttClient.close();
            }
        } catch (MqttException e) {
            e.printStackTrace();
        }
    }
}
-
接收消息
/**
 * description: 服务器段端连接订阅消息、监控topic
 * date: 2022/6/16 15:52
 *
 * @author: zhouhong
 */
@Component
@Log4j2
public class MqttAcceptClient {

    @Autowired
    @Lazy
    private MqttAcceptCallback mqttAcceptCallback;

    @Autowired
    private MqttProperties mqttProperties;

    public static MqttClient client;

    private static MqttClient getClient() {
        return client;
    }

    private static void setClient(MqttClient client) {
        MqttAcceptClient.client = client;
    }

    /**
     * 客户端连接
     */
    public void connect() {
        MqttClient client;
        try {
            // clientId 使用服务器 yml里面配置的 clientId
            client = new MqttClient(mqttProperties.getHostUrl(), mqttProperties.getClientId(), new MemoryPersistence());
            MqttConnectOptions options = new MqttConnectOptions();
            options.setUserName(mqttProperties.getUsername());
            options.setPassword(mqttProperties.getPassword().toCharArray());
            options.setConnectionTimeout(mqttProperties.getTimeout());
            options.setKeepAliveInterval(mqttProperties.getKeepAlive());
            options.setAutomaticReconnect(mqttProperties.getReconnect());
            options.setCleanSession(mqttProperties.getCleanSession());
            MqttAcceptClient.setClient(client);
            try {
                // 设置回调
                client.setCallback(mqttAcceptCallback);
                client.connect(options);
            } catch (Exception e) {
                e.printStackTrace();
            }
        } catch (Exception e) {
            e.printStackTrace();
        }
    }

    /**
     * 重新连接
     */
    public void reconnection() {
        try {
            client.connect();
        } catch (MqttException e) {
            e.printStackTrace();
        }
    }

    /**
     * 订阅某个主题
     *
     * @param topic 主题
     * @param qos   连接方式
     */
    public void subscribe(String topic, int qos) {
        log.info("==============开始订阅主题==============" + topic);
        try {
            client.subscribe(topic, qos);
        } catch (MqttException e) {
            e.printStackTrace();
        }
    }

    /**
     * 取消订阅某个主题
     *
     * @param topic
     */
    public void unsubscribe(String topic) {
        log.info("==============开始取消订阅主题==============" + topic);
        try {
            client.unsubscribe(topic);
        } catch (MqttException e) {
            e.printStackTrace();
        }
    }
}
-
服务端启动时连接订阅主题并监控
/**
 * description: 启动后连接 MQTT 服务器, 监听 mqtt/my_topic 这个topic发送的消息
 * date: 2022/6/16 15:57
 * @author: zhouhong
 */
@Configuration
public class MqttConfig {

    @Resource
    private MqttAcceptClient mqttAcceptClient;

    @Bean
    public MqttAcceptClient getMqttPushClient() {
        mqttAcceptClient.connect();
        return mqttAcceptClient;
    }
}
-
发消息控制类
/**
 * description: 发消息控制类
 * date: 2022/6/16 15:58
 *
 * @author: zhouhong
 */
@RestController
public class SendController {

    @Resource
    private MqttSendClient mqttSendClient;

    @PostMapping("/mqtt/sendmessage")
    public void sendMessage(@RequestBody SendParam sendParam) {
        mqttSendClient.publish(false,sendParam.getTopic(),sendParam.getMessageContent());
    }
}
2.测试
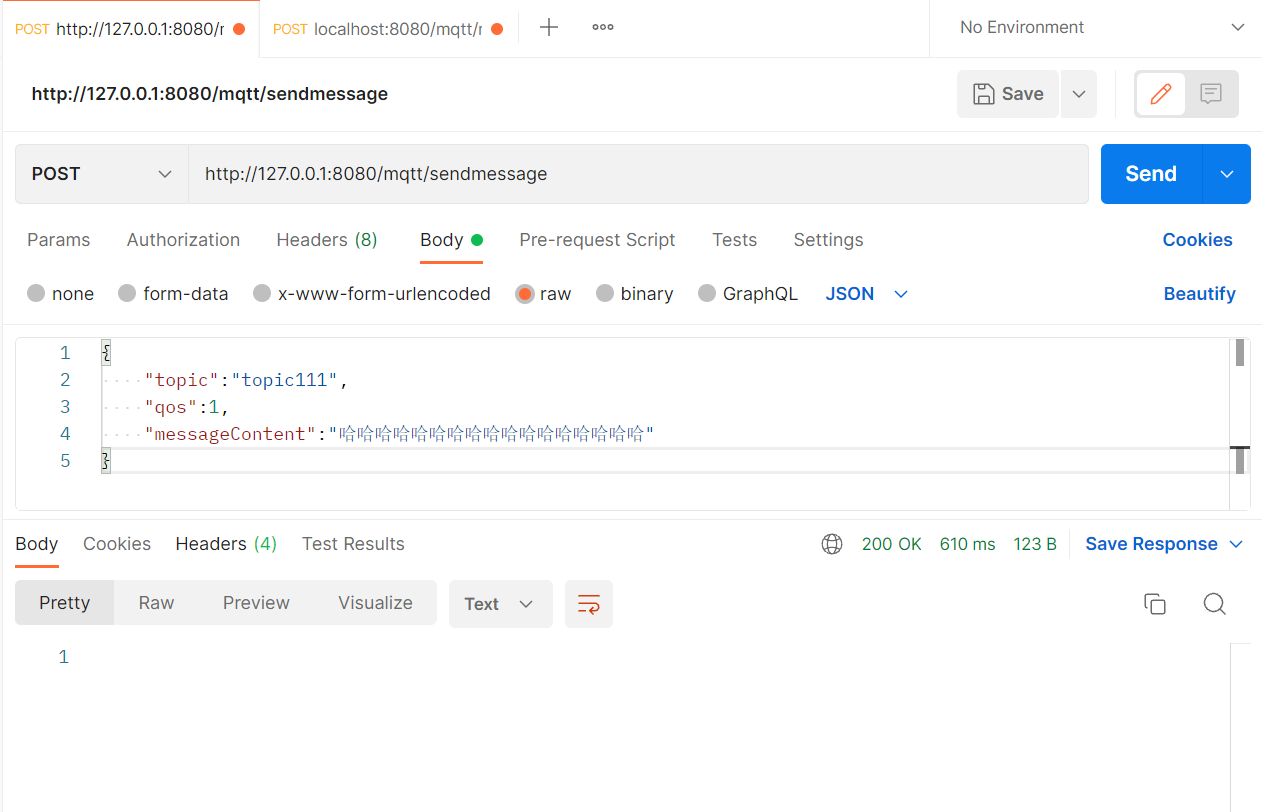
- postman调用发消息接口

- 控制台日志

- 使用另外一个移动端MQTT调试工具测试
- 手机端向主题 topic111 发送消息,并接收。


2. 控制台打印

本文来自博客园,作者:Tom-shushu,转载请注明原文链接:https://www.cnblogs.com/Tom-shushu/p/16390187.html


