How to use the git remote add origin command to push remotely
By itself, Git is an effective open source technology to keep track of local changes as you develop code, especially as you build sophisticated software. And while distributed facilities are built into the tool, many developers use Git purely as a mechanism to locally and privately track changes.
When developers want to take their local Git repository and share it with another developer or push the code into a cloud-based distributed version control service, such as GitHub or GitLab, they can use the git remote add origin command.
Three files and two commits
Before you follow along in this git remote add origin tutorial, set up a local Git installation, a locally initialized repository with at least one Git commit, and an account on GitHub or GitLab. For this tutorial, we will use GitHub, but the process is almost identical on GitLab.
Start off with a local repository, stored in a folder named my-local-repo that has three files in it:
- java
- html
- css
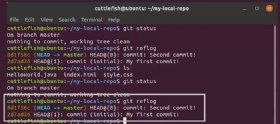
 The git reflog command shows how many commits are in the local repository before the git remote add origin call.
The repository itself only has two commits, which you can see if you execute the git reflog command, as shown in the image below. Reflog is an abbreviation of reference logs.
Create the remote origin on GitHub
After the local repository is validated, the next step is to create a remote repository that the local repository will connect to. It's easy to create a remote repository. Log into GitHub and use the "Create a new repository" wizard.
In this example, I named the GitHub repository my-github-repo to clearly differentiate it from the Git repository that is stored locally in a folder named my-local-repo.
 Set up the remote origin repository on the GitHub server.
Since you will transfer information to the GitHub repository, do not initialize it with a README, configure a gitignore file or add a license. All of those things will exist in the local repository and will be subsequently pushed into the remote GitHub one. If those resources exist in both repositories before the git remote add origin command runs, it will create extra merge and conflict resolution steps that are easily avoided.
Copy and edit GitHub's remote add URL
When GitHub creates your repository, it presents an HTTP link, which is required as part of the git remote add origin command. The URL provided that uniquely identifies the GitHub repository I created is:
http://github.com/cameronmcnz/my-github-repo.git
Copy and paste this URL into a text editor and then add your username and password to the start of the URL:
http://cameronmcnz:T55tutorial@github.com/cameronmcnz/my-github-repo.git
This URL setup lets you authenticate the file without using a credential manager or other password management tool.
Run the git remote add origin command
With the GitHub URL saved to the clipboard in the folder that contains your local Git repository, open a terminal window and run the following git remote add origin command:
git remote add origin http://cameronmcnz:T55tutorial@github.com/cameronmcnz/my-github-repo.git
This command will execute, but the system won't provide any feedback to the terminal window. To verify that the remote repo was added to your configuration, use the git remote –v command. This command will show that GitHub is the fetch and push targets of the local repository.
Perform a git push to the remote
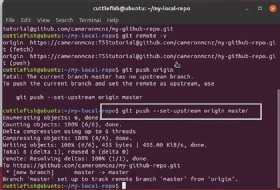
Finally, with the GitHub service configured, push all your local code changes, commits and revision history to the remote server with a git push command. Make sure you specify the --set-upstream option, otherwise the remote server will reject the operation. Also include the name of the branch to push, which in this case is master.
 Push changes to the remote server with the git push command.
git push --set-upstream origin master
As this action completes, the terminal window lists the number of objects pushed to the server and indicates that your local repository is set to track to a branch named master on the GitHub server.
Verify the git remote add push on GitHub
After the git remote add and push commands complete, go back to the GitHub instance and look at the contents of the recently created repository.
 The result of the local git remote add and push command is reflected in the remote GitHub repository.
The remote GitHub repository should contain all the files that make up your local repository and at the same time, maintain a copy of your commit history. If you look at my GitHub repository, you will see the HelloWorld.java, index.html and style.css files, along with an indication that the repository contains two commits. These files and commits are consistent with the output from the git reflog command from the start of this tutorial.
Overview of git remote add origin and push steps
In review, these are the five steps to successfully perform a git remote add origin and push to a remote repository:
- Validate the existence of your local Git repository.
- Create a new, empty Git repository on your remote server.
- Obtain the git remote add URL for the remote repository and add credentials if needed.
- Run the git remote add origin command from your local repository with the --set-upstream and the name of the active branch to push.
- View the pushed files on the remote Git repository to verify that the git remote add and push commands ran successfully.
Now that the remote and local repositories can interact seamlessly, you can continue to commit code locally, push changes to the remote GitHub server, and begin to manage your source code in a distributed manner.


