§2.4 A Starter Application
In the remainder of this chapter, you’ll learn some more of the basic ASP.NET MVC principles by building a simple data entry application.
In the next chapter, you’ll find a discussion of the key MVC architectural principles, and the rest of the book will give increasingly detailed explanations and demonstrations of virtually all ASP.NET MVC 2 features.
§2.4.1 The Story
Now, Let us create a web site(about a party) that allows invitees to send back an electronic RSVP.This application named PartyInvites,will
- Have a home page showing information about the party
- Have an RSVP form into which invitees can enter their contact details and say whether or not they will attend
- Validate form submissions, displaying a thank you page if successful
- E-mail details of completed RSVPs to the party organizer
ok. let us start do the homepage, update the Index.aspx view
    <body>
        <h1>New Year's Party</h1>
        <p>
        <%= ViewData["greeting"] %>!
        We're going to have an exciting party.
        (To do: sell it better. Add pictures or something.)
        </p>
    </body>
§2.4.2 Designing a Data Model
In MVC, M stands for model, and it’s the most important character.
Your model is a software representation of the real-world objects, processes, and rules that make up the subject matter, or domain, of your application.
So we need to creat a type named GuestResponse. This object will be responsible for storing, validating, and ultimately confirming an invitee’s RSVP.
§2.4.3 Adding a Model Class
Add a new, blank C# class called GuestResponse inside the /Models folder
namespace MvcProgram.Models
{
    public class GuestResponse
    {
        public string Name { get; set; }
        public string Email { get; set; }
        public string Phone { get; set; }
        public bool? WillAttend { get; set; }
    }
}
here WillAttend is a nullable bool(the ? mark makes it nullable).This creates a tri-state value: True, False, or null, it used to specified whether the guest ’ll attend.
§2.4.4 Linking Between Actions
There’s going to be an RSVP form, so you’ll need to place a link to it.Update Index.aspx view again as follows:
    <body>
        <h1>New Year's Party</h1>
        <p>
        <%= ViewData["greeting"] %>!
        We're going to have an exciting party.
        (To do: sell it better. Add pictures or something.)
        </p>
        <%=Html.ActionLink("RSVP Now","RsvpForm") %>
    </body>
Note: Html.ActionLink is a HTML helper method. The framework comes with a built-in collection of useful
HTML helpers that give you a convenient shorthand for rendering not just HTML links, but also text input boxes,
check boxes, selection boxes, and so on, and even custom controls. When you type <%: Html. or <%= Html.,
you’ll see Visual Studio’s IntelliSense spring forward to let you pick from the available HTML helper methods.
They’re each explained in Chapter 11, though most are obvious.
Run the project again, and you’ll see the new link, as shown:
Figure 2–9. A view with a link
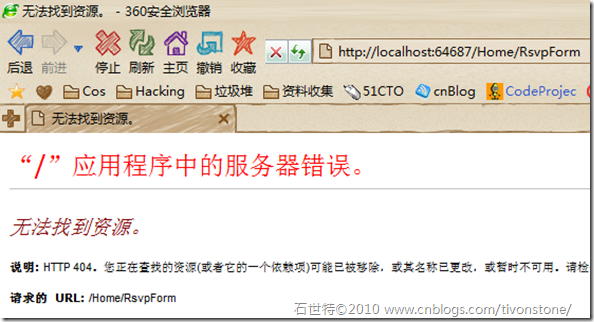
But if you click the RSVP Now link, you’ll get a 404 Not Found error.
So we need creat a new file like the error says.it will read http://yourserver/Home/RsvpForm
Add a new method to your HomeController class
        public ActionResult RsvpForm()
        {
            return View();
        }
§2.4.5 Introducing Strongly Typed Views
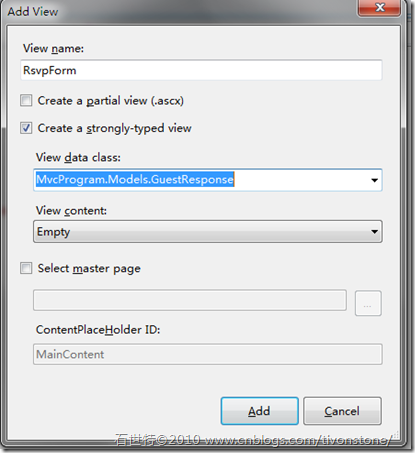
Again, you’ll need to add a view for that new action. But first, make sure you’ve compiled your code. and then right click Views Folder creat a new view, features like this :
When you click Add, you’ll get a new view at this action’s default view location,~/Views/Home/RsvpForm.aspx.
§2.4.6 Building a Form
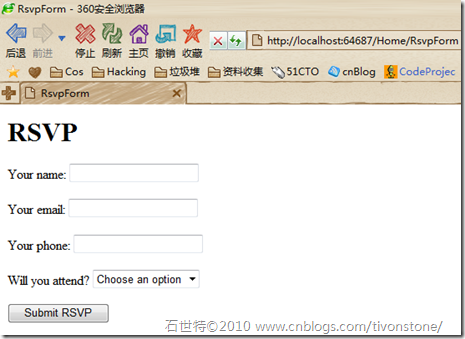
Turning RsvpForm.aspx into a form for editing instances of GuestResponse
<body>
    <h1>RSVP</h1>
    <% using(Html.BeginForm()) { %>
    <p>Your name: <%= Html.TextBoxFor(x => x.Name) %></p>
    <p>Your email: <%= Html.TextBoxFor(x => x.Email) %></p>
    <p>Your phone: <%= Html.TextBoxFor(x => x.Phone) %></p>
    <p>
        Will you attend?
        <%= Html.DropDownListFor(x => x.WillAttend, new[] {
            new SelectListItem { Text = "Yes, I'll be there",
                                          Value = bool.TrueString },
            new SelectListItem { Text = "No, I can't come",
                                          Value = bool.FalseString }
        }, "Choose an option") %>
    </p>
    <input type="submit" value="Submit RSVP" />
    <% } %>
</body>
These HTML helpers let you pick out a model property using a lambda expression (i.e., the x => x.PropertyName syntax). This is only possible because your view is strongly typed.
You can pass parameters to Html.BeginForm(), telling it which action method the form should post to when submitted.
§2.4.7 Handling Form Submissions
In order to receive and process submitted form data . We’ll slice the RsvpForm action down the middle, creating the following:
- A method that responds to HTTP GET requests: Note that a GET request is what a browser issues normally each time someone clicks a link. This version of the action will be responsible for displaying the initial blank form when someone first visits /Home/RsvpForm.
- A method that responds to HTTP POST requests: By default, forms rendered using Html.BeginForm() are submitted by the browser as a POST request. This version of the action will be responsible for receiving submitted data and deciding what to do with it.
The two methods have totally different responsibilities. However, from outside, the pair of C# methods will be seen as a single logical action, since they will have the same name and are invoked by requesting the same URL
§2.4.6 Introducing Model Binding
The second overload takes an instance of GuestResponse as a parameter. Given that the method is being invoked via an HTTP request, and that GuestResponse is a .NET type that is totally unknown to HTTP, how can an HTTP request possibly supply a GuestResponse instance? The answer is model binding, an extremely useful feature of ASP.NET MVC whereby incoming data is automatically parsed and used to populate action method parameters by matching incoming key/value pairs with the names of properties on the desired .NET type.
Let you work primarily in terms of strongly typed .NET objects rather than low-level fiddling with Request.Form[] and Request.QueryString[] dictionaries
§2.4.7 Rendering Arbitrary Views and Passing a Model Object to Them
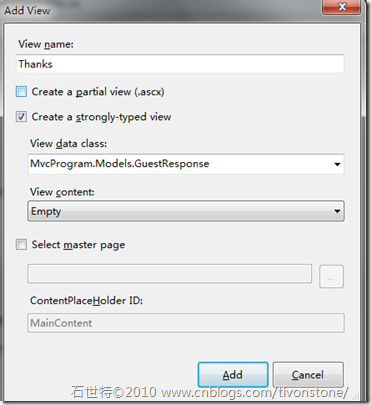
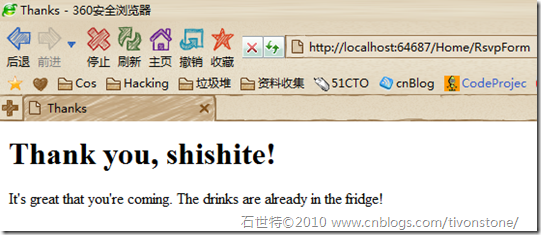
return View("Thanks", guestResponse);This line tells ASP.NET MVC to find and render a view called Thanks, and to supply the guestResponse object to that view. Since this all happens in a controller called HomeController, ASP.NET MVC will expect to find the Thanks view at ~/Views/Home/Thanks.aspx, but of course no such file yet exists. Let’s create it.
After you creat it and fill the code as follows:
    <body>
        <h1>Thank you, <%= Model.Name %>!</h1>
        <% if(Model.WillAttend == true) { %>
        It's great that you're coming. The drinks are already in the fridge!
        <% } else { %>
        Sorry to hear you can't make it, but thanks for letting us know.
        <% } %>
    </body>
then you can fire up your application.and see the welcome page
§2.4.8 Adding Validation
The .NET class library has a namespace called System.ComponentModel.DataAnnotations that includes attributes you can use to define validation rules declaratively.
    public class GuestResponse
    {
        [Required(ErrorMessage="Please enter your name")]
        public string Name { get; set; }
        [Required(ErrorMessage="Please enter your email address")]
        [RegularExpression(".+\\@.+\\..+",
                                        ErrorMessage = "Please enter a valid email address.")]
        public string Email { get; set; }
        [Required(ErrorMessage="Please enter your phone number")]
        public string Phone { get; set; }
        [Required(ErrorMessage="Please make sure if you want to come")]
        public bool? WillAttend { get; set; }
    }
After that, Let’s update the second RsvpForm() action method so that if there were any validation errors:
        [HttpPost]
        public ActionResult RsvpForm(GuestResponse guestResponse)
        {
            if (ModelState.IsValid)
            {
                // To do: E-mail guestResponse to the party organizer
                return View("Thanks", guestResponse);
            }
            else
            {
                return View();
            }
        }
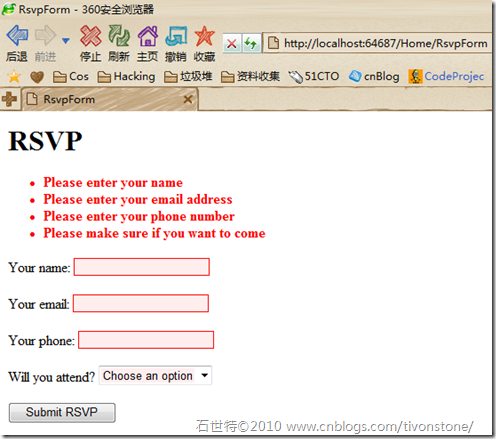
Finally, choose where to display any validation error messages by adding an Html.ValidationSummary() to the form in the RsvpForm.aspx view
    <h1>RSVP</h1>
    <% using(Html.BeginForm()) { %>
    <%=Html.ValidationSummary() %>
    ....leave rest as before....
§2.4.9 Model Binding Tells Input Controls to Redisplay User-Entered Values
I mentioned previously that because HTTP is stateless, you shouldn’t expect input controls to retain state across multiple requests. However, because you’re now using model binding to parse the incoming data, you’ll find that when you redisplay the form after a validation error, the input controls will redisplay any user-entered values.
§2.4.10 Highlighting Invalid Fields
The easiest way to highlight invalid fields is to reference a CSS style sheet, /Content/site.css,
Go to your RsvpForm.aspx view and add a new stylesheet reference to its <head> section:
<head runat="server">
    <title>RsvpForm</title>
    <link rel=Stylesheet href="http://www.cnblogs.com/Content/Site.css" />
</head>
Then run the application.as shown.
§2.4.11 Finishing Off
To construct the outgoing e-mail, start by adding the following method to GuestResponse:
        private MailMessage BuildMailMessage()
        {
            var message = new StringBuilder();
            message.AppendFormat("Date: {0:yyyy-MM-dd hh:mm}\n", DateTime.Now);
            message.AppendFormat("RSVP from: {0}\n", Name);
            message.AppendFormat("Email: {0}\n", Email);
            message.AppendFormat("Phone: {0}\n", Phone);
            message.AppendFormat("Can come: {0}\n", WillAttend.Value ? "Yes" : "No");
            return new MailMessage(
                "rsvps@example.com",                                                        // From
                "party-organizer@example.com",                                         // To
                Name + (WillAttend.Value ? " will attend" : " won't attend"),  // Subject
                message.ToString()                                                            // Body
            );
        }
Then creat a method to call the former one;
        public void Submit()
        {
            new SmtpClient().Send(BuildMailMessage());
        }
Finally, call guestResponse.Submit() from the second RsvpForm() overload, thereby sending the guest response by e-mail only if it’s valid:
        [HttpPost]
        public ActionResult RsvpForm(GuestResponse guestResponse)
        {
            if (ModelState.IsValid)
            {
                // To do: E-mail guestResponse to the party organizer
                guestResponse.Submit();
                return View("Thanks", guestResponse);
            }
            else
            {
                return View();
            }
        }
The last thing you need to do is update the web.config
  <system.net>
    <mailSettings>
      <smtp deliveryMethod="SpecifiedPickupDirectory">
        <network host="ignored"/>
        <specifiedPickupDirectory pickupDirectoryLocation="e:\temp"/>
      </smtp>
    </mailSettings>
  </system.net>
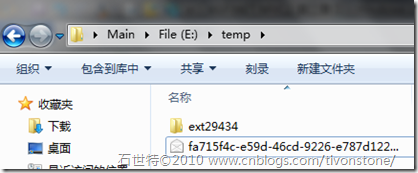
After you run the application,you will see the email in the e:\temp
作者:石世特
出处:http://www.cnblogs.com/TivonStone/
希望本文对你有所帮助,想转随便转,心情好的话给我的文章留个链接.o(. .)o

