§5.2 Building the Shopping Cart
In this section, you’ll do the following:
- Expand your domain model to introduce the notion of a Cart, and work with a second controller class, CartController.
- Create a custom model binder that gives you a very elegant way for action methods to receive a Cart instance relating to the current visitor’s browser session.
- Learn why using multiple <form> tags can be a good thing in ASP.NET MVC (despite being nearly impossible in traditional ASP.NET Web Forms).
- See how Html.RenderAction() can be used to make a reusable cart summary control quickly and easily (in comparison to creating NavController, which was a lengthy task).
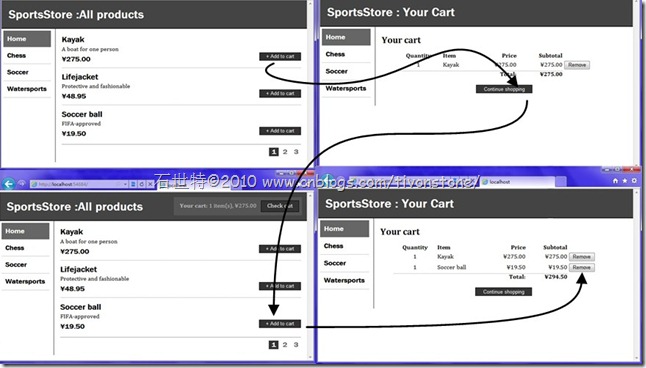
As you can see, each product will appear with an “Add to cart” button. Clicking this adds the product to the visitor’s shopping cart, and takes the visitor to the “Your cart” screen. That displays the contents of their cart, including its total value, and gives them a choice of two directions to go next: “Continue shopping” will take them back to the page they just came from (remembering both the category and page number), and “Check out now” will go ahead to whatever screen completes the order
§5.2.1 Defining the Cart Entity
Put a class called Cart into your SportsStore.Domain project’s Entities folder:
- The cart is initially empty.
- A cart can’t have more than one line corresponding to a given product. (So, when you add a product for which there’s already a corresponding line, it simply increases the quantity.)
- A cart’s total value is the sum of its lines’ prices multiplied by quantities. (For simplicity, we’re omitting any concept of delivery charges.)
namespace SportsStore.Domain.Entities
{
    public class Cart
    {
        private List<CartLine> lines = new List<CartLine>();
        public IList<CartLine> Lines { get { return lines.AsReadOnly(); } }
        public void AddItem(Product product, int quantity)
        {
            var line = lines.FirstOrDefault(x => x.Product.Name == product.Name);
            if (line == null)
                lines.Add(new CartLine() { Product = product, Quantity = quantity });
            else
                line.Quantity += quantity;
        }
        public void RemoveLine(Product product)
        {
            lines.RemoveAll(l => l.Product.Name == product.Name);
        }
        public decimal ComputeTotalValue() {
            return lines.Sum(l => l.Quantity * l.Product.Price);
        }
        public void Clear() {
            lines.Clear();
        }
    }
    public class CartLine
    {
        public Product Product { get; set; }
        public int Quantity { get; set; }
    }
}
§5.2.2 Adding “Add to Cart” Buttons
Go back to your partial view, /Views/Shared/ProductSummary.ascx, and add an “Add to cart” button:
<div class="item">
    <h3><%= Model.Name %></h3>
        <%= Model.Description %>

        <%using (Html.BeginForm("AddCart", "Cart"))
          { %>
          <%=Html.HiddenFor(x=>x.ProductID) %>
          <%=Html.Hidden("returnUrl", Request.Url.PathAndQuery)%>
          <input type="submit" value="+ Add to cart" />
        <%} %>

    <h4><%= Model.Price.ToString("c")%></h4>
</div>
Each of the “Add to cart” buttons will POST the relevant ProductID to an action called AddToCart on a controller class called CartController. Note that Html.BeginForm() renders forms with a method attribute of POST by default, though it also has an overload that lets you specify GET instead
§5.2.3 Creating a Custom Model Binder
ASP.NET MVC has a mechanism called model binding. is used to prepare the parameters passed to action methods. This is how it was possible in Chapter 2 to receive a GuestResponse instance parsed automatically from the incoming HTTP request.
Add the following class to the Infrastructure folder:
namespace SportsStore.WebUI.Infrastructure
{
    public class CartModelBinder : IModelBinder
    {
        private const string cartSessionKey = "_cart";

        #region IModelBinder 成员

        public object BindModel(ControllerContext controllerContext, ModelBindingContext bindingContext)
        {
            if (bindingContext.Model != null)
                throw new InvalidOperationException("Cannot update instances");
            Cart cart = (Cart)controllerContext.HttpContext.Session[cartSessionKey];
            if (cart == null)
            {
                cart = new Cart();
                controllerContext.HttpContext.Session[cartSessionKey] = cart;
            }
            return cart;
        }

        #endregion
    }
}
Now you can understand CartModelBinder simply as a kind of Cart factory that encapsulates the logic of giving each visitor a separate instance stored in their Session collection.
Add the following line to your Global.asax.cs file’s Application_Start() method, nominating CartModelBinder as the binder to use whenever a Cart instance is required:
ModelBinders.Binders.Add(typeof(Cart), new CartModelBinder());
§5.2.4 Creating CartController
Let’s now create CartController, relying on our custom model binder to supply Cart instances.
Implementing AddToCart and RemoveFromCart
namespace SportsStore.WebUI.Controllers
{
    public class CartController : Controller
    {
        private IProductsRepository productsRepository;
        public CartController(IProductsRepository productsRepository)
        {
            this.productsRepository = productsRepository;
        }
        public RedirectToRouteResult AddToCart(Cart cart, int productId,string returnUrl)
        {
            Product product = productsRepository.Products
                .FirstOrDefault(p => p.ProductID == productId);
            cart.AddItem(product, 1);
            return RedirectToAction("Index", new { returnUrl });
        }
        public RedirectToRouteResult RemoveFromCart(Cart cart, int productId,string returnUrl)
        {
            Product product = productsRepository.Products
                .FirstOrDefault(p => p.ProductID == productId);
            cart.RemoveLine(product);
            return RedirectToAction("Index", new { returnUrl });
        }
    }
}
The important thing to notice is that AddToCart and RemoveFromCart’s parameter names match the <form> field names defined in /Views/Shared/ProductSummary.ascx (i.e., productId and returnUrl). That enables ASP.NET MVC to associate incoming form post variables with those parameters.
§5.2.5 Displaying the Cart
All that action has to do is render a view, supplying the visitor’s Cart and the current returnUrl value: add a simple new view model class to your SportsStore.WebUI project’s Models folder:
namespace SportsStore.WebUI.Models
{
    public class CartIndexViewModel
    {
        public Cart Cart { get; set; }
        public string ReturnUrl { get; set; }
    }
}
Implement the simple Index() action method by adding a new method to CartController:
        public ViewResult Index(Cart cart, string returnUrl)
        {
            return View(new CartIndexViewModel
            {
                Cart = cart,
                ReturnUrl = returnUrl
            });
        }
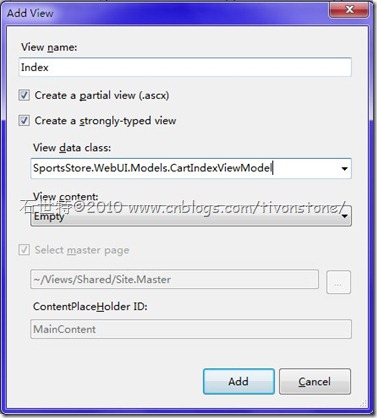
And let’s creat the view:
<asp:Content ID="Content2" ContentPlaceHolderID="MainContent" runat="server">
    <h2>Your cart</h2>
<table width="90%" align="center">
    <thead><tr>
        <th align="center">Quantity</th>
        <th align="left">Item</th>
        <th align="right">Price</th>
        <th align="right">Subtotal</th>
    </tr></thead>
    <tbody>
    <% foreach(var line in Model.Cart.Lines) { %>
    <tr>
    <td align="center"><%= line.Quantity %></td>
    <td align="left"><%= line.Product.Name %></td>
    <td align="right"><%= line.Product.Price.ToString("c") %></td>
    <td align="right">
    <%= (line.Quantity*line.Product.Price).ToString("c") %>
    </td>
    <td>
        <% using(Html.BeginForm("RemoveFromCart", "Cart")) { %>
        <%= Html.Hidden("ProductId", line.Product.ProductID) %>
        <%= Html.HiddenFor(x => x.ReturnUrl) %>
        <input type="submit" value="Remove" />
        <% } %>
    </td>
    </tr>
    <% } %>
    </tbody>
    <tfoot><tr>
    <td colspan="3" align="right">Total:</td>
    <td align="right">
    <%= Model.Cart.ComputeTotalValue().ToString("c") %>
    </td>
    </tr></tfoot>
</table>
<p align="center" class="actionButtons">
<a href="<%= Model.ReturnUrl %>">Continue shopping</a>
</p>
§5.2.6 Displaying a Cart Summary in the Title Bar
a new widget that displays a brief summary of the current cart contents and offers a link to the cart display page. You’ll do this in much the same way that you implemented the navigation widget.Add a new action to CartController:
        public ViewResult Summary(Cart cart)
        {
            return View(cart);
        }
Next, create a partial view for the widget with strongly typed:
<% if(Model.Lines.Count > 0) { %>
    <div id="cart">
        <span class="caption">
        <b>Your cart:</b>
        <%= Model.Lines.Sum(x => x.Quantity) %> item(s),
        <%= Model.ComputeTotalValue().ToString("c") %>
        </span>
        <%= Html.ActionLink("Check out", "Index", "Cart",
        new { returnUrl = Request.Url.PathAndQuery }, null)%>
    </div>
<% } %>
To plug the widget into the master page, add the following bold code to /Views/Shared/Site.Master:<div id="header"> <% if(!(ViewContext.Controller is SportsStore.WebUI.Controllers.CartController)) Html.RenderAction("Summary", "Cart"); %> <div class="title"> <asp:ContentPlaceHolder ID="TitleContent" runat="server"/> </div> </div>
IT IS TIME FOR CLASS, SEE YOU TOMORROW
作者:石世特
出处:http://www.cnblogs.com/TivonStone/
希望本文对你有所帮助,想转随便转,心情好的话给我的文章留个链接.o(. .)o


