Spring IOC 和 AOP
Spring框架中的 IOC 和 AOP
参考博客:https://www.cnblogs.com/xiaoxing/p/5836835.html
一.什么是Spring?
Spring是一个轻量级开源框架,开发目的是为了解决企业应用开发的复杂性,Spring通过bean来管理java类,将java类封装进容器里,需要时便可以为你提供
对应类的对象。可以说,Spring是一个轻量级的控制反转IOC和面向切面AOP的容器框架。Spring框架简单、易于测试,最重要的是它可以做到松耦合,这不仅仅
对服务端应用受益,对所有java应用都有好处。
二.如何简单搭建一个Spring框架?
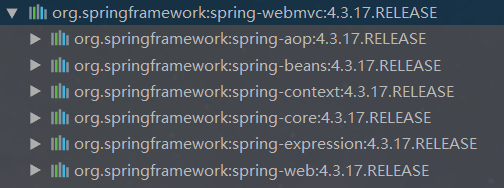
1.首先在maven中导入spring的整合包
1  <!--spring相关-->
2 <dependency>
3      <groupId>org.springframework</groupId>
4      <artifactId>spring-webmvc</artifactId>
5      <version>4.3.17.RELEASE</version>
6 </dependency>
2.在maven中可以看到以下jar包
3.创建一个spring.xml文件,用作spring的配置
 1 <?xml version="1.0" encoding="UTF-8"?>
 2 <beans xmlns="http://www.springframework.org/schema/beans"
 3        xmlns:xsi="http://www.w3.org/2001/XMLSchema-instance"
 4        xmlns:context="http://www.springframework.org/schema/context"
 5        xmlns:aop="http://www.springframework.org/schema/aop"
 6        xsi:schemaLocation="http://www.springframework.org/schema/beans
 7        http://www.springframework.org/schema/beans/spring-beans.xsd http://www.springframework.org/schema/context http://www.springframework.org/schema/context/spring-context.xsd http://www.springframework.org/schema/aop http://www.springframework.org/schema/aop/spring-aop.xsd">
 8
 9         <bean></bean>
10
11 </beans>
4.创建一个类,将其注入到Spring容器里
User类
 1 public class User {
 2
 3     private String name;
 4     private int age;
 5
 6     public User(String name, int age) {
 7         this.name = name;
 8         this.age = age;
 9     }
10
11     public User(){
12
13     }
14
15     public String getName() {
16         return name;
17     }
18
19     public void setName(String name) {
20         this.name = name;
21     }
22
23     public int getAge() {
24         return age;
25     }
26
27     public void setAge(int age) {
28         this.age = age;
29     }
30
31     @Override
32     public String toString() {
33         return "User{" +
34                 "name='" + name + '\'' +
35                 ", age=" + age +
36                 '}';
37     }
38 }
spring.xml
<bean id="entity" class="test.entity.User">
        <property name="name" value="测试"/>
        <property name="age" value="11"/>
 </bean>
5创建一个Test类,测试是否能拿到Spring中返回的对象
1 <bean id="entity" class="test.entity.User">
2         <property name="name" value="测试"/>
3         <property name="age" value="11"/>
4  </bean>
测试结果,成功拿到返回对象的成员变量的值

三.Spring框架中的主要模块
Spring框架中主要包含六大模块:Core、Dao、Orm、Jee、Web、Aop
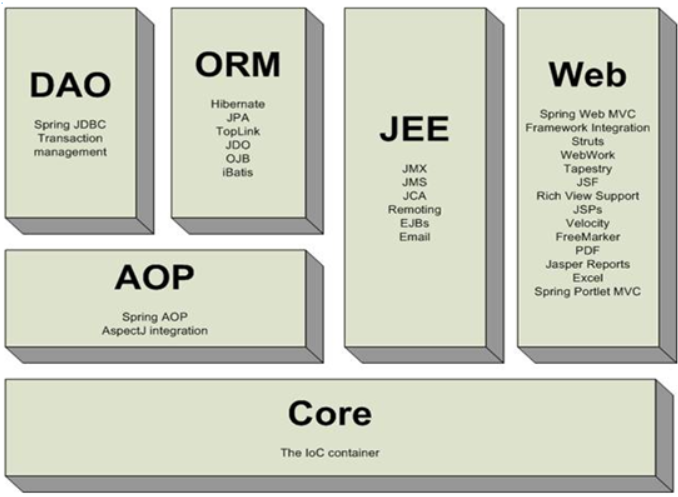
Spring DAO:Spring提供了对JDBC的操作支持:JdbcTemplate模板工具类 。
Spring ORM:Spring可以与ORM框架整合。例如Spring整合Hibernate框架,其中Spring还提供HibernateDaoSupport工具类,简化了Hibernate的操作 。
Spring WEB:Spring提供了对Struts、Springmvc的支持,支持WEB开发。与此同时Spring自身也提供了基于MVC的解决方案 。
Spring AOP:Spring提供面向切面的编程,可以给某一层提供事务管理,例如在Service层添加事物控制 。
Spring JEE:J2EE开发规范的支持,例如EJB 。
Spring Core:提供IOC容器对象的创建和处理依赖对象关系 。
四.什么是IOC?Spring中如何实现IOC?
IOC容器概念:IOC容器指具有依赖注入功能的容器,具有创建对象功能的容器。IOC容器负责实例化、定位、配置应用程序中的对象及建立这些对象间的依赖。在Java中
我们平时创建一个对象的做法就是去new它,但是IOC(控制反转)的思想就是不由程序员手动去做这个事,而是让程序自己去做这个事,在spring中实现IOC思想的就是Spring容器,
将创建对象的工作都交由Spring容器来做。
DI(依赖注入Dependency injection) :在容器创建对象后,处理对象的依赖关系。自动将配置好的内容填充到对象里。
依赖注入有以下几种方式:
1.set注入
创建一个Friend类
 1 public class Friend {
 2
 3     private String name;
 4     private int age;
 5     private String address;
 6
 7     /*
 8        get和set方法
 9     */
10 }
修改之前的User类
 1 public class User {
 2
 3     private String name;
 4     private int age;
 5     private Friend friend;
 6
 7     /*
 8         set和get方法
 9
10     */
11
12     /*
13        重写toString()方法
14     */
15 }
在Spring.xml文件中配置
 1  <bean id="friend" class="test.entity.Friend">
 2         <property name="name" value="张三"/>
 3         <property name="age" value="13"/>
 4         <property name="address" value="X街道X楼"/>
 5     </bean>
 6
 7     <bean id="entity" class="test.entity.User">
 8         <property name="name" value="测试"/>
 9         <property name="age" value="11"/>
10         <property name="friend" ref="friend"/>
11     </bean>
测试Spring是否能够成功创建User对象
1 ApplicationContext ac = new FileSystemXmlApplicationContext("classpath:spring.xml");
2 User user = (User) ac.getBean("entity");
3 System.out.println(user.toString());
输出结果:
![]()
2.构造器注入
分别给User类和Friend类设置有参构造方法
1 public User(String name, int age, Friend friend) {
2         this.name = name;
3         this.age = age;
4         this.friend = friend;
5     }
1 public Friend(String name, int age, String address) {
2         this.name = name;
3         this.age = age;
4         this.address = address;
5     }
Spring.xml配置
 1 <!--构造器注入-->
 2     <bean id="friend" class="test.entity.Friend">
 3         <constructor-arg name="age" value="11"/>
 4         <constructor-arg name="name" value="李四"/>
 5         <constructor-arg name="address" value="XX街道XX号楼"/>
 6     </bean>
 7
 8     <bean id="entity" class="test.entity.User">
 9         <constructor-arg name="name" value="person"/>
10         <constructor-arg name="age" value="12"/>
11         <constructor-arg name="friend" ref="friend"/>
12     </bean>
构造器注入和类的构造方法相互对应,如果在xml文件中配置的参数个数和构造方法里的对应不上就会报错,实现原理就是通过参数来找到对应类
的构造方法并且创建出对象
测试输出结果:
![]()
3.基于注解
在User类和Friend类上加上@Component注解,表示把这两个类注入Spring容器,作为Spring的组件,去掉get和set方法
 1 @Component
 2 public class User {
 3
 4     private String name;
 5     private int age;
 6
 7     @Autowired//自动注入
 8     private Friend friend;
 9
10     public User(String name, int age, Friend friend) {
11         this.name = name;
12         this.age = age;
13         this.friend = friend;
14     }
15
16     public User(){
17
18     }
19
20
21     @Override
22     public String toString() {
23         return "User{" +
24                 "name='" + name + '\'' +
25                 ", age=" + age +
26                 ", friend=" + friend +
27                 '}';
28     }
29 }
 1 @Component
 2 public class Friend {
 3
 4     private String name;
 5     private int age;
 6     private String address;
 7
 8     public Friend() {
 9     }
10
11     public Friend(String name, int age, String address) {
12         this.name = name;
13         this.age = age;
14         this.address = address;
15     }
16
17
18
19     @Override
20     public String toString() {
21         return "Friend{" +
22                 "name='" + name + '\'' +
23                 ", age=" + age +
24                 ", address='" + address + '\'' +
25                 '}';
26     }
27 }
spring.xml配置
1 <bean id="user" class="test.entity.User"/>
2 <bean id="friend" class="test.entity.Friend"/>
在User类中使用@Autowired自动注入friend对象
1 ApplicationContext ac = new ClassPathXmlApplicationContext("classpath:spring.xml");
2 User user = (User) ac.getBean("user");
3 System.out.println(user.toString());
测试结果
![]()
成功获取user对象,friend对象也成功注入
4.在@configuration注解的配置类中注入
创建一个@configuration注解的类
 1 @Configuration
 2 public class Beans {
 3
 4     @Bean
 5     public Friend friend(){
 6         return new Friend("张三", 12, "中央大街");
 7     }
 8
 9     @Bean
10     public User user(Friend friend){
11         return new User();
12     }
13 }
获取User类对象
1 ApplicationContext ac = new ClassPathXmlApplicationContext("classpath:spring.xml");
2 User user = (User) ac.getBean(User.class);
3 System.out.println(user.toString());
运行结果
![]()
成功获取user对象 ,并且Friend类成功注入到User类中
Spring注入相关的注解
@Component         把对象加入ioc容器,对象引用名称是类名,第一个字母小写
@Component(“name”) 把指定名称的对象,加入ioc容器
@Repository        主要用于标识加入容器的对象是一个持久层的组件(类)
@Service           主要用于标识加入容器的对象是一个业务逻辑层的组件
@Controller        主要用于标识加入容器的对象是一个控制层的组件
@Resource          注入属性(DI), 会从容器中找对象注入到@Resource修饰的对象上
@Autowired         注入属性(DI), 会从容器中找对象注入到@Autowired修饰的对象上
5.实现对接口的注入
创建一个接口,接口里的area方法计算各种图形的面积
public interface Shape {
    double area();
}
创建circle类和rectangle类实现shape接口的方法
circle类
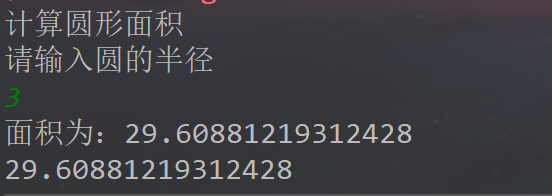
public class Circle implements Shape {

    private final static double pai = 3.1415926;

    public double area() {
        System.out.println("计算圆形面积");
        Scanner sc = new Scanner(System.in);
        System.out.println("请输入圆的半径");
        double radio = sc.nextDouble();
        System.out.println("面积为:" + pai*pai*radio);
        return pai*pai*radio;
    }
}
rectangle类
public class Rectangle implements Shape {
    public double area() {
        System.out.println("计算矩形面积");
        Scanner sc = new Scanner(System.in);
        System.out.println("输入矩形的长度");
        double length = sc.nextDouble();
        System.out.println("输入矩形的宽度");
        double width = sc.nextDouble();
        System.out.println("面积为:" + length*width);
        return length*width;
    }
}
spring.xml文件的配置
 <bean id="circle" class="Pro456.bean.Circle"/>
 <bean id="rectangle" class="Pro456.bean.Rectangle"/>
创建shapeUtil类
public class ShapeUtil {

    public static void calculate(String shapeName){
        ApplicationContext ioc = new ClassPathXmlApplicationContext("spring.xml");
        Shape shape = (Shape) ioc.getBean(shapeName);
        System.out.println(shape.area());
    }
}
ClassPathXmlApplicationContext方法获取spring读取spring的配置文件,通过传入的表示图形类型的字符串来决定实现接口的实现类,
通过getBean获取指定类的对象赋值给接口,最后调用接口中实现的方法计算图形的面积。
测试类
public class Test {

    public static void main(String[] args) {
       ShapeUtil.calculate("circle");
    }
}
代码执行结果:
@Autowired和@resource的区别
一.
@Autowired是根据类型注入的
@Resource是先根据名字,再根据类型注入,@Resource后面可以指定bean的name注入,这样就只会通过名字来注入,如@Resource("test")只会查找id为test的bean注入
二.
@Autowired是Spring中的注解,而@Resource是jdk自带的,是属于j2ee的注解
五.什么是AOP?Spring中如何实现AOP?
AOP是面向切面编程,通俗来讲就是把每个业务中都需要写的同样的代码提取出来,写好后放入每个类的相应的切点,Spring容器会动态地在这些切点位置织入我们写好的代码。
这样做能够大大减少代码的冗余。
AOP涉及名称:
切面(Aspect):其实就是共有功能的实现。如日志切面、权限切面、事务切面等。在实际应用中通常是一个存放共有功能实现的普通Java类,之所以能被AOP容器识别成切面,是在配置中指定的。
通知(Advice):是切面的具体实现。以目标方法为参照点,根据放置的地方不同,可分为前置通知(Before)、后置通知(AfterReturning)、异常通知(AfterThrowing)、最终通知(After)与环绕通知(Around)5种。在实际应用中通常是切面类中的一个方法,具体属于哪类通知,同样是在配置中指定的。
连接点(Joinpoint):就是程序在运行过程中能够插入切面的地点。例如,方法调用、异常抛出或字段修改等,但Spring只支持方法级的连接点。
切入点(Pointcut):用于定义通知应该切入到哪些连接点上。不同的通知通常需要切入到不同的连接点上,这种精准的匹配是由切入点的正则表达式来定义的。
目标对象(Target):就是那些即将切入切面的对象,也就是那些被通知的对象。这些对象中已经只剩下干干净净的核心业务逻辑代码了,所有的共有功能代码等待AOP容器的切入。
代理对象(Proxy):将通知应用到目标对象之后被动态创建的对象。可以简单地理解为,代理对象的功能等于目标对象的核心业务逻辑功能加上共有功能。代理对象对于使用者而言是透明的,是程序运行过程中的产物。
织入(Weaving):将切面应用到目标对象从而创建一个新的代理对象的过程。这个过程可以发生在编译期、类装载期及运行期,当然不同的发生点有着不同的前提条件。譬如发生在编译期的话,就要求有一个支持这种AOP实现的特殊编译器;发生在类装载期,就要求有一个支持AOP实现的特殊类装载器;只有发生在运行期,则可直接通过Java语言的反射机制与动态代理机制来动态实现。
在Spring中实现AOP
首先创建一个切面类
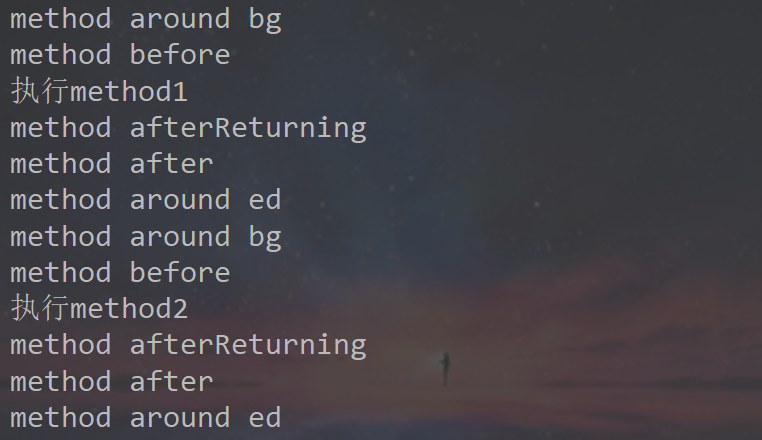
 1 @Aspect //设置为切面类
 2 @Component //注入spring
 3 public class LogAspect {
 4
 5     //以字符串形式表示执行目标条件,得使用final来修饰
 6     //切点表达式
 7     private final String Exec = "execution(* aop.test.service..*.*(..))";
 8
 9     @Pointcut(Exec)
10     public void pointMethode(){}//设置切入点
11
12     //执行顺序:环绕通知(前),前置通知,环绕通知(后),后置通知,返回后通知
13
14     @Before("pointMethode()")// 方法执行前执行
15     public void before(){
16         System.out.println("method before");
17     }
18
19     @After("pointMethode()")// 方法执行后执行
20     public void after(){
21         System.out.println("method after");
22     }
23
24     @AfterReturning("pointMethode()")// 方法返回后执行
25     public void afterReturning(){
26         System.out.println("method afterReturning");
27     }
28
29     @AfterThrowing("pointMethode()")// 方法抛异常后执行
30     public void afterThrowing(){
31         System.out.println("method afterThrowing");
32     }
33
34     @Around("pointMethode()")// 环绕通知
35    public void around(ProceedingJoinPoint pr){
36     System.out.println("method around bg");
37     try { pr.proceed();// 执行目标方法
38     MethodSignature signature = (MethodSignature) pr.getSignature();//获取切点对象
39     Method method = signature.getMethod();//获取方法
40     } catch (Throwable e) {
41         e.printStackTrace();
42     }
43     System.out.println("method around ed"); }
44 }
execution(* aop.test.service..*.*(..)) ,pointMethode中的三个"*"中,第一个*代表返回值,第二*代表service下子包,第三个*代表方法名,“(..)”代表方法参数。
现在的切入点为service类中的所有方法
创建一个service类,并且注入Spring容器
@Service(value = "aopService")
public class AopTestService {

    @LogAspect("show")
    public void method1(){
        System.out.println("执行method1");
    }

    public void method2(){
        System.out.println("执行method2");
    }

}
创建测试方法,执行service类中的切点方法
@RunWith(SpringJUnit4ClassRunner.class)
@ContextConfiguration("classpath:spring.xml")
public class Test {

    @Resource(name = "aopService")
    private AopTestService aopTestService;

    @org.junit.Test
    public void fun(){
        aopTestService.method1();
        aopTestService.method2();
    }
}
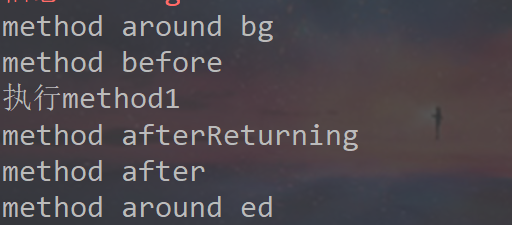
运行结果
通过自定义注解实现AOP
自定义注解类
@Retention(RetentionPolicy.RUNTIME)
@Target(ElementType.METHOD)
public @interface LogAspect {
    String value() default "";
}
在service类的切点方法上添加注解
@LogAspect("show")
    public void method1(){
        System.out.println("执行method1");
    }
修改切面类
    @Before("@annotation(aop.test.annoation.LogAspect)")// 方法执行前执行
    public void before(){
        System.out.println("method before");
    }

    @After("@annotation(aop.test.annoation.LogAspect)")// 方法执行后执行
    public void after(){
        System.out.println("method after");
    }

    @AfterReturning("@annotation(aop.test.annoation.LogAspect)")// 方法返回后执行
    public void afterReturning(){
        System.out.println("method afterReturning");
    }

    @AfterThrowing("@annotation(aop.test.annoation.LogAspect)")// 方法抛异常后执行
    public void afterThrowing(){
        System.out.println("method afterThrowing");
    }

    @Around("@annotation(aop.test.annoation.LogAspect)")// 环绕通知
    public void around(ProceedingJoinPoint pr){
        System.out.println("method around bg");
        try {
            pr.proceed();// 执行目标方法
            MethodSignature signature = (MethodSignature) pr.getSignature();//获取切点对象
            Method method = signature.getMethod();//获取方法
        } catch (Throwable e) {
            e.printStackTrace();
        }
        System.out.println("method around ed");
    }
在测试方法中执行method1

 浙公网安备 33010602011771号