python基础环境
镜像源
- 清华源:https://pypi.tuna.tsinghua.edu.cn/simple
- 豆瓣源:https://pypi.doubanio.com/simple
- 阿里云:http://mirrors.aliyun.com/pypi/simple/
- 中国科技大学 https://pypi.mirrors.ustc.edu.cn/simple/
一、conda命令
参考[1]中写的非常清晰,也有很多命令:
- 一、conda命令
- 二、conda info
- 三、conda create
- 四、conda install
- 五、conda remove
- 六、conda list
- 七、conda search
- 八、conda update
- 九、conda config
# 会发现conda下载的速度经常很慢,因为Anaconda.org的服务器在国外。
# 添加Anaconda的TUNA镜像 , TUNA的help中镜像地址加有引号,需要去掉
conda config --add channels https://mirrors.tuna.tsinghua.edu.cn/anaconda/pkgs/free/
# 移除通道
conda config --remove channels https://mirrors.aliyun.com/anaconda/pkgs/main/
# 设置搜索时显示通道地址
conda config --set show_channel_urls yes
# 显示所有的通道信息
conda config --show channels
# 查看目前的环境
conda env list # 等价于 conda info -e
# 新建一个Anaconda环境,安装python的过程中就会在环境中安装pip等,在做这个操作之前,需要先设置
conda create -n mypy39 python=3.9  # 统一虚拟环境名称为env_xxx开头
# 激活环境
conda activate mypy39
# 退出当前环境
conda deactivate
# 移除环境
conda remove -n mypy39 --all
# 很多依赖库,一般都会安装
conda install numpy pandas flask

# 安装tensorflow-gpu,conda会自动帮我们安装cudatoolkit和cuDNN工具依赖
conda install tensorflow-gpu=2.6.0
二、pip命令
# 查看帮助
pip --help
# 全局设置
pip config set global.index-url https://pypi.tuna.tsinghua.edu.cn/simple
pip config set global.index-url http://mirrors.aliyun.com/pypi/simple/
# 导出依赖库
pip freeze > requirements.txt
# 根据文件安装库
pip install -r requirements.txt
# 指定python环境下安装某包,eg,安装urllib3:
python3.8 -m pip install urllib3
# 指定python环境下安装指定版本号的包,eg.python3.8下安装urllib3:
python3.8 -m pip install urllib3==1.25.9
# 查看现有的库
pip list
# 安装,如果出现不信任的域名,可以在后面加上 --trusted-host 域名
pip install 包名
# 查看是否安装
pip show --file  包名
# 检查哪些包需要更新
pip list --outdated
# 升级包
pip install --upgrade 包名
# 卸载包
pip uninstall 包名

# 豆瓣源:https://pypi.doubanio.com/simple
# 清华源:https://pypi.tuna.tsinghua.edu.cn/simple
# 阿里云:http://mirrors.aliyun.com/pypi/simple/
# 中国科技大学 https://pypi.mirrors.ustc.edu.cn/simple/
# 示例:对opencv进行指定版本升级,当不知道有哪些版本可以选择的时候,
# 随便写一个错误版本号,会提示你有哪些版本可以供选择
pip install --upgrade opencv-contrib-python==4.6.0.66 -i https://pypi.tuna.tsinghua.edu.cn/simple
pip install tensorflow-gpu==2.6.0 -i https://pypi.tuna.tsinghua.edu.cn/simple
pip install cudatoolkit -i https://pypi.tuna.tsinghua.edu.cn/simple
pip install cudnn -i https://pypi.tuna.tsinghua.edu.cn/simple
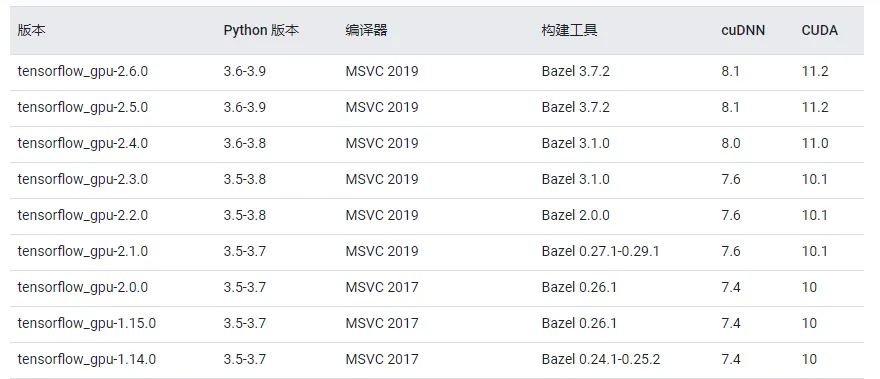
# 版本对应关系https://www.tensorflow.org/install/source_windows?hl=zh-cn
# tensorflow-gpu -> cuDNN -> cudatoolkit -> nvidia
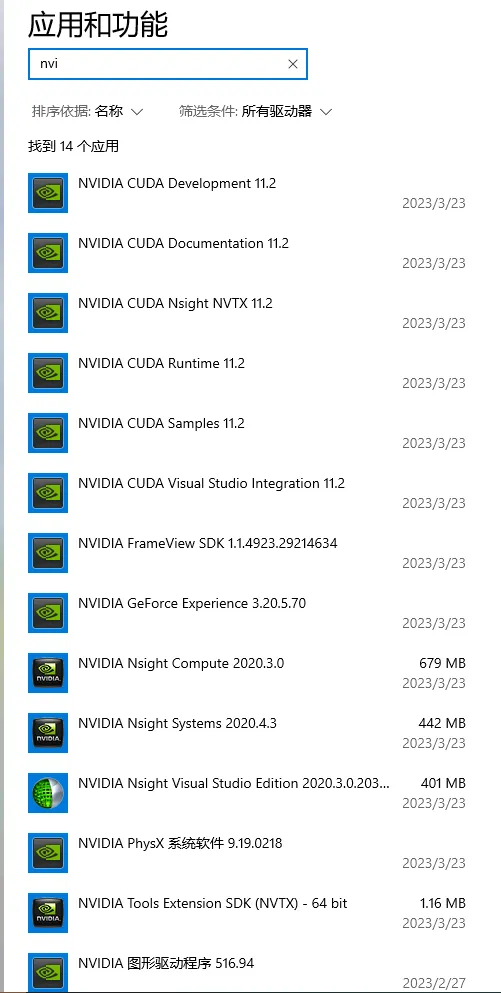
# 查看nvidia驱动信息 nvidia-smi
# cuda官网地址:https://developer.nvidia.com/cuda-toolkit-archive
在python项目中,可以创建虚拟环境,在根目录中创建requirements.txt,创建虚拟环境目录venv
三、centos安装anaconda
./Anaconda3-5.3.0-Linux-x86_64.sh: line 353: bunzip2: command not found
tar: This does not look like a tar archive
tar: Exiting with failure status due to previous errors
解决:安装提示 yum install -y bzip2
重新删除已安装目录,重新执行安装命令
具体安装过程,见【参考[5]】
在安装之后,虚拟环境目录在/root/anaconda3/envs/mypy39中
四、tensorflow-gpu环境安装


可能会报错
If this call came from a _pb2.py file, your generated code is out of date and must be regenerated with protoc >= 3.19.0.
pip install protobuf==3.19.0 -i https://pypi.doubanio.com/simple
安装特别注意事项:
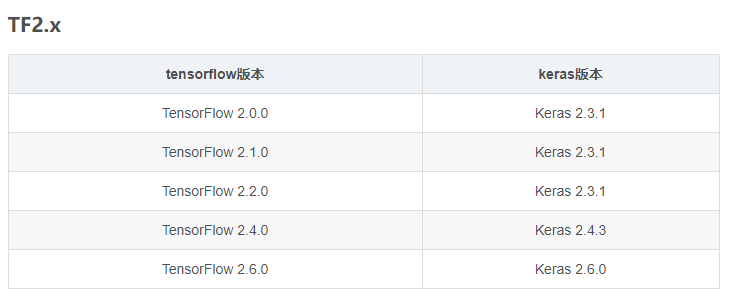
cudnn,cudatoolkit,keras,tensorflow-gpu,tensorflow-estimator的版本

五、Python虚拟环境
# 我的python是版本3.12.x
# 切换到项目根目录下
cd D:\data\git-repository\python-script
# 创建虚拟环境(后面的这个目录名字是可以改的,但是就建议使用venv名字)
python -m venv venv
# 可以指定虚拟环境python版本
python -m venv --python=C:/Python38/python.exe myenv
# 激活虚拟环境(windows),如果是linux: $ source ./venv/bin/activate
.\venv\Scripts\activate
# 这时候就已经进入到了虚拟环境中
# 查看当前虚拟环境中的依赖
pip list
# 根据requirements.txt安装依赖
pip install -r requirements.txt
# 这里运行项目内的代码
python xxxx.py
# 推出虚拟环境
deactivate
十、参考
[1] conda常用命令汇总
[2] Anaconda怎样配置新的环境,并且在Pycharm中使用
[3] 如何切换不同的python环境
[4] anaconda中移除旧环境、增加新环境、查看环境、安装库、清理缓存等操作命令
[5] 如何在Linux服务器上安装Anaconda(超详细) https://blog.csdn.net/wyf2017/article/details/118676765
[6] Tensorflow-gpu安装教程(详细)!!!https://blog.csdn.net/m0_68233404/article/details/128525860
[7] python下载 https://www.python.org/downloads/windows/


【推荐】国内首个AI IDE,深度理解中文开发场景,立即下载体验Trae
【推荐】编程新体验,更懂你的AI,立即体验豆包MarsCode编程助手
【推荐】抖音旗下AI助手豆包,你的智能百科全书,全免费不限次数
【推荐】轻量又高性能的 SSH 工具 IShell:AI 加持,快人一步
· 分享4款.NET开源、免费、实用的商城系统
· 全程不用写代码,我用AI程序员写了一个飞机大战
· MongoDB 8.0这个新功能碉堡了,比商业数据库还牛
· 记一次.NET内存居高不下排查解决与启示
· 白话解读 Dapr 1.15:你的「微服务管家」又秀新绝活了