


适配iOS10的哪些事 ---- 学习笔记八
一. 上传了一个版本,为什么没有构建版本?
解:info.plist中的Bundle version 与上一个版本一致或少于上一个版本,上线新版本时,Bundle version和Bundle ....,short都需要修改。

二. 在适配iOS10时,你上传了一个版本,上传成功后提示你些构建版本无效。

解:在iOS10时,苹果更注重用户的隐私,需要在Info.plist增加一些隐私项,如下 ,只要key加对了就可以,后面的值可以自定义
    <key>NSPhotoLibraryUsageDescription</key>
    <string>App需要您的同意,才能访问相册</string>
    <key>NSCameraUsageDescription</key>
    <string>App需要您的同意,才能访问相机</string>
    <key>NSMicrophoneUsageDescription</key>
    <string>App需要您的同意,才能访问麦克风</string>

    <key>NSLocationUsageDescription</key>
    <string>App需要您的同意,才能访问位置</string>

    <key>NSLocationWhenInUseUsageDescription</key>
    <string>App需要您的同意,才能在使用期间访问位置</string>

    <key>NSLocationAlwaysUsageDescription</key>
    <string>App需要您的同意,才能始终访问位置</string>

    <key>NSCalendarsUsageDescription</key>
    <string>App需要您的同意,才能访问日历</string>

    <key>NSRemindersUsageDescription</key>
    <string>App需要您的同意,才能访问提醒事项</string>

    <key>NSMotionUsageDescription</key>
    <string>App需要您的同意,才能访问运动与健身</string>

    <key>NSHealthUpdateUsageDescription</key>
    <string>App需要您的同意,才能访问健康更新 </string>

    <key>NSHealthShareUsageDescription</key>
    <string>App需要您的同意,才能访问健康分享</string>

    <key>NSBluetoothPeripheralUsageDescription</key>
    <string>App需要您的同意,才能访问蓝牙</string>

    <key>NSAppleMusicUsageDescription</key>
    <string>App需要您的同意,才能访问媒体资料库</string>
三.上传ipa文件遇到的错误,返回90167
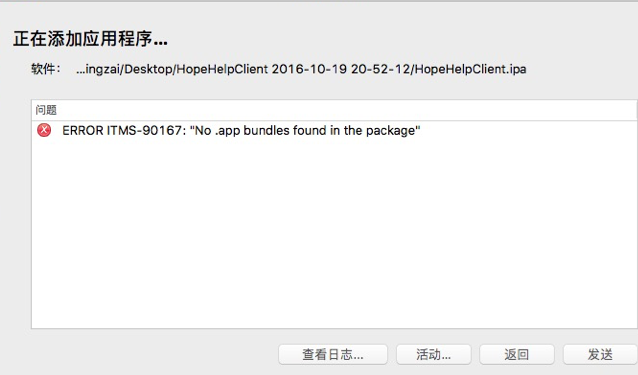
解:上架打包时必须用Xcode8,上传是用Xcode8自带的Application loader,打开Xcode8,选择左上角Xcode->Open Deleloper Tool ->Application Loader上传ipa包。

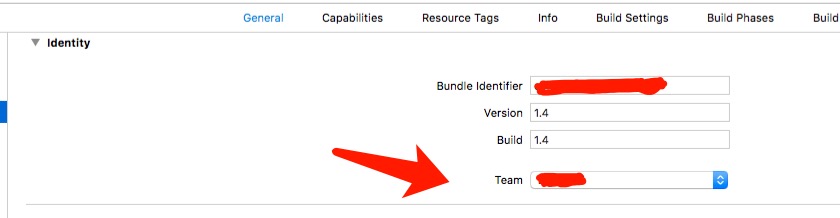
四. 证书的问题,iOS10,苹果会帮助我们自动管理证书。
解:需要在dream中增加上appstore的账号,且这个账号里包含这个app的bunder id 和配置文件。
五. Xib文件的注意事项,用Xcode8打开xib后,Xcode8以下的版本将不能打开工程。
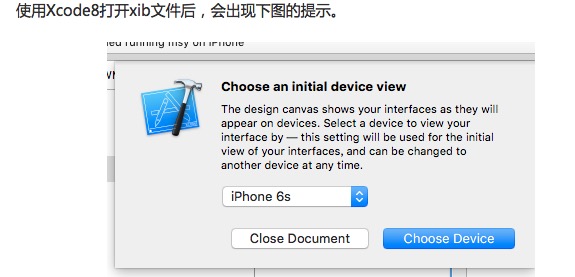
选择了后,在Xcode7.3.1及之下的版本打开后会显示,

需要做的是删除xib中的
<code>
  <capability name="documents saved in the Xcode 8 format" mintoolsversion="8.0"/>
</code>
六.推送,iOS10对推送做了很大的处理,iOS10如果接收不到推送用下面的方法。

iOS10收到通知不再是在
[application: didReceiveRemoteNotification:]方法去处理, iOS10推出新的代理方法,接收和处理各类通知(本地或者远程)
- (void)userNotificationCenter:(UNUserNotificationCenter *)center willPresentNotification:(UNNotification *)notification withCompletionHandler:(void (^)(UNNotificationPresentationOptions))completionHandler {
     //应用在前台收到通知
      NSLog(@"========%@", notification);
}
- (void)userNotificationCenter:(UNUserNotificationCenter *)center didReceiveNotificationResponse:(UNNotificationResponse *)response withCompletionHandler:(void (^)())completionHandler {
    //点击通知进入应用
    NSLog(@"response:%@", response);
}
七. 屏蔽杂乱无章的bug.
更新Xcode8之后,新建立工程,都会打印一堆莫名其妙看不懂的Log.
如这些,
subsystem: com.apple.UIKit, category: HIDEventFiltered, enable_level: 0, persist_level: 0, default_ttl: 0, info_ttl: 0, debug_ttl: 0, generate_symptoms: 0, enable_oversize: 1,
屏蔽的方法如下:
Xcode8里边 Edit Scheme-> Run -> Arguments, 在Environment Variables里边添加
OS_ACTIVITY_MODE = Disable
如果写了之后还是打印log,请重新勾选对勾,就可以解决了
最后,本文参考的文章:
http://ios.jobbole.com/88982/


【推荐】国内首个AI IDE,深度理解中文开发场景,立即下载体验Trae
【推荐】编程新体验,更懂你的AI,立即体验豆包MarsCode编程助手
【推荐】抖音旗下AI助手豆包,你的智能百科全书,全免费不限次数
【推荐】轻量又高性能的 SSH 工具 IShell:AI 加持,快人一步
· AI与.NET技术实操系列:基于图像分类模型对图像进行分类
· go语言实现终端里的倒计时
· 如何编写易于单元测试的代码
· 10年+ .NET Coder 心语,封装的思维:从隐藏、稳定开始理解其本质意义
· .NET Core 中如何实现缓存的预热?
· 分享一个免费、快速、无限量使用的满血 DeepSeek R1 模型,支持深度思考和联网搜索!
· 基于 Docker 搭建 FRP 内网穿透开源项目(很简单哒)
· 25岁的心里话
· ollama系列01:轻松3步本地部署deepseek,普通电脑可用
· 按钮权限的设计及实现