T5-tensorboard 可视化之图层
Tensorboard 可视化之图层
Tensorflow 自带的 tensorboard 可以构建我们的神经网络图层, 让我们看看自己的神经网络长什么样.
开始构建图层结构啦
我们要用到前面用到的代码来构建神经网络图像
首先是数据的输入 input :
# 我们先给输入和输出的占位符指定名称
# 指定的名称会在可视化的图层 input 中显示
xs = tf.placeholder(tf.float32, [None, 1], name='x_in')
ys = tf.placeholder(tf.float32, [None, 1], name='y_in')
图层可以包含子图层, 所以, 我们要用到 with tf.name_scope('inputs') 将xs和ys包含起来, 作为输入层. (inputs 就是图层的名字, 可任意命名)
with tf.name_scope('inputs'):
	xs = tf.placeholder(tf.float32, [None, 1], name='x_in')
	ys = tf.placeholder(tf.float32, [None, 1], name='y_in')
接下来, 就是layer了, 我们前面用了add_layer函数来添加图层, 这里我可以直接在add_layer函数里面构建图层结构. ( 记得 name_scope 可以嵌套的哦
def add_layer(inputs, in_size, out_size, activation_function=None):
	# 每一个图层名为 `layer`
	with tf.name_scope('layer'):
		# 添加层里面的小部件也需要定义
		with tf.name_scope('weights'):
			Weights = tf.Variable(tf.random_normal([in_size, out_size]))
		with tf.name_scope('biases'):
			biases = tf.Variable(tf.zeros([1, out_size]) + 0.1)
		with tf.name_scope('wx_plus_b'):
			Wx_plus_b = tf.add(tf.matmul(inputs, Weights), biases)
		if activation_function is None:
			outputs = Wx_plus_b
		else:
			outputs = activation_function(Wx_plus_b, )
		return outputs
最后是loss和training部分了, 同样为他们各自取名
with tf.name_scope('loss'):
	loss = tf.reduce_mean(tf.reduce_sum(tf.square(ys-prediction),
							reduction_indices=[1]))
with tf.name_scope('train'):
	    train_setp = tf.train.GradientDescentOptimizer(0.1).minimize(loss)
绘制我们的神经网络图啦
绘制方法为tf.summary.FileWriter(dir, sess.graph), 第一个参数为图的储存路径, 第二个参数是将前面定义好的框架信息收集起来, 最后放到dir目录中, 因此需要先获得 Session
sess = tf.Session()
# 执行 python3 filename.py 之后会自动创建 graph 文件夹
# 并把生成的图层图像信息保存在 graph 下, 需要用浏览器观看
writer = tf.summary.FileWriter('graph/', sess.graph)
运行完整代码后「[完整代码] (#code)」, 会自动生成图片信息并保存到 graph 目录中, 然后什么在 graph 上一级目录执行下面这条命令, 它会输出一条地址, 我们在浏览器上打开http://127.0.1.6006:1
Ubuntu ~#  tensorboard --logdir='./graph/'
Starting TensorBoard b'41' on port 6006
(You can navigate to http://127.0.1.1:6006)
...
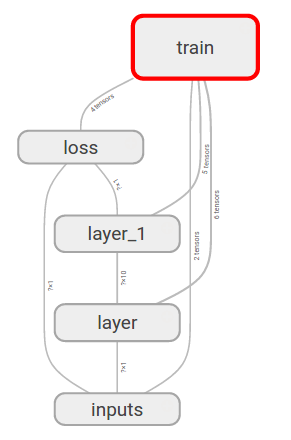
这个网页有多个选项卡, 因为我们只定义了sess.graph, 所以我们切换到GRAPH, 可以看到我们的神经网络的基本结构

我们再点开inputs图层看看, 里面有x_in和y_in两个输入, 这两个名字是我们取的, 其他的可以自己看看啦

完整代码
最后把输入输出图层也加上了名字, 看下完整代码
# !/usr/bin/env python3
# -*- coding: utf-8 -*-

import tensorflow as tf
import numpy as np
import matplotlib.pyplot as plt


# Define add layer function.
def add_layer(inputs, in_size, out_size, activation_function=None):
    # add one more layer and return the output of this layer
    with tf.name_scope('layer'):
        with tf.name_scope('weights'):
            Weights = tf.Variable(tf.random_normal([in_size, out_size]))
        with tf.name_scope('biases'):
            biases = tf.Variable(tf.zeros([1, out_size]) + 0.1)
        with tf.name_scope('wx_plus_b'):
            Wx_plus_b = tf.add(tf.matmul(inputs, Weights), biases)
        if activation_function is None:
            outputs = Wx_plus_b
        else:
            outputs = activation_function(Wx_plus_b, )
        return outputs

# Define palceholder for inputs to network.
# Use [with] including xs & ys:
with tf.name_scope('inputs'):
    xs = tf.placeholder(tf.float32, [None, 1], name='x_in') # Add name
    ys = tf.placeholder(tf.float32, [None, 1], name='y_in')


# Add hidden layer
with tf.name_scope('hidden_layer'):
    l1 = add_layer(xs, 1, 10, activation_function=tf.nn.relu)
# Add output layer
with tf.name_scope('output_layer'):
    prediction = add_layer(l1, 10, 1, activation_function=None)

# The error between prediction and real data
with tf.name_scope('loss'):
    loss = tf.reduce_mean(tf.reduce_sum(tf.square(ys-prediction),
        reduction_indices=[1]))

with tf.name_scope('train'):
    train_setp = tf.train.GradientDescentOptimizer(0.1).minimize(loss)

sess = tf.Session()
# ** Add frame to file
writer = tf.summary.FileWriter('./graph/', sess.graph)

# Important step
sess.run(tf.initialize_all_variables())
最后效果:


 浙公网安备 33010602011771号