使用kubeadm在Ubuntu20.04环境下搭建k8s集群
说明:
写在开始,本文使用使用kubeadm工具在Ubuntu20.04 上面安装 K8s集群。 备注:1、在安装k8s集群过程中,如果机器上已有docker 建议进行卸载,否则会因为版本不匹配,导致安装k8s失败。 2、修改对应的安装机器的源,最好为国内的源,否则可能导致源的访问比较慢,安装过程比较漫长。
安装开始
1、环境列表说明
宿主机为:windows 11+ VMware workstations 虚拟机信息1:k8s-mast
- OS:Ubuntu 20.04.3 LTS
- 角色:master
- IP:192.168.118.131 虚拟机信息2:k8s-node1
- OS:Ubuntu 20.04.3 LTS
- 角色:node
- IP:192.168.118.132
2、安装部署过程
2.1 安装过程
2.1.1 关闭swap分区
执行:sudo swapoff -a 验证:free -m

2.1.2 确保时区、时间正确
执行:sudo timedatectl
2.1.3 确保虚机不会自动suspend
执行:sudo systemctl mask sleep.target suspend.target hibernate.target hybrid-sleep.target
2.1.4 加载内核模块br_netfilter,并调整参数
执行:sudo modprobe br_netfilter 确认已加载:lsmod | grep br_netfilter 调整内核参数,创建k8s.conf,如下: cat <<EOF | sudo tee /etc/sysctl.d/k8s.conf net.bridge.bridge-nf-call-ip6tables = 1 net.bridge.bridge-nf-call-iptables = 1 EOF 使配置生效,执行:sudo sysctl --system
2.1.5 设置rp_filter的值
执行:sudo vi /etc/sysctl.d/10-network-security.conf 将文件中如下两个参数的值从2修改为1 net.ipv4.conf.default.rp_filter=1 net.ipv4.conf.all.rp_filter=1使配置生效,执行:sudo sysctl --system

2.2 部署核心组件
2.2.1 安装docker
2.2.1.1 安装docker
安装docker,执行:sudo apt update && sudo apt install -y docker.io 查看状态,执行:sudo systemctl status docker
2.2.1.2 调整cgroups的驱动
安装后默认cgroups驱动使用cgroupfs ,需要调整为systemd,因此,编辑docker配置文件,执行:sudo vi /etc/docker/daemon.json 添加如下内容: { “exec-opts”: [“native.cgroupdriver=systemd”] } 重启docker,执行: sudo systemctl daemon-reload && sudo systemctl restart docker 检查当前cgroups驱动,执行: sudo docker info | grep -i cgroup 如图:

此处的 WARNING: No swap limit support 并不影响后续使用,因此不用关注。 PS:此处特别重要,否则后续在启动 kubelet 会报错。
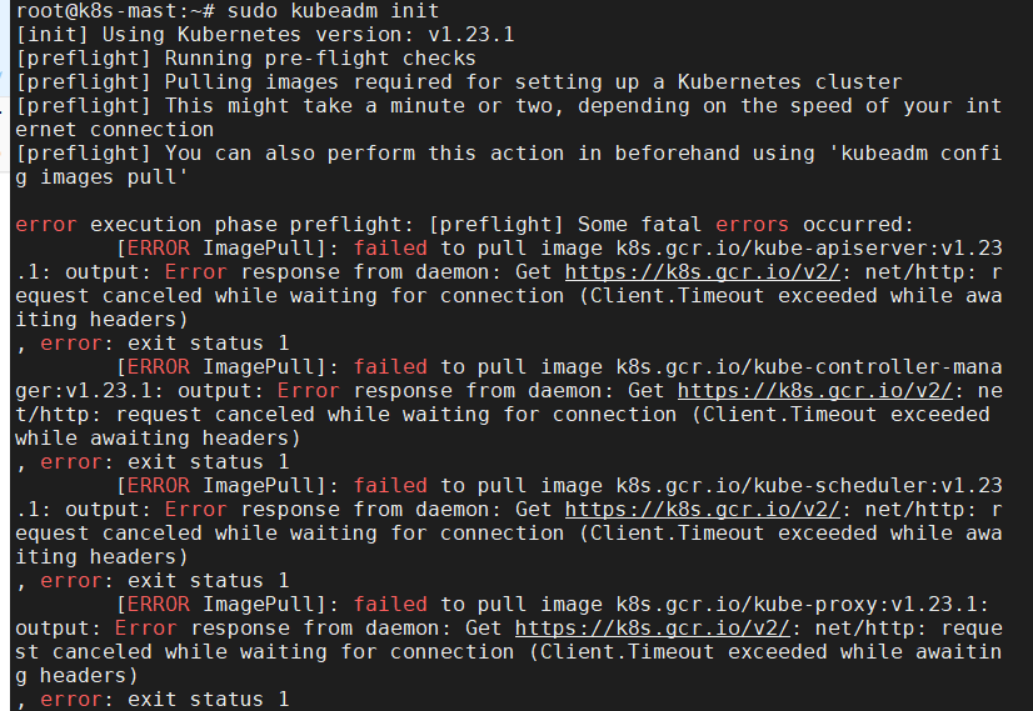
在执行 sudo kubeadm init 会提示:error execution phase preflight: [preflight] Some fatal errors occurred: [ERROR ImagePull]: failed to pull image k8s.gcr.io/kube-apiserver:v1.23 .1: output: Error response from daemon: Get https://k8s.gcr.io/v2/: net/http: r equest canceled while waiting for connection (Client.Timeout exceeded while awa iting headers) , error: exit status 1
2.2.2 安装k8s组件
2.2.2.1 安装k8s组件前的准备
执行: sudo apt-get update && sudo apt-get install -y ca-certificates curl software-properties-common apt-transport-https
2.2.2.2 添加k8s源
添加k8s源,执行:
curl -s https://mirrors.aliyun.com/kubernetes/apt/doc/apt-key.gpg | sudo apt-key add -
sudo tee /etc/apt/sources.list.d/kubernetes.list <<EOF
deb https://mirrors.aliyun.com/kubernetes/apt/ kubernetes-xenial main
EOFbash
2.2.2.3 安装k8s组件
执行: sudo apt-get update && sudo apt-get install -y kubelet kubeadm kubectl && sudo apt-mark hold kubelet kubeadm kubectl
2.3 初始化master节点
2.3.1 初始化master节点
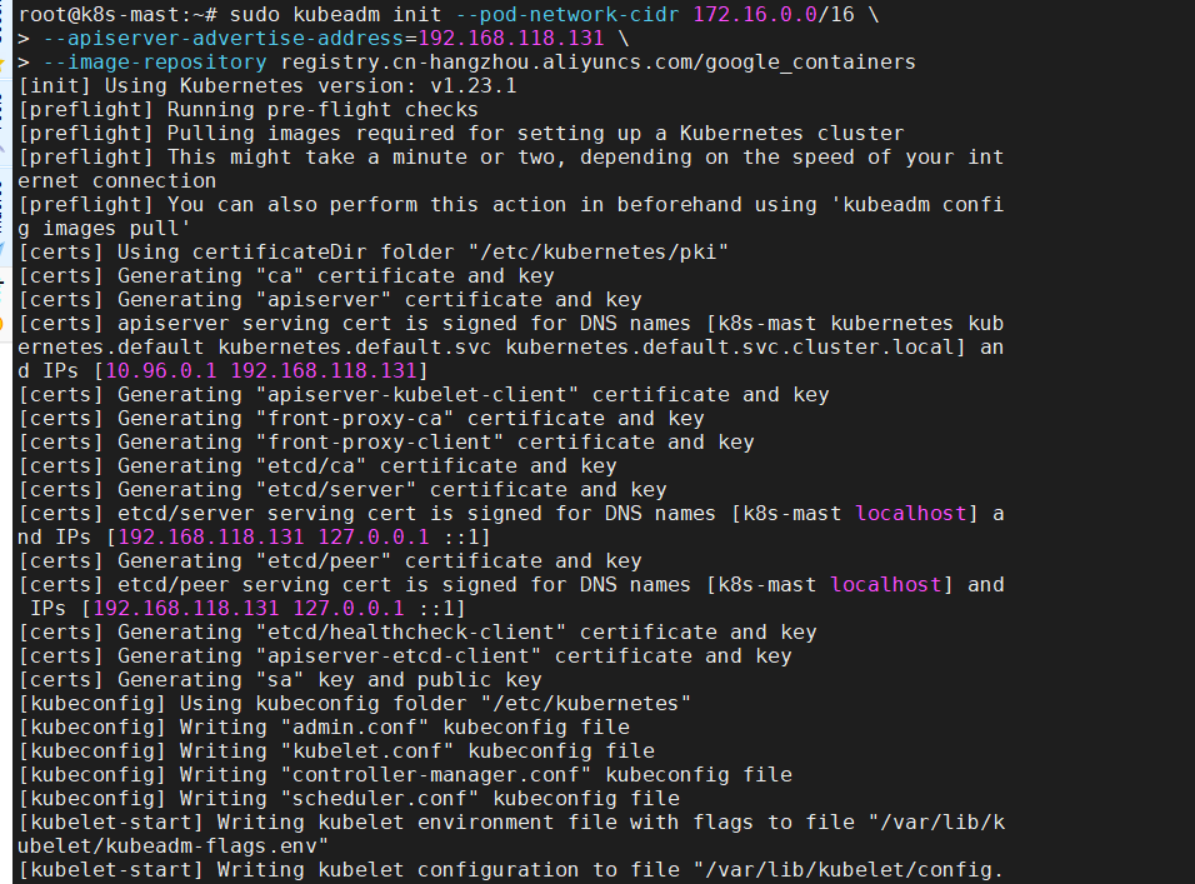
执行: sudo kubeadm init --pod-network-cidr 172.16.0.0/16
–apiserver-advertise-address=192.168.168.131
–image-repository registry.cn-hangzhou.aliyuncs.com/google_containers 说明: 这个命令的NB之处在于,指定了aliyun的registry服务,一下子让整个世界都顺滑了……(这里我是认真的,当你体验过一周甚至更长时间的、生不如死的、如便秘晚期一般的顿挫感后,你对Gemfield、阿里、顺滑、甚至整个世界都会怀有一颗感恩的心……) 使用了非默认的CIDR,一定要和宿主机的局域网的CIDR不一样!(Gemfield如是说,我也不是十分理解,但我确保172.16.0.0/16这个网段在我环境里的唯一性) 如果你的虚机是双网卡(一般都是这样的,一块NAT,一块Host-Only),一定要指定–apiserver-advertise-address地址为Host-Only网卡地址(virtualbox虚机通常是192.168.xxx.xxx),否则后面join的时候就白瞎了。 这个init的过程很慢,因为要拉取7个镜像,且在拉取的过程中控制台没有任何输出,容易造成程序已僵死的错觉,如图:
执行init成功后,记录下以“kubeadm join”开头的最后两行,如图:

Then you can join any number of worker nodes by running the following on each as root:
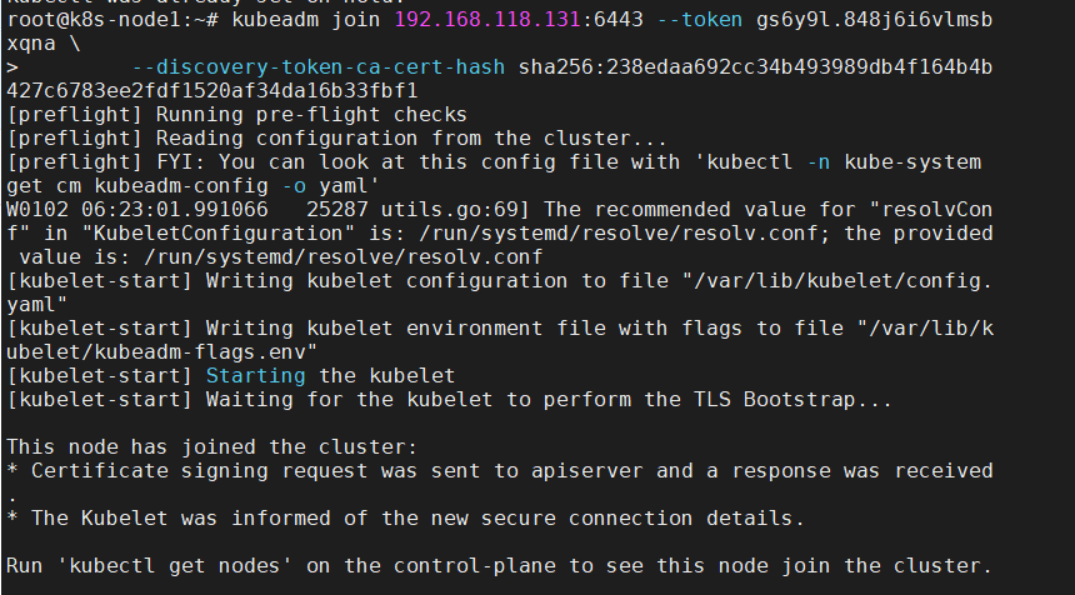
kubeadm join 192.168.118.131:6443 --token gs6y9l.848j6i6vlmsbxqna
–discovery-token-ca-cert-hash sha256:238edaa692cc34b493989db4f164b4b427c6783ee2fdf1520af34da16b33fbf1 上述的内容需要记住,后续通过上述的命令进行添加work节点 ** PS:如果您初始化失败,需要重新执行一次初始化动作的话,请在上述命令“sudo kubeadm init …”中增加一个参数:–ignore-preflight-errors=all**
2.3.2 初始化后置动作
依次执行:
mkdir -p $HOME/.kube sudo cp -i /etc/kubernetes/admin.conf $HOME/.kube/config sudo chown $(id -u):$(id -g) $HOME/.kube/config
2.3.3 启用Flannel网络方案
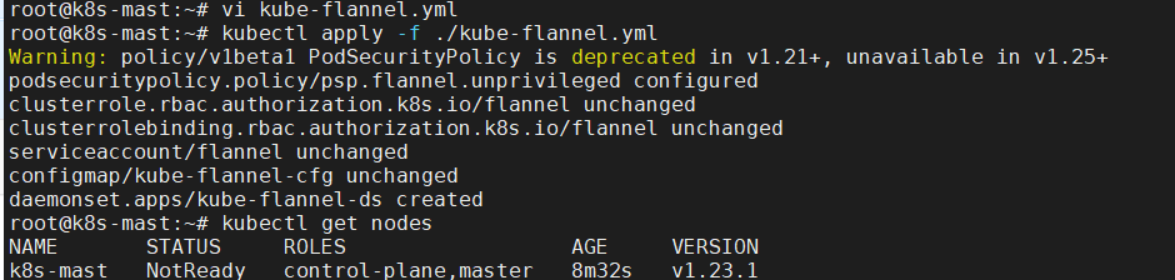
在执行Flannel网络前,此时执行kubectl get nodes 和 kubectl get pods --all-namespaces会看到一些not ready的情况,如图:

接下来启用Flannel网络方案。 下载Flannel的yml文件,执行: wget https://raw.githubusercontent.com/coreos/flannel/master/Documentation/kube-flannel.yml
修改yml文件,执行: vi kube-flannel.yml,找到行“–kube-subnet-mgr”,在其下增加如下一行: “- --iface=enp0s8”(用你的实际网卡名替换enp0s8),如图:
---apiVersion: policy/v1beta1kind: PodSecurityPolicymetadata:
name: psp.flannel.unprivileged
annotations:
seccomp.security.alpha.kubernetes.io/allowedProfileNames: docker/default
seccomp.security.alpha.kubernetes.io/defaultProfileName: docker/default
apparmor.security.beta.kubernetes.io/allowedProfileNames: runtime/default
apparmor.security.beta.kubernetes.io/defaultProfileName: runtime/defaultspec:
privileged: false
volumes:
- configMap
- secret
- emptyDir
- hostPath
allowedHostPaths:
- pathPrefix: "/etc/cni/net.d"
- pathPrefix: "/etc/kube-flannel"
- pathPrefix: "/run/flannel"
readOnlyRootFilesystem: false
# Users and groups
runAsUser:
rule: RunAsAny
supplementalGroups:
rule: RunAsAny
fsGroup:
rule: RunAsAny
# Privilege Escalation
allowPrivilegeEscalation: false
defaultAllowPrivilegeEscalation: false
# Capabilities
allowedCapabilities: ['NET_ADMIN', 'NET_RAW']
defaultAddCapabilities: []
requiredDropCapabilities: []
# Host namespaces
hostPID: false
hostIPC: false
hostNetwork: true
hostPorts:
- min: 0
max: 65535
# SELinux
seLinux:
# SELinux is unused in CaaSP
rule: 'RunAsAny'---kind: ClusterRoleapiVersion: rbac.authorization.k8s.io/v1metadata:
name: flannelrules:- apiGroups: ['extensions']
resources: ['podsecuritypolicies']
verbs: ['use']
resourceNames: ['psp.flannel.unprivileged']- apiGroups:
- ""
resources:
- pods
verbs:
- get- apiGroups:
- ""
resources:
- nodes
verbs:
- list
- watch- apiGroups:
- ""
resources:
- nodes/status
verbs:
- patch---kind: ClusterRoleBindingapiVersion: rbac.authorization.k8s.io/v1metadata:
name: flannelroleRef:
apiGroup: rbac.authorization.k8s.io
kind: ClusterRole
name: flannelsubjects:- kind: ServiceAccount
name: flannel
namespace: kube-system---apiVersion: v1kind: ServiceAccountmetadata:
name: flannel
namespace: kube-system---kind: ConfigMapapiVersion: v1metadata:
name: kube-flannel-cfg
namespace: kube-system
labels:
tier: node
app: flanneldata:
cni-conf.json: |
{
"name": "cbr0",
"cniVersion": "0.3.1",
"plugins": [
{
"type": "flannel",
"delegate": {
"hairpinMode": true,
"isDefaultGateway": true
}
},
{
"type": "portmap",
"capabilities": {
"portMappings": true
}
}
]
} net-conf.json: |
{
"Network": "10.244.0.0/16",
"Backend": {
"Type": "vxlan"
}
}---apiVersion: apps/v1kind: DaemonSetmetadata:
name: kube-flannel-ds
namespace: kube-system
labels:
tier: node
app: flannelspec:
selector:
matchLabels:
app: flannel
template:
metadata:
labels:
tier: node
app: flannel
spec:
affinity:
nodeAffinity:
requiredDuringSchedulingIgnoredDuringExecution:
nodeSelectorTerms:
- matchExpressions:
- key: kubernetes.io/os
operator: In
values:
- linux
hostNetwork: true
priorityClassName: system-node-critical
tolerations:
- operator: Exists
effect: NoSchedule
serviceAccountName: flannel
initContainers:
- name: install-cni-plugin
image: rancher/mirrored-flannelcni-flannel-cni-plugin:v1.0.0
command:
- cp
args:
- -f
- /flannel
- /opt/cni/bin/flannel
volumeMounts:
- name: cni-plugin
mountPath: /opt/cni/bin
- name: install-cni
image: quay.io/coreos/flannel:v0.15.1
command:
- cp
args:
- -f
- /etc/kube-flannel/cni-conf.json
- /etc/cni/net.d/10-flannel.conflist
volumeMounts:
- name: cni
mountPath: /etc/cni/net.d
- name: flannel-cfg
mountPath: /etc/kube-flannel/
containers:
- name: kube-flannel
image: quay.io/coreos/flannel:v0.15.1
command:
- /opt/bin/flanneld
args:
- --ip-masq
- --kube-subnet-mgr
- --inface=ens33
resources:
requests:
cpu: "100m"
memory: "50Mi"
limits:
cpu: "100m"
memory: "50Mi"
securityContext:
privileged: false
capabilities:
add: ["NET_ADMIN", "NET_RAW"]
env:
- name: POD_NAME
valueFrom:
fieldRef:
fieldPath: metadata.name
- name: POD_NAMESPACE
valueFrom:
fieldRef:
fieldPath: metadata.namespace
volumeMounts:
- name: run
mountPath: /run/flannel
- name: flannel-cfg
mountPath: /etc/kube-flannel/
volumes:
- name: run
hostPath:
path: /run/flannel
- name: cni-plugin
hostPath:
path: /opt/cni/bin
- name: cni
hostPath:
path: /etc/cni/net.d
- name: flannel-cfg
configMap:
name: kube-flannel-cfg
yml
启用Flannel网络,执行: kubectl apply -f ./kube-flannel.yml ,执行成功后,稍等3、5分钟,再次执行kubectl get nodes 和 kubectl get pods --all-namespaces,会看到状态正常了,如图:

至此,整个部署工作取得了阶段性胜利,您已经完成了master节点的部署工作,下面继续部署worker节点。 PS:上述2.2 开始的章节需要在各个work节点都要执行一遍,此处不在赘述。
2.4 加入worker节点
2.4.1 部署worker节点的前置动作
请在所有worker节点上执行2.1《部署准备工作》和2.2《部署核心组件》两个小节的步骤。
2.4.2 加入worker节点
在每个worker节点上,执行初始化master成功后,最后输出的命令,如图:
此时执行后发现,work节点并没有ready,work 节点提示 NotReady

2.4.3 调整worker节点配置
仍然是因为虚机双网卡的问题,需要调整worker节点的配置,执行: sudo vi /etc/systemd/system/kubelet.service.d/10-kubeadm.conf 添加如下一行: Environment=“KUBELET_EXTRA_ARGS=–node-ip=192.168.168.132” 注意,将“192.168.168.132”替换为你自己虚机的Host-Only网卡地址

重启kubelet,执行: sudo systemctl daemon-reload && sudo systemctl restart kubelet.service
2.4.4 检查worker节点状态
在join了worker节点后,大约2、3分钟后(也可能10来分钟),在master上执行:kubectl get nodes , 如图:

可以看到STATUS为Ready,但是ROLES为,为修改节点ROLES,在master上执行:kubectl label node k8s-006 node-role.kubernetes.io/worker=worker , 注意将k8s-006替换为你实际的节点名称,然后再次执行:kubectl get nodes , 一切正常,如图:

好了,重复3.4小节,添加更多worker节点吧~ 又至,在您添加了至少两个worker节点后,一个k8s集群就算真正搭建成功了。
以下是主要参考文章列表: https://segmentfault.com/a/1190000040780446

 浙公网安备 33010602011771号