lvs负载均衡
Lvs简介
LVS(Linux Virtual Server)即Linux虚拟服务器,是由章文嵩博士主导的开源负载均衡项目,目前LVS已经被集成到Linux内核模块中。在Linux内核中实现了基于IP的数据请求负载均衡调度方案,终端互联网用户从外部访问公司的负载均衡服务器,终端用户的Web请求会发送给LVS调度器,调度器根据自己预设的算法决定将该请求发送给后端的某台Web服务器,比如,轮询算法可以将外部的请求平均分发给后端的所有服务器,终端用户访问LVS调度器虽然会被转发到后端真实的服务器,但如果真实服务器连接的是相同的存储,提供的服务也是相同的服务,最终用户不管是访问哪台真实服务器,得到的服务内容都是一样的,整个集群对用户而言都是透明的。最后根据LVS工作模式的不同,真实服务器会选择不同的方式将用户需要的数据发送到终端用户,LVS工作模式分为NAT模式、TUN模式、以及DR模式。
VIP RIP
官方站点是:http://www.linuxvirtualserver.org
体系结构
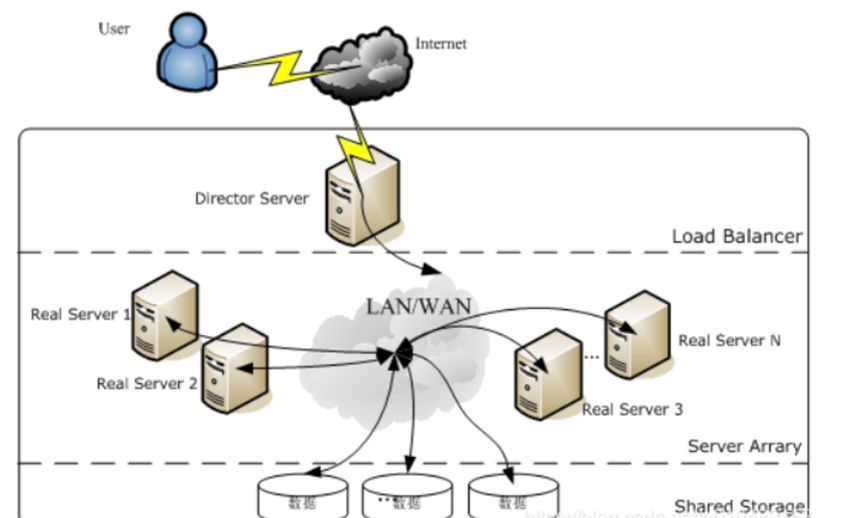
使用LVS架设的服务器集群系统有三个部分组成:最前端的负载均衡层(Loader Balancer),中间的服务器群组层,用Server Array表示,最底层的数据共享存储层,用Shared Storage表示。在用户看来所有的应用都是透明的,用户只是在使用一个虚拟服务器提供的高性能服务。
Load Balancer层:位于整个集群系统的最前端,有一台或者多台负载调度器(Director Server)组成,LVS模块就安装在Director Server上,而Director的主要作用类似于一个路由器,它含有完成LVS功能所设定的路由表,通过这些路由表把用户的请求分发给Server Array层的应用服务器(Real Server)上。同时,在Director Server上还要安装对Real Server服务的监控模块Ldirectord,此模块用于监测各个Real Server服务的健康状况。在Real Server不可用时把它从LVS路由表中剔除,恢复时重新加入。
Server Array层:由一组实际运行应用服务的机器组成,Real Server可以是WEB服务器、MAIL服务器、FTP服务器、DNS服务器、视频服务器中的一个或者多个,每个Real Server之间通过高速的LAN或分布在各地的WAN相连接。在实际的应用中,Director Server也可以同时兼任Real Server的角色。
Shared Storage层:是为所有Real Server提供共享存储空间和内容一致性的存储区域,在物理上,一般有磁盘阵列设备组成,为了提供内容的一致性,一般可以通过NFS网络文件系统共享数据,但是NFS在繁忙的业务系统中,性能并不是很好,此时可以采用集群文件系统,例如Red hat的GFS文件系统,oracle提供的OCFS2文件系统等。
从整个LVS结构可以看出,Director Server是整个LVS的核心,目前,用于Director Server的操作系统只能是Linux和FreeBSD,linux2.6内核不用任何设置就可以支持LVS功能,而FreeBSD作为 Director Server的应用还不是很多,性能也不是很好。对于Real Server,几乎可以是所有的系统平台,Linux、windows、Solaris、AIX、BSD系列都能很好的支持。
一、LVS管理工具
ipvs:内核中的协议栈上实现
ipvs是LVS软件核心,是允许在LB(负载均衡层)上,这是个基于ip层的负载均衡
ipvs的总体结构主要有ip包处理,负载均衡算法,系统配置和管理三个模块以及虚拟服务器与真实服务器链表组成。
ipvs管理集群服务管理服务上的RS(real server)。
一个ipvs主机可以同时定义多个cluster server,但可能会影响调度性格。
一个ipvs服务至少应该有一个RS。
ipvsadm:用户空间的命令行工具,用于管理集群服务器
-A 添加一个集群服务
-E 修改已添加的集群服务
-D 删除虚拟服务
-C 清空整个表
-R 从标准输入重载
-S 保存值到标准输出
-a 向指定的client server中添加real server
-e 修改RS
-d 删除真实服务
-L/-l 列出表
-t 服务器地址是host[:port],tcp协议
-u 服务器地址是host[:port],udp协议
-r 服务器地址主机和端口,只支持端口映射的LVS类型才允许此处使用和集群服务中的不同端口
-g dr(direct routing)(default)模式
-i tun模式
-m nat模式
-w 实际服务器容器,指定权重
-n 数字格式显示ip和port,注意-n只能写在-L之后
Ipvsadm核心功能
集群服务管理:增、删、改
集群服务的RS管理:增、删、改
查看
语法:
ipvsadm -A -t ip:port -s rr
ipvsadm -a -t ip:port -r ip:port -g/m/i
Ipvsadm -Ln
保存:
建议保存在/etc/sysconfig/ipvsadm
ipvsadm-save > /etc/sysconfig/ipvsadm
ipvsadm -Sn > /etc/sysconfig/ipvsadm
重载
ipvsadm -R < /etc/sysconfig/ipvsadm
systemctl restart ipvsadm
四、LVS工作模式及原理
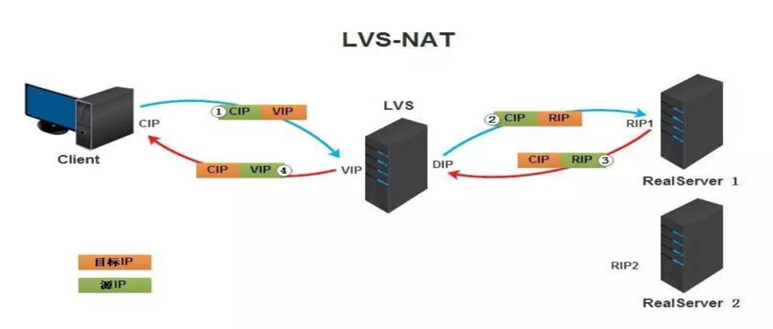
NAT模式:
通过网络地址转换实现的虚拟服务器
大并发访问时,调度器的性能成为瓶颈
DR模式
直接使用路由技术实现虚拟服务器
节点服务器需要配置VIP,注意MAC地址广播
TUN模式
通过隧道方式实现虚拟服务
这个是通过网络地址转换的方法来实现调度的。首先调度器(LB)接收到客户的请求数据包时(请求的目的IP为VIP),根据调度算法决定将请求发送给哪个后端的真实服务器(RS)。然后调度就把客户端发送的请求数据包的目标IP地址及端口改成后端真实服务器的IP地址(RIP),这样真实服务器(RS)就能够接收到客户的请求数据包了。真实服务器响应完请求后,查看默认路由(NAT模式下我们需要把RS的默认路由设置为LB服务器。)把响应后的数据包发送给LB,LB再接收到响应包后,把包的源地址改成虚拟地址(VIP)然后发送回给客户端。
注意事项:
在NAT模式中,Real Server的网关必须指向LVS,否则报文无法送达客户端
特点:
1、NAT 技术将请求的报文和响应的报文都需要通过 LB 进行地址改写,因此网站访问量比较大的时候 LB 负载均衡调度器有比较大的瓶颈,一般要求最多只能 10-20 台节点
2、只需要在 LB 上配置一个公网 IP 地址就可以了。
3、每台内部的 realserver 服务器的网关地址必须是调度器 LB 的内网地址。
4、NAT 模式支持对 IP 地址和端口进行转换。即用户请求的端口和真实服务器的端口可以不一致。
NAT模式的优缺点:
优点:集群中的物理服务器可以使用任何支持TCP/IP操作系统,只有负载均衡器需要一个合法的IP地址
缺点:扩展性有限。当服务器节点(普通PC服务器)增长过多时,负载均衡器将成为整个系统的瓶颈,因为所有的请求包和应答包的流向都经过负载均衡器。当服务器节点过多时,大量的数据包都交汇在负载均衡器那,速度就会变慢!
DR模式原理:
DR模式是通过改写请求报文的目标MAC地址,将请求发给真实服务器的,而真实服务器响应后的处理结果直接返回给客户端用户。同TUN模式一样,DR模式可以极大的提高集群系统的伸缩性。而且DR模式没有IP隧道的开销,对集群中的真实服务器也没有必要必须支持IP隧道协议的要求。但是要求调度器LB与真实服务器RS都有一块网卡连接到同一物理网段上,必须在同一个局域网环境。
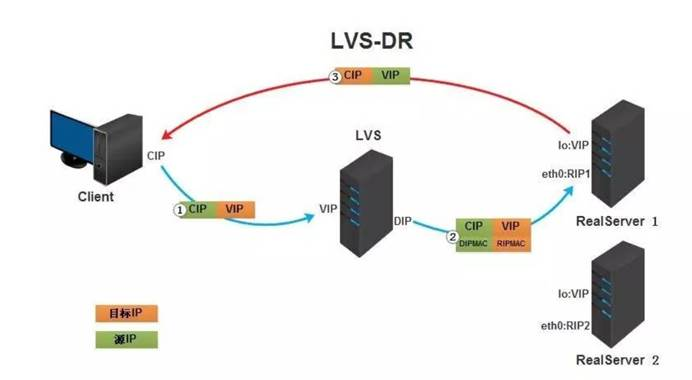
1、客户端将请求发往前端的负载均衡器,请求报文源地址是CIP,目标地址为VIP。
2、负载均衡器收到报文后,发现请求的是在规则里面存在的地址,那么它将客户端请求报文的源MAC地址改为自己DIP的MAC地址,目标MAC改为了RIP的MAC地址,并将此包发送给RS
3、RS发现请求报文中的目的MAC是自己,就会将此报文接收下来,处理完请求报文后,将响应报文通过lo接口送给eth0网卡直接发送给客户端。
注意事项:
需要设置lo接口的VIP不能响应本地网络内的arp请求,这个IP就直接设置为32位的网络位即可。
TUN模式(隧道模式)
LVS/TUN的工作流程图如下所示,它和NAT模式不同的是,它在LB和RS之间的传输不用改写IP地址。而是把客户请求包封装在一个IP tunnel里面,然后发送给RS节点服务器,节点服务器接收到之后解开IP tunnel后,进行响应处理。并且直接把包通过自己的外网地址发送给客户不用经过LB服务器
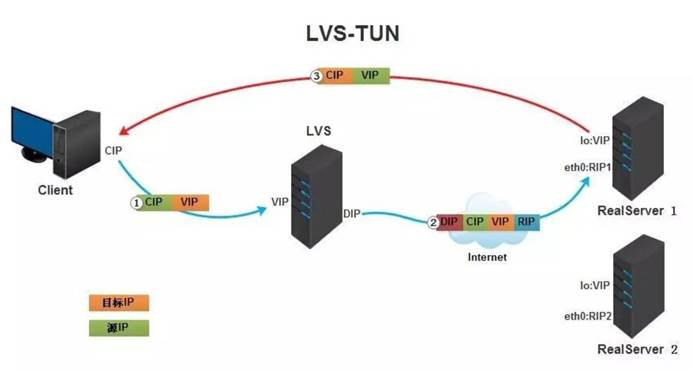
1、客户端将请求发往前端的负载均衡器,请求报文源地址是CIP,目标地址为VIP。
2、负载均衡器收到报文后,发现请求的是在规则里面存在的地址,那么它将在客户端请求报文的首部再封装一层IP报文,将源地址改为DIP,目标地址改为RIP,并将此包发送给RS。
3、RS收到请求报文后,会首先拆开第一层封装,然后发现里面还有一层IP首部的目标地址是自己lo接口上的VIP,所以会处理此请求报文,并将响应报文通过lo接口送给eth0网卡直接发送给客户端。
优点:负载均衡器只负责将请求包分发给后端节点服务器,而RS将应答包直接发给用户。所以,减少了负载均衡器的大量数据流动,负载均衡器不再是系统的瓶颈,就能处理很巨大的请求量,这种方式,一台负载均衡器能够为很多RS进行分发。而且跑在公网上就能进行不同地域的分发。
缺点:隧道模式的RS节点需要合法IP,这种方式需要所有的服务器支持”IP Tunneling”(IP Encapsulation)协议,服务器可能只局限在部分Linux系统上。
五、LVS调度算法
静态调度算法(4种):
1、轮询调度rr
均等的对待每一台服务器,不管服务器上的实际连接数和系统负载
2、加权论调wrr
调度器可以自动问询真实服务器的负载情况,并动态调整权值
3、源地址散列调度算法 sh
与目标地址散列调度算法类似,但它是根据源地址散列算法进行静态分配固定的服务器资源。
4、目标地址散列调度算法 dh
该算法是根据目标 IP 地址通过散列函数将目标 IP 与服务器建立映射关系,出现服务器不可用或负载过高的情况下,发往该目标 IP 的请求会固定发给该服务器。
动态调度算法(6种)
5、最少链接 lc
动态地将网络请求调度到已建立的连接数最少的服务器上
如果集群真实的服务器具有相近的系统性能,采用该算法可以较好的实现负载均衡
6、 加权最少链接 wlc
调度器可以自动问询真实服务器的负载情况,并动态调整权值
带权重的谁不干活就给谁分配,机器配置好的权重高
7、 基于局部性的最少连接调度算法 lblc
这个算法是请求数据包的目标 IP 地址的一种调度算法,该算法先根据请求的目标 IP 地址寻找最近的该目标 IP 地址所有使用的服务器,如果这台服务器依然可用,并且有能力处理该请求,调度器会尽量选择相同的服务器,否则会继续选择其它可行的服务器
8、 复杂的基于局部性最少的连接算法 lblcr
记录的不是要给目标 IP 与一台服务器之间的连接记录,它会维护一个目标 IP 到一组服务器之间的映射关系,防止单点服务器负载过高。
9、 最少期望延迟 sed
不考虑非活动链接,谁的权重大,优先选择权重大的服务器来接收请求,但权重大的机器会比较忙
10、 永不排队 nq
无需队列,如果有realserver的连接数为0就直接分配过去
配置lvs-nat模式的httpd负载集群---http
环境说明:
主机名称 网卡信息(ens160为nat、ens192为仅主机) 安装应用 系统
Client客户端 192.168.124.145(ens160) 无 RHEL8
DR DIP:192.168.124.128(ens160)---VIP:192.168.194.130(ens192) ipvsadm RHEL8
RS1 RIP:192.168.124.135(ens160)---gw:192.168.124.128 httpd RHEL8
RS2 RIP:192.168.124.138(ens160)---gw:192.168.124.128 httpd RHEL8
关闭三台主机的防火墙和selinux
DR
[root@DR ~]# systemctl stop firewalld
[root@DR ~]# setenforce 0

[root@DR ~]# cat /etc/sysconfig/selinux

SELINUX=enforcing
RS1
[root@RS1 ~]# systemctl  stop firewalld
[root@RS1 ~]# setenforce 0
setenforce: SELinux is disabled
RS2
[root@RS2 ~]# systemctl  stop firewalld
[root@RS2 ~]# setenforce 0
setenforce: SELinux is disabled
配置ip信息
添加网卡信息仅主机
DR配置
//添加ens192网卡信息仅主机    (手动添加一块仅主机得网卡然后再添加)
[root@DR ~]# nmcli connection add con-name ens192 ifname ens192 type ethernetConnection 'ens192' (c858376b-6f3e-481a-b073-adedf3b90822) successfully added.
[root@DR network-scripts]# cat ifcfg-ens160
IPADDR=192.168.124.128
PREFIX=24
DNS1=8.8.8.8
[root@localhost ~]# cat /etc/sysconfig/network-scripts/ifcfg-ens192
IPADDR=192.168.194.130
PREFIX=24
DNS1=8.8.8.8

[root@DR ~]# nmcli connection up ens160
[root@DR ~]#  nmcli connection up ens192
配置转发功能
[root@DR ~]# vim /etc/sysctl.conf
[root@DR ~]#
[root@DR ~]# sysctl  -p
net.ipv4.ip_forward = 1
安装ipvsadm并添加规则
[root@DR yum.repos.d]# yum -y install ipvsadm
[root@DR ~]# ipvsadm -A -t 192.168.194.130:80 -s rr
[root@DR ~]# ipvsadm -a -t 192.168.194.130:80 -r 192.168.124.135:80 -m
[root@DR ~]# ipvsadm -a -t 192.168.194.130:80 -r 192.168.124.138:80 -m
[root@DR ~]# ipvsadm -Ln
IP Virtual Server version 1.2.1 (size=4096)
Prot LocalAddress:Port Scheduler Flags
  -> RemoteAddress:Port           Forward Weight ActiveConn InActConn
TCP  192.168.194.130:80 rr
  -> 192.168.124.135:80           Masq    1      0          0
  -> 192.168.124.138:80           Masq    1      0          0
[root@DR ~]# ipvsadm -Sn > /etc/sysconfig/ipvsadm
[root@DR ~]# systemctl  restart ipvsadm
[root@DR ~]# systemctl enable ipvsadm
RS1配置
将网关得地址改为DR得IP地址   (先下载软件再修改网关地址,否则无法联通外网,RS2同理)
[root@RS1 ~]# cat /etc/sysconfig/network-scripts/ifcfg-ens160
IPADDR=192.168.124.135
PREFIX=24
GATEWAY=192.168.124.128
DNS1=8.8.8.8
[root@RS1 network-scripts]# systemctl restart NetworkManager
[root@RS1 network-scripts]#  nmcli connection up ens160
后端RS1部署WEB服务器
[root@RS1 ~]# yum -y install httpd
[root@RS1 ~]# echo RS1 > /var/www/html/index.html
[root@RS1 ~]# systemctl  restart httpd
[root@RS1 ~]# systemctl enable httpd
RS2配置
将网关得地址改为DR得IP地址
[root@localhost network-scripts]# cat ifcfg-ens160
IPADDR=192.168.124.138
PREFIX=24
GATEWAY=192.168.124.128
DNS1=8.8.8.8
[root@localhost network-scripts]# systemctl restart NetworkManager
[root@localhost network-scripts]# nmcli connection up ens160
后端RS2部署WEB服务器
[root@RS2 yum.repos.d]# yum -y install httpd
[root@RS2 ~]# echo RS1 > /var/www/html/index.html
[root@RS2 yum.repos.d]# systemctl  restart httpd
[root@RS2 yum.repos.d]# systemctl  enable httpd
测试
[root@Client ~]#
[root@Client ~]# curl http://192.168.194.130
RS1
[root@Client ~]# curl http://192.168.194.130
ly
[root@Client ~]# curl http://192.168.194.130
RS1
[root@Client ~]# curl http://192.168.194.130
ly
配置lvs-nat模式的httpd负载集群---https
DR配置
生成密钥
[root@DR ~]# mkdir -p /etc/pki/CA/private
[root@DR ~]# cd /etc/pki/CA/
[root@DR CA]#  (umask 077;openssl genrsa -out private/cakey.pem 2048)
Generating RSA private key, 2048 bit long modulus (2 primes)
........+++++
.......................+++++
e is 65537 (0x010001)
[root@DR CA]# openssl rsa -in private/cakey.pem -pubout
writing RSA key
-----BEGIN PUBLIC KEY-----
MIIBIjANBgkqhkiG9w0BAQEFAAOCAQ8AMIIBCgKCAQEAtLSx0P5dQQ7gd3XML+By
NkX+w3ditWhFkWnW47fjaFmBPqHOSyubBaTIm+nPnvu0KsEDlAN44h7ZJNBbxvLM
WrfM2oznyKLsbKqOebtROPAEOsqW4hNH8w9HDYp7hrtT+QW4mcRaHAJvQ0AkFcLR
Lu3gANsfT4GXh4KRMeVbiXAexkvq1scfyEyg1A5qAlcHDJRSGIsLRRFGp9VOb6GL
Put5g6meyIvUaE7bBTQQuqlNWOyinW4kWjpXRNW7kLnY7Kop1QSR++3n0IOgQCf7
iyiCl5KueIwR2yeZByGHxStDvoyvCGSqIX+Tki6oXMrEgprV9F0iHNkYLSCSur3j
JQIDAQAB
-----END PUBLIC KEY-----
[root@DR CA]# penssl req -new -x509 -key private/cakey.pem -out cacert.pem -days 1024
bash: penssl: command not found
[root@DR CA]# openssl req -new -x509 -key private/cakey.pem -out cacert.pem -days 1024
You are about to be asked to enter information that will be incorporated
into your certificate request.
What you are about to enter is what is called a Distinguished Name or a DN.
There are quite a few fields but you can leave some blank
For some fields there will be a default value,
If you enter '.', the field will be left blank.
-----
Country Name (2 letter code) [XX]:CN		//国家
ince Name (full name) []:HB					//省份
Locality Name (eg, city) [Default City]:WH		//城市
Organization Name (eg, company) [Default Company Ltd]:runtime    //公司
Organizational Unit Name (eg, section) []:Linux					 //部门
Common Name (eg, your name or your server's hostname) []:liuyang    //姓名
Email Address []:1@2.com			//邮箱
[root@DR ~]# ls
anaconda-ks.cfg  httpd.crt  httpd.csr  passwd
[root@DR ~]# scp httpd.crt root@192.168.124.135:/etc/httpd/ssl
The authenticity of host '192.168.124.135 (192.168.124.135)' can't be established.
ECDSA key fingerprint is SHA256:AIXWDklZiMgnYNy11/sTShTlJ8yXMXLCfPL+dJ0bec0.
Are you sure you want to continue connecting (yes/no/[fingerprint])? yes
Warning: Permanently added '192.168.124.135' (ECDSA) to the list of known hosts.
root@192.168.124.135's password:
httpd.crt                                  100% 4523     2.2MB/s   00:00
[root@DR ~]# scp /etc/pki/CA/cacert.pem root@192.168.124.135:/etc/httpd/ssl
root@192.168.124.135's password:
cacert.pem                                 100% 1371   746.8KB/s   00:00
//在DR中查看 已经存在了
[root@DR ~]# ls
anaconda-ks.cfg  httpd.csr  passwd
//CA签署证书并发给RS1
[root@DR ~]#  mkdir /etc/pki/CA/newcerts
[root@DR ~]# touch /etc/pki/CA/index.txt
[root@DR ~]# echo "01" > /etc/pki/CA/serial
[root@DR ~]# openssl ca -in httpd.csr -out httpd.crt -days 1024
Using configuration from /etc/pki/tls/openssl.cnf
Check that the request matches the signature
Signature ok
Certificate Details:
        Serial Number: 1 (0x1)
        Validity
            Not Before: Sep 27 09:33:30 2022 GMT
            Not After : Jul 17 09:33:30 2025 GMT
        Subject:
            countryName               = CN
            stateOrProvinceName       = HB
            organizationName          = runtime
            organizationalUnitName    = Linux
            commonName                = liuyang
            emailAddress              = 1@2.com
        X509v3 extensions:
            X509v3 Basic Constraints:
                CA:FALSE
            Netscape Comment:
                OpenSSL Generated Certificate
            X509v3 Subject Key Identifier:
                E8:EC:0B:50:3E:C7:2D:74:DC:7E:ED:B6:56:8A:E3:8B:D4:1E:FE:23
            X509v3 Authority Key Identifier:
                keyid:50:59:55:E0:0E:D9:A8:E6:3A:FA:1A:3B:9B:AE:76:EB:AB:47:58:23

Certificate is to be certified until Jul 17 09:33:30 2025 GMT (1024 days)
Sign the certificate? [y/n]:y
1 out of 1 certificate requests certified, commit? [y/n]y
Write out database with 1 new entries
Data Base Updated
//在DR中添加规则
[root@DR ~]# ipvsadm -A -t 192.168.194.130:443 -s rr
[root@DR ~]# ipvsadm -a -t 192.168.194.130:443 -r 192.168.124.135 -m
[root@DR ~]# ipvsadm -a -t 192.168.194.130:443 -r 192.168.124.138 -m
[root@DR ~]# ipvsadm -Ln
IP Virtual Server version 1.2.1 (size=4096)
Prot LocalAddress:Port Scheduler Flags
  -> RemoteAddress:Port           Forward Weight ActiveConn InActConn
TCP  192.168.124.138:443 rr
TCP  192.168.194.130:80 rr
  -> 192.168.124.135:80           Masq    1      0          0
  -> 192.168.124.138:80           Masq    1      0          0
TCP  192.168.194.130:443 rr
  -> 192.168.124.135:443          Masq    1      0          0
  -> 192.168.124.138:443          Masq    1      0          0
[root@DR ~]# ipvsadm -Sn > /etc/sysconfig/ipvsadm
RS1配置
在RS1中生成证书签署请求,并发送给CA
[root@RS1 ~]# dnf -y install mod_ssl
[root@RS1 ~]# mkdir /etc/httpd/ssl
[root@RS1 ~]# cd /etc/httpd/ssl
[root@RS1 ssl]# (umask 077;openssl genrsa -out httpd.key 2048)
Generating RSA private key, 2048 bit long modulus (2 primes)
.....+++++
................+++++
e is 65537 (0x010001)
[root@RS1 ssl]#  openssl req -new -key httpd.key -days 1024 -out httpd.csr
Ignoring -days; not generating a certificate
You are about to be asked to enter information that will be incorporated
into your certificate request.
What you are about to enter is what is called a Distinguished Name or a DN.
There are quite a few fields but you can leave some blank
For some fields there will be a default value,
If you enter '.', the field will be left blank.
-----
Country Name (2 letter code) [XX]:CN
State or Province Name (full name) []:HB
Locality Name (eg, city) [Default City]:WH
Organization Name (eg, company) [Default Company Ltd]:runtime
Organizational Unit Name (eg, section) []:Linux
Common Name (eg, your name or your server's hostname) []:liuyang
Email Address []:1@2.com
Please enter the following 'extra' attributes
to be sent with your certificate request
A challenge password []:
An optional company name []:
[root@RS1 ssl]# ls
httpd.csr  httpd.key
[root@RS1 ssl]# scp httpd.csr root@192.168.124.128:/root/
The authenticity of host '192.168.124.128 (192.168.124.128)' can't be established.
ECDSA key fingerprint is SHA256:gpQekwQwQvWT0VhHm4D0jUyHrgl0SOQIgerJhIyzOvs.
Are you sure you want to continue connecting (yes/no/[fingerprint])? yes
Warning: Permanently added '192.168.124.128' (ECDSA) to the list of known hosts.
root@192.168.124.128's password:
httpd.csr                                  100% 1021   820.8KB/s   00:00
//RS1中把RS1的证书和密钥发送给RS2
[root@RS1 ssl]# ls
cacert.pem  httpd.crt  httpd.csr  httpd.key
[root@RS1 ssl]# scp cacert.pem httpd.crt httpd.key root@192.168.124.138:/etc/httpd/ssl
The authenticity of host '192.168.124.138 (192.168.124.138)' can't be established.
ECDSA key fingerprint is SHA256:3it+6FyWgA6bDfQbOh0KHZWo22Ur0aGIIHRTL+UN5kg.
Are you sure you want to continue connecting (yes/no/[fingerprint])? yes
Warning: Permanently added '192.168.124.138' (ECDSA) to the list of known hosts.
root@192.168.124.138's password:
cacert.pem                                 100% 1371     1.0MB/s   00:00
httpd.crt                                  100% 4523     5.0MB/s   00:00
httpd.key                                  100% 1675     1.3MB/s   00:00
//在RS1中修改https的配置文件
[root@RS1 ssl]# vim /etc/httpd/conf.d/ssl.conf
SSLCertificateFile /etc/httpd/ssl/httpd.crt
SSLCertificateKeyFile /etc/httpd/ssl/httpd.key
SSLCACertificateFile /etc/httpd/ssl/cacert.pem
[root@RS1 ssl]# systemctl  restart httpd
[root@RS1 ssl]# ss -antl | grep 443
LISTEN 0      128                *:443             *:*
RS2配置
//在RS2中修改https的配置文件
[root@RS2 ~]# dnf -y install mod_ssl
[root@RS2 ssl]# vim /etc/httpd/conf.d/ssl.conf
SSLCertificateFile /etc/httpd/ssl/httpd.crt
SSLCertificateKeyFile /etc/httpd/ssl/httpd.key
SSLCACertificateFile /etc/httpd/ssl/cacert.pem
测试
[root@Client ~]# curl -k https://192.168.194.130:443
ly
[root@Client ~]# curl -k https://192.168.194.130:443
RS1
[root@Client ~]# curl -k https://192.168.194.130:443
ly
[root@Client ~]# curl -k https://192.168.194.130:443
RS1
配置lvs-dr模式得http负载集群
Lvs服务器(DR) DIP 192.168.124.147 VIP 192.168.124.180
Apache服务器(RS1) RIP 192.168.124.135 VIP 192.168.124.180
Apache服务器(RS2) RIP 192.168.124.138 VIP 192.168.124.180
client客户端 IP 192.168.124.145
DR
[root@DR ~]# systemctl stop firewalld
[root@DR ~]# setenforce 0
[root@DR ~]# cat /etc/sysconfig/selinux
SELINUX=enforcing
//添加ip
[root@DR ~]# ifconfig lo 192.168.124.180/32 broadcast 192.168.124.180 netmask 255.255.255.255 up
[root@DR ~]# ip a
1: lo: <LOOPBACK,UP,LOWER_UP> mtu 65536 qdisc noqueue state UNKNOWN group default qlen 1000
    link/loopback 00:00:00:00:00:00 brd 00:00:00:00:00:00
    inet 192.168.124.180/0 brd 192.168.124.180 scope global lo
//添加规则
[root@DR ~]# ipvsadm -A -t 192.168.124.180:80 -s rr
[root@DR ~]# ipvsadm -a -t 192.168.124.180:80 -r 192.168.124.135:80 -g
[root@DR ~]# ipvsadm -a -t 192.168.124.180:80 -r 192.168.124.138:80 -g
[root@DR ~]# ipvsadm -Ln
IP Virtual Server version 1.2.1 (size=4096)
Prot LocalAddress:Port Scheduler Flags
  -> RemoteAddress:Port           Forward Weight ActiveConn InActConn
TCP  192.168.124.180:80 rr
  -> 192.168.124.135:80           Route   1      0          0
  -> 192.168.124.138:80           Route   1      0          0
[root@DR ~]# ipvsadm -Sn > /etc/sysconfig/ipvsadm
[root@DR ~]# systemctl  restart ipvsadm
[root@DR ~]# systemctl  enable ipvsadm


RS1

[root@RS1 ~]# systemctl  stop firewalld
[root@RS1 ~]# setenforce 0
setenforce: SELinux is disabled
//部署httpd web服务器
[root@RS1 ~]# dnf -y install httpd
[root@RS1 ~]# echo "liu" > /var/www/html/index.html
[root@RS1 ~]# systemctl  restart httpd
[root@RS1 ~]# systemctl enable httpd
//配置内核参数
[root@RS1 ~]# cat /etc/sysctl.conf
net.ipv4.conf.all.arp_ignore = 1
net.ipv4.conf.all.arp_announce = 2
net.ipv4.conf.lo.arp_ignore = 1
net.ipv4.conf.lo.arp_announce = 2
[root@RS1 ~]# sysctl -p
net.ipv4.conf.all.arp_ignore = 1
net.ipv4.conf.all.arp_announce = 2
net.ipv4.conf.lo.arp_ignore = 1
net.ipv4.conf.lo.arp_announce = 2

[root@RS1 ~]# ifconfig lo 192.168.124.180/32 broadcast 192.168.124.180 netmask 255.255.255.255 up
[root@RS1 ~]# route add -host 192.168.124.180/32 dev lo

RS2

[root@RS2 ~]# systemctl  stop firewalld
[root@RS2 ~]# setenforce 0
setenforce: SELinux is disabled
//部署httpd web服务器
[root@RS2 ~]# dnf -y install httpd
[root@RS2 ~]# echo "yang" > /var/www/html/index.html
[root@RS2 ~]# systemctl  restart httpd
[root@RS2 ~]# systemctl  enable httpd
//配置内核参数
[root@RS2 ~]# cat /etc/sysctl.conf
net.ipv4.conf.all.arp_ignore = 1
net.ipv4.conf.all.arp_announce = 2
net.ipv4.conf.lo.arp_ignore = 1
net.ipv4.conf.lo.arp_announce = 2
[root@RS2 ~]# sysctl -p
net.ipv4.conf.all.arp_ignore = 1
net.ipv4.conf.all.arp_announce = 2
net.ipv4.conf.lo.arp_ignore = 1
net.ipv4.conf.lo.arp_announce = 2
//添加ip
[root@RS2 ~]# ifconfig lo 192.168.124.180/32 broadcast 192.168.124.180 netmask 255.255.255.255 up
[root@RS2 ~]# route add -host 192.168.124.180/32 dev lo
//测试-
Client
[root@Client ~]# curl http://192.168.124.180
yang
[root@Client ~]# curl http://192.168.124.180
liu
[root@Client ~]# curl http://192.168.124.180
yang
[root@Client ~]# curl http://192.168.124.180
liu
配置lvs-dr模式的httpd负载集群---https
DR配置
//添加ip
[root@DR ~]# ifconfig lo 192.168.124.200/32 broadcast 192.168.124.200 netmask 255.255.255.255 up

-A -t 192.168.124.200:443 -s rr
-a -t 192.168.124.200:443 -r 192.168.124.135:80 -m
-a -t 192.168.124.200:443 -r 192.168.124.138:80 -m
[root@DR ~]# ipvsadm -Ln
IP Virtual Server version 1.2.1 (size=4096)
Prot LocalAddress:Port Scheduler Flags
  -> RemoteAddress:Port           Forward Weight ActiveConn InActConn
TCP  192.168.124.200:80 rr
  -> 192.168.124.135:80           Route   1      0          0
  -> 192.168.124.138:80           Route   1      0          0
[root@DR ~]# ipvsadm -Sn >/etc/sysconfig/ipvsadm
[root@DR ~]# systemctl  restart ipvsadm
[root@DR ~]# systemctl enable ipvsadm
Created symlink /etc/systemd/system/multi-user.target.wants/ipvsadm.service → /usr/lib/systemd/system/ipvsadm.service.
生成密钥
[root@DR ~]# mkdir -p /etc/pki/CA/private
[root@DR ~]# cd /etc/pki/CA/
[root@DR CA]#  (umask 077;openssl genrsa -out private/cakey.pem 2048)
Generating RSA private key, 2048 bit long modulus (2 primes)
..............................................+++++
............................+++++
e is 65537 (0x010001)
[root@DR CA]# openssl rsa -in private/cakey.pem -pubout
writing RSA key
-----BEGIN PUBLIC KEY-----
MIIBIjANBgkqhkiG9w0BAQEFAAOCAQ8AMIIBCgKCAQEAr8IpUH560piKGDboz5RW
9pLP7VW/8gmLLhUH83ZWPro+xlHotNLkAr2uj4lStjoAOTPw5+JZutEbOkurZyNc
NAC1tt1fvZFDR2T69p3DUNCBH+LyL5c63w4upoIbdzTAObLnjCfnDU+gxqTP+20G
ajjGxD8+D3kNhmHjoR9y2wK4gfkz4sBLkiAnWs6KCevGXg4jO1GuLB0XPFlmo4oJ
eXHRNpPNjwpvnMTVXPjmAN4EjBuqV2zSekrFR4oN0a0L7k0nQGVSxuf+sTXrvD1a
ZBQyw+EzWmhldazilEyutBUZr/55cnpgbxieocCq2YxnqWbOYysy324kJs5sDs/W
WwIDAQAB
-----END PUBLIC KEY-----
[root@DR CA]#  openssl req -new -x509 -key private/cakey.pem -out cacert.pem -days 1024
You are about to be asked to enter information that will be incorporated
into your certificate request.
What you are about to enter is what is called a Distinguished Name or a DN.
There are quite a few fields but you can leave some blank
For some fields there will be a default value,
If you enter '.', the field will be left blank.
-----
Country Name (2 letter code) [XX]:CN
State or Province Name (full name) []:HB
Locality Name (eg, city) [Default City]:WH
Organization Name (eg, company) [Default Company Ltd]:runtime
Organizational Unit Name (eg, section) []:linux
Common Name (eg, your name or your server's hostname) []:liuyang
Email Address []:1@2.com
[root@DR CA]#  touch index.txt && echo 01 > serial

[root@DR ~]# mkdir /etc/pki/CA/newcerts
[root@DR ~]# touch /etc/p
pam.d/          pki/            popt.d/         profile.d/
passwd          plymouth/       prelink.conf.d/ protocols
passwd-         pm/             printcap
pkcs11/         polkit-1/       profile
[root@DR ~]# touch /etc/pk
[root@DR ~]# touch /etc/pki/CA/index.txt
[root@DR ~]# echo "01" >/etc/pki/CA/serial
[root@DR ~]# openssl ca -in httpd.csr -out httpd.crt -days 1024
Using configuration from /etc/pki/tls/openssl.cnf
Check that the request matches the signature
Signature ok
Certificate Details:
        Serial Number: 1 (0x1)
        Validity
            Not Before: Sep 28 10:14:02 2022 GMT
            Not After : Jul 18 10:14:02 2025 GMT
        Subject:
            countryName               = CN
            stateOrProvinceName       = HB
            organizationName          = runtime
            organizationalUnitName    = linux
            commonName                = liuyang
            emailAddress              = 1@2.com
        X509v3 extensions:
            X509v3 Basic Constraints:
                CA:FALSE
            Netscape Comment:
                OpenSSL Generated Certificate
            X509v3 Subject Key Identifier:
                8B:DB:3F:52:26:6C:18:6F:80:A9:3F:A7:6B:76:6F:FA:C0:AB:60:D4
            X509v3 Authority Key Identifier:
                keyid:2A:0F:7A:BD:A5:F9:48:B7:3F:20:DF:C5:9D:86:84:5D:44:71:66:13

Certificate is to be certified until Jul 18 10:14:02 2025 GMT (1024 days)
Sign the certificate? [y/n]:y
1 out of 1 certificate requests certified, commit? [y/n]y
Write out database with 1 new entries
Data Base Updated
[root@DR ~]# scp httpd.crt root@192.168.124.135:/etc/httpd/ssl
The authenticity of host '192.168.124.135 (192.168.124.135)' can't be established.
ECDSA key fingerprint is SHA256:AIXWDklZiMgnYNy11/sTShTlJ8yXMXLCfPL+dJ0bec0.
Are you sure you want to continue connecting (yes/no/[fingerprint])? yes
Warning: Permanently added '192.168.124.135' (ECDSA) to the list of known hosts.
root@192.168.124.135's password:
httpd.crt                                  100% 4523     2.7MB/s   00:00
[root@DR ~]# scp /etc/pki/CA/cacert.pem root@192.168.124.135:/etc/httpd/ssl
root@192.168.124.135's password:
cacert.pem                                 100% 1371     1.2MB/s   00:00
RS1
[root@RS1 ~]# yum -y install httpd
[root@RS1 ~]# echo "liu" > /var/www/html/index.html
[root@RS1 ~]# systemctl  restart httpd
[root@RS1 ~]# systemctl enable httpd
修改内核参数
[root@RS1 ~]# cat /etc/sysctl.conf
# sysctl settings are defined through files in
# /usr/lib/sysctl.d/, /run/sysctl.d/, and /etc/sysctl.d/.
#
# Vendors settings live in /usr/lib/sysctl.d/.
# To override a whole file, create a new file with the same in
# /etc/sysctl.d/ and put new settings there. To override
# only specific settings, add a file with a lexically later
# name in /etc/sysctl.d/ and put new settings there.
#
# For more information, see sysctl.conf(5) and sysctl.d(5).
net.ipv4.conf.all.arp_ignore = 1
net.ipv4.conf.all.arp_announce = 2
net.ipv4.conf.lo.arp_ignore = 1
net.ipv4.conf.lo.arp_announce = 2
[root@RS1 ~]# sysctl  -p
net.ipv4.conf.all.arp_ignore = 1
net.ipv4.conf.all.arp_announce = 2
net.ipv4.conf.lo.arp_ignore = 1
net.ipv4.conf.lo.arp_announce = 2
添加ip
[root@RS1 ~]# ifconfig lo 192.168.124.200/32 broadcast 192.168.124.200 netmask 255.255.255.255 up
[root@RS1 ~]# route add -host 192.168.124.200/32 dev lo
//RS1配置https
[root@RS1 ~]# dnf -y install mod_ssl
[root@RS1 ~]# mkdir /etc/httpd/ssl
[root@RS1 ~]# cd /etc/httpd/ssl
[root@RS1 ssl]# (umask 077;openssl genrsa -out httpd.key 2048)
Generating RSA private key, 2048 bit long modulus (2 primes)
........................................................................................................+++++
.........................+++++
e is 65537 (0x010001)
[root@RS1 ssl]#  openssl req -new -key httpd.key -days 1024 -out httpd.csr
Ignoring -days; not generating a certificate
You are about to be asked to enter information that will be incorporated
into your certificate request.
What you are about to enter is what is called a Distinguished Name or a DN.
There are quite a few fields but you can leave some blank
For some fields there will be a default value,
If you enter '.', the field will be left blank.
-----
Country Name (2 letter code) [XX]:CN
State or Province Name (full name) []:HB
Locality Name (eg, city) [Default City]:WH
Organization Name (eg, company) [Default Company Ltd]:runtime
Organizational Unit Name (eg, section) []:linux
Common Name (eg, your name or your server's hostname) []:liuyang
Email Address []:1@2.com
[root@RS1 ssl]# ls
httpd.csr  httpd.key
将csr传给DR
[root@RS1 ssl]# scp httpd.csr root@192.168.124.128:/root/
The authenticity of host '192.168.124.128 (192.168.124.128)' can't be established.
ECDSA key fingerprint is SHA256:gpQekwQwQvWT0VhHm4D0jUyHrgl0SOQIgerJhIyzOvs.
Are you sure you want to continue connecting (yes/no/[fingerprint])? yes
Warning: Permanently added '192.168.124.128' (ECDSA) to the list of known hosts.
root@192.168.124.128's password:
httpd.csr                                  100% 1021   976.2KB/s   00:00
//RS1中把RS1的证书和密钥发送给RS2
[root@RS1 ssl]# scp cacert.pem httpd.crt httpd.key root@192.168.124.138:/etc/
httpd/ssl
The authenticity of host '192.168.124.138 (192.168.124.138)' can't be established.
ECDSA key fingerprint is SHA256:3it+6FyWgA6bDfQbOh0KHZWo22Ur0aGIIHRTL+UN5kg.
Are you sure you want to continue connecting (yes/no/[fingerprint])? yes
Warning: Permanently added '192.168.124.138' (ECDSA) to the list of known hosts.
root@192.168.124.138's password:
cacert.pem                                 100% 1371     1.6MB/s   00:00
httpd.crt                                  100% 4523     3.7MB/s   00:00
httpd.key                                  100% 1675     1.2MB/s   00:00
//在RS1中修改https的配置文件
[root@RS1 ssl]# vim /etc/httpd/conf.d/ssl.conf
SSLCertificateFile /etc/httpd/ssl/httpd.crt
SSLCertificateKeyFile /etc/httpd/ssl/httpd.key
SSLCACertificateFile /etc/httpd/ssl/cacert.pem
[root@RS1 ssl]# systemctl  restart httpd
[root@RS1 ssl]# ss -antl |grep 443
LISTEN 0      128          0.0.0.0:443       0.0.0.0:*
RS2
//部署httpd web服务器
[root@RS2 ~]# yum -y install httpd
[root@RS2 ~]# echo "yang" >/var/www/html/index.html
[root@RS2 ~]# systemctl  restart httpd
[root@RS2 ~]# systemctl enable httpd
//修改内核参数
[root@RS2 ~]# cat /etc/sysctl.conf
net.ipv4.conf.all.arp_ignore = 1
net.ipv4.conf.all.arp_announce = 2
net.ipv4.conf.lo.arp_ignore = 1
net.ipv4.conf.lo.arp_announce = 2
[root@RS2 ~]# sysctl  -p
net.ipv4.conf.all.arp_ignore = 1
net.ipv4.conf.all.arp_announce = 2
net.ipv4.conf.lo.arp_ignore = 1
net.ipv4.conf.lo.arp_announce = 2
添加ip
[root@RS2 ~]# ifconfig lo 192.168.124.200/32 broadcast 192.168.124.200 netmask 255.255.255.255 up
[root@RS2 ~]# route add -host 192.168.124.200/32 dev lo
//在RS1中修改https的配置文件
[root@RS2 ~]# dnf -y install mod_ssl
[root@RS2 ~]# mkdir /etc/httpd/ssl
[root@RS2 ssl]# vim /etc/httpd/conf.d/ssl.conf
SSLCertificateFile /etc/httpd/ssl/httpd.crt
SSLCertificateKeyFile /etc/httpd/ssl/httpd.key
SSLCACertificateFile /etc/httpd/ssl/cacert.pem
Client 测试
[root@Client ~]# curl -k https://192.168.124.200:443
yang
[root@Client ~]# curl -k https://192.168.124.200:443
liu
[root@Client ~]# curl -k https://192.168.124.200:443
yang
[root@Client ~]# curl -k https://192.168.124.200:443
liu
lvs-tun模式的负载集群
关闭防火墙和selinux步骤略
DR配置
//DR配置内核,开启IP转发并添加ip
[root@DR ~]# cat /etc/sysctl.conf
net.ipv4.ip_forward = 1
[root@DR ~]# dnf -y install ipvsadm
[root@DR ~]# ifconfig tunl0 192.168.124.180 broadcast 192.168.124.180 netmask 255.255.255.255 up
//添加规则
[root@DR ~]# ipvsadm -A -t 192.168.124.180:80 -s rr
[root@DR ~]# ipvsadm -a -t 192.168.124.180:80 -r 192.168.124.135 -i
[root@DR ~]# ipvsadm -a -t 192.168.124.180:80 -r 192.168.124.138 -i
[root@DR ~]# ipvsadm -Sn > /etc/sysconfig/ipvsadm
[root@DR ~]# systemctl  restart ipvsadm
RS1配置
//部署httpdweb服务器
[root@RS1 ~]# dnf -y install httpd
[root@RS1 ~]# echo "RS1" > /var/www/html/index.html
[root@RS1 ~]# systemctl  restart httpd
[root@RS1 ~]# systemctl enable httpd
//添加ip并启用ipip模块
[root@RS1 ~]# modprobe  ipip
[root@RS1 ~]# ifconfig tunl0 192.168.124.180 broadcast 192.168.124.180 netmask 255.255.255.255 up
//修改内核,路径/etc/sysctl.conf
[root@RS1 ~]# sysctl -p
net.ipv4.conf.tunl0.arp_ignore = 1
net.ipv4.conf.tunl0.arp_announce = 2
net.ipv4.conf.all.arp_ignore = 1
net.ipv4.conf.all.arp_announce = 2
net.ipv4.conf.tunl0.rp_filter = 0
net.ipv4.conf.all.rp_filter = 0
RS2配置
//部署httpdweb服务器
[root@RS2 ~]# dnf -y install httpd
[root@RS2 ~]# echo "RS1" > /var/www/html/index.html
[root@RS2 ~]# systemctl  restart httpd
[root@RS2 ~]# systemctl enable httpd
//添加ip并启用ipip模块
[root@RS2 ~]# modprobe  ipip
[root@RS2 ~]# ifconfig tunl0 192.168.124.180 broadcast 192.168.124.180 netmask 255.255.255.255 up
//修改内核,路径/etc/sysctl.conf
[root@RS2 ~]# sysctl -p
net.ipv4.conf.tunl0.arp_ignore = 1
net.ipv4.conf.tunl0.arp_announce = 2
net.ipv4.conf.all.arp_ignore = 1
net.ipv4.conf.all.arp_announce = 2
net.ipv4.conf.tunl0.rp_filter = 0
net.ipv4.conf.all.rp_filter = 0
Client 测试
[root@Client ~]# curl http://192.168.124.180
RS2
[root@Client ~]# curl http://192.168.124.180
RS1

 浙公网安备 33010602011771号