
Springboot中的EnableAutoConfiguration注解
@EnableAutoConfiguration注解
Enable*开头的注解大都用于动态的开启某些功能的,其底层原理是使用@import注解导入了一些配置类,可以实现Bean的动态加载,但不一定说所有的Bean都会加载,因为需要满足@Conditional注解中的所有条件才可以创建
//@EnableAutoConfiguration注解下的两个注解:
@AutoConfigurationPackage
@Import({AutoConfigurationImportSelector.class})
即根据以上描述可以得出:Springboot不能够直接自动读取jar包里面的Bean或第三方(其他Module中定义的bean)
演示:Springboot不能自动获取第三方创建的Bean
//第一:在springboot-enable中获取bean -- user
package com.itheima.springbootenable;
import org.springframework.boot.SpringApplication;
import org.springframework.boot.autoconfigure.SpringBootApplication;
import org.springframework.context.ConfigurableApplicationContext;
@SpringBootApplication
public class SpringbootEnableApplication {
public static void main(String[] args) {
ConfigurableApplicationContext run = SpringApplication.run(SpringbootEnableApplication.class, args);
Object object = run.getBean("user"); //获取springboot-other里面的bean-user
System.out.println(object);
}
}
//第二:创建另外一个工程springboot-other, 将User在这个工程中创建
//1.创建Bean
package com.itheima.domain;
public class User {
}
//2.将User纳入到Spring的IOC容器
package com.itheima.config;
import com.itheima.domain.User;
import org.springframework.context.annotation.Bean;
import org.springframework.context.annotation.Configuration;
@Configuration
public class UserConfig { //将User纳入SpringIOC容器
@Bean
public User getUser(){
return new User();
}
}
//第三:在sprigboot-enable中的pom.xml引入springboot-other 项目坐标
<dependency>
<groupId>com.itheima</groupId>
<artifactId>springboot-other</artifactId>
<version>0.0.1-SNAPSHOT</version>
</dependency>
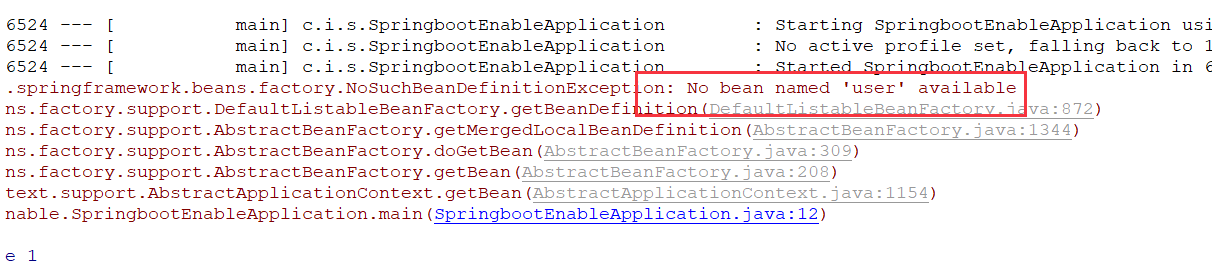
//第四:测试springboot-enable是否可以直接获取springboot-ohter中的User
结论:不能
原因:SpringbootApplication注解下有一个@ComponentScan注解负责扫描,作用是只负责扫描主配置类对应的包和该类下的子包,
被扫到的包中的组件才会被纳入该工程的Spring IOC容器中,而User所在的包是springboot-other工程中的,扫描不到测试结果:
那么Springboot将如何引入第三方中的Bean呢?
共有4中方案
1. 在主配置类上引入@CompanentScan注解,扫描 com.itheima.config 配置类的这个包
@SpringBootApplication
@ComponentScan("com.itheima.config")
public class SpringbootEnableApplication {

	public static void main(String[] args) {
		ConfigurableApplicationContext run = SpringApplication.run(SpringbootEnableApplication.class, args);
		Object object = run.getBean("user");
		System.out.println(object);
	}
}
2. 在主配置类上引入@Import注解,加载创建User的配置类 UserConfig.class
@SpringBootApplication
//1.@ComponentScan("com.itheima.config")
@Import(UserConfig.class)
public class SpringbootEnableApplication {

	public static void main(String[] args) {
		ConfigurableApplicationContext run = SpringApplication.run(SpringbootEnableApplication.class, args);
		Object object = run.getBean("user");
		System.out.println(object);
	}
}
3. 在第三方项目中声明一个注解,将创建User的配置类UserConfig进行import到这个注解中, 主配置类就使用声明的这个注解@EnableUserAnnotion
//springboot-other这个模块
package com.itheima.annoation;

import com.itheima.config.UserConfig;
import org.springframework.context.annotation.Import;

import java.lang.annotation.*;

@Target({ElementType.TYPE})
@Retention(RetentionPolicy.RUNTIME)
@Documented
@Import(UserConfig.class) //将UserConfig 这个配置类import进来
public @interface EnableUserAnnotion {//声明一个注解
}

//springboot-enable这个项目中的主启动类中引入以上声明的那个注解就可以EnableUserAnnotion
package com.itheima.springbootenable;

import com.itheima.annoation.EnableUserAnnotion;
import org.springframework.boot.SpringApplication;
import org.springframework.boot.autoconfigure.SpringBootApplication;
import org.springframework.context.ConfigurableApplicationContext;

@SpringBootApplication
//1.@ComponentScan("com.itheima.config")
//2.@Import(UserConfig.class)
@EnableUserAnnotion
public class SpringbootEnableApplication {

	public static void main(String[] args) {
		ConfigurableApplicationContext run = SpringApplication.run(SpringbootEnableApplication.class, args);
		Object object = run.getBean("user");
		System.out.println(object);
	}
}

 浙公网安备 33010602011771号