eth pow 源码分析
区块头的基本数据结构
废话不多说,直接看代码:
// Header represents a block header in the Ethereum blockchain.
type Header struct {
    // 1.结构信息
    ParentHash  common.Hash    `json:"parentHash"       gencodec:"required"`
    UncleHash   common.Hash    `json:"sha3Uncles"       gencodec:"required"`
    Number      *big.Int       `json:"number"           gencodec:"required"`

    // 2.挖矿基础信息
    Coinbase    common.Address `json:"miner"            gencodec:"required"`
    GasLimit    uint64         `json:"gasLimit"         gencodec:"required"`
    GasUsed     uint64         `json:"gasUsed"          gencodec:"required"`

    // 3.状态信息
    Time        *big.Int       `json:"timestamp"        gencodec:"required"`
    Root        common.Hash    `json:"stateRoot"        gencodec:"required"`
    TxHash      common.Hash    `json:"transactionsRoot" gencodec:"required"`
    ReceiptHash common.Hash    `json:"receiptsRoot"     gencodec:"required"`
    Bloom       Bloom          `json:"logsBloom"        gencodec:"required"`

    // 4.挖矿难度控制
    Difficulty  *big.Int       `json:"difficulty"       gencodec:"required"`

    // 5.PoW参数
    MixDigest   common.Hash    `json:"mixHash"          gencodec:"required"`
    Nonce       BlockNonce     `json:"nonce"            gencodec:"required"`

    // 6.其他
    Extra       []byte         `json:"extraData"        gencodec:"required"`
}
挖矿难度控制
|
PoW参数
接下来的两个参数就和无人不知无人不晓的工作量证明息息相关了,以太坊的工作量证明最终拼的就是谁最先得到这两个参数:MixDigest和Nonce.
目前以太坊线上使用的共识算法是基于PoW的ethash算法,主要实现位于github.com/ethereum/go-ethereum/consensus/ethash包中。
PoW算法的思路都大致是相似的,通过暴力枚举猜测一个nonce值,使得根据这个nonce种子计算出的hash值符合约定的难度,这个难度其实就是要求hash值前缀包含多少个0.
目前以太坊使用的hash是256位,所以将难度折算成前缀0的位数就是:bits0 = (2^256)/difficulty,那么我们的代码不停枚举nonce然后将计算得到的hash值前缀0位数和这个做比较就行了,主逻辑代码如下:
func (ethash *Ethash) mine(block *types.Block, id int, seed uint64, abort chan struct{}, found chan *types.Block) {
    // Extract some data from the header
    var (
        header  = block.Header()
        hash    = header.HashNoNonce().Bytes()
        // 将难度转换得出前缀0的位数
        target  = new(big.Int).Div(maxUint256, header.Difficulty)
        number  = header.Number.Uint64()
        dataset = ethash.dataset(number)
    )
    ...
search:
    for {
        ...
            // Compute the PoW value of this nonce
            digest, result := hashimotoFull(dataset.dataset, hash, nonce)
            if new(big.Int).SetBytes(result).Cmp(target) <= 0 {
                // Correct nonce found, create a new header with it
                header = types.CopyHeader(header)
                header.Nonce = types.EncodeNonce(nonce)
                header.MixDigest = common.BytesToHash(digest)
                ...
            }
            nonce++
         ...
    }
}
该函数首先计算出区块难度对应的前缀0位数target,然后生成PoW依赖的计算数据集dataset = ethash.dataset(number),最终开始死循环尝试计算digest, result := hashimotoFull(dataset.dataset, hash, nonce),得到结果后将这两个随机数据赋值到区块头对应字段去。
当这个区块成功挖出后,别的区块很容易验证这个区块的PoW是否有效,就使用同样方法产生计算数据集dataset,然后调用hashimotoLight(和hashimotoFull基本一致)计算出digest和区块头的MixDigest做比较就可以了。
这里我们跳过了两个重要的步骤:
a.依赖数据集dataset的生成实现 b.hashimotoFull/hashimotoLight的具体实现
依赖数据集的生成就要说到以太坊的DAG
DAG
ethash将DAG(有向非循环图)用于工作量证明算法,这是为每个epoch(epoch := block / epochLength)生成,例如,每3000个区块(125个小时,大约5.2天)。DAG要花很长时间生成。如果客户端只是按需要生成它,那么在找到新epoch第一个区块之前,每个epoch过渡都要等待很长时间。然而,DAG只取决于区块数量,所以可以预先计算来避免在每个epoch过渡过长的等待时间。Geth和ethminer执行自动的DAG生成,每次维持2个DAG以便epoch过渡流畅。挖矿从控制台操控的时候,自动DAG生成会被打开和关闭。
hashimoto
hashimoto()的逻辑比较复杂,包含了多次、多种哈希运算。下面尝试从其中数据结构变化的角度来简单描述之:
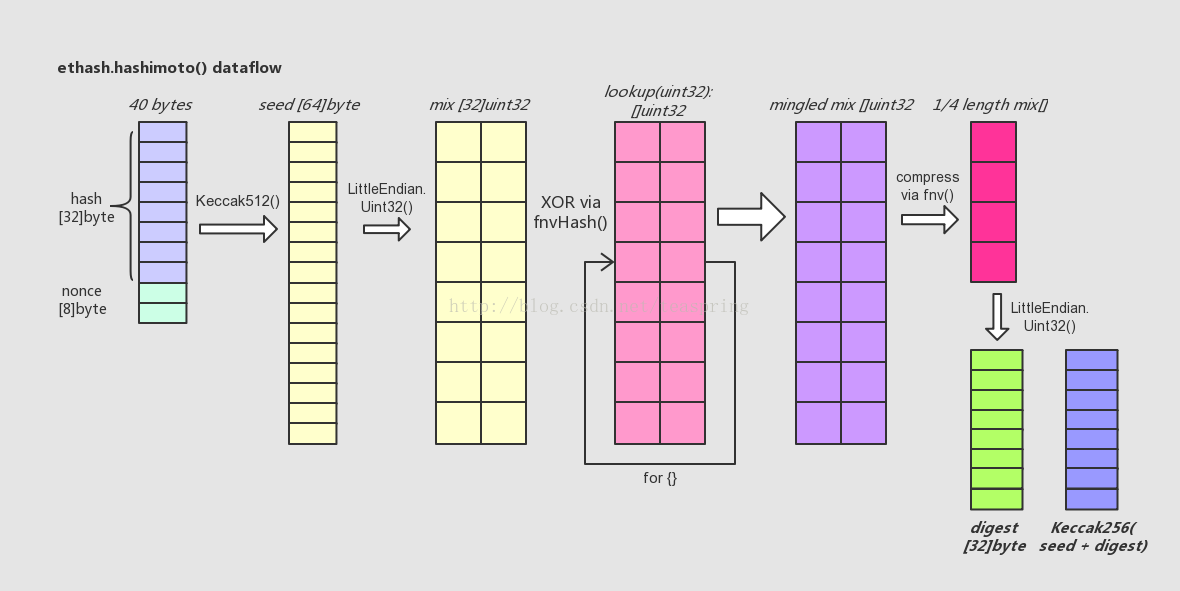
简单介绍一下上图所代表的代码流程:
- 首先,hashimoto()函数将入参@hash和@nonce合并成一个40 bytes长的数组,取它的SHA-512哈希值取名seed,长度为64 bytes。
- 然后,将seed[]转化成以uint32为元素的数组mix[],注意一个uint32数等于4 bytes,故而seed[]只能转化成16个uint32数,而mix[]数组长度32,所以此时mix[]数组前后各半是等值的。
- 接着,lookup()函数登场。用一个循环,不断调用lookup()从外部数据集中取出uint32元素类型数组,向mix[]数组中混入未知的数据。循环的次数可用参数调节,目前设为64次。每次循环中,变化生成参数index,从而使得每次调用lookup()函数取出的数组都各不相同。这里混入数据的方式是一种类似向量“异或”的操作,来自于FNV算法。
- 待混淆数据完成后,得到一个基本上面目全非的mix[],长度为32的uint32数组。这时,将其折叠(压缩)成一个长度缩小成原长1/4的uint32数组,折叠的操作方法还是来自FNV算法。
- 最后,将折叠后的mix[]由长度为8的uint32型数组直接转化成一个长度32的byte数组,这就是返回值@digest;同时将之前的seed[]数组与digest合并再取一次SHA-256哈希值,得到的长度32的byte数组,即返回值@result。
最终经过一系列多次、多种的哈希运算,hashimoto()返回两个长度均为32的byte数组 - digest[]和result[]。回忆一下ethash.mine()函数中,对于hashimotoFull()的两个返回值,会直接以big.int整型数形式比较result和target;如果符合要求,则将digest取SHA3-256的哈希值(256 bits),并存于Header.MixDigest中,待以后Ethash.VerifySeal()可以加以验证。
源码func (ethash *Ethash) mine(block *types.Block, id int, seed uint64, abort chan struct{}, found chan *types.Block) {
// Extract some data from the header
var (
header = block.Header()
hash = ethash.SealHash(header).Bytes()
target = new(big.Int).Div(two256, header.Difficulty)
number = header.Number.Uint64()
dataset = ethash.dataset(number, false)
)
// Start generating random nonces until we abort or find a good one
var (
attempts = int64(0)
nonce = seed
powBuffer = new(big.Int)
)
logger := ethash.config.Log.New("miner", id)
logger.Trace("Started ethash search for new nonces", "seed", seed)
search:
for {
select {
case <-abort:
// Mining terminated, update stats and abort
logger.Trace("Ethash nonce search aborted", "attempts", nonce-seed)
ethash.hashrate.Mark(attempts)
break search
default:
// We don't have to update hash rate on every nonce, so update after after 2^X nonces
attempts++
if (attempts % (1 << 15)) == 0 {
ethash.hashrate.Mark(attempts)
attempts = 0
}
// Compute the PoW value of this nonce
digest, result := hashimotoFull(dataset.dataset, hash, nonce)
// cmp
// -1 if x < y
// 0 if x == y
// +1 if x > y
if powBuffer.SetBytes(result).Cmp(target) <= 0 {
// Correct nonce found, create a new header with it
header = types.CopyHeader(header)
header.Nonce = types.EncodeNonce(nonce)
header.MixDigest = common.BytesToHash(digest)
// Seal and return a block (if still needed)
select {
case found <- block.WithSeal(header):
logger.Trace("Ethash nonce found and reported", "attempts", nonce-seed, "nonce", nonce)
case <-abort:
logger.Trace("Ethash nonce found but discarded", "attempts", nonce-seed, "nonce", nonce)
}
break search
}
nonce++
}
}
// Datasets are unmapped in a finalizer. Ensure that the dataset stays live
// during sealing so it's not unmapped while being read.
runtime.KeepAlive(dataset)
}

miner 架构

首先外部是通过miner对象进行了操作,miner里面则是实用worker对象来实现挖矿的整体功能。miner决定着是否停止挖矿或者是否可以开始挖矿,同时还可以设置矿工的地址来获取奖励。
真正调度处理挖矿相关细节的则是在worker.go里面,我们先来看一张总体的图。
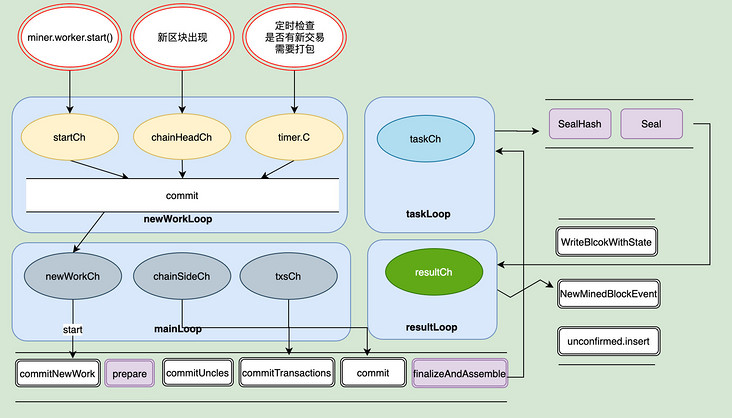
有四个循环,分别通过几个channel负责不同的事:
newWorkLoop
startCh:接收startCh信号,开始挖矿chainHeadCh:表示接收到新区块,需要终止当前的挖矿工作,开始新的挖矿。timer.C:默认每三秒检查一次是否有新交易需要处理。如果有则需要重新开始挖矿。以便将加高的交易优先打包到区块中。
在 newWorkLoop 中还有一个辅助信号,resubmitAdjustCh 和 resubmitIntervalCh。运行外部修改timer计时器的时钟。resubmitAdjustCh是根据历史情况重新计算一个合理的间隔时间。而resubmitIntervalCh则允许外部,实时通过 Miner 实例方法 SetRecommitInterval 修改间隔时间。
mainLoop
newWorkCh:接收生成新的挖矿任务信号chainSideCh:接收区块链中加入了一个新区块作为当前链头的旁支的信号txsCh:接收交易池的Pending中新加入了交易事件的信号
TaskLoop则是提交新的挖矿任务,而resultLoop则是成功出块之后做的一些处理
参考资料
https://qjpcpu.github.io/blog/2018/02/24/shen-ru-ethereumyuan-ma-cong-qu-kuai-tou-kan-gong-shi-wa-kuang/
https://segmentfault.com/a/1190000038460904

 浙公网安备 33010602011771号