

Microsoft VEMap Using Pure Javascript
Posted on 2010-04-29 22:33 Happy Coding 阅读(566) 评论(0) 编辑 收藏 举报Table of Contents
- Introduction
- Types of Map Controls
- Create your First Map
- Geocode Address
- Adding Layers
- Import Data into Map from External Source
- Working with Events
- Working with 3D Map
- Putting all things together
- Conclusion
- References
- History
Introduction
After creating the most popular article 2 years back on Google Maps, I am getting lots of replies/suggestions on my mailbox daily. I have tried to give as much support as I can. During this process, I found lots of people want me to write about Microsoft Map in the same way as I did for Google. While I search for Bing Maps API, I hardly find any links that provides good and precise knowledge on how to start with working with it. Thus, I thought of creating this article for you so that all people who wants to work with Microsoft Maps could be benefitted. I have tried to make this most simple and easy to understand, but if would be excited to see your replies and suggestions. I agree that the article is very much inspired to MSDN as I dont have enough experience with Bing as such. My intension is to give accumulate all the necessary items into a single thread.
If you want to go for Google Maps rather than Microsoft you can follow:
Google Maps in HTML, ASP.NET, PHP, JSP etc. with ease
Microsoft Launches Bing Map services to provide online Mapping Services that enable the user to create custom maps and share information about a location in their own applications. Map service also provides superior API to search for location, Geocode Address of a specific location, Draw Custom Shapes on the map, interact with users etc.
Types of Map Controls

Microsoft Map services gives us two option to create map controls.
- Microsoft Bing Map Control SDK
- Microsoft Bing Web service SDK
In both the process when client requests the server, server gets the data from live.com and sends back to the client. Thus the client always need to be connected to the internet even if it is working in LAN to get online data from Live Servers.
Bing Map Control SDK
The SDK provides Javascript API services that might be added freely to the website and start working with them. The api gives you a number of Javascript classes which one might use to create maps. As this works only in the client side using Javascript, you can use this service to any programming language you wish to (Such as JSP, PHP, ASP etc).
Bing Map Web Srvice SDK
The web service API is a programmable SOAP services implemented using Windows Communication Foundation. You can make use of the library of classes generated automatically when you add reference to the web service. You can integrate the Web service to your web site or WPF windows client and get Imaginary Data when connected to Internet.
In this Article I am going to discuss about Bing Map Control SDK which is Javascript library. I will give you examples on how to make use of Virtual Earth Map controls in your website a better way.
Create your First Map
This might seem to you most exciting. Let us make the most simple map in a web page. I am using just normal html code to make you understand a better and to make this useful to all.
To create a map Just follow the steps below :
- Add the Doctype Declaration at the Top of the Page.
<!DOCTYPE html PUBLIC "-//W3C//DTD XHTML 1.0 Transitional//EN" "http://www.w3.org/TR/xhtml1/DTD/xhtml1-transitional.dtd">
This is very useful as VEMap requires Transitional Dtd. - In
<head>section add<meta http-equiv="Content-Type" content="text/html; charset=utf-8">
Microsoft Recommends use of UTF-8 charset for a web application which displaysVEMap. - In the header section add the Javascript Declaration which downloads the Javascript file to get Imaginary data.
<script charset="UTF-8" type="text/javascript"src="http://ecn.dev.virtualearth.net/mapcontrol/mapcontrol.ashx?v=6.2&mkt=en-us"></script>
Thehttp://ecn.dev.virtualearth.net/mapcontrol/mapcontrol.ashx?v=6.2&mkt=en-usis the main JavaScript file which should be added to your web page to work withVEMapclasses.
Note : You need to always call the JavaScript using this link. You cant save the Javascript file to your server and then try creating your map from it. - Add a container which holds the imaginary data and draw the map. Preferably use Div in this regard.
<div id="myMap" style="position:relative; width:400px; height:400px;"></div>
The map will appear inside the div.
Now putting all of them together we get this page :
<!DOCTYPE html PUBLIC "-//W3C//DTD XHTML 1.0 Transitional//EN"
  "http://www.w3.org/TR/xhtml1/DTD/xhtml1-transitional.dtd"><html xmlns="http://www.w3.org/1999/xhtml">
<head>
    <title>My First Map</title>
    <meta http-equiv="Content-Type" content="text/html; charset=utf-8" />
    <script type="text/javascript" src="http://ecn.dev.virtualearth.net/mapcontrol/mapcontrol.ashx?v=6.2">
    </script>
    <script type="text/javascript">
         var map = null;
         var LA = new VELatLong(34.0540, -118.2370, altitude, VELatLong.RelativeToGround);
         function getMap()
         {
            var myMap = document.getElementById("myMap");
            myMap.style.display='';
            map = new VEMap('myMap');
            map.LoadMap(LA, 14, VEMapStyle.Road, false, VEMapMode.Mode2D, true,
 1);
         }
    </script>
</head>
<body>
    <div id="myMap" style="position: relative; width: 400px; height: 400px; display:none;">
    </div>
    <input type="button" onclick="getMap();" value="Show Map" />
</body>
</html>

Here we have created a Button which will load map directly. Now let us discuss about the few functions used in the above code:
VEMap(divelement) : This will load the Map into a div element. The Id of the div element is passed to the Constructor.
VELatLong(latitude, longitude, altitude, altitudemode): This returns a Geo point object that should be passed to LoadMap. You can define as many Geo points as you want using VELatLong. The Arguments are given below
- Latitude:
Latitudeof a single point in the globe. - Longitude :
Longitudeof the single point in the globe. - Altitude : It defines the Altitude of a point in the globe. This is optional, default value is 0
- AltitudeMode:
Altitudemodedefines how the altitude is represented.Altitudemodecan beVEAltitudeMode.Default, VEAltitudeMode.Absolute, VEAltitudeMode.RelativeToGround. This is optional and Default Value isVEAltitudeMode.Default.AltitudeModecomes very handy when working withMode3D(Discussed in later Sections).
Finally we have called map.LoadMap(point, zoom, style, fixed, mode, showSwitch, tileBuffer) This will Load the map centering the specified VELatLong point.
- VELatLong : It represents the global point to which the map will be centered
- Zoom : Represents the Zoom Level. The Range could be between 1 - 19. Default is 4
- Style : Specifies the Map Style to be displayed. The value can be :
- Road
- Shaded
- Aerial
- Hybrid
- Oblique
- Birdseye
- BirdseyeHybrid
- Fixed : Specifies whether the map could be changed by the user at runtime or not. Default is
false - Mode : Specifies whether the map should be loaded in
Mode2DorMode3Dmode. Default is 2D.
Note : Mode3D requires the browser to install the proper plugin, otherwise the map will not be displayed properly. - ShowSwitch : Defines whether the map mode switch button to be displayed in the map or not
- TileBuffer : Specifies how much tile buffer would be used to smoothen the map navigation.
Adding a Pin
Pushpin are used to point a Geo Location on the map. We can add as many pushpins as we want over the map. The Map will show the pins when the area is viewed dynamically. Let us look into the code below :
 function AddPin()
 {
     // Add a new pushpin to the center of the map.
     pinPoint = map.GetCenter();
     pinPixel = map.LatLongToPixel(pinPoint);
     var pin = map.AddPushpin(pinPoint);
     pin.SetTitle("First Pin <span style=color:red>Demo Title<>/span>");
     pin.SetDescription("This comes to the <b>description</b> of pushpin.");
     pin.SetCustomIcon("<img src='logo.jpg' />");
     pin.SetMoreInfoURL("http://dotnetricks.blogspot.com");
}
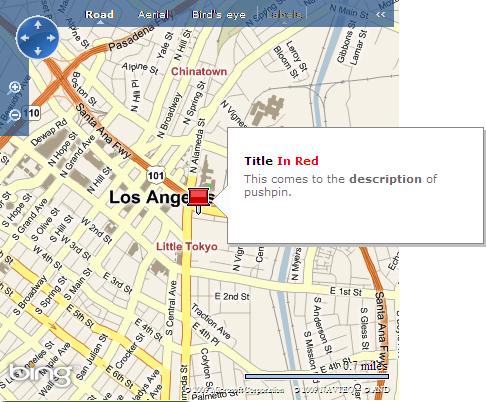
The pin will be added at the center of the map when it is called. map.GetCenter() returns an object of VELatLong which points to the center of the map. This is passed to LatLongToPixel(VeLatLong) to get the actual point VEPixel object. We need to pass this object to AddPushpin to get the pushpin added to the point.
The Pushpin object returned can set Title using SetTitle and Description using SetDescription functions. You can see I used HTML inside SetDescription and SetTitle.SetCustomIcon is used to change the default pin Icon. The SetMoreInfoUrl creates a ... which opens up a new window.
We can also set the entire html content of the pushpin using
var icon = "<div style='font-size:12px;font-weight:bold;
 border:solid 2px Black;background-color:Aqua;width:50px;'>Custom</div>";
var spec = new VECustomIconSpecification();spec.CustomHTML = icon;spec.Image = 'Airplane1.png'pin.SetCustomIcon(spec);
Here I have used VECustomIconSpecification class to define the Custom HTML of the icon.
You can read more about VECustomIconSpecification here.
Adding Shapes to the Map
We can add custom shapes over the map. We may use VEShape class to create custom Shapes over our map.
We can add different shapes to the map based on VEShapeType Enumeration. The Shapes it supports are :
- Pushpin: Used to put a
Pushpinto the Map. - Polyline :
Polylinesare Freehand lines over the map. - Polygon : They are bounded area between points.
Polyline
Polylines can be created using VEShape class. Let us look at the example :
var polyline = new VEShape(VEShapeType.Polyline,  [
    new VELatLong(39.73676229957947, -104.710693359375),
    new VELatLong(39.71563813479633, -104.25476074218751),
    new VELatLong(39.26628442213065, -103.74389648437501),
    new VELatLong(39.26203141523748, -103.5406494140625),
    new VELatLong(39.32579941789296, -102.04101562500001)  ]
);
polyline.HideIcon();polyline.SetLineColor(new
 VEColor(0,255,0,1));polyline.SetFillColor(new
 VEColor(0,0,0,0));polyline.SetLineWidth(5);
map.AddShape(polyline);
The above code will create a polyline over the map which traverses over the points specified. The HideIcon is important in this case otherwise it will put an unnecessary Pushpin Icon on the start point of the polyline. The SetLineColor specifies the RGB color generated from VEColor. The SetFillColor(which is unnecessary for Polylines) speicifies the color to fill the polyline and SetLineWidth specifies the width of the line drawn over map.
Polygon
Polygons are on the other hand gives an enclosed boundary area. You can use the code below :
var polygon = new VEShape(VEShapeType.Polygon,  [
    new VELatLong(41,-102),
    new VELatLong(37,-102),
    new VELatLong(37,-109),
    new VELatLong(41,-109)  ]
);
polygon.HideIcon();polygon.SetLineColor(new
 VEColor(255,0,0,1));polygon.SetFillColor(new
 VEColor(0,0,0,0));polygon.SetLineWidth(5);
This will produce a Polygon area with color filled within it. The code is exactly same as Polylines. As we specified no color for SetFillColor, the enclosed area will be transparent.
Geocode Address
We may use Geocoding to find a location. Geocoding in Version 6.2 got most easiest with the introduction of Find function. You may use Find Function of VEMap control to get the information of the Geographic point from an address. Let us look into its prototype : VEMap.Find(what, where, findType, shapeLayer, startIndex, numberOfResults, showResults, createResults, useDefaultDisambiguation, setBestMapView, callback);
- What : Name of the Business Entity for which search is conducted
- Where : Parameter which specifies the address to be found
- FindType : Currently it supports only
VEFindType.Businesses. So we set this as null - ShapeLayer : This represents the object of
VEShapeLayer. We will discuss how to create layers in later sections. For time being we set this to null - StartIndex: Optional parameter for the start index in the result
- numberOfResults : No of results to be returned from Search
- showResults: A boolean value that specifies whether the results to be shown in the map.
- createResults : Creates a pushpin to the position on which What is specified. Ignores if what is null.
- useDefaultDisambiguation : Specifies whether a dialog box to appear if there is ambiguity in state, country, city etc.
- setBestMapView : Automatically sets the best map view when search result is found.
- Callback : The callback which will be fired on successful search operation complete.
Now let us look at the code :
         function StartGeocoding( address )
         {
            myMap.Find(null, address,  null, null, null, null, null, null null, null,
             GeocodeCallback);
         }
        function GeocodeCallback (shapeLayer, findResults, places, moreResults,
 errorMsg)
        {
           // if there are no results, display any error message and return
           if(places == null)
           {
              alert( (errorMsg == null) ? "Address not found!!!" : errorMsg );
              return;
           }
           var bestPlace = places[0];
                      // Add pushpin to the *best* place
           var location = bestPlace.LatLong;
                      var newShape = new VEShape(VEShapeType.Pushpin,
 location);
                      var desc = "<b>Latitude:</b> " +                           location.Latitude +
 "<br><b>Longitude:</b>"
                           + location.Longitude;
           newShape.SetDescription(desc);
           newShape.SetTitle(bestPlace.Name);
           myMap.AddShape(newShape);
        }

Thus if we call StartGeocoding("Kolkata"), it will put a pointer over the New York city. In the GeocodeCallback function I have created a VEShape with a Pushpin on the best place result. If no result is found, the message box "Address not Found!!!" appears.
Adding Layers
We can create layers within the map. We use VEShapeLayer to create multiple layers over the map. This will enable us to group related informations (such as drawings, PushPins etc), so that it could be hidden and shown easily programmatically. Basically it acts as a container for all types of Shapes.
The process is simple. Create a class of VEShapeLayer, Create objects of VEShape. Add the object of Shape in the object of Layer using AddShape method. Finally, after all the shapes are added to the Shape Layer, we add the Layer to the map using AddShapeLayer of VEMap object.
We can use Show, Hide method of the Layer object to make the layer visible or invisible at times programmatically. You can also use GetShapeByIndex , GetShapeByID, DeleteShape, DeleteAllShapes of Layer object to manipulate after its been added to the Map.
Now let us look at the code below :
//create the layervar layer = new VEShapeLayer();
//add a pushpinvar pin = new VEShape(VEShapeType.Pushpin, new VELatLong(39.73,
 -105));
pin.SetTitle("Goes to Title of the Pushpin");
pin.SetDescription("Goes as Description.");
var icon = "<div style='font-size:12px;font-weight:bold;border:solid 2px
Black;
background-color:Aqua;width:50px;'>My Custom
Pushpin</div>";
pin.SetCustomIcon(icon);
pin.SetPhotoURL("http://yourserver/images/mypicture.jpg");
layer.AddShape(pin);
//add a polygonvar polygon = new VEShape(VEShapeType.Polygon,  [
    new VELatLong(41,-102),
    new VELatLong(37,-102),
    new VELatLong(37,-109),
    new VELatLong(41,-109)  ]);
polygon.HideIcon();
polygon.SetLineColor(new VEColor(255,0,0,1));
polygon.SetFillColor(new
 VEColor(0,0,255,0));
polygon.SetLineWidth(5);
layer.AddShape(polygon);
//Add a polylinevar polyline = new VEShape(VEShapeType.Polyline,  [
    new VELatLong(39.73676229957947, -104.710693359375),
    new VELatLong(39.71563813479633, -104.25476074218751),
    new VELatLong(39.26628442213065, -103.74389648437501),
    new VELatLong(39.26203141523748, -103.5406494140625),
    new VELatLong(39.32579941789296, -102.04101562500001)
  ]);
polyline.HideIcon();polyline.SetLineColor(new
 VEColor(0,255,0,1));polyline.SetFillColor(new
 VEColor(0,0,255,0));
polyline.SetLineWidth(5);
layer.AddShape(polyline);
map.AddShapeLayer(layer);
}
This code looks almost similar to the others, the only difference is, We added a new Layer using VEShapeLayer and added all the Shapes on the layer rather than adding them directly to the map. Additionally I have shown how to create CustomPin using only html. You can use SetCustomIcon to generate custom pin for your map. The SetPhotoURL function will add an image on the Description pane. You may also use ClearInfoBoxStyle / SetInfoBoxStyle methods before drawing the custom infobox youself.
Import Data into Map from External Source
Virtual Earth maps has an inbuilt to import data from 3 types of linkage :
- Shape collection using Windows Live : You can create shapes on scratchpad associated with your Live website. This data could be used very easily to your web site to draw shapes with Title and description. To Do Follow the Steps mentioned :
- Open Bing Website
- Draw custom map controls. Remember to check the Share map check box
- Get CID from the share link. For my one its BAFA39A62A57009C!227
- Draw the map using
VeShapeSourceSpecification.
Shape using GeoRSS: You can use yourGEORssfeed to generate custom map layer.Shape using KML feeds: KML feeds can also be used easily to generate you Custom Shape Layer.

Let us see the code :
var layer = new VEShapeLayer();
   var veLayerSpec = new
        VEShapeSourceSpecification(VEDataType.VECollection,"BAFA39A62A57009C!227",
 layer);
   map.ImportShapeLayerData(veLayerSpec);
Here we have used VEShapeSourceSpecification to generate the Custom Shape Layer. VEDataType could be of 3 types :
- VEDataType.VECollection : Specified if datasource is Live Scrachpad feed. I have used this resource to show the map
- VEDataType.GeoRSS : Specified if the datasource is a link which corresponds to the GEORSS Feed.
var veLayerSpec = new VEShapeSourceSpecification(VEDataType.GeoRSS, "http://localhost/GEOFeeds/myfeed.xml", layer);
- The schema Definition of GeoRSS feed :
-
<?xml version="1.0" encoding="utf-8"?><rss xmlns:georss="http://www.georss.org/georss" version="2.0"> <channel> <title>My Map</title> <link>http://www.bing.com</link> <description>This is custom map created by Abhishek Sur</description> <language>en-in</language> <item> <title>Kolkata</title> <link>http://www.bing.com/?cid=BAFA39A62A57009C!227</link> <description>This is called City of Joy<br>Click <a href='www.indiarocks.com'>here</a> for more information.</description> <guid isPermaLink="false">65c45d4e4c933e6c</guid> <pubDate>Tue, 29 Sep 2009 22:24:39 GMT</pubDate> <georss:point>22.2280904167845 86.044921875</georss:point> </item> <item> <title>Kolkata</title> <link>http://www.bing.com/?cid=BAFA39A62A57009C!227</link> <description>This is called City of Joy<br>Click <a href='www.indiabuilds.com'>here</a> for more information.</description> <guid isPermaLink="false">65c45d4e4c933e6c</guid> <pubDate>Tue, 29 Sep 2009 22:24:39 GMT</pubDate> <georss:polygon>22.816694126899844 86.044921875 25.423431426334236 88.24218750000001 26.056782885778812 81.73828125 22.044913300245675 83.759765625 21.105000275382054 85.16601562500001 21.596150576461447 87.05566406250001 22.532853707527103 87.97851562500001 22.167057857886142 88.81347656250001 23.22115498184656 88.59375 23.704894502324887 87.93457031250001 24.587090339209624 87.451171875 24.186847428521233 89.9560546875 23.584126032644097 89.12109375 22.816694126899844 86.044921875</georss:polygon> </item> - Here georss could be of 3 types:
georss:point, georss:polyline and georss:polygon.
You can generate the GeoRSS dynamically using the data from the server. To do this create one httphandler and create the response directly. Remember to useContentType=application/xml; - VEDataType.ImportXML : Specified if KML data is specified in datasource.
var veLayerSpec = new VEShapeSourceSpecification(VEDataType.ImportXML, "http://localhost/kml/myXML.xml", layer);

Thus we can see the map is successfully imported to the map in the image above.
Working with Events
Event handling with Map is the most vital section of building a map.VEMap responds to various events, starting from Normal Keyboard events, it responds to drag and drop, mouse click, scroll wheel movements etc. and also to custom Map events if attached.
Working with events is very easy. You only need to write a callback function which will be called automatically when event is triggered. And then use AttachEvent to register the event.
map.AttachEvent(eventname, functionname)
Let us look at the code :
         var map = null;
         var loc = new VELatLong(41.0540, -102.2370);
         function getMap()
         {
            var myMap = document.getElementById("myMap");
            myMap.style.display='';
            map = new VEMap('myMap');
            map.LoadMap(loc, 9, VEMapStyle.Road, false, VEMapMode.Mode2D, true,
 1);
            //create a polygon
            var polygon = new VEShape(VEShapeType.Polygon,
              [
                new VELatLong(41, -102),
                new VELatLong(37, -102),
                new VELatLong(37, -109),
                new VELatLong(41, -109)
              ]);
            polygon.SetLineColor(new VEColor(255, 0, 0, 1));
            polygon.SetFillColor(new VEColor(0, 255, 0, 0));
            polygon.SetTitle("This goes to title");
            polygon.SetDescription("This goes to Description");
            polygon.SetLineWidth(5);
            map.AddShape(polygon);
            map.AttachEvent("onclick", MouseHandler);
            map.AttachEvent("ondoubleclick", MouseHandler);
            map.AttachEvent("onmousedown", MouseHandler);
            map.AttachEvent("onmouseup", MouseHandler);
            map.AttachEvent("onmousewheel", MouseHandler);
                    }
        function MouseHandler(e)
 {
                var msg = "Mouse: ";
                msg += e.eventName;
                if (e.eventName == "onclick")
 {
                    if (e.leftMouseButton)
                        msg += "left";
                   else if (e.rightMouseButton)
                        msg += "right";
                    else
                        msg += "middle";
 ;
                }
                msg += " Clicked at ";
                msg += "X:" + e.mapX + "  Y:" + e.mapY + " with ";
                msg += " Shift: " + e.shiftKey;
                msg += " Ctrl: " + e.ctrlKey;
                msg += " Alt: " + e.altKey;
                if (e.elementID != null)
 {
 //Gets in when an element generates an event
                    msg += e.elementID + "<br>";
                    var shape = map.GetShapeByID(e.elementID);
                    msg += "Title: " + shape.GetTitle() + " and ";
                    msg += "Description: " + shape.GetDescription() + "<br>";

               }
                else
                     msg += "map";
                document.getElementById("resultDiv").innerHTML = msg;
            }

In the code above, I have added few event handlers called onclick, ondoubleclick, onmousedown ... each of which calls MouseHandler. Inside any mouseeventhandler we get an implicit object e. We can use e.eventName to get which event generates the event. e.mapX, e.mapY represents the Co-ordinate point of the map where event generated. e.elementID gets the bound element(if any) which is within the area, e.zoomLevel defines the current Zoom of the map etc. Here we got the bound Polygon and fetch its Title and description to show you.
Working with 3D Map
To work with 3D mode you need to install Virtual Earth 3D plugin. The 3D plugin will launch automatically whenever you click on 3D button of the main navigation menu. 
After installing the 3D plugin you can also install 3D Model Creation software called 3dVIA. It allows you to create custom object directly over map which you can later exported or import directly to your website very easily using ImportShapeLayerData.

After successful installation, try creating your first 3d map.
In order to work with 3D map we need to change the map mode to 3D. Using the code VEMap.SetMapMode(VEMapMode.Mode3D) will load the map in 3D. The process of creating 3D map is almost similar to how we work in 2D. Let us suppose take the example of Pushpin.
var pin = new VEShape(VEShapeType.Pushpin,new VELatLong(47.62048276634572,-122.34932886660015)); map.AddShape(pin);

We can set Altitude of the Pushpin using SetAltitude method.
   var pin = new VEShape(VEShapeType.Pushpin,new
 VELatLong(47.62048276634572,                -122.34932886660015));
 pin.SetAltitude(250);  pin.SetAltitudeMode(VEAltitudeMode.Absolute);
 map.AddShape(pin);
If we specify VEAltitudeMode.Default, or VEAltitudeMode.RelativeToGround as Altitudemode, then the altitude is set from the Ground, just like the image below.
The above picture shows how the image gets changed using altitude.
You can use 3DVIA to create custom 3D models to the Map. Go to bing.com/maps [^] , Move to 3D view and go to collections menu, then click “Open your collections” and then click on the house icon or right-click a location, then click “Add 3D model”.
After you create 3D model use this using the same process :
var veLayerSpec = new VEShapeSourceSpecification(VEDataType.VECollection, "E7DBA9A4BFD458C5!113", layer);map.ImportShapeLayerData(veLayerSpec);
Putting all things together
Finally let us create a website with all the most important things in place. For the demo I have created a custom menu for the map which will allow you to perform the most important operations. Let us look into the oode below:
<!DOCTYPE html PUBLIC "-//W3C//DTD XHTML 1.0 Transitional//EN"
                       "http://www.w3.org/TR/xhtml1/DTD/xhtml1-transitional.dtd"><html>
<head><style type="text/css">  ul, li{margin:0;padding:0;}  ul.pmenu {
   position:absolute;    margin: 0;    padding: 1px;    list-style: none;    width:
150px;     border: 1px solid #ccc;    background:white;    display:none;
z-index:10;  }  ul.pmenu li {position: relative;}  ul.pmenu li ul {    position:
absolute;     left: 150px;     top: 0;    display: none;    z-index:10;  }  ul.pmenu li a
{    display: block;    text-decoration: none;    color: black;    padding: 2px 5px 2px
 20px;  }  ul.pmenu li a:hover {    background:#335EA8;    color:white;  }  ul.pmenu
li a.parent {    background:url('drop_down_triangle.gif') no-repeat 140px 4px;  }
 ul.pmenu li a.parent:hover {    background:#335EA8
url('drop_down_triangle_hover.gif') no-repeat 140px 4px;  }  * html ul.pmenu li {
float: left; height: 1%; }  * html ul.pmenu li a { height: 1%; }  * html ul.pmenu li ul
 {left:147px;}  ul.pmenu li:hover ul, ul.pmenu li.over ul { display: block; }
ul.pmenu li ul{left:150px;}</style><script src="http://ecn.dev.virtualearth.net
/mapcontrol/mapcontrol.ashx?v=6.2"></script><script>   var map;   var shape;   var
 mapx, mapy;  function hidePopupMenu()  {    var menu =
document.getElementById('popupmenu').style.display='none';  }  function
showPopupMenu(e)  {    var menu = document.getElementById('popupmenu');    if
(e.rightMouseButton)    {        var latlong = map.LatLongToPixel(new
VELatLong(e.mapX,e.mapY));        var x = map.GetLeft();        var y =
map.GetTop();        mapx = e.mapX;        mapy = e.mapY;
menu.style.display='block'; //Showing the menu        menu.style.left = e.mapX + x;
//Positioning the menu        menu.style.top = e.mapY + y;
if(e.elementID)          shape = map.GetShapeByID(e.elementID);    }    else
{        hidePopupMenu();    }      }  function GetMap()  {    map = new
VEMap('myMap');    map.LoadMap();    map.AttachEvent('onclick',
showPopupMenu);    prepMenu();  }  function prepMenu()  {    navRoot =
document.getElementById("popupmenu");    var items =
navRoot.getElementsByTagName('li');    for (i=0; i<items.length; i++)    {      node
= items[i];      if (node.nodeName=="LI")      {      node.onmouseover =
function()      {        this.className+=" over"; //Show the submenu      }
node.onmouseout=function()      {        if (this.className.indexOf('pmenu') >
0)        {        this.className="pmenu";        }        else {        this.className =
"";        }      }      }    }  }  function deleteObject()  {     if(shape)
map.DeleteShape(shape);     shape = null;  }      function StartGeocoding( address
)         {            map.Find(null,    // what              address, // where              null,

   // VEFindType (always VEFindType.Businesses)              null,    // VEShapeLayer

(base by default)              null,    // start index for results (0 by default)

null,    // max number of results (default is 10)              null,    // show results?

(default is true)              null,    // create pushpin for what results? (ignored since
what is null)              null,    // use default disambiguation? (default is
true)              null,    // set best map view? (default is true)
         GeocodeCallback);  // call back function        }        function GeocodeCallback
(shapeLayer, findResults, places, moreResults, errorMsg)        {           // if there
are no results, display any error message and return           if(places == null)
      {              alert( (errorMsg == null) ? "There were no results" : errorMsg
);              return;           }           var bestPlace = places[0];                      // Add
pushpin to the *best* place           var location = bestPlace.LatLong;
    var newShape = new VEShape(VEShapeType.Pushpin, location);                      var
desc = "Latitude: " + location.Latitude + "<br>Longitude:" +
location.Longitude;           newShape.SetDescription(desc);
         newShape.SetTitle(bestPlace.Name);           map.AddShape(newShape);
     }        function onGeocodeClick()        {           map.Clear();           address =
document.getElementById("txtWhere").value;           StartGeocoding(address);
    }</script></head><body onload="GetMap();">    <input id="txtWhere"
type="text" style="width: 255px; " />     <input type="button" value="Geocode"
onclick="onGeocodeClick()" />  <div id='myMap' style="position:relative;
width:400px; height:400px;"></div>  <ul id="popupmenu" class="pmenu">
<li><a href="#" onclick='' class="parent">Switch view</a>    <ul class="pmenu">
   <li><a href="#"         onclick="map.SetMapStyle(VEMapStyle.Hybrid);
hidePopupMenu()">Hybrid</a></li>      <li><a href="#"
     onclick="map.SetMapStyle(VEMapStyle.Road);
hidePopupMenu()">Road</a></li>      <li><a href="#"
      onclick="map.SetMapStyle(VEMapStyle.Aerial);
hidePopupMenu()">Aerial</a></li>      <li><a href="#"
    onclick="map.SetMapStyle(VEMapStyle.Birdseye);hidePopupMenu()">Bird's
Eye</a></li>    </ul>    </li>    <li><a href="#" onclick=''
class="parent">Zoom</a>    <ul class="pmenu">      <li><a href="#"
onclick="map.ZoomIn();hidePopupMenu()">In</a></li>      <li><a href="#"
onclick="map.ZoomOut();hidePopupMenu()">Out</a></li>    </ul>    </li>    <li><a
href="#"       onclick="map.AddPushpin(map.GetCenter());hidePopupMenu();">Add
Pushpin</a></li>    <li><a href="#"       onclick="deleteObject();
hidePopupMenu();">Delete Object</a></li>  </ul></body></html>

The above code will create a Custom Context Menu which has all the functionalities that a common map should have. You can also use Geocode feature address using the Textbox in the map above.
Conclusion
VEMap control is easy to develop and very handy tool to display maps. If you need any further help, feel free to comment. I would love to answer your queries.
This is part 1 of the Article. I would also be going further for WPF users and composing Part 2 of this topic very soon which will include the Web Service solution and also I will give an idea how you can use Virtual Map earth in Windows application. Hope you will read that too.
References
For further reading and studies consult : MSDN Link [^]
Or Interactive Examples here : http://www.microsoft.com/maps/isdk/ajax/ [^]
History
Initial Post : 29th September 2009
I would like to see your replies as well. Hope you like this topic. If not, just let me know to fix it so that the article could be enriched with your thoughts.
Thank you for your support.
