关于SpringBoot应用的启动状态检查
关于SpringBoot启动状态的检查
背景:
当项目由多个SpringBoot的jar包构成,为简化启动流程,写了一个启动脚本,执行脚本的start命令即可启动多个SpringBoot的jar包。原先的启动状态的判断是使用进程号和端口号来判断的,但是这种判断方式对于SpringBoot程序来说并不准确。当服务器的内存为32G时,通过以上的条件来判断启动状态时,会发生SpringBoot服务正在启动过程中,但是先占用了进程号和端口号,并没有准备好提供服务。此时,如果访问未启动完成的前端就会报错。
解决方案:
方案一:
SpringBoot程序启动完成,准备好提供服务的时间点是Started <应用名> in <启动时间> seconds (JVM running for <JVM 运行时间>) .
其中,<应用名> 为 Spring Boot 应用的名称,<启动时间> 为 Spring Boot 应用启动所花费的时间,单位为秒,<JVM 运行时间> 为 JVM 运行时间,单位为毫秒。
这条日志信息表明 Spring Boot 应用已经成功启动,并且可以开始接收请求和处理业务逻辑。
所以,可以通过监听 ApplicationStartedEvent 事件来获得启动成功的标志,例如:
测试项目目录如下,
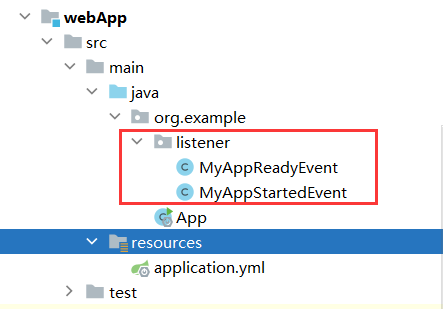
MyAppStartedEvent
package org.example.listener;

import lombok.extern.slf4j.Slf4j;
import org.springframework.boot.context.event.ApplicationStartedEvent;
import org.springframework.context.ApplicationListener;
import org.springframework.context.annotation.ComponentScan;
import org.springframework.stereotype.Component;

@Component
@Slf4j
public class MyAppStartedEvent implements ApplicationListener<ApplicationStartedEvent> {
    @Override
    public void onApplicationEvent(ApplicationStartedEvent event) {
        long timestamp = event.getTimestamp();
        log.info("ApplicationStartedEvent 时间 : {}", timestamp);
        // sleep5秒,用来确认和ReadyEvent的顺序
        try {
            Thread.sleep(5000);
        } catch (InterruptedException e) {
            throw new RuntimeException(e);
        }
    }
}
MyAppReadyEvent
package org.example.listener;

import lombok.extern.slf4j.Slf4j;
import org.springframework.boot.context.event.ApplicationReadyEvent;
import org.springframework.context.ApplicationListener;
import org.springframework.stereotype.Component;

@Component
@Slf4j
public class MyAppReadyEvent implements ApplicationListener<ApplicationReadyEvent> {

    @Override
    public void onApplicationEvent(ApplicationReadyEvent event) {
        long timestamp = event.getTimestamp();
        log.info("ApplicationReadyEvent 时间 : {}", timestamp);
    }
}
App
package org.example;


import lombok.extern.slf4j.Slf4j;
import org.springframework.boot.SpringApplication;
import org.springframework.boot.autoconfigure.SpringBootApplication;

@SpringBootApplication
@Slf4j
public class App
{
    public static void main( String[] args )
    {
        SpringApplication.run(App.class,args);
        log.info("hello world!");
    }
}
输出如下

总结:
优点:灵活,通过监听事件,可以做到细化监听状态,执行的内容也可以做到定制化
缺点:需要实现具体的逻辑,例如实现与启动启动脚本进程之间的交互
方案二:
使用Actuator组件,用来判断服务的启动状态
使用示例:
pom文件中添加依赖
    <dependency>
      <groupId>org.springframework.boot</groupId>
      <artifactId>spring-boot-starter-actuator</artifactId>
    </dependency>
在yml文件中配置监控的服务
这里不做配置,只做简单演示,如果需要详细配置,请阅读下方的参考
启动服务,访问对应ip:port/actuator/health 即可获取服务的状态
http://localhost:8080/actuator/health
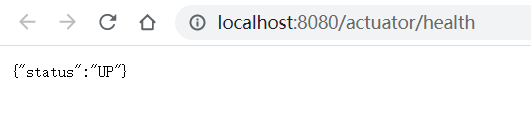
up为启动状态正常,否则为非正常。
总结:
优点:
- 简单使用不需要配置
- 可以同时监控其他组件,例如mongo、es之类的,需要配置
- 可以自定义健康状态检查
请根据项目的实际情况判断哪种方案更适合待解决的问题。
参考
本文来自博客园,作者:永恒&,转载请注明原文链接:https://www.cnblogs.com/Sun-yuan/p/17398271.html
