

Andrid09——Service
Service
Service是什么?
service是Android中实现程序后台运行的解决方案,它非常适合执行纳西而不需要和用户交互而且还要求长期运行的任务。不过需要注意的是,service并不是运行在一个独立的进程当中的,而是依赖于创建service时所在的应用程序进程。另外,service并不会自动开启线程,所有的代码都是默认运行在主线程中的。也就是序号,我们需要在service的内部手动创建子线程,并在这里执行具体的任务,否则就有可能出现主线程被阻塞的情况。
Android多线程编程
线程的基本用法
创建一个类继承Thread,然后重写父类方法run(),并在里面编写耗时逻辑即可:
class MyThread extends Thread{
    @Override
    public void run(){
        // 处理具体的逻辑
    }
}
然后在主线程中new然后start()即可启动。但是,继承的方式耦合性很高,因此更多的时候我们都选择使用Runnable接口的方式来定义一个接口,例如;
class MyThread implements Runnable {
    @Override
    public void run(){
        // 处理具体的逻辑
    }
}
使用了这种写法,启动线程的方法也需要进行相应的改变:
MyThread myThread = new MyThread();
new Thread(myThread).start();
另外你也可以采用内冥函数,或者lambda表达式的方式来定义一个runnable接口,并创建线程。
在子线程中更新UI
和许多其他的GUI库一样,Android的UI也是线程不安全的。也就是说,如果想要更新应用程序里的UI元素,必须在主线程中进行,否则就会出现异常。下面实现一个逻辑证明一下:
- 首先在布局文件定义两个控件:一个
TextView和一个Button。button用于改变textview中显示的内容 - mainactivity则在按钮中开启一个子线程,然后在子线程中调用TextView的
setText()方法来修改字符串。
    @Override
    protected void onCreate(Bundle savedInstanceState) {
        super.onCreate(savedInstanceState);
        setContentView(R.layout.activity_main);

        Button changeBtn = (Button) findViewById(R.id.button);
        TextView text = (TextView) findViewById(R.id.text);

        changeBtn.setOnClickListener(new View.OnClickListener() {
            @Override
            public void onClick(View v) {
                new Thread(new Runnable() {
                    @Override
                    public void run() {
                        text.setText("Nice to meet you");
                    }
                }).start();
            }
        });
    }
会出现如下错误,:
E/AndroidRuntime: FATAL EXCEPTION: Thread-6
    Process: com.ssozh.androidthreadtest, PID: 20362
    android.view.ViewRootImpl$CalledFromWrongThreadException: Only the original thread that created a view hierarchy can touch its views.
由此证明了Android确实是不允许在子线程中进行UI操作的。
但是有时候,我们必须在子线程里执行一些耗时任务,然后根据任务的执行结果来更新相应的UI控件。对于这种情况,Android提供了一套异步消息处理机制,完美的解决了在子线程中进行UI操作的问题。因此我们可以在主线程中创建一个handler。然后在子线程只传递值即可达到子进程控制UI变化的效果:
    public static final int UPDATE_TEXT = 1;
    private TextView text;
    private Handler handler = new Handler() {
        public void handleMessage(Message msg) {
            switch (msg.what) {
                case UPDATE_TEXT:
                    // 在这里可以进行UI操作。
                    text.setText("Nice to meet you");
                    break;
                default:
                    break;
            }
        }
    };

    @Override
    protected void onCreate(Bundle savedInstanceState) {
        super.onCreate(savedInstanceState);
        setContentView(R.layout.activity_main);

        Button changeBtn = (Button) findViewById(R.id.button);
        text = (TextView) findViewById(R.id.text);


        changeBtn.setOnClickListener(new View.OnClickListener() {
            @Override
            public void onClick(View v) {
                new Thread(new Runnable() {
                    @Override
                    public void run() {
                        // 创建子线程,并传递值给主线程的handler。
                        Message message = new Message();
                        message.what = UPDATE_TEXT;
                        handler.sendMessage(message);
                    }
                }).start();
            }
        });
    }
具体而言,在子线程中创建了一个Message,然后调用handler的sendMessage方法将这条Message发送出去。很快Handler就会收到这条Message,并在handleMessage方法中对他进行处理。而这个handleMessage方法中的代码就是在主线程中运行的了。
以上就是Android异步消息处理的基本方法,使用这个机制流可以出色的解决掉在子线程中更新UI的问题。
解析异步消息处理机制
Android中的异步消息处理主要由4个部分组成:Message、Handler、MessageQueue和Looper。
- Message是在线程之间传递消息,它可以在内部携带少量的信息,用于在不同线程之间交换数据。Message除了可以使用what字段,还可以使用arg1和arg2字段来携带一些整型数据,使用obj字段携带一个Object对象。
- Handler:它主要是用来发送和处理消息的。发送消息一般是使用Handler的sendMessage方法,而发出的消息经过一系列地辗转处理以后,最终会传递到Handler的
handleMessage方法中。 - MessageQueue:是消息队列的意思,主要用于存放所有通过Handler发送的消息。这部分消息会一直存在于消息队列中,等待被处理。每个线程只会有一个MessageQueue对象。
- Looper是每个线程中的
messageQueue的管家,调用Looper的loop()方法后,就会进入到一个无限循环当中,然后每当发现messageQueue中存在一条消息,就会把它取出,并传递到handler的handlermessage方法中。每个线程中也只会有一共looper对象。
异步消息处理流程:
-
首先需要在主线程中创建一个Handler对象,并重写
handleMessage()方法。 -
当子线程中需要进行UI操作时,就创建一个message对象,并通过handler将这条消息发送出去。
-
之后这条消息会被添加到messagequeue的队列中等待被处理。
-
同时looper则会尝试从messagequeue中取出处理消息。
-
最后分发回handler的
handlermessage()方法中。【由于handler是在主线中创建的,所以handlermessage方法也是在主线程中运行的】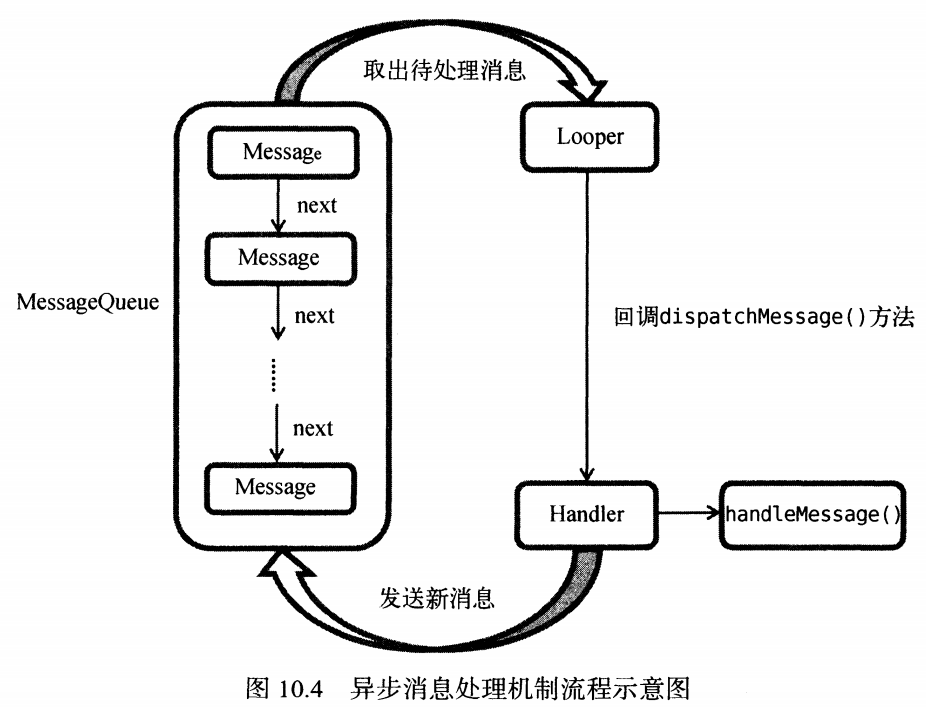
AsyncTask【 被废弃】
AsyncTask已经在已经在Android11被废弃。
AsyncTask背后的实现原理也是基于异步消息处理机制的,只是Android帮我们做了很好的封装而已。
AsyncTask是一个抽象类,如果想使用他, 就必须创建一个子类去继承他,在继承时我们可以为AsyncTask类指定三个泛型参数:
Params:在执行AsyncTask时需要传入的参数,可用于在后台任务中使用。Progress:后台任务执行时,如果需要在界面上显示当前进度,则使用这个指定的泛型作为进度单位。Result:当任务执行完毕后,如果需要对结果进行返回,则使用这里指定的泛型作为返回值类型。
形式如下:
class DownloadTask extends AsynTask<Void, Integer, Boolean>{

}
另外需要重写四个方法:
-
onPreExecute():在后天任务开始调用之前调用,用于进行一些界面上的初始化操作,比如显示一个进度条对话框等。 -
doInBackground(Params...):这个方法的所有代码都会在子进程中运行,我们应该在这里去处理耗时任务。任务一旦完成就通过return语句来将任务的执行结果返回,如果AsyncTask的第三个泛型参数指定的就是Void,就可以不返回任务执行的结果。这个过程是不能进行UI操作的 -
onProgressUpdate(Progress...):当在后台任务调用了publishProgress(Progress..)方法之后,onProgressUpdate方法就会很快被调用,该方法携带的参数就是在后台任务中传递过来的。在这个方法中可以对UI进行操作。 -
onPostExecute(Result):当后台任务执行完毕并通过return语句进行返回时,这个方法就很快被调用。返回的数据会作为参数传递到此方法中,可以利用result进行一些UI操作。
比较完整的写法如下:
RxJava
RxJava是一个响应式框架。初学RxJava只要把握两点:观察者模式 和 异步,就基本可以熟练使用RxJava了。
ReactiveX的历史
ReactiveX是Reactive Extensions的缩写,一般简写为Rx,最初是LINQ的一个扩展,由微软的架构师Erik Meijer领导的团队开发,在2012年11月开源,Rx是一个编程模型,目标是提供一致的编程接口,帮助开发者更方便的处理异步数据流,Rx库支持.NET、JavaScript和C++,Rx近几年越来越流行了,现在已经支持几乎全部的流行编程语言了,Rx的大部分语言库由ReactiveX这个组织负责维护,比较流行的有RxJava/RxJS/Rx.NET,社区网站是 reactivex.io。
推荐阅读:https://juejin.cn/post/6844904151747395591
https://github.com/ReactiveX/RxJava
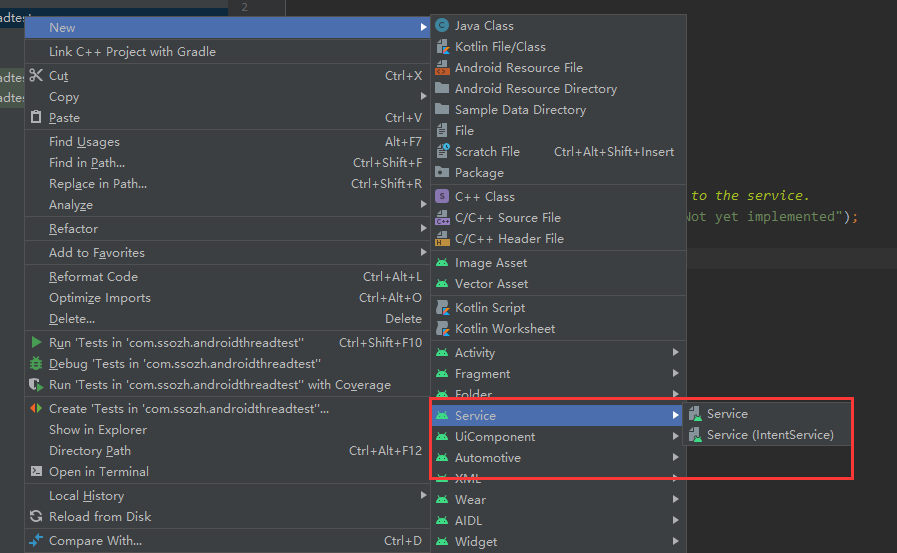
Service的基本用法
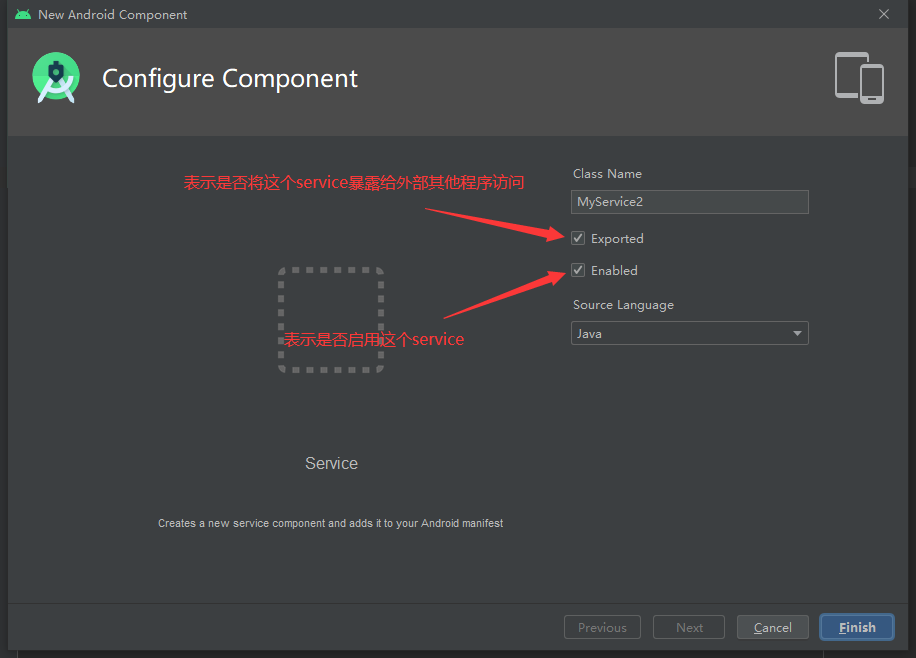
定义一个Service
作为四大组件之一,也是在项目中反键就可以看到Service按钮,进行创建的。
public class MyService extends Service {
    public MyService() {
    }

    @Override
    public IBinder onBind(Intent intent) {
        // TODO: Return the communication channel to the service.
        throw new UnsupportedOperationException("Not yet implemented");
    }

    @Override
    public void onCreate() {
        super.onCreate();
    }

    @Override
    public int onStartCommand(Intent intent, int flags, int startId) {
        return super.onStartCommand(intent, flags, startId);
    }

    @Override
    public void onDestroy() {
        super.onDestroy();
    }
}
第一二个是必须重写的抽象方法,后面三个则是每个service中最常用到的3个方法了。
-
onCreate():在service创建的时候调用。 -
onDestory():销毁的时候使用,回收不再使用的资源。 -
onStartCommand():在每次service启动的时候调用。
另外,service是需要在manifest中注册的,不过Android studio会自动帮我们创建好。【如果BUG可以看看是不是少了这个部分】
启动和停止Service
定义好service之后,接下来就应该考虑如何启动以及停止这个service。启动和停止的方法主要是借助intent来实现的。
代码如下:
    @Override
    protected void onCreate(Bundle savedInstanceState) {
        super.onCreate(savedInstanceState);
        setContentView(R.layout.activity_main);

        Button startServiceBtn = (Button) findViewById(R.id.start_service_btn);
        Button stopServiceBtn = (Button) findViewById(R.id.stop_service_btn);
        startServiceBtn.setOnClickListener(new View.OnClickListener() {
            @Override
            public void onClick(View v) {
                Intent intent = new Intent(MainActivity.this, MyService.class);
                startService(intent);
            }
        });

        stopServiceBtn.setOnClickListener(new View.OnClickListener() {
            @Override
            public void onClick(View v) {
                Intent intent = new Intent(MainActivity.this, MyService.class);
                stopService(intent);
            }
        });
    }
// 在MyService中的代码:
    @Override
    public void onCreate() {
        super.onCreate();
        Log.d(TAG, "onCreate: executed");
    }

    @Override
    public void onDestroy() {
        super.onDestroy();
        Log.d(TAG, "onDestroy: executed");
    }

    @Override
    public int onStartCommand(Intent intent, int flags, int startId) {
        Log.d(TAG, "onStartCommand: executed");
        return super.onStartCommand(intent, flags, startId);
    }
结果(过滤后)如下:
2020-12-13 00:05:50.629 30404-30404/com.ssozh.servicetest D/MyService: onCreate: executed
2020-12-13 00:05:50.629 30404-30404/com.ssozh.servicetest D/MyService: onStartCommand: executed
2020-12-13 00:05:54.764 30404-30404/com.ssozh.servicetest D/MyService: onDestroy: executed
2020-12-13 00:06:16.449 30404-30404/com.ssozh.servicetest D/MyService: onCreate: executed
2020-12-13 00:06:16.450 30404-30404/com.ssozh.servicetest D/MyService: onStartCommand: executed
2020-12-13 00:06:22.539 30404-30404/com.ssozh.servicetest D/MyService: onDestroy: executed
onCreate()和onStartCommand()的区别:
onCreate():在service第一次创建的时候被调用。【因为第一次创建,所以先创建,在启动两个都调用了】onStartCommand():在每次启动service的时候都会被调用。
从Android8.0系统开始,应用的后台功能被大幅削减。现在只有在当前应用保持在前台可见状态的情况下,service才能保证稳定运行,一旦应用进入后台之后,service随时可能被系统回收。当然如果你真的非常需要长期在后台执行一些任务,可以使用前台service或者workmanager。
Activity和Service进行通信
实际上上面的功能只是实现了启动和关闭service,并不能让activity和service进行通信,实际上为了实现这一功能,是需要借助onBind()方法。假设我们希望MyService里面提供了一个下载功能,然后在activity中可以决定何时开始下载,以及随时查看下载的进度。实现这个代码的思路是创建一个专门的Binder对象来对下载功能进行管理。
通信过程:
-
首先创建一个ServiceConnection的匿名类实现,并在里面重写了
onServiceConnected()方法和onServiceDisconnected()方法。onServiceConnected会在activity和service成功绑定的时候调用onServiceDisconnected只有在service的创建进程崩溃或者被杀掉的时候才会调用。
-
在
onServiceConnected方法中,又通过向下转型得到了DownloadBinder的实例,然后让私有变量指向他, 这样就可以在activity中操作service中的实例,从而达到了通信的效果。public class MainActivity extends AppCompatActivity { private DownloadBinder downloadBinder; private ServiceConnection connection = new ServiceConnection() { @Override public void onServiceConnected(ComponentName name, IBinder service) { // 重点:获取了这个对象的具体代码!【未绑定!】 downloadBinder = (DownloadBinder) service; // 下面两句也可以没有 downloadBinder.startDownload(); downloadBinder.getProgress(); } // ... } } -
但是,虽然实现了通信的功能,但是没有绑定,具体绑定是通过创建activity和service的Intent,然后通过
bindService方法实现绑定:Intent bindIntent = new Intent(MainActivity.this, MyService.class); bindService(bindIntent,connection,BIND_AUTO_CREATE); // 绑定服务,三个参数:Intent(activity,service), serviceconnection实例 和 标志位 -
unbindService()方法也是用于解绑
全部代码:
public class MainActivity extends AppCompatActivity {

    private DownloadBinder downloadBinder;
    private ServiceConnection connection = new ServiceConnection() {
        @Override
        public void onServiceConnected(ComponentName name, IBinder service) {
            downloadBinder = (DownloadBinder) service;
            // 下面两句也可以没有
            downloadBinder.startDownload();
            downloadBinder.getProgress();
        }

        @Override
        public void onServiceDisconnected(ComponentName name) {

        }
    };

    @Override
    protected void onCreate(Bundle savedInstanceState) {
        super.onCreate(savedInstanceState);
        setContentView(R.layout.activity_main);

        Button startServiceBtn = (Button) findViewById(R.id.start_service_btn);
        Button stopServiceBtn = (Button) findViewById(R.id.stop_service_btn);
        Button bindServiceBtn = (Button) findViewById(R.id.bind_service_btn);
        Button unbindServiceBtn = (Button) findViewById(R.id.unbind_service_btn);
        startServiceBtn.setOnClickListener(new View.OnClickListener() {
            @Override
            public void onClick(View v) {
                Intent intent = new Intent(MainActivity.this, MyService.class);
                startService(intent);
            }
        });

        stopServiceBtn.setOnClickListener(new View.OnClickListener() {
            @Override
            public void onClick(View v) {
                Intent intent = new Intent(MainActivity.this, MyService.class);
                stopService(intent);
            }
        });

        bindServiceBtn.setOnClickListener(new View.OnClickListener() {
            @Override
            public void onClick(View v) {
                Intent bindIntent = new Intent(MainActivity.this, MyService.class);
                bindService(bindIntent,connection,BIND_AUTO_CREATE); // 绑定服务
            }
        });

        unbindServiceBtn.setOnClickListener(new View.OnClickListener() {
            @Override
            public void onClick(View v) {
                unbindService(connection);
            }
        });

        Button seeBtn = (Button) findViewById(R.id.see_service_btn);
        seeBtn.setOnClickListener(new View.OnClickListener() {
            @Override
            public void onClick(View v) {
                downloadBinder.getProgress();
            }
        });
    }
}

// DownloadBinder类
public class DownloadBinder extends Binder {

    private static final String TAG = "DownloadBinder";

    public void startDownload(){
        Log.d(TAG, "startDownload: startDownload");
    }

    public void getProgress(){
        Log.d(TAG, "getProgress: executed");
    }
}

// service类
public class MyService extends Service {
    private final String TAG = "MyService";
    private DownloadBinder mbinder = new DownloadBinder();
    public MyService() {
    }

    @Override
    public IBinder onBind(Intent intent) {
        return mbinder;
    }

    @Override
    public void onCreate() {
        super.onCreate();
        Log.d(TAG, "onCreate: executed");
    }
	//...
}
Service的生命周期
一旦在任何位置调用了context的startService()方法,相应的service就会启动:
onCreate()方法执行onStartCommand()方法执行
如果context调用了stopService或stopSelf。就会停止,service调用了:
onDestory方法。
可以调用context的bindService()来获取一个服务的持久连接,相应的service就会:
-
如果这个服务还没有启动,则先调用
onCreate方法, -
然后调用
onBind()方法 -
之后调用方可以获取到
onBind()方法里面返回的IBinder对象的实例。
如果context调用了unbindService方法:
onDestory也会执行。
如果同时调用了startService和bindService方法的时候,根据Android的机制,必须要让上面两种状态同时不满足,服务才会被销毁。也就是说,这种情况下,必须要同时调用stopService和unbindService两个方法,onDestory方法才会被执行
Service的更多技巧
使用前台Service
service几乎都是在后台运行的,从Android8.0系统开始,只有当应用保持在前台可见状态的情况下,service才能保证稳定运行,一旦应用进入后台之后,Service随时都有可能被系统回收。如果你想service能够一直保持运行状态,就可以考虑使用前台service。前台service和普通的service最大区别就在于。它一直会有一个正在运行的图片在系统的状态栏显示,下拉状态栏后可以看到更加详细的信息,非常类似于通知的效果。
创建一个前台service,只需要修改onCreate()方法中的代码,加入创建通知的方法,只不过在构建Notification对象后并没有使用NotificationManager将通知显示出来,而是调用了startForeground()方法。这个方法两个参数:
- 第一个参数:通知的id。类似于
notify()方法的第一个参数。 - 第二个参数:构建的
Notification对象。
public class MyService extends Service {
    private final String TAG = "MyService";
    private DownloadBinder mbinder = new DownloadBinder();
    public MyService() {
    }

    @Override
    public IBinder onBind(Intent intent) {
        return mbinder;
    }

    @Override
    public void onCreate() {
        super.onCreate();
        Log.d(TAG, "onCreate: executed");
        // 获取manager,创建channel
        String channelId = "my_service";
        NotificationManager manager =(NotificationManager) getSystemService(Context.NOTIFICATION_SERVICE);
        if(Build.VERSION.SDK_INT>Build.VERSION_CODES.O){
            NotificationChannel channel = new NotificationChannel(channelId, "foreground notification", NotificationManager.IMPORTANCE_DEFAULT);
            manager.createNotificationChannel(channel);
        }
        Intent intent = new Intent(this,MainActivity.class);
        PendingIntent pi = PendingIntent.getActivity(this,0,intent,0);
        Notification notification = new NotificationCompat.Builder(this,channelId)  // 如果不写channelId是不支持的!
                .setContentTitle("This is content titile")
                .setContentText("This is content text")
                .setWhen(System.currentTimeMillis())
                .setSmallIcon(R.mipmap.ic_launcher)
                .setLargeIcon(BitmapFactory.decodeResource(getResources(),R.mipmap.ic_launcher))
                .setContentIntent(pi)
                .build();
            startForeground(1,notification);
    }
【注意上面的代码是在service中写的,虽然和notification相似,但是notification是写在activity中的。】
因为从Android9.0系统开始,使用前台service必须在Androidmanifest文件中进行权限声明才行:
<uses-permission android:name="android.permission.FOREGROUND_SERVICE"/>
如果你遇到了以下错误:
020-12-13 15:19:32.429 8399-8399/com.ssozh.servicetest E/AndroidRuntime: FATAL EXCEPTION: main
    Process: com.ssozh.servicetest, PID: 8399
    android.app.RemoteServiceException: Bad notification for startForeground
可能是因为你没有创建channel,而只写了一个channelId。
使用IntentService
service中的代码都是默认运行在主线程当中的,如果直接在service中处理一些耗时,就很容易出现ANR(Application Not Responding)的情况。所以这个时候就需要用到Android多线程编程的技术了,我们应该在service的么给具体id方法里开启一个子线程,然后在这里处理那些耗时的逻辑。具体创建线程并允许的代码应该写在onStartCommand()中。但是这样写的话,服务一旦启动后,就会一直处于运行状态,必须调用stopService()或者stopSelf()方法才能让 服务停止下来。标准代码如下:
    @Override
    public int onStartCommand(Intent intent, int flags, int startId) {
        Log.d(TAG, "onStartCommand: executed");
        new Thread(new Runnable() {
            @Override
            public void run() {
                // 处理具体的逻辑
                stopSelf();
            }
        }).start();
        return super.onStartCommand(intent, flags, startId);
    }
虽然说这种写法不复杂,但是总会有一些人忘记开线程,或者忘记调用stopSelf()方法。为了可以创建一个异步的、会自动停止的服务,Android专门提供了一个IntentService类,来解决前面提出的两个尴尬问题。
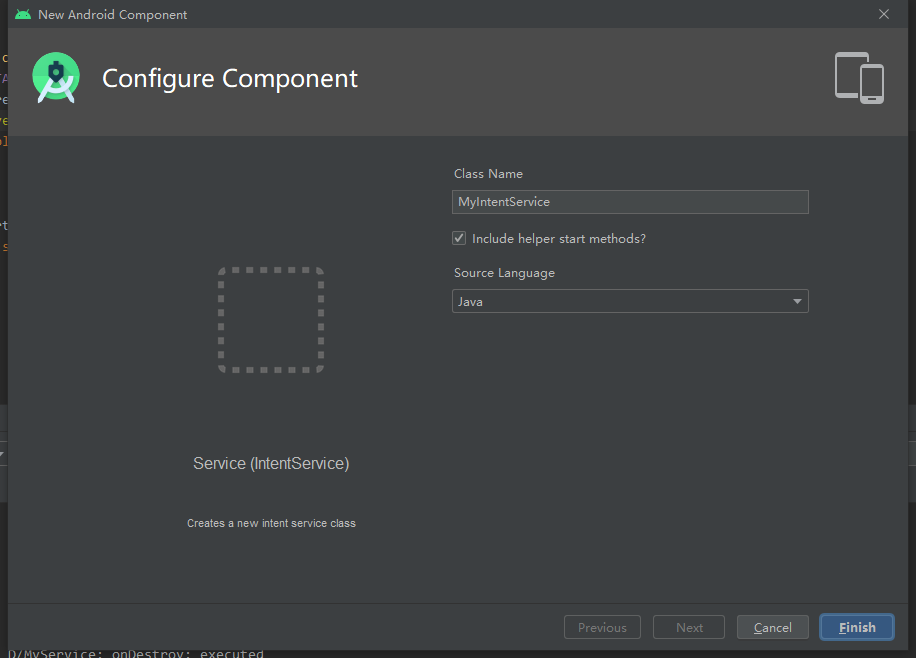
首先创建一个IntentService:
- 他会自动创建一个
MyIntentService继承IntentService类。 - 会自动在manifest中注册。
然后在mainactivity中,编写一个button 的回调事件(注意是startService):
Button startIntentService = (Button) findViewById(R.id.start_intent_service_btn);
startIntentService.setOnClickListener(new View.OnClickListener() {
    @Override
    public void onClick(View v) {
        Log.d(TAG, "Thread id is "+Thread.currentThread().getName());
        Intent intent = new Intent(MainActivity.this, MyIntentService.class);
        startService(intent);
    }
});
同时重写MyIntentService中的onHandleIntent方法:
    @Override
    protected void onHandleIntent(Intent intent) {
        // 打印当前线程
        Log.d(TAG, "onHandleIntent: Thread id is "+Thread.currentThread().getName());
        if (intent != null) {
            final String action = intent.getAction();
            if (ACTION_FOO.equals(action)) {
                final String param1 = intent.getStringExtra(EXTRA_PARAM1);
                final String param2 = intent.getStringExtra(EXTRA_PARAM2);
                handleActionFoo(param1, param2);
            } else if (ACTION_BAZ.equals(action)) {
                final String param1 = intent.getStringExtra(EXTRA_PARAM1);
                final String param2 = intent.getStringExtra(EXTRA_PARAM2);
                handleActionBaz(param1, param2);
            }
        }
    }
执行,效果如下:
2020-12-13 16:35:18.980 14925-14925/com.ssozh.servicetest D/MainActivity: Thread id is main
2020-12-13 16:35:19.005 14925-15048/com.ssozh.servicetest D/MyIntentService: onHandleIntent: Thread id is IntentService[MyIntentService]
2020-12-13 16:35:19.017 14925-14925/com.ssozh.servicetest D/MyIntentService: onDestroy: executed


【推荐】国内首个AI IDE,深度理解中文开发场景,立即下载体验Trae
【推荐】编程新体验,更懂你的AI,立即体验豆包MarsCode编程助手
【推荐】抖音旗下AI助手豆包,你的智能百科全书,全免费不限次数
【推荐】轻量又高性能的 SSH 工具 IShell:AI 加持,快人一步
· 开发者必知的日志记录最佳实践
· SQL Server 2025 AI相关能力初探
· Linux系列:如何用 C#调用 C方法造成内存泄露
· AI与.NET技术实操系列(二):开始使用ML.NET
· 记一次.NET内存居高不下排查解决与启示
· Manus重磅发布:全球首款通用AI代理技术深度解析与实战指南
· 被坑几百块钱后,我竟然真的恢复了删除的微信聊天记录!
· 没有Manus邀请码?试试免邀请码的MGX或者开源的OpenManus吧
· 园子的第一款AI主题卫衣上架——"HELLO! HOW CAN I ASSIST YOU TODAY
· 【自荐】一款简洁、开源的在线白板工具 Drawnix