
Spring入门
一、Spring概述介绍
Spring 框架是一个开源的 Java 平台,它最初是由 Rod Johnson 编写的,并且于 2003 年 6 月首
次在 Apache 2.0 许可下发布。
Spring 是轻量级的框架,其基础版本只有 2 MB 左右的大小。
Spring 框架的核心特性是可以用于开发任何 Java 应用程序,但是在 Java EE 平台上构建 web 应
用程序是需要扩展的。 Spring 框架的目标是使 J2EE 开发变得更容易使用,通过启用基于 POJO
编程模型来促进良好的编程实践。
1、Spring Farmework
是 Spring 基础框架,可以视为 Spring 基础设施,基本上任何其他 Spring 项目都是以 Spring Framework
为基础的。
特性
- 非侵入式:使用 Spring Framework 开发应用程序时,Spring 对应用程序本身的结构影响非常小。对领域模型可以做到零污染;对功能性组件也只需要使用几个简单的注解进行标记,完全不会破坏原有结构,反而能将组件结构进一步简化。这就使得基于 Spring Framework 开发应用程序时结构清晰、简洁优雅。
- 控制反转:IOC——Inversion of Control,翻转资源获取方向。把自己创建资源、向环境索取资源变成环境将资源准备好,我们享受资源注入。
- 面向切面编程:AOP——Aspect Oriented Programming,在不修改源代码的基础上增强代码功能。
- 容器:Spring IOC 是一个容器,因为它包含并且管理组件对象的生命周期。组件享受到了容器化的管理,替程序员屏蔽了组件创建过程中的大量细节,极大的降低了使用门槛,大幅度提高了开发
效率。 - 组件化:Spring 实现了使用简单的组件配置组合成一个复杂的应用。在 Spring 中可以使用 XML和 Java 注解组合这些对象。这使得我们可以基于一个个功能明确、边界清晰的组件有条不紊的搭建超大型复杂应用系统。
- 声明式:很多以前需要编写代码才能实现的功能,现在只需要声明需求即可由框架代为实现。
- 一站式:在 IOC 和 AOP 的基础上可以整合各种企业应用的开源框架和优秀的第三方类库。而且Spring 旗下的项目已经覆盖了广泛领域,很多方面的功能性需求可以在 Spring Framework 的基础上全部使用 Spring 来实现。
Spring Framework五大功能模块
| 功能模块 | 功能介绍 |
|---|---|
| Core Container | 核心容器,在 Spring 环境下使用任何功能都必须基于 IOC 容器。 |
| AOP&Aspects | 面向切面编程 |
| Testing | 提供了对 junit 或 TestNG 测试框架的整合。 |
| Data Access/Integration | 提供了对数据访问/集成的功能。 |
| Spring MVC | 提供了面向Web应用程序的集成功能。 |
二、IOC容器
IOC:Inversion of Control,翻译过来是反转控制。
在开发中时,我们不需要知道知道创建资源对象的方式,只需要提供接收对象的方式即可。将对象的创建、销毁交给spring进行管理。
1、DI
DI:Dependency Injection,翻译过来是依赖注入。
DI 是 IOC 的另一种表述方式:即组件以一些预先定义好的方式(例如:setter 方法)接受来自于容器的资源注入。相对于IOC而言,这种表述更直接。
IOC 就是一种反转控制的思想, 而 DI 是对 IOC 的一种具体实现。
2、 IOC容器在Spring中的实现
IOC 容器中管理的组件也叫做 bean。在创建bean 之前,首先需要创建 IOC 容器。
Spring 提供了 IOC 容器的两种实现方式:
- 1)
BeanFactory
这是 IOC 容器的基本实现,是 Spring 内部使用的接口。面向 Spring 本身,不提供给开发人员使用。 - 2)
ApplicationContext
BeanFactory 的子接口,提供了更多高级特性。面向 Spring 的使用者,几乎所有场合都使用
ApplicationContext 而不是底层的 BeanFactory。 - ApplicationContext的主要实现类
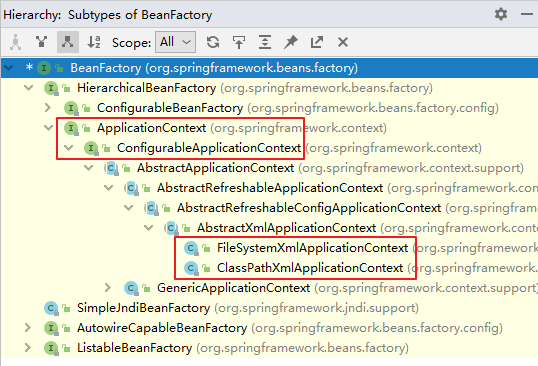
| 类型名 | 简介 |
|---|---|
| ClassPathXmlApplicationContext | 通过读取类路径下的 XML 格式的配置文件创建 IOC 容器 对象。 |
| FileSystemXmlApplicationContext | 通过文件系统路径读取 XML 格式的配置文件创建 IOC 容 器对象 |
| ConfigurableApplicationContext | ApplicationContext 的子接口,包含一些扩展方法 refresh() 和 close() ,让 ApplicationContext 具有启动、 关闭和刷新上下文的能力。 |
| WebApplicationContext | 专门为 Web 应用准备,基于 Web 环境创建 IOC 容器对 象,并将对象引入存入 ServletContext 域中。 |
三、XML方式管理bean
1、入门案例
- 引入依赖
 <!-- 基于Maven依赖传递性,导入spring-context依赖即可导入当前所需所有jar包    -->
<dependency>
	<groupId>org.springframework</groupId>
	<artifactId>spring-context</artifactId>
	<version>5.3.1</version>
</dependency>
- 创建类
public class HelloWorld {
    public void sayHello(){
        System.out.println("Hello Spring!");
    }
}
- 创建Spring的配置文件
<?xml version="1.0" encoding="UTF-8"?>
<beans xmlns="http://www.springframework.org/schema/beans"
       xmlns:xsi="http://www.w3.org/2001/XMLSchema-instance"
       xsi:schemaLocation="http://www.springframework.org/schema/beans http://www.springframework.org/schema/beans/spring-beans.xsd">

    <!--
        配置HelloWorld所对应的bean,即将HelloWorld的对象交给Spring的IOC容器管理
        通过bean标签配置IOC容器所管理的bean
        属性:
        id:设置bean的唯一标识
        class:设置bean所对应类型的全类名
    -->
    <bean id="helloworld" class="com.snow.pojo.HelloWorld"></bean>
</beans>
- 测试
    @Test
    public void testSayHello(){
        ApplicationContext ac = new ClassPathXmlApplicationContext("applicationContext.xml");
        HelloWorld helloworld = ac.getBean("helloworld", HelloWorld.class);
        helloworld.sayHello();
    }
2、获取bean的三种方式
- 根据id获取
HelloWorld bean = ac.getBean("helloworld");
- 根据类型获取
HelloWorld bean = ac.getBean(HelloWorld.class);
- 根据id和类型获取
HelloWorld bean = ac.getBean("helloworld", HelloWorld.class);
3、依赖注入的两种方式
实体类
public class Student {
	private Integer id;
	private String name;
	private Integer age;
	private String sex;

	public Student() {

	}

	public Student(Integer id, String name, Integer age, String sex) {
		this.id = id;
		this.name = name;
		this.age = age;
		this.sex = sex;
	}


	public Integer getId() {
		return id;
	}
	public void setId(Integer id) {
		this.id = id;
	}
	public String getName() {
		return name;
	}
	public void setName(String name) {
		this.name = name;
	}
	public Integer getAge() {
		return age;
	}
	public void setAge(Integer age) {
		this.age = age;
	}
	public String getSex() {
		return sex;
	}
	public void setSex(String sex) {
		this.sex = sex;
	}
}
- setter方式注入
    <bean id="studentTwo" class="com.atguigu.spring.pojo.Student">
        <!--
            property:通过成员变量的set方法进行赋值
            name:设置需要赋值的属性名(和set方法有关)
            value:设置为属性所赋的值
        -->
        <property name="sid" value="1001"></property>
        <property name="sname" value="张三"></property>
        <property name="age" value="23"></property>
        <property name="gender" value="男"></property>
    </bean>
- 构造器注入
constructor-arg标签还有两个属性可以进一步描述构造器参数:
index:指定参数所在位置的索引(从0开始)
name:指定参数名
    <bean id="studentThree" class="com.atguigu.spring.pojo.Student">
        <constructor-arg value="1002"></constructor-arg>
        <constructor-arg value="李四"></constructor-arg>
        <constructor-arg value="女"></constructor-arg>
        <constructor-arg value="24" name="age"></constructor-arg>
    </bean>
4、为类、数组、集合类型属性赋值
- 类属性赋值
<!-- ref属性:引用IOC容器中某个bean的id,将所对应的bean为属性赋值    -->
<property name="clazz" ref="clazzOne"></property>
- list集合属性赋值
<property name="students">
	<list>
		<ref bean="studentOne"></ref>
		<ref bean="studentTwo"></ref>
		<ref bean="studentThree"></ref>
	</list>
</property>
- map集合属性赋值
<property name="teacherMap">
	<map>
		<entry key="10086" value-ref="teacherOne"></entry>
		<entry key="10010" value-ref="teacherTwo"></entry>
	</map>
</property>
- 数组属性赋值
<property name="hobby">
	<array>
		<value>抽烟</value>
		<value>喝酒</value>
		<value>烫头</value>
	</array>
</property>
5、引入外部属性文件
- 加入依赖
<!-- MySQL驱动 -->
<dependency>
	<groupId>mysql</groupId>
	<artifactId>mysql-connector-java</artifactId>
	<version>8.0.16</version>
</dependency>
<!-- 数据源 -->
<dependency>
	<groupId>com.alibaba</groupId>
	<artifactId>druid</artifactId>
	<version>1.0.31</version>
</dependency>
- 创建外部文件
jdbc.driver=com.mysql.cj.jdbc.Driver
jdbc.url=jdbc:mysql://localhost:3306/ssm?serverTimezone=UTC
jdbc.username=root
jdbc.password=123456
- 引入外部文件
    <!-- 引入外部属性文件 -->
    <context:property-placeholder location="classpath:jdbc.properties"/>

    <!-- 配置数据源 -->
    <bean id="druidDataSource" class="com.alibaba.druid.pool.DruidDataSource">
        <property name="driverClassName" value="${jdbc.driver}"></property>
        <property name="url" value="${jdbc.url}"></property>
        <property name="username" value="${jdbc.username}"></property>
        <property name="password" value="${jdbc.password}"></property>
    </bean>
- 测试
    @Test
    public void dataSourceTest() throws SQLException {
        ApplicationContext ac = new ClassPathXmlApplicationContext("applicationContext.xml");
        DruidDataSource dataSource = ac.getBean(DruidDataSource.class);
        System.out.println(dataSource.getConnection());
    }
6、bean的作用域和生命周期
-
作用域
在Spring中可以通过配置bean标签的scope属性来指定bean的作用域范围,各取值含义参加下表(如果是在WebApplicationContext环境下才会有下面两个作用域):
|取值 | 含义 |
| ------------ | ------------ |
| singleton(默认) | 在IOC容器中,这个bean的对象始终为单实例|
| prototype | 这个bean在IOC容器中有多个实例 |
| request | 在一个请求范围内有效 |
| session | 在一个会话范围内有效 | -
生命周期
1.bean对象创建(调用无参构造器)
2.给bean对象设置属性
3.bean对象初始化之前操作(由bean的后置处理器负责)
4.bean对象初始化(需在配置bean时指定初始化方法)
5.bean对象初始化之后操作(由bean的后置处理器负责)
6.bean对象就绪可以使用
7.bean对象销毁(需在配置bean时指定销毁方法)
8.IOC容器关闭
四、自动装配
自动装配:
根据指定的策略,在IOC容器中匹配某一个bean,自动为指定的bean中所依赖的类类型或接口类型属性赋值
1、基于XML方式自动装配
使用bean标签的autowire属性设置自动装配效果
自动装配方式:byType
- byType:根据类型匹配IOC容器中的某个兼容类型的bean,为属性自动赋值
若在IOC中,没有任何一个兼容类型的bean能够为属性赋值,则该属性不装配,即值为默认值null。
若在IOC中,有多个兼容类型的bean能够为属性赋值,则抛出异常NoUniqueBeanDefinitionException - byName:将自动装配的属性的属性名,作为bean的id在IOC容器中匹配相对应的bean进行赋值
UserController类
public class UserController {

    private UserService userService;

    public void setUserService(UserService userService) {
        this.userService = userService;
    }

    public void saveUser(){
        userService.saveUser();
    }
}
    <!-- 基于xml方式自动装配 -->
    <bean class="com.snow.controller.UserController" autowire="byType"></bean>

    <bean id="userService" class="com.snow.service.impl.UserServiceImpl" autowire="byType"></bean>

    <bean id="userDao" class="com.snow.dao.impl.UserDaoImpl"></bean>
2、基于注解方式自动装配
- 添加依赖
<!-- 基于Maven依赖传递性,导入spring-context依赖即可导入当前所需所有jar包 -->
<dependency>
	<groupId>org.springframework</groupId>
	<artifactId>spring-context</artifactId>
	<version>5.3.1</version>
</dependency>
-
标识组件常用注解
@Component:将类标识为普通组件
@Controller:将类标识为控制层组件
@Service:将类标识为业务层组件
@Repository:将类标识为持久层组件
@Controller、@Service、@Repository这三个注解只是在@Component注解
的基础上起了三个新的名字。
对于Spring使用IOC容器管理这些组件来说没有区别。所以@Controller、@Service、@Repository这三个注解只是给开发人员看的,让我们能够便于分辨组件的作用。 -
创建组件
控制层组件UserController@Controller public class UserController { @Autowired private UserService userService; public void saveUser(){ userService.saveUser(); } }接口UserService
public interface UserService {
	void saveUser();
}
业务层组件UserServiceImpl
@Service
public class UserServiceImpl implements UserService {
	@Autowired
	private UserDao userDao;
	@Override
	public void saveUser() {
		userDao.saveUser();
	}

}
接口UserDao
public interface UserDao {
	void saveUser();
}
持久层组件UserDaoImpl
@Repository public class UserDaoImpl implements UserDao { @Override public void saveUser() { System.out.println("保存成功"); } } -
配置文件中开启扫描组件
需要引入context命名空间
<?xml version="1.0" encoding="UTF-8"?>
<beans xmlns="http://www.springframework.org/schema/beans"
       xmlns:xsi="http://www.w3.org/2001/XMLSchema-instance"
       xmlns:context="http://www.springframework.org/schema/context"
       xsi:schemaLocation="http://www.springframework.org/schema/beans http://www.springframework.org/schema/beans/spring-beans.xsd http://www.springframework.org/schema/context https://www.springframework.org/schema/context/spring-context.xsd">

    <!-- 扫描组件 -->
    <context:component-scan base-package="com.snow"></context:component-scan>

</beans>
五、AOP
AOP(Aspect Oriented Programming)是一种设计思想,是软件设计领域中的面向切面编程,它是面向对象编程的一种补充和完善,它以通过预编译方式和运行期动态代理方式实现在不修改源代码的情况下给程序动态统一添加额外功能的一种技术。
作用:
- 简化代码:把方法中固定位置的重复的代码抽取出来,让被抽取的方法更专注于自己的核心功能, 提高内聚性。
- 代码增强:把特定的功能封装到切面类中,看哪里有需要,就往上套,被套用了切面逻辑的方法就 被切面给增强了。
1、相关术语
- 横切关注点
从每个方法中抽取出来的同一类非核心业务。在同一个项目中,我们可以使用多个横切关注点对相关方 法进行多个不同方面的增强。
这个概念不是语法层面天然存在的,而是根据附加功能的逻辑上的需要:有十个附加功能,就有十个横 切关注点。 - 通知
每一个横切关注点上要做的事情都需要写一个方法来实现,这样的方法就叫通知方法。 - 切面
封装通知方法的类。 - 目标
被代理的目标对象。 - 代理
向目标对象应用通知之后创建的代理对象。 - 连接点
这也是一个纯逻辑概念,不是语法定义的。
就是方式需要实现增强共功能的地方。 - 切入点
定位连接点的方式。
每个类的方法中都包含多个连接点,所以连接点是类中客观存在的事物(从逻辑上来说)。
如果把连接点看作数据库中的记录,那么切入点就是查询记录的 SQL 语句。
Spring 的 AOP 技术可以通过切入点定位到特定的连接点。
切点通过 org.springframework.aop.Pointcut 接口进行描述,它使用类和方法作为连接点的查询条件。
3、通知类型及顺序
- 通知分类:
- 前置通知:在被代理的目标方法前执行
- 返回通知:在被代理的目标方法成功结束后执行(寿终正寝)
- 异常通知:在被代理的目标方法异常结束后执行(死于非命)
- 后置通知:在被代理的目标方法最终结束后执行(盖棺定论)
- 环绕通知:使用try...catch...finally结构围绕整个被代理的目标方法,包括上面四种通知对应的所 有位置
- 通知执行顺序
- Spring版本5.3.x以前:
前置通知
目标操作
后置通知
返回通知或异常通知 - Spring版本5.3.x以后:
前置通知
目标操作
返回通知或异常通知
后置通知
- Spring版本5.3.x以前:
2、基于注解方式实现aop
- 添加依赖
<!-- 基于Maven依赖传递性,导入spring-context依赖即可导入当前所需所有jar包    -->
<dependency>
	<groupId>org.springframework</groupId>
	<artifactId>spring-context</artifactId>
	<version>5.3.1</version>
</dependency>
<!-- spring-aspects会帮我们传递过来aspectjweaver -->
<dependency>
	<groupId>org.springframework</groupId>
	<artifactId>spring-aspects</artifactId>
	<version>5.3.1</version>
</dependency>
-
创建被代理的目标资源
还是上面创建的Calculator接口及实现类 -
创建切面类并配置
/**
 * @Author: Snow
 * @CreateTime: 2022/11/3 16:32
 * @Description:
 * 切面类
 */
@Component
@Aspect //将该类标记为切面
public class LogAspect {
    /**
     * 设置公共切入点
     */
    @Pointcut("execution(* com.snow.aop.annotation.CalculatorImpl.*(..)) ")
    public void pointCut(){}

    //前置通知
    @Before("pointCut()")
    public void beforeMethod(JoinPoint joinPoint){
        String methodName = joinPoint.getSignature().getName();
        String args = Arrays.toString(joinPoint.getArgs());
        System.out.println("logger--->前置通知,方法名:"+methodName+",参数:"+args);
    }

    //后置通知
    @After("pointCut()")
    public void afterMethod(JoinPoint joinPoint){
        String methodName = joinPoint.getSignature().getName();
        System.out.println("logger--->后置通知,方法名:"+methodName+",方法执行完毕");
    }

    //返回通知
    @AfterReturning(value = "pointCut()",returning = "result")
    public void afterReturnMethod(JoinPoint joinPoint,Object result){
        String methodName = joinPoint.getSignature().getName();
        System.out.println("logger--->返回通知,方法名:"+methodName+",结果:"+result);
    }

    //异常通知
    @AfterThrowing(value = "pointCut()",throwing = "ex")
    public void afterThrowingMethod(JoinPoint joinPoint,Exception ex){
        String methodName = joinPoint.getSignature().getName();
        System.out.println("logger--->异常通知,方法名:"+methodName+",异常:"+ex);
    }

    //环绕通知
    @Around(value = "pointCut()")
    public Object aroundMethod(ProceedingJoinPoint joinPoint){
        String methodName = joinPoint.getSignature().getName();
        String args = Arrays.toString(joinPoint.getArgs());
        Object result = null;
        try {
            System.out.println("环绕通知-->目标对象方法执行之前");
            //目标对象(连接点)方法的执行
            result = joinPoint.proceed();
            System.out.println("环绕通知-->目标对象方法返回值之后");
        } catch (Throwable throwable) {
            throwable.printStackTrace();
            System.out.println("环绕通知-->目标对象方法出现异常时");
        } finally {
            System.out.println("环绕通知-->目标对象方法执行完毕");
        }
        return result;
    }
}
- 配置spring配置文件
    <!-- 开启组件扫描 -->
    <context:component-scan base-package="com.snow.aop.annotation"/>

    <!-- 开启aop注解 -->
    <aop:aspectj-autoproxy/>
六、声明式事务
1、编程式事务与声明式事务
- 编程式事务
事务功能的相关操作全部通过自己编写代码来实现- 缺点:
细节没有被屏蔽:具体操作过程中,所有细节都需要程序员自己来完成,比较繁琐。
代码复用性不高。
- 缺点:
try{
	// 开启事务:关闭事务的自动提交
	conn.setAutoCommit(false);
	// 核心操作
	// 提交事务
	conn.commit();
}catch(Exception e){
	// 回滚事务
	conn.rollBack();
}finally{
	// 释放数据库连接 conn.close();
}
- 声明式事务
既然事务控制的代码有规律可循,代码的结构基本是确定的,所以框架就可以将固定模式的代码抽取出来,进行相关的封装。- 优点:
1:提高开发效率
2:消除了冗余的代码
3:框架会综合考虑相关领域中在实际开发环境下有可能遇到的各种问题,进行了健壮性、性能等各个方面的优化
- 优点:
2、基于注解的声明式事务
- 加入依赖
<!-- 基于Maven依赖传递性,导入spring-context依赖即可导入当前所需所有jar包 -->
<dependency>
	<groupId>org.springframework</groupId>
	<artifactId>spring-context</artifactId>
	<version>5.3.1</version>
</dependency>
- 添加配置
    <!-- 配置事务管理器 -->
    <bean id="transactionManager" class="org.springframework.jdbc.datasource.DataSourceTransactionManager">
        <property name="dataSource" ref="druidDataSource"></property>
    </bean>
    <!-- 开启事务注解驱动 -->
    <tx:annotation-driven transaction-manager="transactionManager" />
- 添加事务注解
@Transaction
    @Transactional
    public void buyBook(Integer bookId, Integer userId) {
        //查询图书价格
        Integer price =  bookDao.getBookPrice(bookId);
        //更新图书库存
        bookDao.updateBookStock(bookId);
        //更新用户余额
        bookDao.updateUserBalance(price,userId);
    }

 浙公网安备 33010602011771号