Vs code断点调试Cocos Lua
需求:
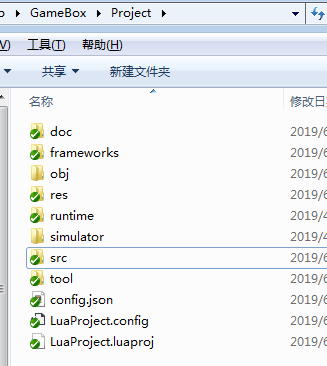
使用cocos 3.10新建Lua项目,命名为Project,其项目目录如下:

文件主要目录:
res: cocos的资源目录
src: cocos lua的脚本目录
使用Visual Studio Code进行编译开发,其安装地址为:https://code.visualstudio.com/
关于lua的编写检测与添加断点调试,其步骤如下:
1. 安装luaide,在扩展里面搜索luaide(推荐使用最新版本)

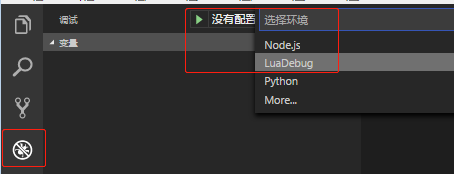
2. 设置,将项目中src目录放置到vscode中,点击F5启动调试,会提示配置相关,选择LuaDebug, 这时就会出现launch.json文件

在launch.json中,我们针对于本地调试修改如下配置:
{
    "name": "Cocos2-Window",
    "type": "lua",
    "request": "launch",
    "runtimeTypesc": "运行时类型,支持:Lua51, Cocos2, Cocos3, Unity",
    "runtimeType": "Cocos2",
    "localRootDesc": "--必填 当前文件夹目录 填写错误容易导致res或者src获取不到文件的问题",
    "localRoot": "${workspaceRoot}/../",
    "mainFileDesc": "-- 先填 启动的lua文件名 运行程序支持workdir当做file进行传入 window与mac 填写方式不一致",
    "mainFile": "src/main.lua",
    "portDesc": "--必填 调试器的端口 可修改 与调用LuaDebug/LuaDebugjit的端口对应",
    "port": 7003,
    "exePathDesc1": "--必填 执行文件路径",
    "exePathDesc2": "--必填 win-> ",
    "exePathDesc3": "--必填 mac ->运行程序,选择app右键->显示包内容 -> Contents/MacOS/AppName 不需要添加后缀名",
    "exePath": "${workspaceRoot}/../simulator/win32/Project.exe",
    "printTypeDesc": "--必填 print打印方式 1 控制台和系统输出,2 控制台输出,3 系统输出",
    "printType": 1,
},
{
    "name": "Cocos2-Mac",
    "type": "lua",
    "request": "launch",
    "runtimeType": "Cocos3",
    "localRoot": "${workspaceRoot}",
    "commandLine": "-workdir ${workspaceRoot}/../ -file src/main.lua",
    "port": 7003,
    "exePath": "${workspaceRoot}/../runtime/mac/Project-desktop.app/Contents/MacOS/Project-desktop",
   "printType": 1,
},
其主要配置参数说明:
name: 命名调试器的名字,比如Cocos3_Windows, Cocos3_Mac等
type: 配置类型,不需要修改
request: 请求配置类型
runtimeType: 运行时类型,不需要修改支持:Lua51, Cocos2, Cocos3, Unity
localRoot: 调试文件夹目录
manFile: 启动的lua文件名
commandLine: 删除了原有的mainFile配置,可直接填写命令参数,其相关的配置有:
  -workdir: 设置项目目录,
  -file: 设置启动脚本
  -writable: 设置device.writablePath对应的路径,未指定时,为项目目录
  -package.path: 设置附加的lua模块加载路径
  -size: 设置模拟器的屏幕尺寸,格式为: 宽度x高度
  -scale: 设置模拟器的缩放比例:范围在0.1~1.0之间
  -write-debug-log: 将调试信息写入debug.log文件,该文件存放于项目目录中
  -disable-wrte-debug-log: 禁止写入调试信息到debug.log中
  -console: 显示调试信息控制台窗口
  -disable-console: 禁止调试信息控制台窗口
  -offset: 启动时模拟器窗口的偏移位置,格式:{xoffset, yoffset}

port: 调试端口,和调试代码中的端口一致即可。如果有多个VsCode工程,建议端口双方的端口不一致,否则调试无效
exePath: 执行文件路径,注意:
    在widnows中,可填入其exe的完整路径
    在mac中可找到对应的desktop app项目,然后右键->显示包内容->Contents/MacOS/AppName, 可不添加其后缀
print: print打印方式:1 控制台和系统输出 2 控制台输出 3 系统输出
3. 断点调试配置
需要LuaDebug.lua,其官网下载:https://github.com/k0204/LuaIde
下载成功后,将../LuaIde/luadebug下的LuaDebug.lua,LuaDebugjit.lua文件放置到你的项目src目录下,然后在项目的main.lua中添加如下代码:
-- 设置加载图像失败时是否弹出消息框
cc.FileUtils:getInstance():setPopupNotify(false)

-- 添加搜索路径,为了避免运行时获取不到目录文件,将其置顶
local writePath = cc.FileUtils:getInstance():getWritablePath()
local resSearchPaths = {
    writePath,
    writePath .. "lua_classes/",
    writePath .. "src/",
    writePath .. "res/",
    "lua_classes/",
    "src/",
    "res/",
}
cc.FileUtils:getInstance():setSearchPaths(resSearchPaths)

require "config"
require "cocos.init"

local function main()
    require("app.MyApp"):create():run()
end

-- 添加ludIde调试代码,GitHub: https://github.com/k0204/LuaIde
-- 在cocos2.x中使用LuaDebug;在cocos3.x中使用LuaDebugjit
-- breakInfoFunc: 断点及时刷新函数,需要在定时器中调用,该函数用于确保断点能够及时的发送到lua client
-- xpcallFun: 程序异常监听函数,用于当程序出现异常时调试器定位错误代码
-- 7003在lauch.json中的port端口中配置,一致即可
local breakInfoFun,xpcallFun = require("LuaDebugjit")("localhost", 7003)
-- 1.断点定时器添加,
cc.Director:getInstance():getScheduler():scheduleScriptFunc(breakInfoFun, 0.3, false)
-- 2.程序异常监听
__G__TRACKBACK__ = function(errorMessage)
    xpcallFun()
    print("----------------------------------------")
    local msg = debug.traceback(errorMessage, 3)
    print(msg)
    print("----------------------------------------")
end

local status, msg = xpcall(main, __G__TRACKBACK__)
if not status then
    print(msg)
end
4. F5启动调试
启动代码后,倘若提示类似如下的错误:
[LUA ERROR] USE "cc.exports.print1" = value "INSTEAD OF SET GLOBAL VARIABLE"
or
cc.exports.StartDebug ...
这是由于在代码的config.lua中,添加了对全局变量的判定:
-- disable create unexpected global variable
CC_DISABLE_GLOBAL = true        -- 设为false
注意:在不熟悉LuaDebug.lua代码的情况下,不建议将未声明的全局变量或者方法修改为局部,否则很容易导致添加断点无效的问题
6. Simulator console窗口
运行项目后,若Simulator consolue窗口未显示的情况下,可修改:
// SimulatorWin.cpp
// define 1 to open console ui and setup windows system menu, 0 to disable
// 由0设置为1
#define SIMULATOR_WITH_CONSOLE_AND_MENU 1
7. 其他
若在使用Visual Studio的情况下,想调试lua,可查看如下文档:cocos BabeLua
参考资料:
LuaIde: https://github.com/k0204/LuaIde
LuaIde Wiki: https://github.com/k0204/LuaIde/wiki
cocos3.x调试: https://www.showdoc.cc/luaide?page_id=713832708344106
commandLine命令参考: https://www.showdoc.cc/luaide?page_id=713877806710429
Visual Studio Code命令参考: https://code.visualstudio.com/docs/editor/variables-reference#_environment-variables


 浙公网安备 33010602011771号