[Linux]Ansible自动化运维① - 入门知识
参考:
一、Ansible 概述
1.1 Ansible 是什么
Ansible是一款由Python开发(由Paramiko和PyYAML两个关键模块构建)的自动化运维软件,集合了“前辈”们的优点,实现了批量系统配置、批量程序部署、批量运行命令等功能。
1.2 Ansible 优势
- 安装部署简单,易学习
- 轻量级控制端,支持多主机并行管理
- 无需装agent,基于SSH管理
- 非root账户也可用
1.3 Ansible 特性
幂等性:同样的条件,一次请求和重复的多次请求对系统资源的影响是一致的。
二、Ansible 入门
2.1 Ansible 架构

| 组件 | 功能 |
|---|---|
| Ansible | 核心程序。 |
| Host Inventory | Ansible管理的主机信息,包括IP地址、SSH端口号、账号、密码等。 |
| Playbooks | 剧本,格式为YAML格式,模块化定义一系列任务,供外部统一调用。 |
| Plugins | 插件。 |
| Custom modules | 自定义模块,完成核心模块无法完成的功能。 |
| Core modules | 核心模块,Ansible自带的。 |
| Connection Plugins | 连接插件,建立Ansible与其他组件间的通信(支持多种连接方式,不局限于SSH)。 |
| Ansible Galaxy | 共享ansible role的平台。 |
2.2 Ansible 安装
先配置epel源(可以理解为更高级的yum源)
yum install -y epel-release
然后在控制端安装ansible
yum install ansible
至此,ansible就安装完成了。
2.3 Ansible 命令集
ansible:定义并运行简单任务。
ansible-config:查看、编辑、管理 Ansible 配置。
ansible-doc:文档查看工具。
ansible-galaxy:分享Roles模块的官网平台,需要网络。
ansible-playbook:执行playbook剧本。
ansible-pull:从仓库拉取playbook。
ansible-vault:文件加解密工具。
ansible-console:REPL控制台执行 Ansible 任务。
2.4 Ansible 配置文件
2.4.1 ansible.cfg 主配置文件
默认放在/etc/ansible/ansible.cfg路径下,常见参数:
#这个参数表示主机清单inventory文件的位置
inventory = /etc/ansible/hosts
#放ansible模块的目录,支持多个目录,用冒号隔开
library = /usr/share/ansible
#并发连接数,默认为5
forks = 5
#默认执行命令的用户,不建议用root
sudo_user = root
#连接端口,SSH默认为22,建议修改
remote_port = 22
#设置是否检查SSH主机的密钥
host_key_checking = False
#SSH连接超时的时间
timeout = 60
#放ansible日志的路径
log_path = /var/log/ansible.log
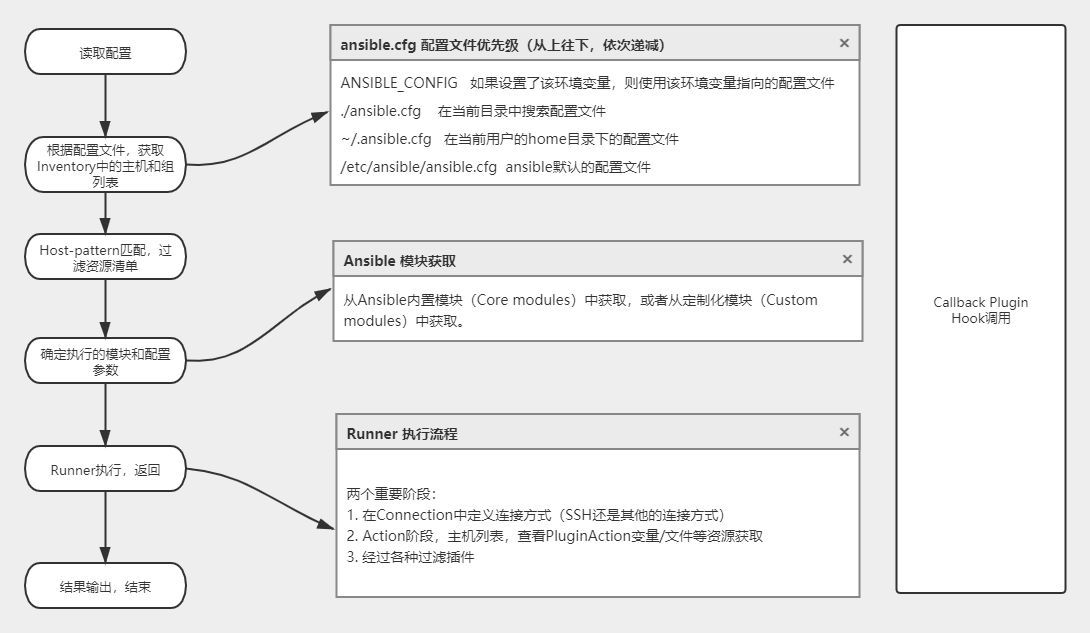
优先级由上往下依次递减:
-
ANSIBLE_CONFIG:环境变量指向的配置文件
-
./ansible.cfg:当前目录下的配置文件
-
~/.ansible.cfg:当前用户目录下ansible配置文件
-
/etc/ansible/ansible.cfg:包管理方式安装生成的配置文件
2.4.2 Inventory 主机清单
Inventory主机清单放在这:/etc/ansible/hosts
注意:写主机名的时候,在 /etc/hosts 里需要有记录。
有三种写法:
-
直接指名主机IP地址或主机名(全局)。
sky1.example.com sky2.example.com -
定义组名,把主机IP地址或主机名加进去。
[group1] sky1.example.com 192.168.122.200 [group2] sky2.example.com 192.168.122.100 -
子组定义,关键字一定得是[xxx:children]。
[sky:children]
sky1.example.com
sky2.example.com
2.5 Ansible 免密登陆被控端(SSH)
说明:控制端生成密钥对并把公钥发送到被控端的机器上,在登陆时即可实现免密。
具体实现如下:
- 控制端
#生成密钥对,类型为rsa
ssh-keygen -t rsa
#发送到被控端,可通过-p参数指定端口(生产环境中有可能默认SSH端口不是22)
ssh-copy-id -i ~/.ssh/id_rsa.pub 192.168.122.200
三、Ansible 任务执行模式
3.1 ad-hoc 命令行
ad-hoc:使用单个模块,支持批量执行单条命令。
ansible <主机或主机组> -m <模块名> -a '参数'
-m:选项指定模块名-a:选项指定发送的参数
3.2 playbook 剧本
Playbook:通过YAML语法定义多个task集合来完成管理。
3.3 程序运行流程

3.4 命令执行流程
- 加载配置文件,默认
/etc/ansible/ansible.cfg - 通过Inventory清单,找到需要执行的主机或主机组。
- 加载要用到的模块。
- 通过ansible将模块或者命令生成对应的python脚本,传输到远端服务器。
- 对应执行用户家目录的
.ansible/tmp/xxx.py文件 - 提权用户执行该py文件,并返回结果。
- 删除py文件,退出。
四、Ansible 常用模块
4.1 模块帮助
4.1.1 测试拓扑

4.1.2 测试的Inventory
[root@vm1 ~]# cat /etc/ansible/hosts
[test]
192.168.122.200
4.1.3 常用模块帮助命令
ansible-doc -l:查看所有内置模块
ansible-doc <模块名>:查看模块名
ansible-doc -s <模块名>:查看模块参数列表
4.1.4 命令前提(重要)
[root@vm1 ~]# ansible test -m ping

192.168.122.200 | SUCCESS => {
    "ansible_facts": {
        "discovered_interpreter_python": "/usr/libexec/platform-python"
    },
    "changed": false,
    "ping": "pong"
}
在这里对test主机组进行ping测试,返回pong则是成功,这样就可以开始执行下面的任务了。
4.2 命令行模块(command、shell)
4.2.1 command 模块
说明:在不通过-m参数指定模块的情况下,ad-hoc默认就是使用的command模块,这个模块不支持shell变量和管道等,如果想要使用,请使用-m参数指定shell模块。
- 默认下,使用的是command模块,发送命令。
[root@vm1 ~]# ansible test -m command -a "ping www.baidu.com -c 5"

192.168.122.200 | CHANGED | rc=0 >>
PING www.a.shifen.com (183.232.231.172) 56(84) bytes of data.
64 bytes from 183.232.231.172 (183.232.231.172): icmp_seq=1 ttl=127 time=12.8 ms
64 bytes from 183.232.231.172 (183.232.231.172): icmp_seq=2 ttl=127 time=12.7 ms
64 bytes from 183.232.231.172 (183.232.231.172): icmp_seq=3 ttl=127 time=11.10 ms
64 bytes from 183.232.231.172 (183.232.231.172): icmp_seq=4 ttl=127 time=14.9 ms
64 bytes from 183.232.231.172 (183.232.231.172): icmp_seq=5 ttl=127 time=12.3 ms

--- www.a.shifen.com ping statistics ---
5 packets transmitted, 5 received, 0% packet loss, time 12ms
rtt min/avg/max/mdev = 11.956/12.916/14.869/1.026 ms
4.2.2 shell 模块
说明:shell模块,支持管道和shell变量。
[root@vm1 ~]# ansible test -m shell -a "echo ${HOSTNAME}"

192.168.122.200 | CHANGED | rc=0 >>
vm1
4.2 文件操作模块
4.2.1 file 模块
说明:file模块,可以进行对文件的管理。
-
创建文件夹:
[root@vm1 /]# ansible test -m file -a "path=/tmp/file_test/ state=directory" 192.168.122.200 | CHANGED => { "ansible_facts": { "discovered_interpreter_python": "/usr/libexec/platform-python" }, "changed": true, "gid": 0, "group": "root", "mode": "0755", "owner": "root", "path": "/tmp/file_test/", "secontext": "unconfined_u:object_r:user_tmp_t:s0", "size": 6, "state": "directory", "uid": 0 } -
创建文件:
[root@vm1 /]# ansible test -m file -a "path=/tmp/file_test/file1 state=touch" 192.168.122.200 | CHANGED => { "ansible_facts": { "discovered_interpreter_python": "/usr/libexec/platform-python" }, "changed": true, "dest": "/tmp/file_test/file1", "gid": 0, "group": "root", "mode": "0644", "owner": "root", "secontext": "unconfined_u:object_r:user_tmp_t:s0", "size": 0, "state": "file", "uid": 0 } -
删除文件:
[root@vm1 /]# ansible test -m file -a "path=/tmp/file_test/file1 state=absent" 192.168.122.200 | CHANGED => { "ansible_facts": { "discovered_interpreter_python": "/usr/libexec/platform-python" }, "changed": true, "path": "/tmp/file_test/file1", "state": "absent" } -
删除文件夹:
[root@vm1 /]# ansible test -m file -a "path=/tmp/file_test state=absent"

192.168.122.200 | CHANGED => {
    "ansible_facts": {
        "discovered_interpreter_python": "/usr/libexec/platform-python"
    },
    "changed": true,
    "path": "/tmp/file_test",
    "state": "absent"
}
4.2.2 copy 模块
说明:copy模块,指定src和dest可完成文件复制
- 复制/etc/hosts到/tmp/hosts
[root@vm1 ~]# ansible test -m copy -a "src=/etc/hosts dest=/tmp/hosts"

192.168.122.200 | CHANGED => {
    "ansible_facts": {
        "discovered_interpreter_python": "/usr/libexec/platform-python"
    },
    "changed": true,
    "checksum": "7335999eb54c15c67566186bdfc46f64e0d5a1aa",
    "dest": "/tmp/hosts",
    "gid": 0,
    "group": "root",
    "md5sum": "54fb6627dbaa37721048e4549db3224d",
    "mode": "0644",
    "owner": "root",
    "secontext": "unconfined_u:object_r:admin_home_t:s0",
    "size": 158,
    "src": "/root/.ansible/tmp/ansible-tmp-1625579580.7383313-3373-17711169432251/source",
    "state": "file",
    "uid": 0
}
后面的放到②里面写,嘻嘻🕵️♂️


 浙公网安备 33010602011771号