Spring Aop源码分析
开头
aop部分的解析器由AopNamespaceHandler注册,其init方法:
@Override
public void init() {
    registerBeanDefinitionParser("config", new ConfigBeanDefinitionParser());
    registerBeanDefinitionParser("aspectj-autoproxy", new AspectJAutoProxyBeanDefinitionParser());
    registerBeanDefinitionDecorator("scoped-proxy", new ScopedProxyBeanDefinitionDecorator());
}
aop:config
此标签用以配置pointcut, advisor, aspect,实例:
<aop:config>
    <aop:pointcut expression="execution(* exam.service..*.*(..))" id="transaction"/>
    <aop:advisor advice-ref="txAdvice" pointcut-ref="transaction"/>
    <aop:aspect ref="" />
</aop:config>
ConfigBeanDefinitionParser.parse:
@Override
public BeanDefinition parse(Element element, ParserContext parserContext) {
    CompositeComponentDefinition compositeDef =
            new CompositeComponentDefinition(element.getTagName(),
            parserContext.extractSource(element));
    parserContext.pushContainingComponent(compositeDef);
    // 是否生成代理类
    configureAutoProxyCreator(parserContext, element);
    List<Element> childElts = DomUtils.getChildElements(element);
    for (Element elt: childElts) {
        String localName = parserContext.getDelegate().getLocalName(elt);
        if (POINTCUT.equals(localName)) {
            parsePointcut(elt, parserContext);
        } else if (ADVISOR.equals(localName)) {
            parseAdvisor(elt, parserContext);
        } else if (ASPECT.equals(localName)) {
            parseAspect(elt, parserContext);
        }
    }
    parserContext.popAndRegisterContainingComponent();
    return null;
}
解析
解析的过程主要分为以下几个部分。
proxy-target-class & expose-proxy
对应着aop:config的两个属性,前者代表是否为被代理这生成CGLIB子类,默认false,只为接口生成代理子类(话说如果不生成子类那么怎么拦截?)。后者代表是否将代理bean暴露给用户,如果暴露,可以通过Spring AopContext类获得,默认不暴露。
解析的过程无非就是属性的读取,不再详细说明。
aop:pointcut
pointcut的解析是一个生成一个BeanDefinition并将其id, expression等属性保存在BeanDefinition中。注意以下几点:
- BeanDefinition的ID来自于id属性,如果没有,那么自动生成。
- BeanDefinition的class是AspectJExpressionPointcut。
- BeanDefinition的scope为prototype。
AspectJExpressionPointcut类图:
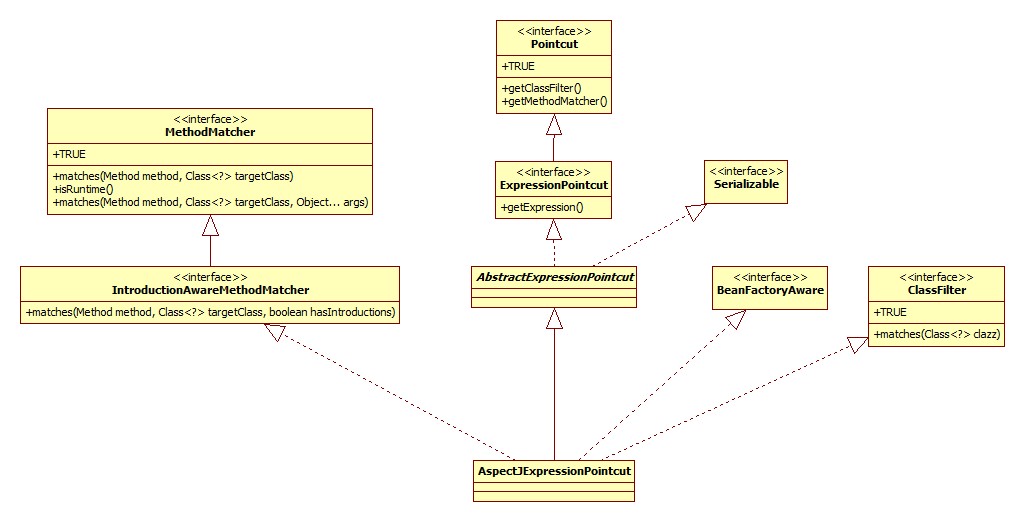
aop:advisor
首先是其所有属性的示例:
<aop:advisor id="" order="" advice-ref="aopAdvice" pointcut="" pointcut-ref="" />
advisor概念是Spring独有的,来自于上古时代,应该是较早时候的aop概念的实现: AOP Alliance (Java/J2EE AOP standards)。Spring官方的说法: aop-schema-advisors。
其相关的包/类就在spring-aop下:
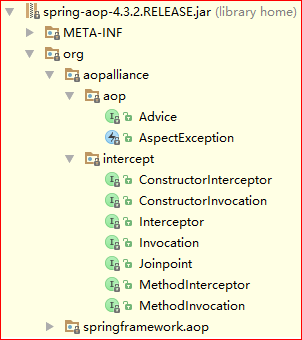
advice-ref是必须的属性,并且这里的advice必须实现org.aopalliance.aop.Advice的子接口。这些子接口指的什么呢,见Spring官方文档: aop-api-advice-types。比如org.aopalliance.intercept.MethodInterceptor。
最常见的用途就是结合事务使用:
<tx:advice id="txAdvice" transaction-manager="transactionManager">
    <tx:attributes>
        <tx:method name="get*" read-only="true" propagation="NOT_SUPPORTED"/>
        <tx:method name="find*" read-only="true" propagation="NOT_SUPPORTED"/>
        <tx:method name="*" propagation="REQUIRED"/>
    </tx:attributes>
</tx:advice>

<aop:config>
    <aop:pointcut expression="execution(* exam.service..*.*(..))" id="transaction"/>
    <aop:advisor advice-ref="txAdvice" pointcut-ref="transaction"/>
</aop:config>
解析的套路和楼上类似,只不过此处的beanClass是DefaultBeanFactoryPointcutAdvisor,其类图:
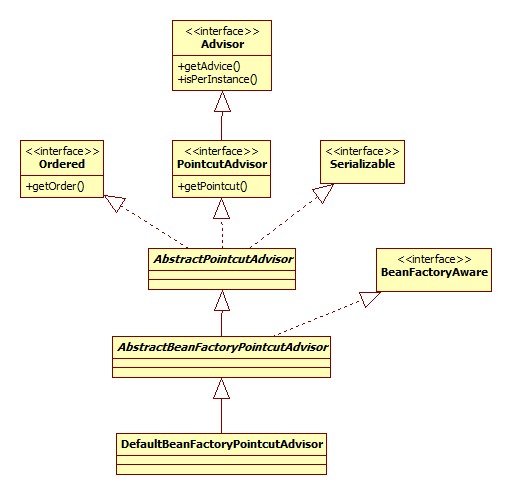
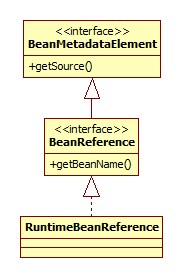
另外注意对于pointcut和pointcut-ref两者处理的区别,对于pointcut属性,Spring会同样创建一个AspectJExpressionPointcut类型的BeanDefinition,对于pointcut-ref会生成一个RuntimeBeanReference对象指向原pointcut的引用。此类的类图:
可以看出,这种aop的实现需要实现各种接口,所以不应该再使用此种方式进行aop,除了Spring内部的实现。
aop:aspect
配置举例:
<bean id="aopAdvice" class="base.aop.AopDemoAdvice" />
<!-- 必须配置,因为被代理的对象必须在Spring容器中 -->
<bean id="aopDemo" class="base.aop.AopDemo" />
<aop:config>
    <aop:pointcut id="pointcut" expression="execution(* base.aop.AopDemo.send())" />
    <aop:aspect ref="aopAdvice">
        <aop:before method="beforeSend" pointcut-ref="pointcut" />
        <aop:after method="afterSend" pointcut-ref="pointcut" />
    </aop:aspect>
</aop:config>
解析形成的BeanDefinition结构如下:
AspectComponentDefinition
    beanRefArray
        RuntimeBeanReference(aop:aspect的ref属性)
    beanDefArray
        // 被注册
        RootBeanDefinition(aop:declare-parents)
            beanClass: DeclareParentsAdvisor
            ConstructorArg
                implement-interface
                types-matching
                default-impl
                delegate-ref
        // 被注册
        RootBeanDefinition(aop:before,aop:after...)
            beanClass: AspectJPointcutAdvisor
            ConstructorArg
                RootBeanDefinition
                    beanClass: 由子标签决定
                    ConstructorArg
                        RootBeanDefinition
                            beanClass: MethodLocatingFactoryBean
                            properties
                                targetBeanName: aspectName
                                methodName: method属性
                        RootBeanDefinition
                            beanClass: SimpleBeanFactoryAwareAspectInstanceFactory
                            properties
                                aspectBeanName: aspectName
                        //还有pointcut定义和引用...
结构图里面的aspectName来自于aop:aspect的ref属性,此属性是必须配置的,因为Spring要知道aop:before等标签指定的方法是哪个bean/类/对象的方法。
aop:declare-parents
对于aop:declare-parents子标签,其决定的是代理子类应该实现哪些接口:
<aop:declare-parents types-matching="" implement-interface="" />
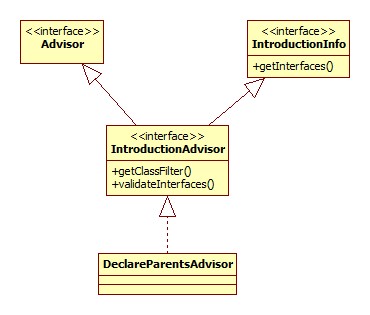
此标签最终被解析成为beanClass为DeclareParentsAdvisor的BeanDefinition,并注册到容器中。其类图:
其它
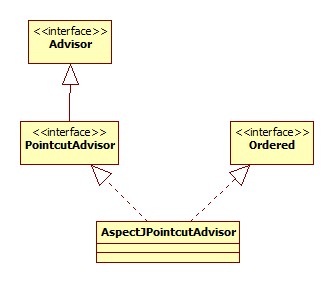
此处的其它指的是aop:before, aop:after等最核心的标签。其最终被解析为beanClass为AspectJPointcutAdvisor的BeanDefinition,类图:
正如上面结构图里所描述的,其构造参数为一个BeanDefintion,此对象的beanClass是不确定的,由aop:before/after中的before和after决定,代码:
private Class<?> getAdviceClass(Element adviceElement, ParserContext parserContext) {
    String elementName = parserContext.getDelegate().getLocalName(adviceElement);
    if (BEFORE.equals(elementName)) {
        return AspectJMethodBeforeAdvice.class;
    } else if (AFTER.equals(elementName)) {
        return AspectJAfterAdvice.class;
    } else if (AFTER_RETURNING_ELEMENT.equals(elementName)) {
        return AspectJAfterReturningAdvice.class;
    } else if (AFTER_THROWING_ELEMENT.equals(elementName)) {
        return AspectJAfterThrowingAdvice.class;
    } else if (AROUND.equals(elementName)) {
        return AspectJAroundAdvice.class;
    }
}
而此BeanDefintion的构造参数又由以下三个部分组成:
MethodLocatingFactoryBean
第一个便是beanClass为此类型的BeanDefinition。其内部有一个methodName属性,存储的便是标签的method属性的值。其类图:
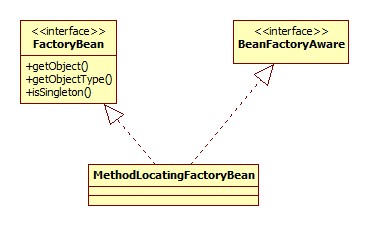
这个东西是干什么用的呢?其实是用于在指定的advice(aop:aspect的ref属性)中得到Method对象。入口在setBeanFactory方法:
@Override
public void setBeanFactory(BeanFactory beanFactory) {
    Class<?> beanClass = beanFactory.getType(this.targetBeanName);
    this.method = BeanUtils.resolveSignature(this.methodName, beanClass);
}
SimpleBeanFactoryAwareAspectInstanceFactory
其类图:
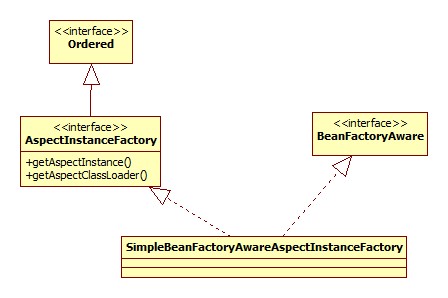
此类用于在BeanFactory中定位aspect bean,这个bean指的是谁?
<bean id="aopAdvice" class="base.aop.AopDemoAdvice" />
就是它!查找很简单:
@Override
public Object getAspectInstance() {
    return this.beanFactory.getBean(this.aspectBeanName);
}
总结
从整个aop:aspect标签最终被解析为一个AspectJPointcutAdvisor来看,Spring在实现上仍将其作为Advisor的概念。
代理子类生成
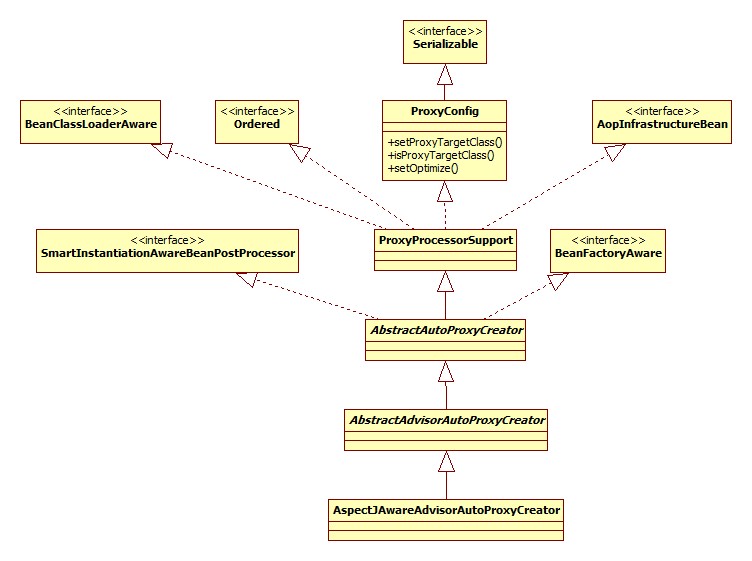
关键在于AspectJAwareAdvisorAutoProxyCreator,此对象在ConfigBeanDefinitionParser的configureAutoProxyCreator方法中注册,其类图:
那么子类生成的入口在哪里呢?
入口
从AspectJAwareAdvisorAutoProxyCreator的类图中可以看出,此类实现了SmartInstantiationAwareBeanPostProcessor接口,所以很容易想到入口应该位于此接口及其父接口(BeanPostProcessor)的相关方法中。实际上确实是这样的。
postProcessBeforeInstantiation
调用时机
先来回顾一下此方法在Bean创建的过程中的调用时机。
AbstractAutowireCapableBeanFactory.createBean部分源码:
//// Give BeanPostProcessors a chance to return a proxy instead of the target bean instance.
Object bean = resolveBeforeInstantiation(beanName, mbdToUse);
if (bean != null) {
    return bean;
}
Object beanInstance = doCreateBean(beanName, mbdToUse, args);
可以看出,调用发生在Bean实例的创建之前。
源码
AbstractAutoProxyCreator.postProcessBeforeInstantiation:
@Override
public Object postProcessBeforeInstantiation(Class<?> beanClass, String beanName) {
    Object cacheKey = getCacheKey(beanClass, beanName);
    if (beanName == null || !this.targetSourcedBeans.contains(beanName)) {
        if (this.advisedBeans.containsKey(cacheKey)) {
            return null;
        }
        if (isInfrastructureClass(beanClass) || shouldSkip(beanClass, beanName)) {
            this.advisedBeans.put(cacheKey, Boolean.FALSE);
            return null;
        }
    }
    if (beanName != null) {
        TargetSource targetSource = getCustomTargetSource(beanClass, beanName);
        if (targetSource != null) {
            this.targetSourcedBeans.add(beanName);
            Object[] specificInterceptors =
                getAdvicesAndAdvisorsForBean(beanClass, beanName, targetSource);
            Object proxy = createProxy(beanClass, beanName, specificInterceptors, targetSource);
            this.proxyTypes.put(cacheKey, proxy.getClass());
            return proxy;
        }
    }
    return null;
}
下面分部分对其进行说明。
应该代理 ?
Spring首先会对当前的beanClass进行检查(是否应该/可以对其进行代理)。
不应该代理的类分为两种情况:
- 用于实现AOP的Spring基础类,此种情况在isInfrastructureClass方法中完成检测(单词Infrastructure正是基础设施的意思)。
- 子类定义的应该跳过的类,默认AbstractAutoProxyCreator的实现直接返回false,即都不应该跳过。
基础类检测
AbstractAutoProxyCreator.isInfrastructureClass:
protected boolean isInfrastructureClass(Class<?> beanClass) {
    boolean retVal = Advice.class.isAssignableFrom(beanClass) ||
            Pointcut.class.isAssignableFrom(beanClass) ||
            Advisor.class.isAssignableFrom(beanClass) ||
            AopInfrastructureBean.class.isAssignableFrom(beanClass);
    return retVal;
}
可以看出,任何Advice、Pointcut、Advisor、AopInfrastructureBean的子类都被当做Spring实现AOP的基础设施类。
跳过类检测
即shouldSkip方法。前面提到了,AbstractAutoProxyCreator的默认实现直接返回fasle,这一特性被子类AspectJAwareAdvisorAutoProxyCreator重写:
@Override
protected boolean shouldSkip(Class<?> beanClass, String beanName) {
    List<Advisor> candidateAdvisors = findCandidateAdvisors();
    for (Advisor advisor : candidateAdvisors) {
        if (advisor instanceof AspectJPointcutAdvisor) {
            if (((AbstractAspectJAdvice) advisor.getAdvice()).getAspectName().equals(beanName)) {
                return true;
            }
        }
    }
    return super.shouldSkip(beanClass, beanName);
}
那么此方法跳过的是谁呢?
其实就是我们通过aop:aspect标签配置的切面,即:
<bean id="aopAdvice" class="base.aop.AopDemoAdvice" />
<aop:config>
    <aop:aspect ref="aopAdvice">
    </aop:aspect>
</aop:config>
里的aopAdvice。
从前面的aop:aspect一节中可以知道,Spring对于aop:config的解析其实是把aop:before/after等标签解析成为了AspectJPointcutAdvisor类型的BeanDefinition,而aopAdvice以AbstractAspectJAdvice的类型保存在其中。
所以可以得出结论: Spring跳过的是适用于当前bean的Advisor的Advice/Aspect对象。
AOP逻辑

那么Spring又是如何找到适用于当前bean的Advisor的呢?
Advisor寻找
关键便是findCandidateAdvisors方法,此方法将逻辑委托给BeanFactoryAdvisorRetrievalHelper.findAdvisorBeans:
public List<Advisor> findAdvisorBeans() {
    String[] advisorNames = null;
    synchronized (this) {
         // 结果缓存
        advisorNames = this.cachedAdvisorBeanNames;
        if (advisorNames == null) {
             // 去容器中寻找
            advisorNames = BeanFactoryUtils.beanNamesForTypeIncludingAncestors(
                    this.beanFactory, Advisor.class, true, false);
            this.cachedAdvisorBeanNames = advisorNames;
        }
    }
    if (advisorNames.length == 0) {
        return new LinkedList<Advisor>();
    }
    List<Advisor> advisors = new LinkedList<Advisor>();
    for (String name : advisorNames) {
        if (isEligibleBean(name)) {
            if (!this.beanFactory.isCurrentlyInCreation(name)) {
                advisors.add(this.beanFactory.getBean(name, Advisor.class));
            }
        }
    }
    return advisors;
}
可以看出,首先是从容器中获取到所有的Advisor示例,然后调用isEligibleBean方法逐一判断Advisor是否适用于当前bean。
适用性检测
指的便是isEligibleBean方法。最终调用的是AbstractAdvisorAutoProxyCreator的同名方法:
protected boolean isEligibleAdvisorBean(String beanName) {
    return true;
}
而AbstractAdvisorAutoProxyCreator的子类AspectJAwareAdvisorAutoProxyCreator并没有覆盖此方法,所以此处会对容器中所有的Advisor的Advice进行跳过。
检测结果缓存
因为postProcessBeforeInstantiation方法会在每个bean初始化之前被调用,所以没有必要每次都真的进行基础类检测和跳过类检测,Spring使用了advisedBeans作为缓存用以提高性能。
TargetSource
从源码中可以看出,对于自定义的TargetSource,Spring会立即执行代理子类的创建。Spring的代理其实是针对TargetSource的,其类图:
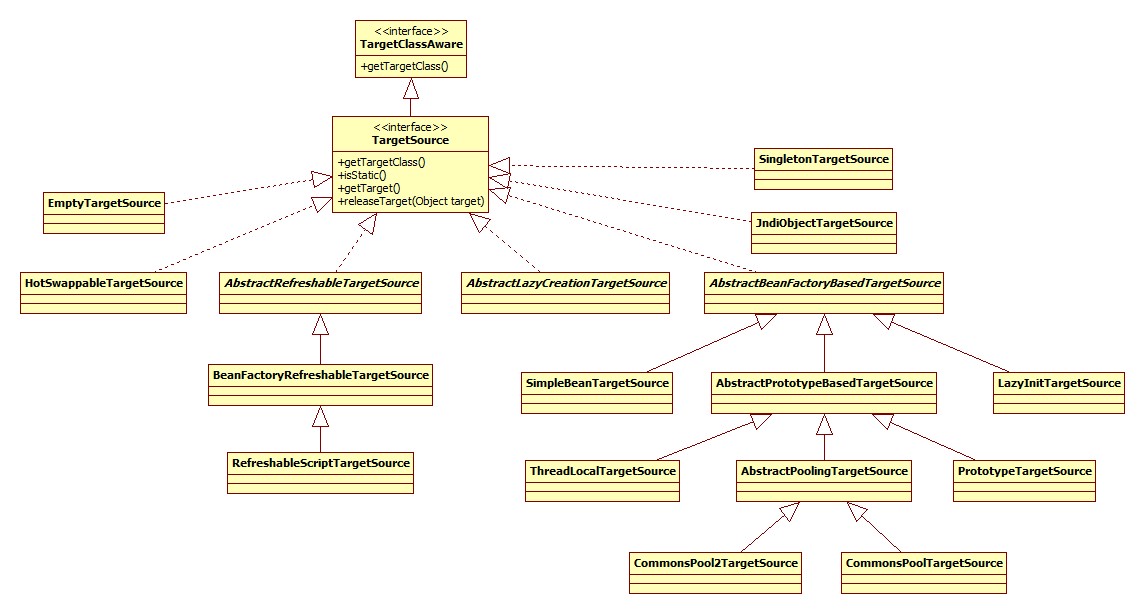
关于此接口在此不展开叙述。
postProcessAfterInitialization
AbstractAutoProxyCreator.postProcessAfterInitialization:
@Override
public Object postProcessAfterInitialization(Object bean, String beanName) {
    if (bean != null) {
        Object cacheKey = getCacheKey(bean.getClass(), beanName);
        if (!this.earlyProxyReferences.contains(cacheKey)) {
            return wrapIfNecessary(bean, beanName, cacheKey);
        }
    }
    return bean;
}
关键便在于wrapIfNecessary方法:
protected Object wrapIfNecessary(Object bean, String beanName, Object cacheKey) {
    //自定义TargetSource,已经进行过代理子类生成
    if (beanName != null && this.targetSourcedBeans.contains(beanName)) {
        return bean;
    }
    if (Boolean.FALSE.equals(this.advisedBeans.get(cacheKey))) {
        return bean;
    }
    if (isInfrastructureClass(bean.getClass()) || shouldSkip(bean.getClass(), beanName)) {
        this.advisedBeans.put(cacheKey, Boolean.FALSE);
        return bean;
    }
    // Create proxy if we have advice.
    Object[] specificInterceptors = getAdvicesAndAdvisorsForBean(bean.getClass(), beanName, null);
    if (specificInterceptors != DO_NOT_PROXY) {
        this.advisedBeans.put(cacheKey, Boolean.TRUE);
        // 创建
        Object proxy = createProxy(
                bean.getClass(), beanName, specificInterceptors, new SingletonTargetSource(bean));
        this.proxyTypes.put(cacheKey, proxy.getClass());
        return proxy;
    }
    this.advisedBeans.put(cacheKey, Boolean.FALSE);
    return bean;
}
可以看出,在此方法的开头又进行了基础类以及跳过类的检测,再次不再赘述。
Advisor寻找
即getAdvicesAndAdvisorsForBean方法,这里进行的便是去容器中寻找适用于当前bean的Advisor,最终调用的是
AbstractAdvisorAutoProxyCreator.findEligibleAdvisors:
protected List<Advisor> findEligibleAdvisors(Class<?> beanClass, String beanName) {
    List<Advisor> candidateAdvisors = findCandidateAdvisors();
    List<Advisor> eligibleAdvisors = findAdvisorsThatCanApply(candidateAdvisors, beanClass, beanName);
    extendAdvisors(eligibleAdvisors);
    if (!eligibleAdvisors.isEmpty()) {
        eligibleAdvisors = sortAdvisors(eligibleAdvisors);
    }
    return eligibleAdvisors;
}
findCandidateAdvisors前面已经说过了。
适用性判断
findAdvisorsThatCanApply最终调用AopUtils.findAdvisorsThatCanApply:
public static List<Advisor> findAdvisorsThatCanApply(List<Advisor> candidateAdvisors, Class<?> clazz) {
    if (candidateAdvisors.isEmpty()) {
        return candidateAdvisors;
    }
    List<Advisor> eligibleAdvisors = new LinkedList<Advisor>();
    for (Advisor candidate : candidateAdvisors) {
        if (candidate instanceof IntroductionAdvisor && canApply(candidate, clazz)) {
            eligibleAdvisors.add(candidate);
        }
    }
    boolean hasIntroductions = !eligibleAdvisors.isEmpty();
    for (Advisor candidate : candidateAdvisors) {
        if (candidate instanceof IntroductionAdvisor) {
            // already processed
            continue;
        }
        if (canApply(candidate, clazz, hasIntroductions)) {
            eligibleAdvisors.add(candidate);
        }
    }
    return eligibleAdvisors;
}
关键在于canApply方法,从源码中可以看出,对于Advisor的判断分为了IntroductionAdvisor以及非IntroductionAdvisor两种情况。
这种分开处理导致了IntroductionAdvisor在Advisor链中总是位于非IntroductionAdvisor前面。
canApply(candidate, clazz)其实等价于canApply(candidate, clazz, false):
public static boolean canApply(Advisor advisor, Class<?> targetClass, boolean hasIntroductions) {
    if (advisor instanceof IntroductionAdvisor) {
        return ((IntroductionAdvisor) advisor).getClassFilter().matches(targetClass);
    }
    else if (advisor instanceof PointcutAdvisor) {
        PointcutAdvisor pca = (PointcutAdvisor) advisor;
        return canApply(pca.getPointcut(), targetClass, hasIntroductions);
    }
    else {
        // It doesn't have a pointcut so we assume it applies.
        return true;
    }
}
很明显,对于引入Advisor与其它Advisor是两种不同的判断方式。
引入
引入的概念在下面aop:scoped-proxy中有提到。因为引入的目的在于动态地向一个类添加另一种功能(接口),所以只要判断给定的类是否是要引入到的类即可。
其它
AopUtils.canApply:
public static boolean canApply(Pointcut pc, Class<?> targetClass, boolean hasIntroductions) {
    //是否Pointcut可以匹配当前类
    if (!pc.getClassFilter().matches(targetClass)) {
        return false;
    }
    MethodMatcher methodMatcher = pc.getMethodMatcher();
    //是否Pointcut可以匹配所有方法
    if (methodMatcher == MethodMatcher.TRUE) {
        // No need to iterate the methods if we're matching any method anyway...
        return true;
    }
    IntroductionAwareMethodMatcher introductionAwareMethodMatcher = null;
    if (methodMatcher instanceof IntroductionAwareMethodMatcher) {
        introductionAwareMethodMatcher = (IntroductionAwareMethodMatcher) methodMatcher;
    }
    Set<Class<?>> classes = new LinkedHashSet<Class<?>>
        (ClassUtils.getAllInterfacesForClassAsSet(targetClass));
    classes.add(targetClass);
    for (Class<?> clazz : classes) {
        Method[] methods = ReflectionUtils.getAllDeclaredMethods(clazz);
        for (Method method : methods) {
            if ((introductionAwareMethodMatcher != null &&
                    introductionAwareMethodMatcher
                        .matches(method, targetClass, hasIntroductions)) ||
                    methodMatcher.matches(method, targetClass)) {
                return true;
            }
        }
    }
    return false;
}
Spring的Pointcut由ClassFilter和MethodMatcher两部分组成,其中前者用以判断给定的类是否在Pointcut的匹配范围内,后者用以在ClassFilter匹配满足的情况下判断给定的方法是否在Pointcut匹配的范围内。
从源码中可以看出,如果ClassFilter匹配得到满足并且Pointcut并不能匹配此类的任意方法,便会用反射的方法获取targetClass(被检测类)的全部方法逐一交由Pointcut的MethodMatcher进行检测。
关于Pointcut表达式是如何解析及存储的在此不再展开。
Advisor扩展
AbstractAdvisorAutoProxyCreator.extendAdvisors允许子类向Advisor链表中添加自己的Advisor。子类AspectJAwareAdvisorAutoProxyCreator重写了此方法,其逻辑是:
如果Advisor链表中的Advisor含有AspectJ Advice,那么将会把一个ExposeInvocationInterceptor添加到链表的表头,目的在于将MethodInvocation以ThreadLocal的方式暴露给后面所有的Advisor,暂不知道具体的用途。
排序
即sortAdvisors方法,用于对实现了Ordered接口的Advisor进行排序。
创建
AbstractAutoProxyCreator.createProxy(略去非关键代码):
protected Object createProxy(
        Class<?> beanClass, String beanName, Object[] specificInterceptors, TargetSource targetSource) {
    ProxyFactory proxyFactory = new ProxyFactory();
    proxyFactory.copyFrom(this);
    //将interceptor适配为Advisor
    Advisor[] advisors = buildAdvisors(beanName, specificInterceptors);
    for (Advisor advisor : advisors) {
        proxyFactory.addAdvisor(advisor);
    }
    return proxyFactory.getProxy(getProxyClassLoader());
}
JDK动态代理 or Cglib
由DefaultAopProxyFactory.createAopProxy方法决定使用何种方式创建代理子类。
@Override
public AopProxy createAopProxy(AdvisedSupport config) throws AopConfigException {
    if (config.isOptimize() || config.isProxyTargetClass() ||
            hasNoUserSuppliedProxyInterfaces(config)) {
        Class<?> targetClass = config.getTargetClass();
        if (targetClass.isInterface() || Proxy.isProxyClass(targetClass)) {
            return new JdkDynamicAopProxy(config);
        }
        return new ObjenesisCglibAopProxy(config);
    } else {
        return new JdkDynamicAopProxy(config);
    }
}
逻辑很明显,如果指定了(proxy-target-classs设为true)使用Cglib,那么就会使用Cglib的方式,如果没有指定(或为false),那么先回检测被代理类是否实现了自己的接口,如果实现了,那么就采用JDK动态代理的方式。
JDK动态代理
JdkDynamicAopProxy.getProxy:
@Override
public Object getProxy(ClassLoader classLoader) {
    //找到可以用来进行代理的接口
    Class<?>[] proxiedInterfaces = AopProxyUtils.completeProxiedInterfaces(this.advised, true);
    //用来代理的接口中是否定义了equals或者是hashCode方法?
    //结果保存在内部equalsDefined和hashCodeDefined两个成员变量中
    findDefinedEqualsAndHashCodeMethods(proxiedInterfaces);
    return Proxy.newProxyInstance(classLoader, proxiedInterfaces, this);
}
可以看出,关键的InvocationHandler参数其实就是JdkDynamicAopProxy自身。
其invoke方法较长,源码就不贴了,下面进行分部分说明。
equals & hashCode
如果被代理类实现了equals或者是hashCode方法,那么生成的代理子类的equals、hashCode方法实际上执行的是JdkDynamicAopProxy相应方法的逻辑。
invoke方法部分源码:
if (!this.equalsDefined && AopUtils.isEqualsMethod(method)) {
    // The target does not implement the equals(Object) method itself.
    return equals(args[0]);
}
链式调用
对于切点方法,比如前面aop:aspect示例配置中的beforeSend
<aop:before method="beforeSend" pointcut-ref="pointcut" />
Spring会创建一个MethodInvocation对象对所有相关的Advisor进行链式调用。invoke相关源码:
List<Object> chain = this.advised.getInterceptorsAndDynamicInterceptionAdvice(method, targetClass);
invocation = new ReflectiveMethodInvocation(proxy, target, method, args, targetClass, chain);
Object retVal = invocation.proceed();
Cglib
同样是对于Advisor的链式调用,不再详细展开。
aop:scoped-proxy
此配置一般是这样使用:
<bean id="userPreferences" class="com.foo.UserPreferences" scope="session">
    <aop:scoped-proxy/>
</bean>
<bean id="userManager" class="com.foo.UserManager">
    <property name="userPreferences" ref="userPreferences"/>
</bean>
对于ref属性,只会在userManager初始化时注入一次。这会造成什么问题呢?以session的Scope为例,因为只会注入一次,所以,userManager引用的始终是同一个userPreferences对象,即使现在可能已经过时了。此配置便可以使userManager引用的其实是一个对代理的引用,所以可以始终获取到最新的userPreferences。
其作用和注解@ScopedProxy相同。
其解析由ScopedProxyBeanDefinitionDecorator完成,类图:

解析
入口
从类图可以看出,ScopedProxyBeanDefinitionDecorator和之前的解析器都不同,它的调用入口不同以往:
DefaultBeanDefinitionDocumentReader.processBeanDefinition:
protected void processBeanDefinition(Element ele, BeanDefinitionParserDelegate delegate) {
    BeanDefinitionHolder bdHolder = delegate.parseBeanDefinitionElement(ele);
    if (bdHolder != null) {
         // 装饰
        bdHolder = delegate.decorateBeanDefinitionIfRequired(ele, bdHolder);
    }
}
BeanDefinitionParserDelegate.decorateIfRequired:
public BeanDefinitionHolder decorateIfRequired(
        Node node, BeanDefinitionHolder originalDef, BeanDefinition containingBd) {
    String namespaceUri = getNamespaceURI(node);
    if (!isDefaultNamespace(namespaceUri)) {
        NamespaceHandler handler = this.readerContext.getNamespaceHandlerResolver()
            .resolve(namespaceUri);
        if (handler != null) {
            return handler.
                decorate(node, originalDef, new ParserContext(this.readerContext, this, containingBd));
        }
    }
    return originalDef;
}
一目了然。
这么做(装饰)的原因就是此标签是用在bean内部的,从decorate的方法签名可以看出,第二个便是父(bean)BeanDefinition,所以叫做装饰。
装饰
@Override
public BeanDefinitionHolder decorate(Node node, BeanDefinitionHolder definition, ParserContext parserContext) {
    boolean proxyTargetClass = true;
    if (node instanceof Element) {
        Element ele = (Element) node;
        if (ele.hasAttribute(PROXY_TARGET_CLASS)) {
            proxyTargetClass = Boolean.valueOf(ele.getAttribute(PROXY_TARGET_CLASS));
        }
    }
    BeanDefinitionHolder holder =
            ScopedProxyUtils.
            createScopedProxy(definition, parserContext.getRegistry(), proxyTargetClass);
    String targetBeanName = ScopedProxyUtils.getTargetBeanName(definition.getBeanName());
    // 空实现
    parserContext.getReaderContext().fireComponentRegistered(
            new BeanComponentDefinition(definition.getBeanDefinition(), targetBeanName));
    return holder;
}
核心便是createScopedProxy方法,其源码较长,但是这个套路之前见识过了,就是一个偷天换日: 创建一个新的BeanDefinition对象,beanName为被代理的bean的名字,被代理的bean名字为scopedTarget.原名字。被代理的bean扔将被注册到容器中。
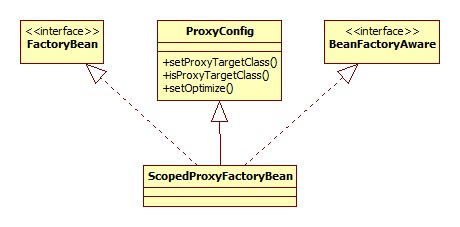
新的BeanDefintion的beanClass为ScopedProxyFactoryBean,其类图:
代理生成
入口便是setBeanFactory方法:
@Override
public void setBeanFactory(BeanFactory beanFactory) {
    ConfigurableBeanFactory cbf = (ConfigurableBeanFactory) beanFactory;
    this.scopedTargetSource.setBeanFactory(beanFactory);
    ProxyFactory pf = new ProxyFactory();
    pf.copyFrom(this);
    pf.setTargetSource(this.scopedTargetSource);

    Class<?> beanType = beanFactory.getType(this.targetBeanName);
    if (!isProxyTargetClass() || beanType.isInterface() ||
        Modifier.isPrivate(beanType.getModifiers())) {
         // JDK动态代理可用的接口
        pf.setInterfaces(ClassUtils.getAllInterfacesForClass(beanType, cbf.getBeanClassLoader()));
    }
    // Add an introduction that implements only the methods on ScopedObject.
    ScopedObject scopedObject = new DefaultScopedObject
        (cbf, this.scopedTargetSource.getTargetBeanName());
    pf.addAdvice(new DelegatingIntroductionInterceptor(scopedObject));
    // Add the AopInfrastructureBean marker to indicate that the scoped proxy
    // itself is not subject to auto-proxying! Only its target bean is.
    pf.addInterface(AopInfrastructureBean.class);
    this.proxy = pf.getProxy(cbf.getBeanClassLoader());
}
这个套路上面也见过了。
Advisor
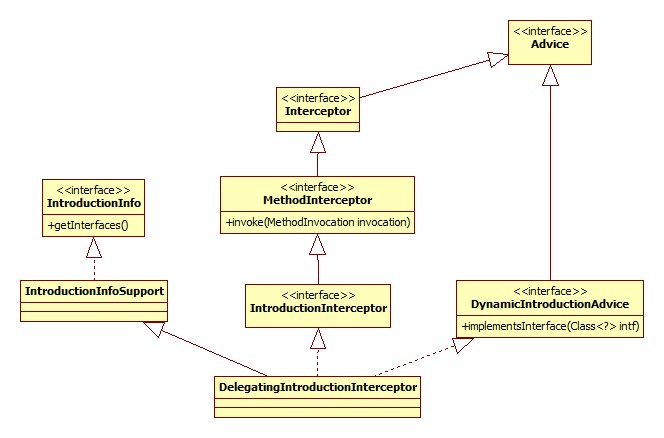
核心的拦截逻辑是通过DelegatingIntroductionInterceptor来完成的,其类图:
AdvisedSupport.addAdvice方法将其转化为Advisor:
@Override
public void addAdvice(int pos, Advice advice) throws AopConfigException {
    if (advice instanceof IntroductionInfo) {
        // We don't need an IntroductionAdvisor for this kind of introduction:
        // It's fully self-describing.
        addAdvisor(pos, new DefaultIntroductionAdvisor(advice, (IntroductionInfo) advice));
    } else if (advice instanceof DynamicIntroductionAdvice) {
        // We need an IntroductionAdvisor for this kind of introduction.
    } else {
        addAdvisor(pos, new DefaultPointcutAdvisor(advice));
    }
}
显然,DelegatingIntroductionInterceptor被包装为DefaultIntroductionAdvisor对象。
DelegatingIntroductionInterceptor到底是个什么东西呢?这其实就引出了Spring的Introduction(引入)概念。
引入
通常意义上的Spring AOP一般是在方法层面上进行逻辑的改变,而引入指的是在不修改类源码的情况下,直接为一个类添加新的功能。下面是一个引入使用的例子:
SpringAOP中的IntroductionInterceptor
例子
自定义Scope
为了便于测试,我们定义一个生存周期仅仅在于一次调用的Scope,源码:
public class OneScope implements Scope {

    private int index = 0;

    @Override
    public Object get(String name, ObjectFactory<?> objectFactory) {
        System.out.println("get被调用");
        return new Student("skywalker-" + (index++), index);
    }
    //忽略其它方法
}
将其注册到容器中,有两种方法:
-
在代码中:
context.getBeanFactory().registerScope("one", new OneScope()); -
配置文件:
<bean class="org.springframework.beans.factory.config.CustomScopeConfigurer">
  <property name="scopes">
      <map>
          <entry key="one">
              <bean class="base.scope.OneScope" />
          </entry>
      </map>
  </property>
</bean>
配置
此时就可以使用我们自己的Scope了:
<bean class="base.SimpleBean" id="simpleBean">
    <property name="student" ref="student" />
</bean>

<bean id="student" class="base.Student" scope="one">
    <aop:scoped-proxy />
</bean>
测试
执行以下代码:
SimpleBean simpleBean = context.getBean(SimpleBean.class);
System.out.println(simpleBean.getStudent().getName());
System.out.println(simpleBean.getStudent().getName());
可以看到以下输出:
get被调用
skywalker-0
get被调用
skywalker-1
可以得出结论: 当调用被代理的bean的方法时才会触发Scoped的语义,只是获得其对象(getStudent)没有效果。
原理
doGetBean
从根本上来说在于AbstractBeanFactory.doGetBean,部分源码:
//scope非prototype和Singleton
else {
    String scopeName = mbd.getScope();
    final Scope scope = this.scopes.get(scopeName);
    Object scopedInstance = scope.get(beanName, new ObjectFactory<Object>() {
        @Override
        public Object getObject() throws BeansException {
            beforePrototypeCreation(beanName);
            try {
                return createBean(beanName, mbd, args);
            }
            finally {
                afterPrototypeCreation(beanName);
            }
        }
    });
    bean = getObjectForBeanInstance(scopedInstance, name, beanName, mbd);
}
scopes是BeanFactory内部的一个 LinkedHashMap<String, Scope>类型的对象。scope.get实际上调用的就是我们的OneSocpe的get方法,没有用到ObjectFactory。
所以,每调用一次getBean,就会导致一个新的Sudent被创建并返回。
代理子类
还有一个关键的问题,从上面可以知道SimpleBean内部的student引用其实是一个CGLIB代理子类的对象,那么当调用这个代理对象的相应方法(比如getName)时,是怎样导致Student重新创建(或是getBean被调用)的?
CallbackFilter & Callback
必须首先理解下CGLIB的这两个概念。
Callback
Callback是Cglib所有自定义逻辑(增强)的共同接口。
其简略类图:

CallbackFilter
在CGLib回调时可以设置对不同方法执行不同的回调逻辑,或者根本不执行回调。
jdk并不支持这么搞,只支持设置一个InvocationHandler处理(拦截)所有的方法。其类图:
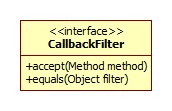
Cglib的Enhancer可以指定一个Callback数组,而accept方法的返回值是一个int值,其实就是Callback数组的下标,这样便达到了指定回调逻辑的目的。
参考:
回调
一般的方法使用的是DynamicAdvisedInterceptor作为回调逻辑,其intercept关键源码:
@Override
public Object intercept(Object proxy, Method method, Object[] args, MethodProxy methodProxy) {
    Object target = getTarget();
}
target就是被代理对象。
getTarget:
protected Object getTarget() throws Exception {
    return this.advised.getTargetSource().getTarget();
}
TargetSource前面说过了,默认是SimpleBeanTargetSource:
@Override
public Object getTarget() throws Exception {
    return getBeanFactory().getBean(getTargetBeanName());
}
至此,真相大白。
aop:aspectj-autoproxy
此标签用以开启对于@AspectJ注解风格AOP的支持。
属性
proxy-target-class
你懂的。
expose-proxy
是否应该把代理对象暴露给AopContext,默认false。
栗子
切面
@Aspect
public class AspectDemo {
    @Pointcut("execution(void base.aop.AopDemo.send(..))")
    public void beforeSend() {}
    @Before("beforeSend()")
    public void before() {
        System.out.println("send之前");
    }
}
被代理类
public class AopDemo implements AopDemoInter {
    public void send() {
        System.out.println("send from aopdemo");
    }
    public void receive() {
        System.out.println("receive from aopdemo");
    }
    @Override
    public void inter() {
        System.out.println("inter");
    }
}
配置
<aop:aspectj-autoproxy proxy-target-class="true" />
<bean class="base.aop.AopDemo" />
<bean class="base.aop.annotation.AspectDemo" />
因为AopDemo实现了AopDemoInter接口,但做实验的send方法又不在此接口里定义,所以只能用cglib的方式代理。
可以看出,即使标注了@Aspect注解,仍然需要将切面自己配置到Spring容器中。
解析
AspectJAutoProxyBeanDefinitionParser.parse:
@Override
public BeanDefinition parse(Element element, ParserContext parserContext) {
    AopNamespaceUtils.
        registerAspectJAnnotationAutoProxyCreatorIfNecessary(parserContext, element);
    extendBeanDefinition(element, parserContext);
    return null;
}
注册最终在AopConfigUtils.registerOrEscalateApcAsRequired方法中完成,创建器实际上是一个AnnotationAwareAspectJAutoProxyCreator类的对象,此类是前面AspectJAwareAdvisorAutoProxyCreator的子类。
原理
既然是AspectJAwareAdvisorAutoProxyCreator的子类,那么其代理子类的创建等核心逻辑自然是一样的。这里所需要关注的地方自然是所不一样的地方: 即是如何体现其注解的特性的。
前面说过,AspectJAwareAdvisorAutoProxyCreator通过findCandidateAdvisors方法来找到适用于bean的Advisor,所以注解的特性也是通过重写此方法来体现。
AnnotationAwareAspectJAutoProxyCreator.findCandidateAdvisors:
@Override
protected List<Advisor> findCandidateAdvisors() {
    List<Advisor> advisors = super.findCandidateAdvisors();
    //这里
    advisors.addAll(this.aspectJAdvisorsBuilder.buildAspectJAdvisors());
    return advisors;
}
buildAspectJAdvisors方法所做的便是从容器中得到所有的bean,逐一判断是不是一个Aspect。那么判断Aspect的依据是什么?
AbstractAspectJAdvisorFactory.isAspect:
@Override
public boolean isAspect(Class<?> clazz) {
    return (hasAspectAnnotation(clazz) && !compiledByAjc(clazz));
}
至于其它的实现细节不再探究。
总结
Spring对于AspectJ风格AOP的支持停留在外表(注解)上面,内部的实现仍然是自己的东西。
拾遗
AOP切面的坑
- 定义在private方法上的切面不会被执行,这个很容易理解,毕竟子类不能覆盖父类的私有方法。
- 同一个代理子类内部的方法相互调用不会再次执行切面。
这里以Cglib为例对第二点进行说明,cglib的相关核心组件可以参考前面CallbackFilter & Callback部分。对于配置了一个切面的典型场景,Spring内部的执行流程可总结如下图:

核心便是对目标方法的调用上,这里由CglibMethodInvocation的invokeJoinpoint实现:
@Override
protected Object invokeJoinpoint() throws Throwable {
    if (this.publicMethod) {
        return this.methodProxy.invoke(this.target, this.arguments);
    } else {
        return super.invokeJoinpoint();
    }
}
如果是非public方法,那么Spring将使用反射的方法对其进行调用,因为反射将其可访问性设为true。MethodProxy是Cglib对方法代理的抽象,这里的关键是方法调用的对象(目标)是我们的原生类对象,而不是Cglib代理子类的对象,这就从根本上决定了对同类方法的调用不会再次经过切面。
总结
前面aop:aspectj-autoproxy-属性-expose-proxy一节提到了,Spring允许我们将代理子类暴露出来,可以进行如下配置:
<aop:config expose-proxy="true">
    <aop:advisor advice-ref="simpleMethodInterceptor" pointcut="execution(* aop.SimpleAopBean.*(..))" />
</aop:config>
当我们需要在一个被代理方法中调用同类的方法时(此方法也需要经过切面),可以这样调用:
public void testB() {
    System.out.println("testB执行");
    ((SimpleAopBean) AopContext.currentProxy()).testC();
}
这里其实是一个ThreadLocal,当Cglib代理子类创建调用链之间便会将代理类设置到其中,DynamicAdvisedInterceptor.intercept相关源码:
if (this.advised.exposeProxy) {
    // Make invocation available if necessary.
    oldProxy = AopContext.setCurrentProxy(proxy);
    setProxyContext = true;
}


