Vue学习之Vue-Router
一、安装和使用vue-router
1、安装vue-router
(1)命令:npm install vue-router --save
(2)安装脚手架时可以选上路由,会自动把路由的相关配置配置好。
2.如果使用的是命令安装的话,需要把相关的配置手动配置好
第一步:在src文件夹中创建router文件夹,在router中创建index.js文件
第二步:导入路由对象(vue-router)和vue对象
import VueRouter from 'vue-router'
import Vue from 'vue'
第三部:用过vue.use()安装插件
Vue.use(VueRouter)
第四步:创建VueRouter对象
const routers=[

]
const router=new VueRouter({
  //配置路由和组件之间的关系
  routers
})
第五步:将创建router对象传入到vue实例中
export default router
第六步:将router对象导入到vue实例中
import router from './router'//完整的路径是./router/index.js不过./router写也会去找index.js
 ew Vue({
       el: '#app',
       router,
       render: h => h(App)
})
3、使用vue-router的步骤:
第一步:创建路由组件
<template>
    <div>
        <h2>我是首页</h2>
        <p>我是首页内容</p>
    </div>
</template>
<script>
export default {
    name:"Home"
}
</script>
<style scoped>

</style>
第二步:配置路由映射:组件和路由映射关系
(1):如果用命令安装vue-router时
//index.js中的routers配置
const routers=[
{
path:'/home'//当路径有/home是内容渲染Home组件
component:Home
}
]
(2)如果是脚手架选择安装时
export default new Router({
  mode: 'history',//把路径中#号去掉
  routes: [
    {
      path:‘’,
      redirect:‘/home’
    },
    {
      path: '/home',
      name: 'Home',
      component: Home
    },
    {
      path: '/about',
      name: 'about',
      component: about
    }

  ]
})
第三步:使用路由:通过<router-link>和<router-view>
//在路口组件中添加
<template>
  <div id="app">
    <router-link to="/home">首页</router-link>//路径添加/home
    <router-link to="/about">子页面</router-link>
    <router-view></router-view>//渲染内容,相当于给子组件占一个位置
  </div>

</template>
4、router-link属性:to属性:to=‘/home’拼接路径
tag属性:默认渲染成a标签,加入tag='button'渲染成button按钮形式
replace:加入replace时浏览器的前进后退按钮不在起作用!
active-clss:当不加入时点击router-link标签时会默认赋一个clss叫router-link-active名称,加入active-clss='active'时,再点击标签时clss的名称会变成active名字;
或者在index.js的export default new Router中加入linkActiveClass:'actove'也可以
5、路由的跳转(只是把router-link标签换成最普通的标签,用点击事件的方式改变路由):
<template>
  <div id="app">
    <button @click="homeclick">首页</button>
    <button @click="aboutclick">子页面</button>
    <router-view></router-view>
  </div>
</template>
6、路由的动态绑定
应用场景:跳转到用户的个人信息页面,并将个人信息显示出来,并且路径后面跟随用户ID
(1)首先映射路由的js中:
{
  path: '/about/:abc',//abc随便起的名字
  name: 'about',
  component: about
}
(2)在根组件中动态的数据拼接到按钮的路由上
<router-link :to="'/about/'+userid" >子页面</router-link>
(3)在子组件中获取路径中路径中用户的ID
<script>
export default {
    name:"about",
    computed:{
        id(){
            return this.$route.params.abc//获取被点击按钮,路由的用户的id,abc是路由映射时自定义的名称
        }
    }
}
</script>
7、路由的懒加载
在路由的index.js中导入的方式从
import router from './router/Home'方式变成
8、路由的嵌套使用(应用场景:首页中有两个子路由按钮,分别为新闻按钮和消息按钮)
(1)首先在配置路由的js文件中添加首页子组件的导入
const Homeone=()=> import('../components/Homeone')
const Hometwo=()=> import('../components/Hometwo')
其次在首页路由中配置子路由对象组
export default new Router({
  mode: 'history',//把#号去掉
  linkActiveClass:'actove',
  routes: [
    {
      path:'',
      redirect:'/home'
    },
    {
      path: '/home',
      name: 'Home',
      component: Home,
      children:[
        {
          path:'',
          redirect:'one'//默认路由
        },{
          path:'one',//子路由不需要在前面添加斜杠
          component:Homeone
        },{
          path:'two',
          component:Hometwo
        }
      ]
    },
    {
      path: '/about/:abc',
      name: 'about',
      component: about
    }

  ]
})
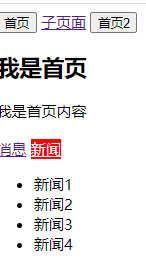
(2)在首页组件中添加router-link和router-view
<template>
    <div>
        <h2>我是首页</h2>
        <p>我是首页内容</p>
        <router-link to="/home/one">消息</router-link>
        <router-link to="/home/two">新闻</router-link>//路由路径必须到/home,如果直接写/one的话/one把/home替换了!!
        <router-view></router-view>
    </div>
</template>
9、vue-router路由传递参数
应用场景:路由带参数,渲染子组件的时候把参数展示到子组件上
router-link按钮时:
(1)、路由
<router-link :to="{path:'/home',query:{name:'张三',age:'14',phone:'13668637623'}}" tag="button" replace >首页</router-link>
(2)、子组件中获取路由参数
  <h2>{{$route.query.name}}</h2>
普通按钮时(button按钮):

(1)、路由
<button @click="homeclick">首页</button>

hometowclick(){
      this.$router.push({
          path:'/home',
          query:{
            name:'李四',
            age:13,
            phone:'13668637622'
          }
      })
    }
(2)、子组件中获取路由参数

  <h2>{{$route.query.name}}</h2>
  9、vue-router全局导航守卫(当路由和渲染的内容改变时,相应的页面名称title相应的改变)

(1)、脚手架在配置路由中index.js时将导出router对象和创建对象合并一块,在实现title名称改变时分开
const router =new Router({
  mode: 'history',//把#号去掉
  linkActiveClass:'actove',
  routes: [
    {
      path:'',
      redirect:'/home'
    },
    {
      path: '/home',
      name: 'Home',
      component: Home,
      meta:{
        title:'首页'
      }
    },
    {
      path: '/about/:abc',
      name: 'about',
      component: about,
      meta:{
        title:'子页面'
      }
    }
  ]
})
//前置钩子
router.beforeEach((to,from,next)=>{
  //从from跳转到to
  document.title=to.matched[0].meta.title
  console.log(to);
  next()
})
export default router;
to:即将要进入的目标的路由对象

from:当前导航即将要离开的路由对象

next:调用该方法后,才能进入下一个钩子

更多内容,可以查看官网:https://router.vuejs.org/zh/guide/advanced/navigation-guards.html
10、keep-alive
应用场景:不需要重新渲染,点击首页面新闻按钮后,再点击子页面按钮,再返回首页时,信息还是新闻的信息

(1)、首先在父组件app.vue中加入keep-alive把router-view标签包含在内
 <keep-alive>
      <router-view/>
 </keep-alive>
(2)、其次首页组件中
11、keep-alive属性
include -只有匹配的组件会被缓存
exclude -匹配到的组件都不会被缓存

例如:


 浙公网安备 33010602011771号