使用Sherry-tooltip美化及自定义Tooltip
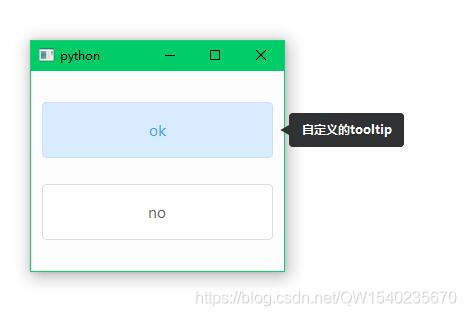
1. 效果图
No BB,Look Demo.
2. 实现方式
Sherry-tooltip 原本是作为 Sherry 插件形式实现tooltip的自定义,后考虑项目脱离框架运行需要,而进行去框架依赖,使其可以在原生的PyQt项目中运行,同时秉承代码零侵入原则,对Qt原生接口进行了反射,做到使用与去除全程无感。
安装方式
pip install sherry-tooltip
2.1 原生框架使用
在你的现有PyQt项目中使用Sherry-tootip
import sys
from PyQt5.QtWidgets import QPushButton, QVBoxLayout, QApplication, QDialog
from sherry_tooltip import TooltipAgent
if __name__ == '__main__':
# ✨ 原生框架只需在视图实例化前先行实例化即可
TooltipAgent()
app = QApplication(sys.argv)
widget = QDialog()
widget.resize(100, 200)
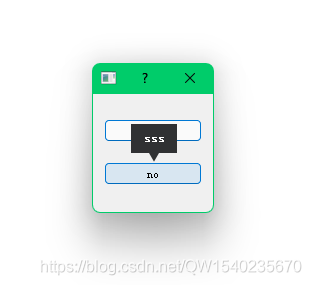
widget.setToolTip("ces")
layout = QVBoxLayout(widget)
button = QPushButton(widget)
button.setText("ok")
button.setToolTip("123")
layout.addWidget(button)
button1 = QPushButton(widget)
button1.setText("no")
button1.setToolTip("sss")
layout.addWidget(button1)
widget.setLayout(layout)
widget.exec_()
sys.exit(app.exit())
2.2在Sherry中使用
-
在项目下新建precondition.py(如果还没有的话)
-
在文件中添加以下代码
from sherry.variable.precondition import *

from sherry_tooltip import TooltipAgent

# 使用Sherry加载器初始化TooltipAgent
TaskDispatcher.update({
    "tooltip_hook": TooltipAgent,
})
- 启动你的项目即可实现tooltip hook,例如这里有一个简单的例子:
# coding=utf-8
"""
create by pymu
on 2021/7/23
at 11:23
"""
from PyQt5.QtWidgets import *
from sherry.core.launcher import Application
from sherry_tooltip.base_tip_content import BaseTipLabel
from sherry_tooltip.tooltip import CustomTooltip
if __name__ == '__main__':
widget = QDialog()
widget.resize(200, 300)
# 使用原生的接口(低侵入性,去除插件也无影响)
# widget.setToolTip("ces")
layout = QVBoxLayout(widget)
button = QPushButton(widget)
setattr(button, CustomTooltip.TOOLTIP_POSITION_KEY, 1)
setattr(button, CustomTooltip.TOOLTIP_ARROW_DIRECTION_KEY, 13)
# a = QWidget()
a = BaseTipLabel()
a.setObjectName("a")
layout1 = QVBoxLayout(a)
a.setLayout(layout1)
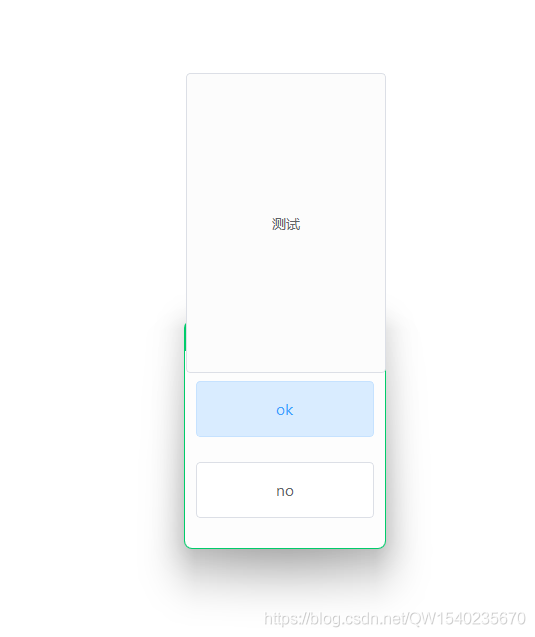
button1 = QPushButton(a)
button1.setFixedSize(200, 300)
button1.setText('测试')
button1.setStyleSheet(""" background: #fcfcfc; """)
layout1.addWidget(button1)
# a.show()
setattr(button, CustomTooltip.TOOLTIP_WIDGET_KEY, a)
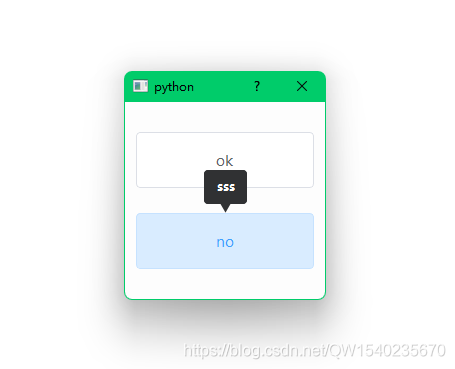
button.setText("ok")
button.setToolTip("123\n123123\n1231231\n23123")
layout.addWidget(button)
button1 = QPushButton(widget)
button1.setText("no")
button1.setToolTip("sss")
layout.addWidget(button1)
widget.setLayout(layout)
Application(activity=widget).run()
2.3如何使用自定义的tooltip?
自定义的tooltip 可以更换提示类型的
    ToolTip(QDialog) : tooltip的载体
    TooltipLabel(BaseTipLabel): tooltip显示的内容(默认是这个)
    BaseTipLabel(QWidget): tooltip显示的内容基类(如果需要用ToolTip来显示自定义的控件,则需要继承这个基类)

    可以在需要显示的控件中添加自定义属性如:

    class Custom(QPushButton):

        _sherry_tooltip_position = 1  # 指定tooltip显示的位置
        _sherry_tooltip_arrow_direction = 1  # 指定tooltip箭头的方向(0-12)13或者其他为不显示
        _sherry_tooltip_widget = CustomContent(QLabel, BaseTipLabel) # 一般在方法中设定要显示的内容,注意多态的继承先后秩序
                                                                     # 也可以不继承,这个不影响
例如这里写了一个自定义的控件:
# ✨ 还可以指定widget显示的内容自定义,可以是Sherry-tooltip的基类,也可以是原生QWidget类(同样代码低侵入)
# a = QWidget()
a = BaseTipLabel()
a.setObjectName("a")
layout1 = QVBoxLayout(a)
a.setLayout(layout1)
button1 = QPushButton(a)
# 👓 值得一提的是tooltip使用了adjustSize() 所以你要指定大小的话就需要使用绝对大小,否则他会把你的控件压缩成最小。
button1.setFixedSize(200, 300)
button1.setText('测试')
button1.setStyleSheet(""" background: #fcfcfc; """)
layout1.addWidget(button1)
setattr(button, CustomTooltip.TOOLTIP_WIDGET_KEY, a)

 浙公网安备 33010602011771号