

10. Spring security
依赖
<dependency>
<groupid>org.springframework.boot</groupid>
<artifactid>spring-boot-starter-security</artifactid>
</dependency>
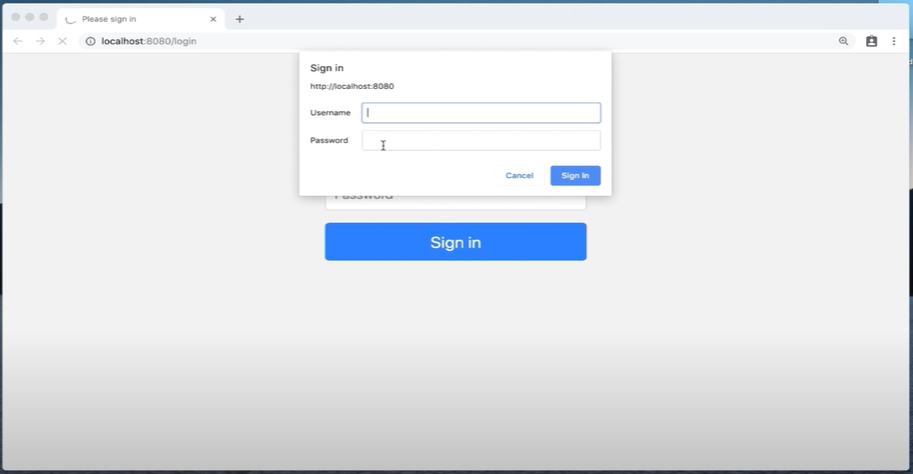
添加依赖后,项目中所有资源都会被保护起来。启动项目后访问任何一个接口都会跳转到登陆页面,这个页面是Spring Security提供的
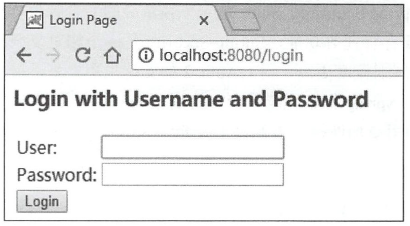
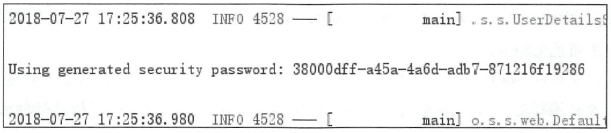
默认的用户名是user ,默认的登录密码则在每次启动项目时随机生成
登录成功后,用户就可以访问想要的接口了。
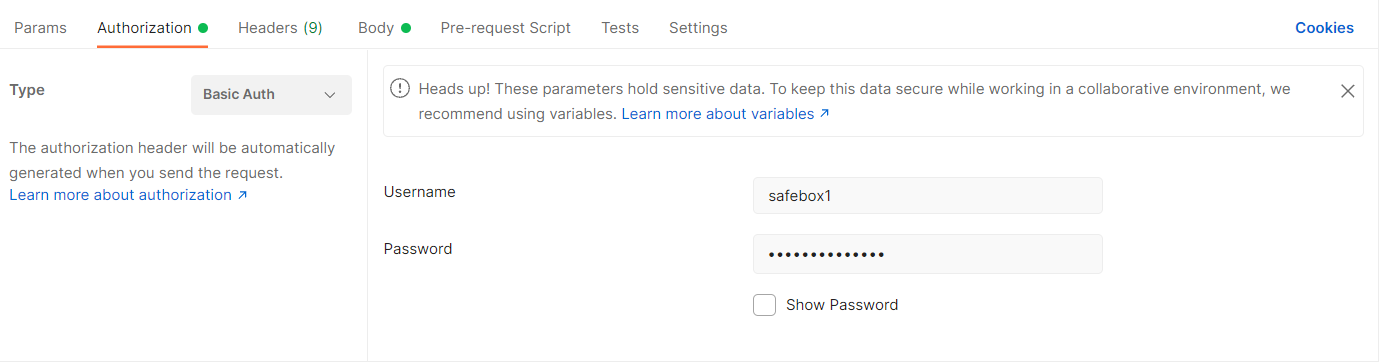
如果使用postman则在这里输入密码。同时不要忘记即时清理右上角的cookies,可能会引起密码错误。
当登陆成功后session会保存用户的登陆状态,也就是说用户可以无限访问其他页面。如果需要退出登陆则需要访问 http://localhost:8080/logout 来退出登陆。
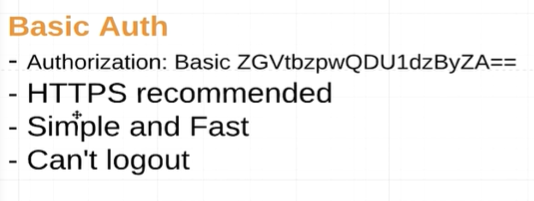
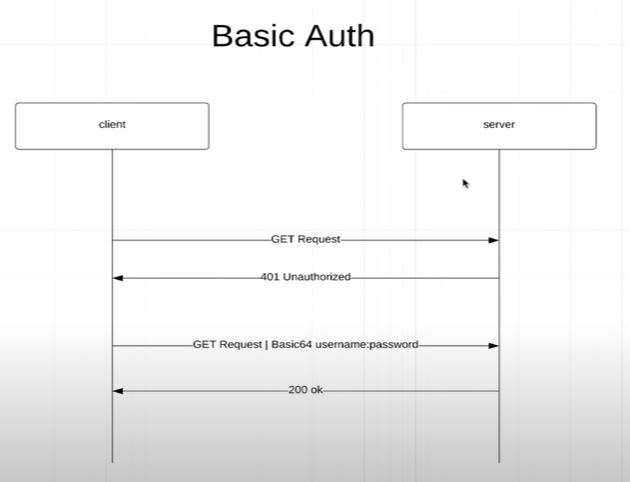
Basic Auth

@Configuration
@EnableWebSecurity
public class ApplicationSecurityConfig extends WebSecurityConfigurerAdapter {
  @Override
    protected void configure(HttpSecurity http) throws Exception {
        http.authorizeHttpRequests()
            .anyRequest()
            .authenticated()
            .and()
       .httpBasic();
    }
}
访问任何一个接口都会弹出一个登陆窗口,而 login 界面已经不存在了。我们无法访问。所有没有定义过的接口都会是Whitelabel Error Page。
basic auth是无法访问 /logout 来退出的,因为登陆的密码携带在request中。
@Configuration
@EnableWebSecurity
public class ApplicationSecurityConfig extends WebSecurityConfigurerAdapter {
  @Override
    protected void configure(HttpSecurity http) throws Exception {
        http.authorizeHttpRequests()
       // 允许不登陆就可访问以下接口
       .antMatcher("/", "index", "/css/*", "/js/*")
       .permitAll()
       // antMatcher 还可以定义访问方法
       // .antMatchers(HttpMethod.POST, "/hello").permitAll()
            .anyRequest()
            .authenticated()
            .and()
       .httpBasic();
    }
}
使用自定义用户
前面的例子中使用的一直都是一个自动生成的用户,那么我们该如何自定义符合我们需求的用户呢。我们可以在 WebSecurityConfigurerAdapter 重写 userDetailsService
@Configuration
@EnableWebSecurity
public class ApplicationSecurityConfig extends WebSecurityConfigurerAdapter {

    @Bean
    @Override
    public UserDetailsService userDetailsService() {
        UserDetails user1 = User.builder()
                .username("user1")
                .password("password")
                .roles("STUDENT") // ROLE_STUDENT
                .build();

        UserDetails user2 = User.builder()
                .username("user2")
                .password("password")
                .roles("TEACHER") // ROLE_STUDENT
                .build();

        return new InMemoryUserDetailsManager(user1, user2);
    }

    // 省略 protected void configure(HttpSecurity http) throws Exception

}
经过测试我们无法使用自定义的用户进行登陆,因为缺少了加密密码步骤。
新建一个类
@Configuration
public class PasswordConfig {
    @Bean
    PasswordEncoder passwordEncoder() {
     // 10 是指密码的strength,是一个optional parameter
     //
        return new BCryptPasswordEncoder(10);
    }
}
把加密方法引入security config
@Configuration
@EnableWebSecurity
public class ApplicationSecurityConfig extends WebSecurityConfigurerAdapter {
  // 方法1
    private final PasswordEncoder passwordEncoder;

    @Autowired
    public ApplicationSecurityConfig(PasswordEncoder passwordEncoder) {
        this.passwordEncoder = passwordEncoder;
  }

  // 方法2
    @Bean
    public PasswordEncoder passwordEncoder(){
        return new BCryptPasswordEncoder();
    }
  // 以上两种方法可以二选一
    @Bean
    @Override
    public UserDetailsService userDetailsService() {
        UserDetails user1 = User.builder()
                .username("user1")
                .password(passwordEncoder.encode(("password")) // 对密码进行加密
                .roles("STUDENT") // ROLE_STUDENT
                .build();

        UserDetails user2 = User.builder()
                .username("user2")
                .password(passwordEncoder.encode(("password")) // 对密码进行加密
                .roles("TEACHER") // ROLE_STUDENT
                .build();

        return new InMemoryUserDetailsManager(user1, user2);
    }

    // 省略 protected void configure(HttpSecurity http) throws Exception

}
现在我们就可以成功登陆了!
Role and Permission -> ROLE BASED AUTHENTICATION
1. create ApplicationUserPermission
public enum ApplicationUserPermission {
    STUDENT_READ("student:read"),
    STUDENT_WRITE("student:write"),
    COURSE_READ("course:read"),
    COURSE_WRITE("course:write"),

    private final String permission;

    ApplicationUserPermission(String permission) {
        this.permission = permission;
    }

    public String getPermission() {
        return permission;
    }
}
<dependency>
    <groupId>com.google.guava</groupId>
    <artifactId>guava</artifactId>
    <version>28.1-jre</version>
</dependency>
2. create ApplicationUserRole
public enum ApplicationUserRole {
    STUDENT(Sets.newHashSet()),
    ADMIN(Sets.newHashSet(COURSE_READ, COURSE_WRITE, STUDENT_READ, COURSE_WRITE));

    private final Set<ApplicationUserPermission> permissions;

    ApplicationUserRole(Set<ApplicationUserPermission> permissions) {
        this.permissions = permissions;
    }

    public Set<ApplicationUserPermission> getPermissions() {
        return permissions;
    }
}
3. use ApplicationUserRole in the userDetailsService@Configuration
@Configuration
@EnableWebSecurity
public class ApplicationSecurityConfig extends WebSecurityConfigurerAdapter {

    @Bean
    @Override
    public UserDetailsService userDetailsService() {
        UserDetails user1 = User.builder()
                .username("user1")
                .password(passwordEncoder.encode(("password")) // 对密码进行加密
                .roles(ApplicationUserRole.STUDENT.name()) // ROLE_STUDENT
                .build();

        UserDetails user2 = User.builder()
                .username("user2")
                .password(passwordEncoder.encode(("password")) // 对密码进行加密
                .roles(ApplicationUserRole.ADMIN.name()) // ROLE_STUDENT
                .build();

        return new InMemoryUserDetailsManager(user1, user2);
    }
  @Override
    protected void configure(HttpSecurity http) throws Exception {
        http.authorizeHttpRequests()
       // 允许不登陆就可访问以下接口
       .antMatcher("/", "index", "/css/*", "/js/*")
       .permitAll()
       // antMatcher 还可以定义访问方法
       // .antMatchers(HttpMethod.POST, "/hello").permitAll()
       .antMatcher("/api/**").hasRole(ApplicationUserRole.STUDENT.name())
       // 只有Role是Student的User才可以访问api开头的接口
            .anyRequest()
            .authenticated()
            .and()
       .httpBasic();
    }
}
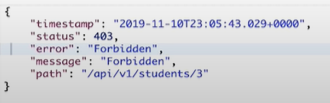
如果方法的用户的role不是STUDENT则会收到forbidden
Permission based authentication
1. 添加新Role到ApplicationUserRole
public enum ApplicationUserRole {
  // 使用构造方法创建的enum实力
    STUDENT(Sets.newHashSet()),
    ADMIN(Sets.newHashSet(COURSE_READ, COURSE_WRITE, STUDENT_READ, COURSE_WRITE));
    ADMINTRAINEE(Sets.newHashSet(COURSE_READ, STUDENT_READ));

    private final Set<ApplicationUserPermission> permissions;

  // 构造方法
    ApplicationUserRole(Set<ApplicationUserPermission> permissions) {
        this.permissions = permissions;
    }

    public Set<ApplicationUserPermission> getPermissions() {
        return permissions;
    }

  public Set<SimpleGrantedAuthority> getGrantedAuthorities() {
    Set<SimpleGrantedAuthority permissions=
      getPermissions().stream()
      .map(permission -> new SimpleGrantedAuthority(permission.getPermission()))
      .collect(Collectors.toSet());
    permissions.add(nnew SimpleGrantedAuthority("ROLE_" + this.name()));
    return permissions;
  }
}
2. 添加新用户到UserDetailsService
@Configuration
@EnableWebSecurity
public class ApplicationSecurityConfig extends WebSecurityConfigurerAdapter {

    @Bean
    @Override
    public UserDetailsService userDetailsService() {
        UserDetails user1 = User.builder()
                .username("user1")
                .password(passwordEncoder.encode(("password")) // 对密码进行加密
                //.roles(ApplicationUserRole.STUDENT.name()) // ROLE_STUDENT
                .authorities(ApplicationUserRole.STUDENT.getGrantedAuthorities())
          .build();

        UserDetails user2 = User.builder()
                .username("user2")
                .password(passwordEncoder.encode(("password")) // 对密码进行加密
                // .roles(ApplicationUserRole.ADMIN.name()) // ROLE_STUDENT
                .authorities(ApplicationUserRole.ADMIN.getGrantedAuthorities())
          .build();

     UserDetails user3 = User.builder()
                .username("user3")
                .password(passwordEncoder.encode(("password")) // 对密码进行加密
                // .roles(ApplicationUserRole.ADMINTRAINEE.name()) // ROLE_STUDENT
                .authorities(ApplicationUserRole.ADMINtRAINEE.getGrantedAuthorities())
          .build();

        return new InMemoryUserDetailsManager(user1, user2, user3);
    }
}
3. 给configure 添加新的过滤条件
@Configuration
@EnableWebSecurity
public class ApplicationSecurityConfig extends WebSecurityConfigurerAdapter {
  @Override
  protected void configure(HttpSecurity http) throws Exception {
        http
            .csrf().disable()
            .authorizeHttpRequests()
            // 允许不登陆就可访问以下接口
       .antMatcher("/", "index", "/css/*", "/js/*").permitAll()

       // antMatcher 还可以定义访问方法
       // .antMatchers(HttpMethod.POST, "/hello").permitAll()

       .antMatcher("/api/**").hasRole(ApplicationUserRole.STUDENT.name())
       // 只有Role是Student的User才可以访问api开头的接口

       // 将会根据顺序过滤,一但不符合条件就会返回forbidden
       .antMatchers(HttpMethod.DELETE, "/management/api/**").hasAuthority(ApplicationUserPermission.COURSE_WRITE.getPsermission())
       .antMatchers(HttpMethod.POST, "/management/api/**").hasAuthority(ApplicationUserPermission.COURSE_WRITE.getPermission())
       .antMatchers(HttpMethod.PUT, "/management/api/**").hasAuthority(ApplicationUserPermission.COURSE_WRITE.getPermission())
       .antMatchers(HttpMethod.GET, "/management/api/**").hasAnyRole(ApplicationUserRole.ADMIN.name(), ApplicationUserRole.ADMINTRAINEE.name())
       .anyRequest()
       .authenticated()
       .and()
       .httpBasic();
  }
}
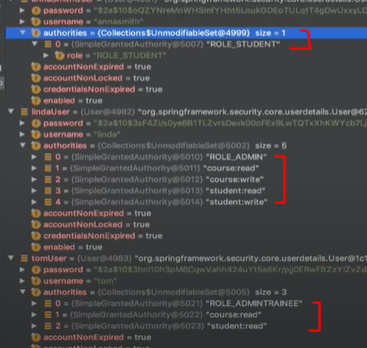
我们创建的三个用户的authorities将会是这样:
@PreAuthorize at Controller
上面的 antMatchers 还有另外已经写法,那就是在Controller 使用PreAuthorize注解
@GetMapping
@PreAuthorize("hasAnyRole('ROLE_ADMIN, ROLE_ADMINTRAINEE')")
public List<Student> getAllStudents() {
    ...
}

@PostMapping
@PreAuthorize("hasAuthority('student:write')")
public void registerNewStudent() {
    ...
}

@DeleteMapping
@PreAuthorize("hasAuthority('student:write')")
public void deleteStudent() {
    ...
}

@GetMapping
@PreAuthorize("hasAuthority('student:write')")
public void updateStudent() {
    ...
}
以上代码的效果和antMatchers完全相同,二者选其一即可。
如果使用PreAuthorize的话需要在 ApplicationSecurityConfig 上添加注解@EnableGlobalMethodSecurity(prePostEnabled = true)
PreAuthorize还可以使用:hasRole('ROLE_'), hasAnyRole('ROLE_, ROLE_,...'), hasAuthority('permission'), hasAnyAuthority('permission, permission')
Form based authentication
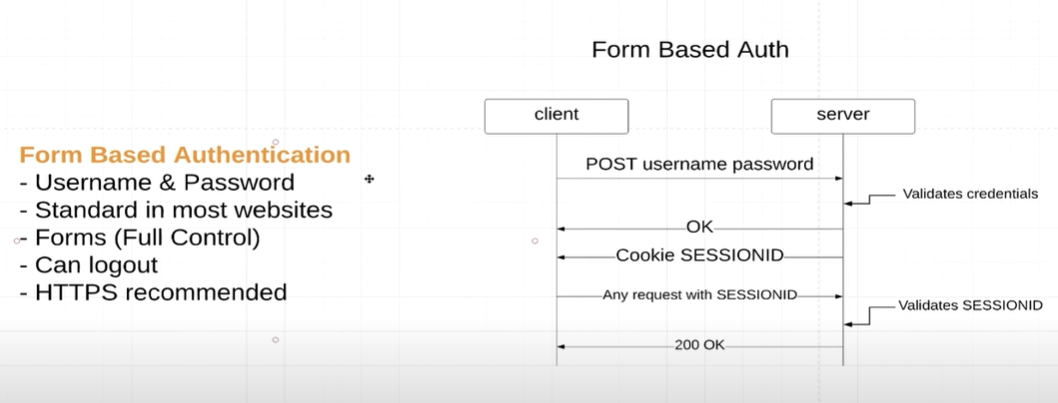
SessionID 是储存在memory database中的所以重新启动service后登陆状态就会消失。当然我们也可以把SessionID储存在Postgres或Redis中。
@Configuration
@EnableWebSecurity
public class ApplicationSecurityConfig extends WebSecurityConfigurerAdapter {
  @Override
  protected void configure(HttpSecurity http) throws Exception {
        http
            .csrf().disable()
            .authorizeHttpRequests()
            // 允许不登陆就可访问以下接口
       .antMatcher("/", "index", "/css/*", "/js/*").permitAll()

       .antMatcher("/api/**").hasRole(ApplicationUserRole.STUDENT.name())
       // 只有Role是Student的User才可以访问api开头的接口

       .anyRequest()
       .authenticated()
       .and()
       .formLogin();
  }
}
运行项目时会跳转到登陆页面,而不是像basic auth的登陆弹窗。登陆状态会一直保存直到 /logout
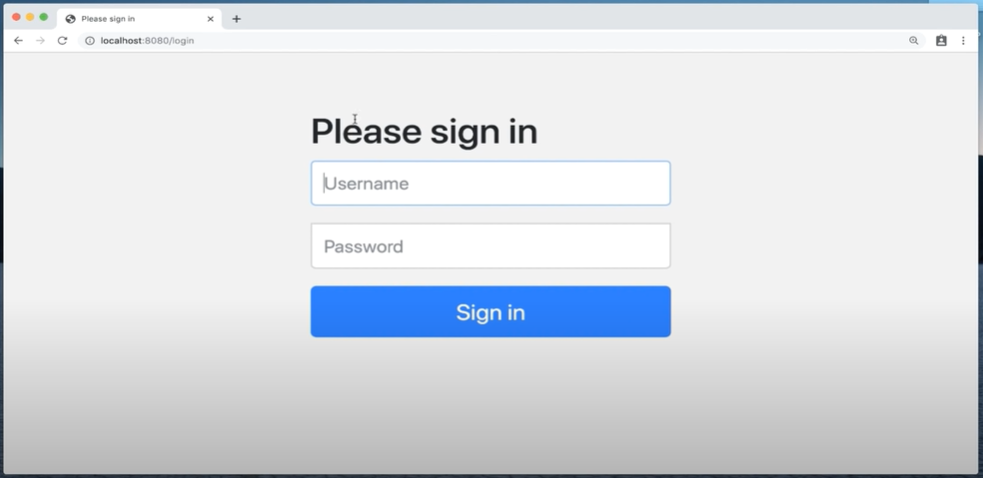
自定义登陆页面
@Configuration
@EnableWebSecurity
public class ApplicationSecurityConfig extends WebSecurityConfigurerAdapter {
  @Override
  protected void configure(HttpSecurity http) throws Exception {
        http
            .csrf().disable()
            .authorizeHttpRequests()
            // 允许不登陆就可访问以下接口
       .antMatcher("/", "index", "/css/*", "/js/*").permitAll()

       .antMatcher("/api/**").hasRole(ApplicationUserRole.STUDENT.name())
       // 只有Role是Student的User才可以访问api开头的接口

       .anyRequest()
       .authenticated()
       .and()
       .formLogin()
            .loginPage("/login").permitAll; // 需要有resources/template/login.html文件
  }
}
书写html文件我们需要添加依赖

Controller
登陆后跳转到指定页面
@Configuration
@EnableWebSecurity
public class ApplicationSecurityConfig extends WebSecurityConfigurerAdapter {
  @Override
  protected void configure(HttpSecurity http) throws Exception {
        http
            .csrf().disable()
            .authorizeHttpRequests()
            // 允许不登陆就可访问以下接口
       .antMatcher("/", "index", "/css/*", "/js/*").permitAll()

       .antMatcher("/api/**").hasRole(ApplicationUserRole.STUDENT.name())
       // 只有Role是Student的User才可以访问api开头的接口

       .anyRequest()
       .authenticated()
       .and()
       .formLogin()
            .loginPage("/login").permitAll
            .defaultSuccessUrl("/courses", true); // 需要有resources/template/courses.html文件
} }
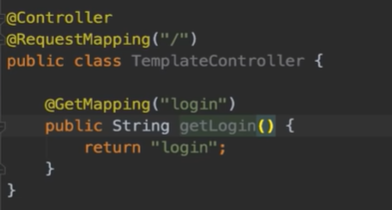
Controller
@Controller
@RequestMapping("/")
public class TemplateController {

    @GetMapping("login")
    public String getLogin() {
        return "login"; //必须和HTML文件名相符
    }

    @GetMapping("courses")
    public String getLogin() {
        return "courses"; // 必须和HTML文件名相符
} }
Remember me
@Configuration
@EnableWebSecurity
public class ApplicationSecurityConfig extends WebSecurityConfigurerAdapter {
  @Override
  protected void configure(HttpSecurity http) throws Exception {
        http
            .csrf().disable()
            .authorizeHttpRequests()
            // 允许不登陆就可访问以下接口
       .antMatcher("/", "index", "/css/*", "/js/*").permitAll()

       .antMatcher("/api/**").hasRole(ApplicationUserRole.STUDENT.name())
       // 只有Role是Student的User才可以访问api开头的接口

       .anyRequest()
       .authenticated()
       .and()
       .formLogin()
            .loginPage("/login").permitAll
            .defaultSuccessUrl("/courses", true)
            .and()
            .rememberMe(); // defaults to 2 weeks
       // .rememberMe().tokenValiditySeconds((int) TimeUnit.DAYS.toSeconds(21)).key("somethingverysecured");

  }
 }
在login界面添加一个checkbox,不需要任何其他代码只需选中check box那么remember-me就会是on.

在网页的network查看:
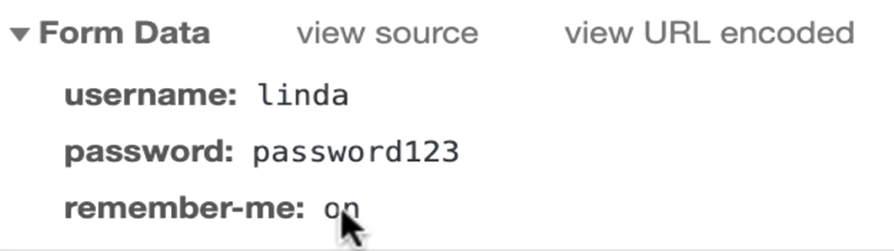
remember me是on时,在cookies中会多一个remember me cookie。remember me cookie 含有 username,expiration time,md5 hash of the above 2 value。
Logout
@Configuration
@EnableWebSecurity
public class ApplicationSecurityConfig extends WebSecurityConfigurerAdapter {
  @Override
  protected void configure(HttpSecurity http) throws Exception {
        http
            .csrf().disable()
            .authorizeHttpRequests()
            // 允许不登陆就可访问以下接口
       .antMatcher("/", "index", "/css/*", "/js/*").permitAll()

       .antMatcher("/api/**").hasRole(ApplicationUserRole.STUDENT.name())
       // 只有Role是Student的User才可以访问api开头的接口

       .anyRequest()
       .authenticated()
       .and()
       .formLogin()
            .loginPage("/login").permitAll
            .defaultSuccessUrl("/courses", true)
            .and()
            .rememberMe().tokenValiditySeconds((int) TimeUnit.DAYS.toSeconds(21)).key("somethingverysecured")
            .and()
            .logout()
            .logoutUrl("/logout")
            .clearAuthentication(true)
            .invalidateHttpSession(true)
            .deleteCookies("JSESSIONID", "remember-me" )
            .logoutSuccessUrl("/login");
  }
 }


logout button

@Configuration
@EnableWebSecurity
public class ApplicationSecurityConfig extends WebSecurityConfigurerAdapter {
  @Override
  protected void configure(HttpSecurity http) throws Exception {
        http
            .csrf().disable()
            .authorizeHttpRequests()
            // 允许不登陆就可访问以下接口
       .antMatcher("/", "index", "/css/*", "/js/*").permitAll()

       .antMatcher("/api/**").hasRole(ApplicationUserRole.STUDENT.name())
       // 只有Role是Student的User才可以访问api开头的接口

       .anyRequest()
       .authenticated()
       .and()
       .formLogin()
            .loginPage("/login").permitAll
            .defaultSuccessUrl("/courses", true)
            .passwordParameter("password") // 这几个parameter要和form中每个对应组件的name相同
            .usernameParameter("username")
            .and()
            .rememberMe().tokenValiditySeconds((int) TimeUnit.DAYS.toSeconds(21)).key("somethingverysecured")
            .rememberMeParameter("remember-me")
            .and()
            .logout()
            .logoutUrl("/logout")
            .clearAuthentication(true)
            .invalidateHttpSession(true)
            .deleteCookies("JSESSIONID", "remember-me" )
            .logoutSuccessUrl("/login");
  }
 }
Database Authentication
在UserDetailsService接口中看它的继承类

Database Authentication需要使用的就是JdbcDaoImpl
创建ApplicationUser
public class ApplicationUser implements UserDetails {

    private final List<? extends GrantedAuthority> grantedAuthorities;
    private final String password;
    private final String username;
    private final boolean isAccountNonExpired;
    private final boolean isAccountLocked;
    private final boolean isCredentialsNonExpired;
    private final boolean isEnabled;

    public ApplicationUser(List<? extends GrantedAuthority> grantedAuthorities,
                           String password,
                           String username,
                           boolean isAccountNonExpired,
                           boolean isAccountLocked,
                           boolean isCredentialsNonExpired,
                           boolean isEnabled) {
        this.grantedAuthorities = grantedAuthorities;
        this.password = password;
        this.username = username;
        this.isAccountNonExpired = isAccountNonExpired;
        this.isAccountLocked = isAccountLocked;
        this.isCredentialsNonExpired = isCredentialsNonExpired;
        this.isEnabled = isEnabled;
    }


    @Override
    public Collection<? extends GrantedAuthority> getAuthorities() {
        return grantedAuthorities;
    }

    @Override
    public String getPassword() {
        return password;
    }

    @Override
    public String getUsername() {
        return username;
    }

    @Override
    public boolean isAccountNonExpired() {
        return isAccountNonExpired;
    }

    @Override
    public boolean isAccountNonLocked() {
        return isAccountLocked;
    }

    @Override
    public boolean isCredentialsNonExpired() {
        return isCredentialsNonExpired;
    }

    @Override
    public boolean isEnabled() {
        return isEnabled;
    }
}
创建ApplicationUserService
@Service
public class ApplicationUserService implements UserDetailsService {
    private final ApplicationUSerDao applicationUSerDao;

    @Autowired
  // Qualifier("fake") 指定ApplicationUserDao使用的implement,如果只有一个可以不添加。这里指的就是@Reposity("fake")的FakeApplicationUserDaoService
    public ApplicationUserService(@Qualifier("fake") ApplicationUserDao applicationUserDao) {
        this.applicationUSerDao = applicationUSerDao;
    }

    @Override
    public UserDetails loadUserByUsername(String username) throws UsernameNotFoundException {
        return applicationUSerDao
                .selectApplicationUserByUsername(username)
                .orElseThrow(() -> new UsernameNotFoundException(String.format("Username %s not found", username)));
    }

    @Bean
    public PasswordEncoder passwordEncoder(){
        return new BCryptPasswordEncoder();
    }
}
创建ApplicationUserDao
public interface ApplicationUserDao {
    public Optional<ApplicationUser> selectApplicationUserByUsername(String username);
}
创建FakeApplicationUserDaoService用于代替数据库数据
@Repository("fake")
public class FakeApplicationUserDaoService implements ApplicationUSerDao{

    private final PasswordEncoder passwordEncoder;

    @Autowired
    public FakeApplicationUserDaoService(PasswordEncoder passwordEncoder) {
        this.passwordEncoder = passwordEncoder;
    }

    @Override
    public Optional<ApplicationUser> selectApplicationUserByUsername(String username) {
        return getApplicationUsers()
                .stream()
                .filter(applicationUser -> username.equals(applicationUser.getUsername()))
                .findFirst();
    }

    private List<ApplicationUser> getApplicationUsers() {
        List<ApplicationUser> applicationUsers = new ArrayList<>();
        applicationUsers.add(new ApplicationUser(
                "annasmith",
                passwordEncoder.encode("password"),
                STUDENT.getGrantedAuthorities(),
                true, true, true, true
                ));
        applicationUsers.add(new ApplicationUser(
                "linda",
                passwordEncoder.encode("password"),
                ADMIN.getGrantedAuthorities(),
                true, true, true, true
        ));
        applicationUsers.add(new ApplicationUser(
                "tom",
                passwordEncoder.encode("password"),
                ADMINTRAINEE.getGrantedAuthorities(),
                true, true, true, true
        ));
    }
}
@Configuration
@EnableWebSecurity
public class ApplicationSecurityConfig extends WebSecurityConfigurerAdapter {

   // 省略 protected void configure(HttpSecurity http) throws Exception

  private final PasswordEncoder passwordEncoder;
  private final ApplicationUserService applicationUserService;

  @Autowired
  public ApplicationSecurityConfig(PasswordEncoder passwordEncoder, ApplicationUserService applicationUserService) {
    this.passwordEncoder = passwordEncoder;
    this.applicationUserService = applicationUserService;
  }

    @Override
    protected void configure(AuthenticationManagerBuilder auth) throws Exception {
        auth.authenticationProvider(daoAuthenticationProvider());
    }

    @Bean
    public DaoAuthenticationProvider daoAuthenticationProvider() {
        DaoAuthenticationProvider provider = new DaoAuthenticationProvider();
        provider.setPasswordEncoder(passwordEncoder);
        provider.setUserDetailsService(applicationUserService);
        return provider;
    }
 }
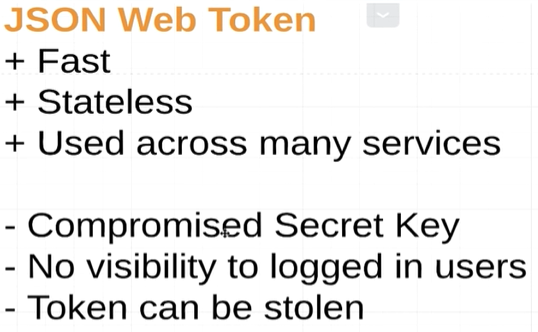
jwt(json web token)

1. 添加dependencies
<dependencies>

    <dependency>
        <groupId>io.jsonwebtoken</groupId>
        <artifactId>jjwt</artifactId>
        <version>0.9.1</version>
    </dependency>

    <dependency>
        <groupId>javax.xml.bind</groupId>
        <artifactId>jaxb-api</artifactId>
    </dependency>

    <dependency>
        <groupId>com.sun.xml.bind</groupId>
        <artifactId>jaxb-impl</artifactId>
        <version>4.0.0</version>
    </dependency>

</dependencies>
<dependency>
    <groupId>io.jsonwebtoken</groupId>
    <artifactId>jjwt-api</artifactId>
    <version>0.11.5</version>
</dependency>
<dependency>
    <groupId>io.jsonwebtoken</groupId>
    <artifactId>jjwt-impl</artifactId>
    <version>0.11.5</version>
    <scope>runtime</scope>
</dependency>
<dependency>
    <groupId>io.jsonwebtoken</groupId>
    <artifactId>jjwt-jackson</artifactId> <!-- or jjwt-gson if Gson is preferred -->
    <version>0.11.5</version>
    <scope>runtime</scope>
</dependency>
2. 当用户sends credentials时对用户名和密码进行检查
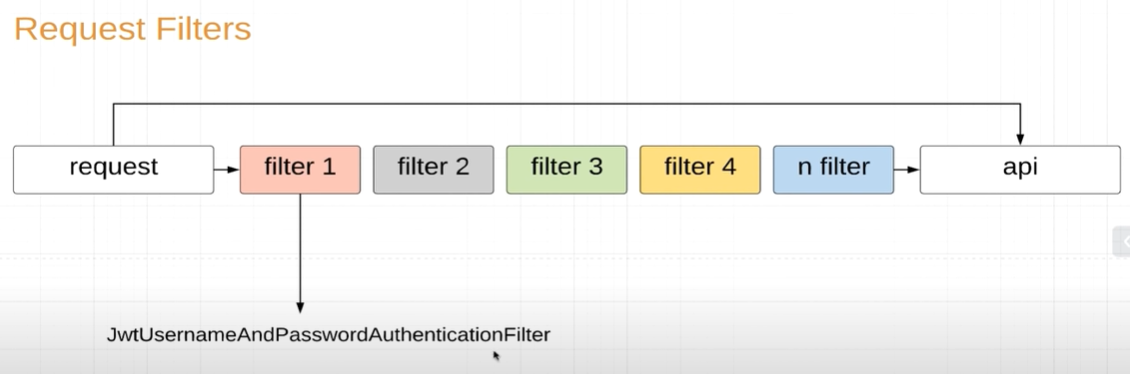
public class JwtUsernameAndPasswordAuthenticationFilter extends UsernamePasswordAuthenticationFilter {
    @Autowired
    private AuthenticationManager authenticationManager;

    @Override
    public Authentication attemptAuthentication(HttpServletRequest request,
                                                HttpServletResponse response) throws AuthenticationException {

        try {
            UsernameAndPasswordAuthenticationRequest authenticationRequest =
                    new ObjectMapper().readValue(request.getInputStream(), UsernameAndPasswordAuthenticationRequest.class);

            Authentication authentication = new UsernamePasswordAuthenticationToken(
                    authenticationRequest.getUsername(),
                    authenticationRequest.getPassword());
            // 检查username和password是否正确
            return authenticationManager.authenticate(authentication);
        } catch (IOException e) {
            throw new RuntimeException(e);
        }
    }
}
需要创建一个新类来匹配request的值
public class UsernameAndPasswordAuthenticationRequest {
    private String username;
    private String password;

    public UsernameAndPasswordAuthenticationRequest() {
    }

    public String getUsername() {
        return username;
    }

    public void setUsername(String username) {
        this.username = username;
    }

    public String getPassword() {
        return password;
    }

    public void setPassword(String password) {
        this.password = password;
    }
}
3. 检查通过后返回token
public class JwtUsernameAndPasswordAuthenticationFilter extends UsernamePasswordAuthenticationFilter { @Autowired private AuthenticationManager authenticationManager; // 省略 attemptAuthentication // 如果attemptAuthentication的验证不通过就不会运行这个方法 @Override protected void successfulAuthentication(HttpServletRequest request, HttpServletResponse response, FilterChain chain, Authentication authResult) throws IOException, ServletException { String key = "securesecuresecuresecuresecuresecuresecuresecuresecure"; String token = Jwts.builder() .setSubject(authResult.getName()) // subject 就是要生成 token 的值,比如这里可以是用户名、用户 ID 等。 .claim("authorities", authResult.getAuthorities()) .setIssuedAt(new Date()) //JWT发行时的时间戳 .setExpiration(java.sql.Date.valueOf(LocalDate.now().plusWeeks(2))) .signWith(Keys.hmacShaKeyFor(key.getBytes()))
//我使用 .signWith(SignatureAlgorithm.HS256,secret.getBytes(StandardCharsets.UTF_8))
          .compact();
      response.addHeader("Authorization", "Bearer " + token);
  }
}
4. 在configure中添加 jwtFilter,jwt是一个stateless的
@Configuration
@EnableWebSecurity
public class ApplicationSecurityConfig extends WebSecurityConfigurerAdapter {

  @Override
  protected void configure(HttpSecurity http) throws Exception {
        http
            .csrf().disable()
            .sessionManagement().sessionCreationPolicy(SessionCreationPolicy.STATELESS)
            .and()
            // authenticationManager() is a function of WebSecurityConfigurerAdapter
            .addFilter(new JwtUsernameAndPasswordAuthenticationFilter(authenticationManager()))
            .authorizeHttpRequests()
       .antMatcher("/", "index", "/css/*", "/js/*").permitAll()
       .antMatcher("/api/**").hasRole(ApplicationUserRole.STUDENT.name())
       .anyRequest()
       .authenticated();
  }
}
5. create jwtTokenVerifier

public class JwtTokenVerifier extends OncePerRequestFilter {

    @Override
    protected void doFilterInternal(HttpServletRequest request,
                                    HttpServletResponse response,
                                    FilterChain filterChain) throws ServletException, IOException {

        String authorizationHeader = request.getHeader("Authorization");

        if (authorizationHeader == null
                || !authorizationHeader.startsWith("Bearer ")) {
        // 去到下一个filter
            filterChain.doFilter(request, response);
            return;
        }

        String token = authorizationHeader.replace("Bearer ", "");
        try {
            String key = "securesecuresecuresecuresecuresecuresecuresecuresecure";
            Jws<Claims> claimsJws = Jwts.parser()
                    .setSigningKey(Keys.hmacShaKeyFor(key.getBytes()))
                    .parseClaimsJws(token);

            Claims body = claimsJws.getBody();

            String username = body.getSubject();

            var authorities = (List<Map<String, String>>) body.get("authorities");

            Set<SimpleGrantedAuthority> simpleGrantedAuthorities = authorities.stream()
                    .map(m -> new SimpleGrantedAuthority(m.get("authority")))
                    .collect(Collectors.toSet());

            Authentication authentication = new UsernamePasswordAuthenticationToken(
                    username, null, simpleGrantedAuthorities
            );

            SecurityContextHolder.getContext().setAuthentication(authentication);
        } catch (JwtException e) {
            throw new IllegalStateException(String.format("Token %s cannot be truest", token));
        }
filterChain.doFilter(request, response); // 去下一个filter
} }
6. 添加这个filter
@Configuration
@EnableWebSecurity
public class ApplicationSecurityConfig extends WebSecurityConfigurerAdapter {

  @Override
  protected void configure(HttpSecurity http) throws Exception {
        http
            .csrf().disable()
            .sessionManagement().sessionCreationPolicy(SessionCreationPolicy.STATELESS)
            .and()
            // authenticationManager() is a function of WebSecurityConfigurerAdapter
            .addFilter(new JwtUsernameAndPasswordAuthenticationFilter(authenticationManager()))
            // this filter will be after the JwtUsernameAndPasswordAuthenticationFilter
            .addFilterAfter(new JwtTokenVerifier(), JwtUsernameAndPasswordAuthenticationFilter.class)
            .authorizeHttpRequests()
       .antMatcher("/", "index", "/css/*", "/js/*").permitAll()
       .antMatcher("/api/**").hasRole(ApplicationUserRole.STUDENT.name())
       .anyRequest()
       .authenticated();
  }
}
JWT config


【推荐】国内首个AI IDE,深度理解中文开发场景,立即下载体验Trae
【推荐】编程新体验,更懂你的AI,立即体验豆包MarsCode编程助手
【推荐】抖音旗下AI助手豆包,你的智能百科全书,全免费不限次数
【推荐】轻量又高性能的 SSH 工具 IShell:AI 加持,快人一步
· 阿里最新开源QwQ-32B,效果媲美deepseek-r1满血版,部署成本又又又降低了!
· 开源Multi-agent AI智能体框架aevatar.ai,欢迎大家贡献代码
· Manus重磅发布:全球首款通用AI代理技术深度解析与实战指南
· 被坑几百块钱后,我竟然真的恢复了删除的微信聊天记录!
· AI技术革命,工作效率10个最佳AI工具