一、pytest基础
一、 setup 和 teardown 操作
setup: 在测试函数或类之前执行, 完成准备工作,例如数据库连接、数 据测试、打开文件等。
teardown: 在测试函数或类之后执行,完成收尾工作, 例如断开数据库 连接、回收内存资源。
二、编写规则
1. 测试文件以 test_ 开头或以 _test结尾
2. 测试类以Test开头, 并且不能带有 init 方法
3. 测试函数以test_开头
4. 断言assert即可
5. 设置执行顺序, @pytest.mark.run(order=1)
6. 全局变量 @pytest.fixture()
	参数scope
		session: 只执行一次
		module: 在模块级别中只执行一次
		class: 在类级别中只执行一次
		function: 在函数界别中执行一次
三、 pytest.ini
pytest 配置文件
1. 可以修改命名规范
示例:
[pytest]
python_files = test_*.py *_test.py
python_classes = Test* zz
python_functions = test_*
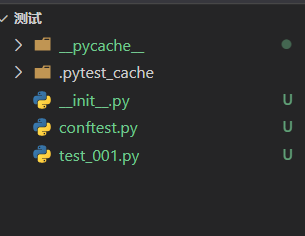
四、conftest.py:
- 名称固定,不可修改
- conftest.py文件和用例在同一目录下,那么conftest.py作用于整个目录
- conftest.py 文件所在目录必须存在__init__.py 文件
- 不能被其他目录导入
- 所有同目录测试文件运行前都会执行conftest.py 文件
示例:
test_001.py
import pytest
import requests
# 示例

#函数
def test_001():
print("执行测试用例001")
# 测试类
def setup_module():
print("模块运行前****")
def teardown_module():
print("模块运行后****")
class Test002():
def setup_class(self):
print("测试类运行前执行一次")
def teardown_class(self):
print("测试类运行后执行一次")
def setup(self):
print("用例执行前执行一次")
def teardown(self):
print("用例执行后执行一次")
def test_003(self, gettoken):
print("执行003--------%s" % gettoken)
# 数据驱动, indata 还可以来自,excel 等数据容器,通过函数读出来
indata = [['6', '1'], ['9', '0'], ['', '1'], ['zzz', '0']]
@pytest.mark.parametrize("weaid, status", indata) # 将有返回值的汉
def test_004(self, weaid, status):
data = {
'app' : 'weather.realtime',
'weaid' : weaid,
'ag' : 'today,futureDay,lifeIndex,futureHour',
'appkey' : '59762',
'sign' : '9e3a8cd9e31faaabcdb592085ab3dc57',
'format' : 'json',
}
response = requests.get("https://sapi.k780.com", data)
res_json = response.json()
print(weaid)
assert res_json["success"] == status
if __name__ == "__main__":
# -s 返回打印信息, --html 报告 需要安装 pytest-html
pytest.main(["-s", "--html=./reports/result.html"])
configtest.py
import pytest


# 全局变量
@pytest.fixture()
def gettoken():
    token = "xxx001"
    return token
五、main参数
在pytest 中添加:
addopts = -s --html=./reports/result.html


 浙公网安备 33010602011771号