ES on debian
https://www.rosehosting.com/blog/how-to-install-and-set-up-elasticsearch-on-debian-11/
apt install default-jre

systemctl enable --now elasticsearch
systemctl status elasticsearch
systemctl restart elasticsearch

/usr/share/elasticsearch/bin/elasticsearch-reset-password -u elastic
https://linuxhint.com/install-elasticsearch-debian/
sudo dpkg -i elasticsearch-7.14.1-amd64.deb
https://documentation.wazuh.com/current/deployment-options/elastic-stack/distributed-deployment/elasticsearch-cluster/elasticsearch-multi-node-cluster.html
https://github.com/elastic/ansible-elasticsearch
https://www.toptal.com/ansible/update-elastic-stack-ansible-playbooks
https://garutilorenzo.github.io/ansible-collection-elk/
https://www.inmotionhosting.com/support/edu/software/how-to-install-elasticsearch/#debian
Setting Elasticsearch as a System Service
Use the following command to start Elasticsearch now:
systemctl start elasticsearch
Use the following command to enable Elasticsearch to automatically start upon system reboot:
systemctl enable elasticsearch
Use the following command to check for any issues related to starting or enabling Elasticsearch:
systemctl status elasticsearch
sudo systemctl start elasticsearch.service
sudo systemctl enable elasticsearch.service --now
sudo systemctl status elasticsearch.service
sudo ufw allow 9200
Configuring Elasticsearch
To make changes to Elasticsearch, edit the Elasticsearch YAML file:
nano /etc/elasticsearch/elasticsearch.yml
For the package distributions, the config directory location defaults to /etc/elasticsearch.
elasticsearch.yml for configuring Elasticsearch
jvm.options for configuring Elasticsearch JVM settings
log4j2.properties for configuring Elasticsearch logging
By default, Elasticsearch uses port 9200 or the next available port between 9200-9300. If you need to specify a different Elasticsearch port, change the following line and remove the # at the beginning:
#http.port: 9200
Ensure Elasticsearch is running on an open port, changing localhost to your domain or other hostname as needed:
curl -X GET localhost:9200
To find your server IP in the command line, use hostname -i
If this Elasticsearch installation will join a node cluster, change the hostname to a server IP address or server hostname and remove the # at the beginning of the following line:
#network.host: 192.168.0.1
You can also create descriptive node name for easier navigation among cluster setups by modifying the following line:
#node.name: node-1
Try
espkg=/media/sf_tmp/sea/elasticsearch-8.9.1-amd64.deb

sudo apt install default-jre -y

java --version

sudo dpkg -i $espkg
Authentication and authorization are enabled.
TLS for the transport and HTTP layers is enabled and configured.

The generated password for the elastic built-in superuser is : N7VkGfnrLbLMwfzqT*kW

If this node should join an existing cluster, you can reconfigure this with
'/usr/share/elasticsearch/bin/elasticsearch-reconfigure-node --enrollment-token <token-here>'
after creating an enrollment token on your existing cluster.

You can complete the following actions at any time:

Reset the password of the elastic built-in superuser with
'/usr/share/elasticsearch/bin/elasticsearch-reset-password -u elastic'.

Generate an enrollment token for Kibana instances with
 '/usr/share/elasticsearch/bin/elasticsearch-create-enrollment-token -s kibana'.

Generate an enrollment token for Elasticsearch nodes with
'/usr/share/elasticsearch/bin/elasticsearch-create-enrollment-token -s node'.

-------------------------------------------------------------------------------------------------
### NOT starting on installation, please execute the following statements to
configure elasticsearch service to start automatically using systemd
sudo systemctl daemon-reload
sudo systemctl enable elasticsearch.service
### You can start elasticsearch service by executing
sudo systemctl start elasticsearch.service
sudo systemctl daemon-reload
sudo systemctl enable elasticsearch.service
sudo systemctl status elasticsearch.service

sudo systemctl start elasticsearch.service
sudo systemctl status elasticsearch.service
sudo systemctl daemon-reload
sudo systemctl enable elasticsearch.service
Created symlink /etc/systemd/system/multi-user.target.wants/elasticsearch.service → /lib/systemd/system/elasticsearch.service.
sudo systemctl status elasticsearch.service
○ elasticsearch.service - Elasticsearch
     Loaded: loaded (/lib/systemd/system/elasticsearch.service; enabled; preset: enabled)
     Active: inactive (dead)
       Docs: https://www.elastic.co
sudo systemctl status elasticsearch.service
● elasticsearch.service - Elasticsearch
     Loaded: loaded (/lib/systemd/system/elasticsearch.service; enabled; preset: enabled)
     Active: active (running) since Mon 2023-09-04 02:02:48 EDT; 11s ago
       Docs: https://www.elastic.co
   Main PID: 2848 (java)
      Tasks: 85 (limit: 9453)
     Memory: 4.3G
        CPU: 37.191s
     CGroup: /system.slice/elasticsearch.service
             ├─2848 /usr/share/elasticsearch/jdk/bin/java -Xms4m -Xmx64m -XX:+UseSerialGC -Dcli.name=server -Dcli.script=/usr/share/elasticsearch/>
             ├─2908 /usr/share/elasticsearch/jdk/bin/java -Des.networkaddress.cache.ttl=60 -Des.networkaddress.cache.negative.ttl=10 -Djava.securi>
             └─2931 /usr/share/elasticsearch/modules/x-pack-ml/platform/linux-x86_64/bin/controller

Sep 04 02:02:36 GnuNode systemd[1]: Starting elasticsearch.service - Elasticsearch...
Sep 04 02:02:48 GnuNode systemd[1]: Started elasticsearch.service - Elasticsearch.
curl -X GET localhost:9200
curl: (52) Empty reply from server
sudo cat /etc/elasticsearch/elasticsearch.yml

# ======================== Elasticsearch Configuration =========================
#
# NOTE: Elasticsearch comes with reasonable defaults for most settings.
#       Before you set out to tweak and tune the configuration, make sure you
#       understand what are you trying to accomplish and the consequences.
#
# The primary way of configuring a node is via this file. This template lists
# the most important settings you may want to configure for a production cluster.
#
# Please consult the documentation for further information on configuration options:
# https://www.elastic.co/guide/en/elasticsearch/reference/index.html
#
# ---------------------------------- Cluster -----------------------------------
#
# Use a descriptive name for your cluster:
#
#cluster.name: my-application
#
# ------------------------------------ Node ------------------------------------
#
# Use a descriptive name for the node:
#
#node.name: node-1
#
# Add custom attributes to the node:
#
#node.attr.rack: r1
#
# ----------------------------------- Paths ------------------------------------
#
# Path to directory where to store the data (separate multiple locations by comma):
#
path.data: /var/lib/elasticsearch
#
# Path to log files:
#
path.logs: /var/log/elasticsearch
#
# ----------------------------------- Memory -----------------------------------
#
# Lock the memory on startup:
#
#bootstrap.memory_lock: true
#
# Make sure that the heap size is set to about half the memory available
# on the system and that the owner of the process is allowed to use this
# limit.
#
# Elasticsearch performs poorly when the system is swapping the memory.
#
# ---------------------------------- Network -----------------------------------
#
# By default Elasticsearch is only accessible on localhost. Set a different
# address here to expose this node on the network:
#
#network.host: 192.168.0.1
#
# By default Elasticsearch listens for HTTP traffic on the first free port it
# finds starting at 9200. Set a specific HTTP port here:
#
#http.port: 9200
#
# For more information, consult the network module documentation.
#
# --------------------------------- Discovery ----------------------------------
#
# Pass an initial list of hosts to perform discovery when this node is started:
# The default list of hosts is ["127.0.0.1", "[::1]"]
#
#discovery.seed_hosts: ["host1", "host2"]
#
# Bootstrap the cluster using an initial set of master-eligible nodes:
#
#cluster.initial_master_nodes: ["node-1", "node-2"]
#
# For more information, consult the discovery and cluster formation module documentation.
#
# ---------------------------------- Various -----------------------------------
#
# Allow wildcard deletion of indices:
#
#action.destructive_requires_name: false

#----------------------- BEGIN SECURITY AUTO CONFIGURATION -----------------------
#
# The following settings, TLS certificates, and keys have been automatically
# generated to configure Elasticsearch security features on 04-09-2023 05:54:24
#
# --------------------------------------------------------------------------------

# Enable security features
xpack.security.enabled: true

xpack.security.enrollment.enabled: true

# Enable encryption for HTTP API client connections, such as Kibana, Logstash, and Agents
xpack.security.http.ssl:
  enabled: true
  keystore.path: certs/http.p12

# Enable encryption and mutual authentication between cluster nodes
xpack.security.transport.ssl:
  enabled: true
  verification_mode: certificate
  keystore.path: certs/transport.p12
  truststore.path: certs/transport.p12
# Create a new cluster with the current node only
# Additional nodes can still join the cluster later
cluster.initial_master_nodes: ["GnuNode"]

# Allow HTTP API connections from anywhere
# Connections are encrypted and require user authentication
http.host: 0.0.0.0

# Allow other nodes to join the cluster from anywhere
# Connections are encrypted and mutually authenticated
#transport.host: 0.0.0.0

#----------------------- END SECURITY AUTO CONFIGURATION -------------------------
kibpkg=/media/sf_tmp/sea/kibana-8.9.1-amd64.deb
sudo dpkg -i $kibpkg

Setting up kibana (8.9.1) ...
Creating kibana group... OK
Creating kibana user... OK
Created Kibana keystore in /etc/kibana/kibana.keystore
To configure Kibana to start automatically when the system starts, run the following commands:
sudo systemctl daemon-reload
sudo systemctl enable kibana.service
Kibana can be started and stopped as follows:
sudo systemctl start kibana.service
sudo systemctl stop kibana.service
These commands provide no feedback as to whether Kibana was started successfully or not.
Log information can be accessed via
journalctl -u kibana.service
/etc/kibana/kibana.yml
sudo /usr/share/elasticsearch/bin/elasticsearch-create-enrollment-token -s kibana
eyJ2ZXIiOiI4LjkuMSIsImFkciI6WyIxMC44OC45Ni4yMTI6OTIwMCJdLCJmZ3IiOiI4MmI1MTA3NTQ2NTI3N2U2NTI5Yzg4ZGFkMmNlYjM3YjY0N2EwNDdkNmZmMWIxMzJiY2JlZGI3ODRkYjhiN2E1Iiwia2V5IjoiejkzWlhvb0JYckZIV1RYNEhQNk06QTJpYXJxOWpTUnFrY2M2RS1CX2I1ZyJ9
sudo systemctl status kibana.service
sudo systemctl status kibana.service
● kibana.service - Kibana
Loaded: loaded (/lib/systemd/system/kibana.service; enabled; preset: enabled)
Active: active (running) since Mon 2023-09-04 02:20:34 EDT; 37s ago
Docs: https://www.elastic.co
Main PID: 3372 (node)
Tasks: 11 (limit: 9453)
Memory: 354.6M
CPU: 8.465s
CGroup: /system.slice/kibana.service
└─3372 /usr/share/kibana/bin/../node/bin/node /usr/share/kibana/bin/../src/cli/dist
Sep 04 02:20:41 GnuNode kibana[3372]: [2023-09-04T02:20:41.798-04:00][INFO ][plugins-service] Plugin "serverless" is disabled.
Sep 04 02:20:41 GnuNode kibana[3372]: [2023-09-04T02:20:41.798-04:00][INFO ][plugins-service] Plugin "serverlessObservability" is disabled.
Sep 04 02:20:41 GnuNode kibana[3372]: [2023-09-04T02:20:41.798-04:00][INFO ][plugins-service] Plugin "serverlessSearch" is disabled.
Sep 04 02:20:41 GnuNode kibana[3372]: [2023-09-04T02:20:41.798-04:00][INFO ][plugins-service] Plugin "serverlessSecurity" is disabled.
Sep 04 02:20:41 GnuNode kibana[3372]: [2023-09-04T02:20:41.876-04:00][INFO ][http.server.Preboot] http server running at http://localhost:5601
Sep 04 02:20:41 GnuNode kibana[3372]: [2023-09-04T02:20:41.976-04:00][INFO ][plugins-system.preboot] Setting up [1] plugins: [interactiveSetup]
Sep 04 02:20:41 GnuNode kibana[3372]: [2023-09-04T02:20:41.977-04:00][INFO ][preboot] "interactiveSetup" plugin is holding setup: Validating Elast>
Sep 04 02:20:41 GnuNode kibana[3372]: [2023-09-04T02:20:41.999-04:00][INFO ][root] Holding setup until preboot stage is completed.
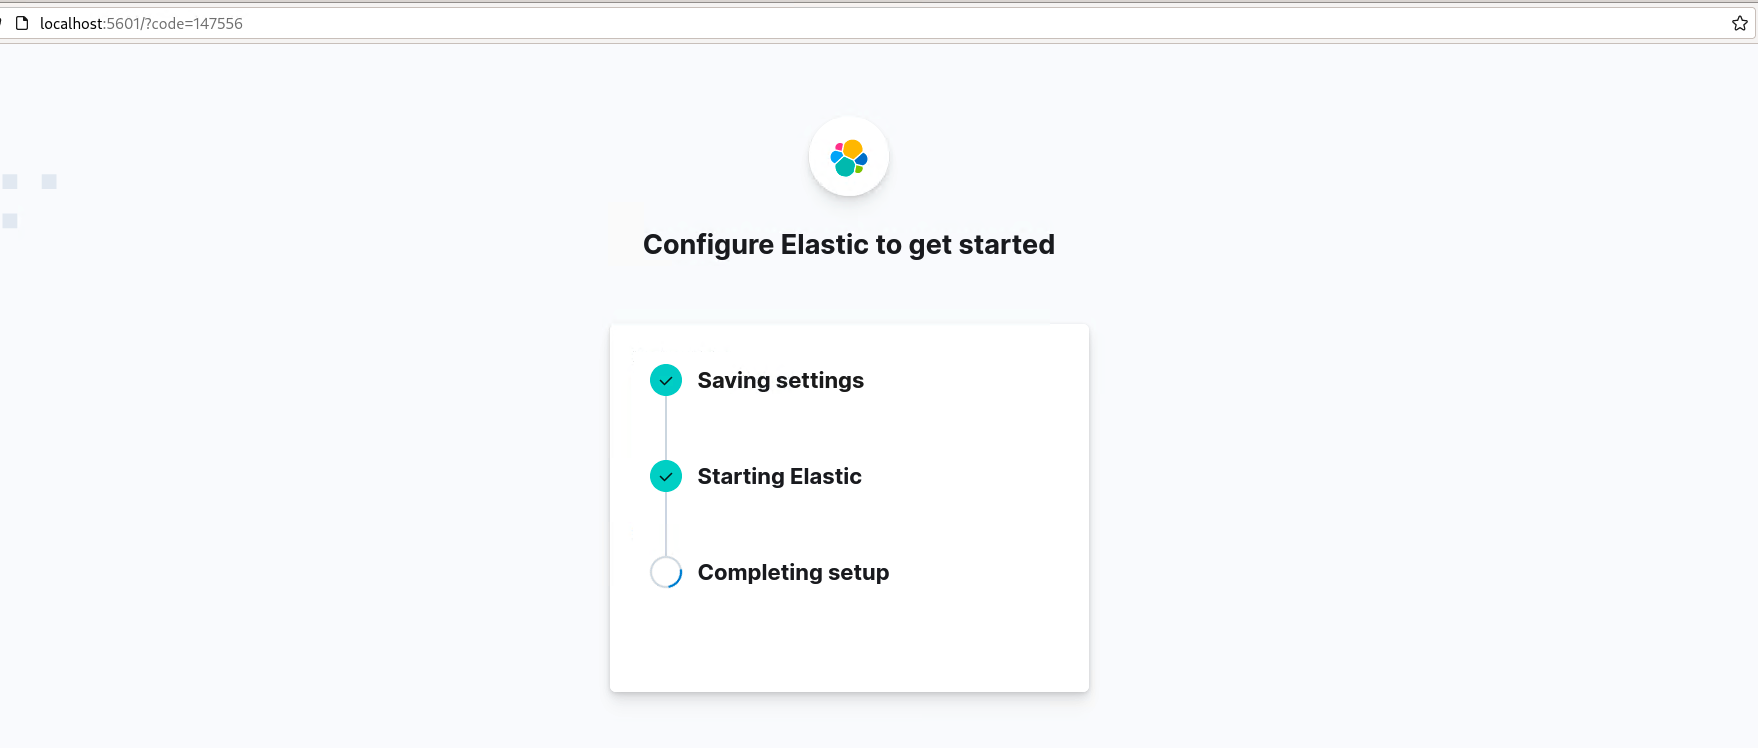
Sep 04 02:20:42 GnuNode kibana[3372]: i Kibana has not been configured.
Sep 04 02:20:42 GnuNode kibana[3372]: Go to http://localhost:5601/?code=147556 to get started.


 浙公网安备 33010602011771号