JWT SpingBoot原理

2.3 JWT令牌
前面我们介绍了基于令牌技术来实现会话追踪。这里所提到的令牌就是用户身份的标识,其本质就是一个字符串。令牌的形式有很多,我们使用的是功能强大的 JWT令牌。
2.3.1 介绍
JWT全称:JSON Web Token (官网:JSON Web Tokens - jwt.io)
-
定义了一种简洁的、自包含的格式,用于在通信双方以json数据格式安全的传输信息。由于数字签名的存在,这些信息是可靠的。
简洁:是指jwt就是一个 简单 的字符串。可以在请求参数或者是请求头当中直接传递。
自包含:指的是jwt令牌,看似是一个随机的字符串,但是 我们是可以根据自身的需求在jwt令牌中存储自定义的数据内容。如:可以直接在jwt令牌中存储用户的相关信息。
简单来讲,jwt就是将原始的json数据格式进行了安全的封装,这样就可以直接基于jwt在通信双方安全的进行信息传输了。
JWT的组成: (JWT令牌由三个部分组成,三个部分之间使用英文的点来分割)
-
第一部分:Header(头), 记录令牌类型、签名算法等。 例如:{"alg":"HS256","type":"JWT"}
-
第二部分:Payload(有效载荷(装东西的)),携带一些自定义信息、默认信息等。 例如:{"id":"1", "username":"Tom"}
-
第三部分:Signature(签名),防止Token被篡改、确保安全性。将header、payload,并加入指定秘钥,通过指定签名算法 自动计算而来。
签名的目的就是为了防jwt令牌被篡改,而 正是因为jwt令牌最后一个部分数字签名的存在,所以整个jwt 令牌是非常安全可靠的。一旦jwt令牌当中任何一个部分、任何一个字符被篡改了,整个令牌在校验的时候都会失败,所以它是非常安全可靠的。

JWT是如何将原始的JSON格式数据,转变为字符串的呢?
其实在生成JWT令牌时, 会对JSON格式的数据进行一次编码:进行base64编码
Base64:是一种 基于64个可打印的字符来表示二进制数据的编码方式。既然能编码,那也就意味着 也能解码。所使用的64个字符分别是A到Z、a到z、 0- 9, 一个加号,一个斜杠,加起来就是64个字符。任何数据经过base64编码之后,最终就会通过这64个字符来表示。当然还有一个符号,那就是等号。 等号它是一个补位的符号
需要注意的是Base64是编码方式,而不是加密方式。
JWT令牌最典型的应用场景就是登录认证:

-
在浏览器发起请求来执行登录操作,此时会访问登录的接口,如果登录成功之后,我们需要生成一个jwt令牌,将生成的 jwt令牌返回给前端。
-
前端拿到jwt令牌之后,会将jwt令牌存储起来。在后续的每一次请求中都会将jwt令牌携带到服务端。
-
服务端统一拦截请求之后,先来判断一下这次请求有没有把令牌带过来,如果没有带过来,直接拒绝访问,如果带过来了,还要校验一下令牌是否是有效。如果有效,就直接放行进行请求的处理。
在JWT登录认证的场景中我们发现,整个流程当中涉及到两步操作:
-
在登录成功之后,要生成令牌。
-
每一次请求当中,要接收令牌并对令牌进行校验。
2.3.2 生成和校验
简单介绍了JWT令牌以及JWT令牌的组成之后,接下来学习基于Java代码如何生成和校验JWT令牌。
首先我们先来实现JWT令牌的生成。要想使用JWT令牌,需要先引入JWT的依赖:
<!-- JWT依赖-->
<dependency>
    <groupId>io.jsonwebtoken</groupId>
    <artifactId>jjwt</artifactId>
    <version>0.9.1</version>
</dependency>
在引入完JWT来赖后,就可以调用工具包中提供的API来完成JWT令牌的生成和校验
工具类:Jwts
生成JWT代码实现:
@Test
public void genJwt(){
    Map<String,Object> claims = new HashMap<>();
    claims.put("id",1);
    claims.put("username","Tom");

    String jwt = Jwts.builder()
        .setClaims(claims) //自定义内容(载荷)
        .signWith(SignatureAlgorithm.HS256, "itheima") //签名算法
        .setExpiration(new Date(System.currentTimeMillis() + 24*3600*1000)) //有效期
        .compact();//compact方法返回string jwt令牌

    System.out.println(jwt);
}
运行测试方法:
eyJhbGciOiJIUzI1NiJ9.eyJpZCI6MSwiZXhwIjoxNjcyNzI5NzMwfQ.fHi0Ub8npbyt71UqLXDdLyipptLgxBUg_mSuGJtXtBk
输出的结果就是生成的JWT令牌,通过英文的点分割对三个部分进行分割,我们可以将生成的令牌复制一下,然后打开JWT的官网,将生成的令牌直接放在Encoded位置,此时就会自动的将令牌解析出来。

第一部分解析出来,看到 JSON格式的原始数据,所使用的签名算法为HS256。
第二个部分是我们自定义的数据,之前我们 自定义的数据就是id,还有一个exp代表的是我们所设置的过期时间。
由于前两个部分是base64编码,所以是可以直接解码出来。但 最后一个部分并不是base64编码,是 经过签名算法计算出来的,所以最后一个部分是不会解析的。
实现了JWT令牌的生成,下面我们接着使用Java代码来校验JWT令牌(解析生成的令牌):
@Test
public void parseJwt(){
    Claims claims = Jwts.parser()
        .setSigningKey("itheima")//指定签名密钥(必须保证和生成令牌时使用相同的签名密钥)
	    .parseClaimsJws("eyJhbGciOiJIUzI1NiJ9.eyJpZCI6MSwiZXhwIjoxNjcyNzI5NzMwfQ.fHi0Ub8npbyt71UqLXDdLyipptLgxBUg_mSuGJtXtBk")
        .getBody();

    System.out.println(claims);
}
运行测试方法:
{id=1, exp=1672729730}
令牌解析后,我们可以看 到id和过期时间,如果在解析的过程当中没有报错,就说明解析成功了。
下面我们做一个测试:把令牌header中的数字9变为8,运行测试方法后发现报错:
原header: eyJhbGciOiJIUzI1NiJ9
修改为: eyJhbGciOiJIUzI1NiJ8

结论:篡改令牌中的任何一个字符,在对令牌进行解析时都会报错,所以JWT令牌是非常安全可靠的。
我们继续测试:修改生成令牌的时指定的过期时间,修改为1分钟
@Test
public void genJwt(){
    Map<String,Object> claims = new HashMap<>();
    claims.put(“id”,1);
    claims.put(“username”,“Tom”);
    String jwt = Jwts.builder()
        .setClaims(claims) //自定义内容(载荷)
        .signWith(SignatureAlgorithm.HS256, “itheima”) //签名算法
        .setExpiration(new Date(System.currentTimeMillis() + 60*1000)) //有效期60秒
        .compact();

    System.out.println(jwt);
    //输出结果:eyJhbGciOiJIUzI1NiJ9.eyJpZCI6MSwiZXhwIjoxNjczMDA5NzU0fQ.RcVIR65AkGiax-ID6FjW60eLFH3tPTKdoK7UtE4A1ro
}

@Test
public void parseJwt(){
    Claims claims = Jwts.parser()
        .setSigningKey("itheima")//指定签名密钥
.parseClaimsJws("eyJhbGciOiJIUzI1NiJ9.eyJpZCI6MSwiZXhwIjoxNjczMDA5NzU0fQ.RcVIR65AkGiax-ID6FjW60eLFH3tPTKdoK7UtE4A1ro")
        .getBody();

    System.out.println(claims);
}
等待1分钟之后运行测试方法发现也报错了,说明:JWT令牌过期后,令牌就失效了,解析的为非法令牌
通过以上测试,我们在使用JWT令牌时需要注意:
-
JWT校验时使用的签名秘钥,必须和生成JWT令牌时使用的秘钥是配套的。
-
如果JWT令牌解析校验时报错,则说明 JWT令牌被篡改 或 失效了,令牌非法。
2.3.3 登录下发令牌
JWT令牌的生成和校验的基本操作我们已经学习完了,接下来我们就需要在案例当中通过JWT令牌技术来跟踪会话。具体的思路我们前面已经分析过了,主要就是两步操作:
-
生成令牌
-
在登录成功之后来生成一个JWT令牌,并且把这个令牌直接返回给前端
-
校验令牌
-
拦截前端请求,从请求中获取到令牌,对令牌进行解析校验
那我们首先来完成:登录成功之后生成JWT令牌,并且把令牌返回给前端。
JWT令牌怎么返回给前端呢?此时我们就需要再来看一下接口文档当中关于登录接口的描述(主要看响应数据):
-
响应数据
参数格式:application/json
参数说明:
| 名称 | 类型 | 是否必须 | 默认值 | 备注 | 其他信息 |
| code | number | 必须 | 响应码, 1 成功 ; 0 失败 | ||
| msg | string | 非必须 | 提示信息 | ||
| data | string | 必须 | 返回的数据 , jwt令牌 |
响应数据样例:
{
  "code": 1,
  "msg": "success",
  "data": "eyJhbGciOiJIUzI1NiJ9.eyJuYW1lIjoi6YeR5bq4IiwiaWQiOjEsInVzZXJuYW1lIjoiamlueW9uZyIsImV4cCI6MTY2MjIwNzA0OH0.KkUc_CXJZJ8Dd063eImx4H9Ojfrr6XMJ-yVzaWCVZCo"
}-
备注说明

{
	"code": 0,
	"msg": "NOT_LOGIN",
	"data": null
}
解读完接口文档中的描述了,目前我们先来完成令牌的生成和令牌的下发,我们只需要生成一个令牌返回给前端就可以了。
实现步骤:
-
引入JWT工具类
-
在项目工程下创建com.itheima.utils包,并把提供JWT工具类复制到该包下
-
登录完成后,调用工具类生成JWT令牌并返回
JWT工具类
public class JwtUtils {

    private static String signKey = "itheima";//签名密钥
    private static Long expire = 43200000L; //有效时间

    /**
     * 生成JWT令牌
     * @param claims JWT第二部分负载 payload 中存储的内容
     * @return
     */
    public static String generateJwt(Map<String, Object> claims){
        String jwt = Jwts.builder()
                .addClaims(claims)//自定义信息(有效载荷)
                .signWith(SignatureAlgorithm.HS256, signKey)//签名算法(头部)
                .setExpiration(new Date(System.currentTimeMillis() + expire))//过期时间
                .compact();
        return jwt;
    }

    /**
     * 解析JWT令牌
     * @param jwt JWT令牌
     * @return JWT第二部分负载 payload 中存储的内容
     */
    public static Claims parseJWT(String jwt){
        Claims claims = Jwts.parser()
                .setSigningKey(signKey)//指定签名密钥
                .parseClaimsJws(jwt)//指定令牌Token
                .getBody();
        return claims;
    }
}
登录成功,生成JWT令牌并返回
@RestController
@Slf4j
public class LoginController {
    //依赖业务层对象
    @Autowired
    private EmpService empService;

    @PostMapping("/login")
    public Result login(@RequestBody Emp emp) {
        //调用业务层:登录功能
        Emp loginEmp = empService.login(emp);

        //判断:登录用户是否存在
        if(loginEmp !=null ){
            //自定义信息
            Map<String , Object> claims = new HashMap<>();
            claims.put("id", loginEmp.getId());
            claims.put("username",loginEmp.getUsername());
            claims.put("name",loginEmp.getName());

            //使用JWT工具类,生成身份令牌
            String token = JwtUtils.generateJwt(claims);
            return Result.success(token);
        }
        return Result.error("用户名或密码错误");
    }
}
重启服务,打开postman测试登录接口:

打开浏览器完成前后端联调操作:利用开发者工具,抓取一下网络请求

登录请求完成后,可以看到JWT令牌已经响应给了前端,此时前端就会将JWT令牌存储在浏览器本地。
服务器响应的JWT令牌存储在本地浏览器哪里了呢?
-
在当前案例中,JWT令牌存储在浏览器的本地存储空间local storage中了。 local storage是浏览器的本地存储,在移动端也是支持的。

我们在发起一个查询部门数据的请求,此时我们可以看到在请求头中包含一个token(JWT令牌),后续的每一次请求当中,都会将这个令牌携带到服务端。

SpingBoot原理
在前面十多天的课程当中,我们学习的都是web开发的技术使用,都是面向应用层面的,我们学会了怎么样去用。而我们今天所要学习的是web后端开发的最后一个篇章springboot原理篇,主要偏向于底层原理。
我们今天的课程安排包括这么三个部分:
-
配置优先级:Springboot项目当中属性配置的常见方式以及配置的优先级
-
Bean的管理
-
剖析Springboot的底层原理
1. 配置优先级
2. Bean管理
在前面的课程当中,我们已经讲过了我们可以通过Spring当中提供的注解@Component以及它的三个衍生注解(@Controller、@Service、@Repository)来声明IOC容器中的bean对象,同时我们也学习了如何为应用程序注入运行时所需要依赖的bean对象,也就是依赖注入DI。
我们今天主要学习IOC容器中Bean的其他使用细节,主要学习以下三方面:
-
如何从IOC容器中手动的获取到bean对象
-
bean的作用域配置
-
管理第三方的bean对象
接下来我们先来学习第一方面,从IOC容器中获取bean对象。
2.1 获取Bean
默认情况下,SpringBoot项目在启动的时候会自动的创建IOC容器(也称为Spring容器),并且在启动的过程当中会自动的将bean对象都创建好,存放在IOC容器当中。应用程序在运行时需要依赖什么bean对象,就直接进行依赖注入就可以了。
而在Spring容器中提供了一些方法,可以主动从IOC容器中获取到bean对象,下面介绍3种常用方式:
-
根据name获取bean
Object getBean(String name)-
根据类型获取bean
<T> T getBean(Class<T> requiredType)-
根据name获取bean(带类型转换)
<T> T getBean(String name, Class<T> requiredType)思考:要从IOC容器当中来获取到bean对象,需要先拿到IOC容器对象,怎么样才能拿到IOC容器呢?
-
想获取到IOC容器,直接将IOC容器对象注入进来就可以了
控制器:DeptController
@RestController
@RequestMapping("/depts")
public class DeptController {

    @Autowired
    private DeptService deptService;

    public DeptController(){
        System.out.println("DeptController constructor ....");
    }

    @GetMapping
    public Result list(){
        List<Dept> deptList = deptService.list();
        return Result.success(deptList);
    }

    @DeleteMapping("/{id}")
    public Result delete(@PathVariable Integer id)  {
        deptService.delete(id);
        return Result.success();
    }

    @PostMapping
    public Result save(@RequestBody Dept dept){
        deptService.save(dept);
        return Result.success();
    }
}
业务实现类:DeptServiceImpl
@Slf4j
@Service
public class DeptServiceImpl implements DeptService {
    @Autowired
    private DeptMapper deptMapper;

    @Override
    public List<Dept> list() {
        List<Dept> deptList = deptMapper.list();
        return deptList;
    }

    @Override
    public void delete(Integer id) {
        deptMapper.delete(id);
    }

    @Override
    public void save(Dept dept) {
        dept.setCreateTime(LocalDateTime.now());
        dept.setUpdateTime(LocalDateTime.now());
        deptMapper.save(dept);
    }
}
Mapper接口:
@Mapper
public interface DeptMapper {
    //查询全部部门数据
    @Select("select * from dept")
    List<Dept> list();

    //删除部门
    @Delete("delete from dept where id = #{id}")
    void delete(Integer id);

    //新增部门
    @Insert("insert into dept(name, create_time, update_time) values (#{name},#{createTime},#{updateTime})")
    void save(Dept dept);
}
测试类:
@SpringBootTest
class SpringbootWebConfig2ApplicationTests {

    @Autowired
    private ApplicationContext applicationContext; //IOC容器对象

    //获取bean对象
    @Test
    public void testGetBean(){
        //根据bean的名称获取
        DeptController bean1 = (DeptController) applicationContext.getBean("deptController");
        System.out.println(bean1);

        //根据bean的类型获取
        DeptController bean2 = applicationContext.getBean(DeptController.class);
        System.out.println(bean2);

        //根据bean的名称 及 类型获取
        DeptController bean3 = applicationContext.getBean("deptController", DeptController.class);
        System.out.println(bean3);
    }
}
程序运行后控制台日志:

问题:输出的bean对象地址值是一样的,说明IOC容器当中的bean对象有几个?
答案:只有一个。 (默认情况下,IOC中的bean对象是单例)
那么能不能将bean对象设置为非单例的(每次获取的bean都是一个新对象)?
可以,在下一个知识点(bean作用域)中讲解。
注意事项:
-
上述所说的 【Spring项目启动时,会把其中的bean都创建好】还会受到作用域及延迟初始化影响,这里主要针对于默认的单例非延迟加载的bean而言。
2.2 Bean作用域
在前面我们提到的IOC容器当中,默认bean对象是单例模式(只有一个实例对象)。那么如何设置bean对象为非单例呢?需要设置bean的作用域。
在Spring中支持五种作用域,后三种在web环境才生效:
| 作用域 | 说明 |
| singleton | 容器内同名称的bean只有一个实例(单例)(默认) |
| prototype | 每次使用该bean时会创建新的实例(非单例) |
| request | 每个请求范围内会创建新的实例(web环境中,了解) |
| session | 每个会话范围内会创建新的实例(web环境中,了解) |
| application | 每个应用范围内会创建新的实例(web环境中,了解) |
知道了bean的5种作用域了,我们要怎么去设置一个bean的作用域呢?
-
可以借助Spring中的@Scope注解来进行配置作用域

1). 测试一
-
控制器
//默认bean的作用域为:singleton (单例)
@Lazy //延迟加载(第一次使用bean对象时,才会创建bean对象并交给ioc容器管理)
@RestController
@RequestMapping("/depts")
public class DeptController {

    @Autowired
    private DeptService deptService;

    public DeptController(){
        System.out.println("DeptController constructor ....");
    }

    //省略其他代码...
}-
测试类
@SpringBootTest
class SpringbootWebConfig2ApplicationTests {

    @Autowired
    private ApplicationContext applicationContext; //IOC容器对象

    //bean的作用域
    @Test
    public void testScope(){
        for (int i = 0; i < 10; i++) {
            DeptController deptController = applicationContext.getBean(DeptController.class);
            System.out.println(deptController);
        }
    }
}
重启SpringBoot服务,运行测试方法,查看控制台打印的日志:

注意事项:
IOC容器中的bean默认使用的作用域:singleton (单例)
默认singleton的bean,在容器启动时被创建,可以使用@Lazy注解来延迟初始化(延迟到第一次使用时)
2). 测试二
修改控制器DeptController代码:
@Scope("prototype") //bean作用域为非单例
@Lazy //延迟加载
@RestController
@RequestMapping("/depts")
public class DeptController {

    @Autowired
    private DeptService deptService;

    public DeptController(){
        System.out.println("DeptController constructor ....");
    }

    //省略其他代码...
}
重启SpringBoot服务,再次执行测试方法,查看控制吧打印的日志:

注意事项:
prototype的bean,每一次使用该bean的时候都会创建一个新的实例
实际开发当中,绝大部分的Bean是单例的,也就是说绝大部分Bean不需要配置scope属性
2.3 第三方Bean
学习完bean的获取、bean的作用域之后,接下来我们再来学习第三方bean的配置。
之前我们所配置的bean,像controller、service,dao三层体系下编写的类,这些类都是我们在项目当中自己定义的类(自定义类)。当我们要声明这些bean,也非常简单,我们只需要在类上加上@Component以及它的这三个衍生注解(@Controller、@Service、@Repository),就可以来声明这个bean对象了。
但是在我们项目开发当中,还有一种情况就是这个类它不是我们自己编写的,而是我们引入的第三方依赖当中提供的。
在pom.xml文件中,引入dom4j:
<!--Dom4j-->
<dependency>
    <groupId>org.dom4j</groupId>
    <artifactId>dom4j</artifactId>
    <version>2.1.3</version>
</dependency>
dom4j就是第三方组织提供的。 dom4j中的SAXReader类就是第三方编写的。
当我们需要使用到SAXReader对象时,直接进行依赖注入是不是就可以了呢?
-
按照我们之前的做法,需要在SAXReader类上添加一个注解@Component(将当前类交给IOC容器管理)
![]()

结论:第三方提供的类是只读的。无法在第三方类上添加@Component注解或衍生注解。
那么我们应该怎样使用并定义第三方的bean呢?
-
如果要管理的bean对象来自于第三方(不是自定义的),是无法用@Component 及衍生注解声明bean的,就需要用到**@Bean**注解。
解决方案1:在启动类上添加@Bean标识的方法
@SpringBootApplication
public class SpringbootWebConfig2Application {

    public static void main(String[] args) {
        SpringApplication.run(SpringbootWebConfig2Application.class, args);
    }

    //声明第三方bean
    @Bean //将当前方法的返回值对象交给IOC容器管理, 成为IOC容器bean
    public SAXReader saxReader(){
        return new SAXReader();
    }
}
xml文件:
<?xml version="1.0" encoding="UTF-8"?>
<emp>
    <name>Tom</name>
    <age>18</age>
</emp>
测试类:
@SpringBootTest
class SpringbootWebConfig2ApplicationTests {

    @Autowired
    private SAXReader saxReader;

    //第三方bean的管理
    @Test
    public void testThirdBean() throws Exception {
        Document document = saxReader.read(this.getClass().getClassLoader().getResource("1.xml"));
        Element rootElement = document.getRootElement();
        String name = rootElement.element("name").getText();
        String age = rootElement.element("age").getText();

        System.out.println(name + " : " + age);
    }

    //省略其他代码...
}
重启SpringBoot服务,执行测试方法后,控制台输出日志:
Tom : 18说明:以上在启动类中声明第三方Bean的作法,不建议使用(项目中要保证启动类的纯粹性)
解决方案2:在配置类中定义@Bean标识的方法
-
如果需要定义第三方Bean时, 通常会单独定义一个配置类
@Configuration //配置类  (在配置类当中对第三方bean进行集中的配置管理)
public class CommonConfig {

    //声明第三方bean
    @Bean //将当前方法的返回值对象交给IOC容器管理, 成为IOC容器bean
          //通过@Bean注解的name/value属性指定bean名称, 如果未指定, 默认是方法名
    public SAXReader reader(DeptService deptService){
        System.out.println(deptService);
        return new SAXReader();
    }

}
注释掉SpringBoot启动类中创建第三方bean对象的代码,重启服务,执行测试方法,查看控制台日志:
Tom : 18在方法上加上一个@Bean注解,Spring 容器在启动的时候,它会自动的调用这个方法,并将方法的返回值声明为Spring容器当中的Bean对象。
注意事项 :
通过@Bean注解的name或value属性可以声明bean的名称,如果不指定,默认bean的名称就是方法名。
如果第三方bean需要依赖其它bean对象,直接在bean定义方法中设置形参即可,容器会根据类型自动装配。
关于Bean大家只需要保持一个原则:
-
如果是在项目当中我们自己定义的类,想将这些类交给IOC容器管理,我们直接使用@Component以及它的衍生注解来声明就可以。
-
如果这个类它不是我们自己定义的,而是引入的第三方依赖当中提供的类,而且我们还想将这个类交给IOC容器管理。此时我们就需要在配置类中定义一个方法,在方法上加上一个@Bean注解,通过这种方式来声明第三方的bean对象。
3. SpringBoot原理
SpringBoot使我们能够集中精力地去关注业务功能的开发,而不用过多地关注框架本身的配置使用。而我们前面所讲解的都是面向应用层面的技术,接下来我们开始学习SpringBoot的原理,这部分内容偏向于底层的原理分析。
在剖析SpringBoot的原理之前,我们先来快速回顾一下我们前面所讲解的Spring家族的框架。
Spring是目前世界上最流行的Java框架,它可以帮助我们更加快速、更加容易的来构建Java项目。而在Spring家族当中提供了很多优秀的框架,而所有的框架都是基于一个基础框架的SpringFramework(也就是Spring框架)。而前面我们也提到,如果我们直接基于Spring框架进行项目的开发,会比较繁琐。
这个繁琐主要体现在两个地方:
-
在pom.xml中依赖配置比较繁琐,在项目开发时,需要自己去找到对应的依赖,还需要找到依赖它所配套的依赖以及对应版本,否则就会出现版本冲突问题。
-
在使用Spring框架进行项目开发时,需要在Spring的配置文件中做大量的配置,这就造成Spring框架入门难度较大,学习成本较高。

基于Spring存在的问题,官方在Spring框架4.0版本之后,又 推出了一个全新的框架:SpringBoot。
通过 SpringBoot来简化Spring框架的开发(是简化不是替代)。我们直接基于SpringBoot来构建Java项目,会让我们的项目开发更加简单,更加快捷。
SpringBoot框架之所以使用起来更简单更快捷,是因为SpringBoot框架底层提供了两个非常重要的功能:一个是起步依赖,一个是自动配置。

通过SpringBoot所提供的起步依赖,就可以大大的 简化pom文件当中依赖的配置,从而解决了Spring框架当中依赖配置繁琐的问题。
通过 自动配置的功能就可以大大的简化框架在使用时bean的声明以及bean的配置。我们只需要引入程序开发时所需要的起步依赖,项目开发时所用到常见的配置都已经有了,我们直接使用就可以了。
简单回顾之后,接下来我们来学习下SpringBoot的原理。其实学习SpringBoot的原理就是来解析SpringBoot当中的起步依赖与自动配置的原理。我们首先来学习SpringBoot当中起步依赖的原理。
3.1 起步依赖
假如我们没有使用SpringBoot,用的是Spring框架进行web程序的开发,此时我们就需要引入web程序开发所需要的一些依赖。

spring-webmvc依赖:这是Spring框架进行web程序开发所需要的依赖
servlet-api依赖:Servlet基础依赖
jackson-databind依赖:JSON处理工具包
如果要使用AOP,还需要引入aop依赖、aspect依赖
项目中所引入的这些依赖,还需要保证版本匹配,否则就可能会出现版本冲突问题。
如果我们使用了SpringBoot,就不需要像上面这么繁琐的引入依赖了。我们只需要引入一个依赖就可以了,那就是web开发的起步依赖:springboot-starter-web。

为什么我们只需要引入一个web开发的起步依赖,web开发所需要的所有的依赖都有了呢?
-
因为Maven的依赖传递。
在SpringBoot给我们提供的这些起步依赖当中,已提供了当前程序开发所需要的所有的常见依赖(官网地址: Spring Boot Reference Documentation。
比如:springboot-starter-web,这是web开发的起步依赖,在web开发的起步依赖当中,就集成了web开发中常见的依赖:json、web、webmvc、tomcat等。我们只需要引入这一个起步依赖,其他的依赖都会自动的通过Maven的依赖传递进来。
结论:起步依赖的原理就是Maven的依赖传递。
3.2 自动配置
我们讲解了SpringBoot当中起步依赖的原理,就是Maven的依赖传递。接下来我们解析下自动配置的原理,我们要分析自动配置的原理,首先要知道什么是自动配置。
3.2.1 概述
SpringBoot的自动配置就是当Spring容器启动后,一些配置类、bean对象就自动存入到了IOC容器中,不需要我们手动去声明,从而简化了开发,省去了繁琐的配置操作。
比如:我们要进行事务管理、要进行AOP程序的开发,此时就不需要我们再去手动的声明这些bean对象了,我们直接使用就可以从而大大的简化程序的开发,省去了繁琐的配置操作。
下面我们打开idea,一起来看下自动配置的效果:
-
运行SpringBoot启动类


大家会看到有两个CommonConfig,在第一个CommonConfig类中定义了一个bean对象,bean对象的名字叫reader。
在第二个CommonConfig中它的bean名字叫commonConfig,为什么还会有这样一个bean对象呢?原因是在CommonConfig配置类上添加了一个注解@Configuration,而@Configuration底层就是@Component

所以配置类最终也是SpringIOC容器当中的一个bean对象
在IOC容器中除了我们自己定义的bean以外,还有很多配置类,这些配置类都是SpringBoot在启动的时候加载进来的配置类。这些配置类加载进来之后,它也会生成很多的bean对象。

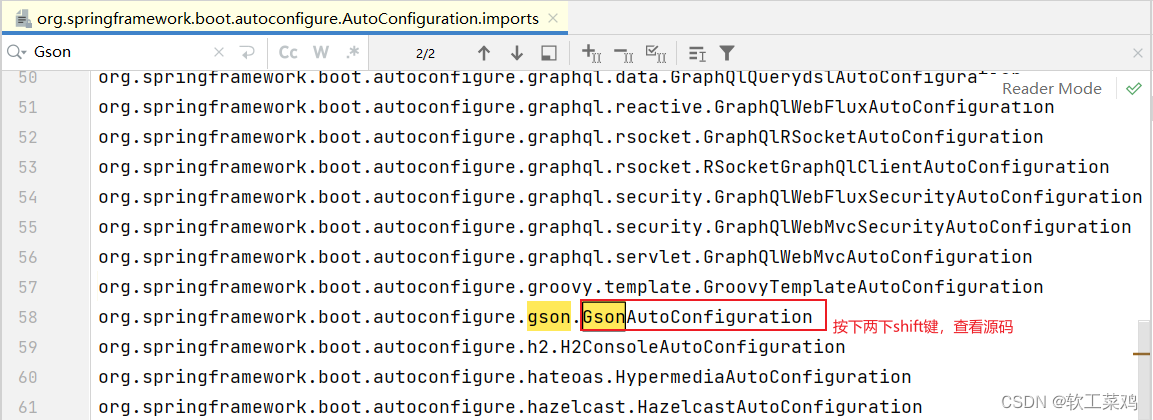
比如:配置类GsonAutoConfiguration里面有一个bean,bean的名字叫gson,它的类型是Gson。
com.google.gson.Gson是谷歌包中提供的用来处理JSON格式数据的。
当我们想要使用这些配置类中生成的bean对象时,可以使用@Autowired就自动注入了:
import com.google.gson.Gson;
import com.itheima.pojo.Result;
import org.junit.jupiter.api.Test;
import org.springframework.beans.factory.annotation.Autowired;
import org.springframework.boot.test.context.SpringBootTest;

@SpringBootTest
public class AutoConfigurationTests {

    @Autowired
    private Gson gson;


    @Test
    public void testJson(){
        String json = gson.toJson(Result.success());
        System.out.println(json);
    }
}
添加断点,使用debug模式运行测试类程序:

问题:在当前项目中我们并没有声明谷歌提供的Gson这么一个bean对象,然后我们却可以通过@Autowired从Spring容器中注入bean对象,那么这个bean对象怎么来的?
答案:SpringBoot项目在启动时通过自动配置完成了bean对象的创建。
体验了SpringBoot的自动配置了,下面我们就来分析自动配置的原理。其实分析自动配置原理就是来解析在SpringBoot项目中,在引入依赖之后是如何将依赖jar包当中所定义的配置类以及bean加载到SpringIOC容器中的。
3.2.2 常见方案
3.2.2.1 概述
解析自动配置的原理就是分析在 SpringBoot项目当中,我们引入对应的依赖之后,是如何将依赖jar包当中所提供的bean以及配置类直接加载到当前项目的SpringIOC容器当中的。
接下来,我们就直接通过代码来分析自动配置原理。
准备工作:在Idea中导入"资料\03. 自动配置原理"下的itheima-utils工程
1、在SpringBoot项目 spring-boot-web-config2 工程中,通过坐标引入itheima-utils依赖

@Component
public class TokenParser {
    public void parse(){
        System.out.println("TokenParser ... parse ...");
    }
}
2、在测试类中,添加测试方法
@SpringBootTest
public class AutoConfigurationTests {

    @Autowired
    private ApplicationContext applicationContext;

    @Test
    public void testTokenParse(){
        System.out.println(applicationContext.getBean(TokenParser.class));
    }
    //省略其他代码...
}
3、执行测试方法

异常信息描述: 没有com.example.TokenParse类型的bean
说明:在Spring容器中没有找到com.example.TokenParse类型的bean对象
思考:引入进来的第三方依赖当中的bean以及配置类为什么没有生效?
-
原因在我们之前讲解IOC的时候有提到过,在类上添加@Component注解来声明bean对象时,还需要保证@Component注解能被Spring的组件扫描到。
-
SpringBoot项目中的@SpringBootApplication注解,具有包扫描的作用,但是它只会扫描启动类所在的当前包以及子包。
-
当前包:com.itheima, 第三方依赖中提供的包:com.example(扫描不到)
那么如何解决以上问题的呢?
-
方案1:@ComponentScan 组件扫描
-
方案2:@Import 导入(使用@Import导入的类会被Spring加载到IOC容器中)
3.2.2.2 方案一
@ComponentScan组件扫描
@SpringBootApplication
@ComponentScan({"com.itheima","com.example"}) //指定要扫描的包
public class SpringbootWebConfig2Application {
    public static void main(String[] args) {
        SpringApplication.run(SpringbootWebConfig2Application.class, args);
    }
}
重新执行测试方法,控制台日志输出:

大家可以想象一下, 如果采用以上这种方式来完成自动配置,那我们进行项目开发时,当需要引入大量的第三方的依赖,就需要在启动类上配置N多要扫描的包,这种方式会很繁琐。而且这种大面积的扫描性能也比较低。
缺点:
使用繁琐
性能低
结论: SpringBoot中并没有采用以上这种方案 。
3.2.2.3 方案二
@Import导入
-
导入形式主要有以下几种:
-
导入普通类
-
导入配置类
-
导入ImportSelector接口实现类
1). 使用@Import导入普通类:
@Import(TokenParser.class) //导入的类会被Spring加载到IOC容器中
@SpringBootApplication
public class SpringbootWebConfig2Application {
    public static void main(String[] args) {
        SpringApplication.run(SpringbootWebConfig2Application.class, args);
    }
}
重新执行测试方法,控制台日志输出:
2). 使用@Import导入配置类:
-
配置类
@Configuration
public class HeaderConfig {
    @Bean
    public HeaderParser headerParser(){
        return new HeaderParser();
    }

    @Bean
    public HeaderGenerator headerGenerator(){
        return new HeaderGenerator();
    }
}-
启动类
@Import(HeaderConfig.class) //导入配置类
@SpringBootApplication
public class SpringbootWebConfig2Application {
    public static void main(String[] args) {
        SpringApplication.run(SpringbootWebConfig2Application.class, args);
    }
}-
测试类
@SpringBootTest
public class AutoConfigurationTests {
    @Autowired
    private ApplicationContext applicationContext;

    @Test
    public void testHeaderParser(){
        System.out.println(applicationContext.getBean(HeaderParser.class));
    }

    @Test
    public void testHeaderGenerator(){
        System.out.println(applicationContext.getBean(HeaderGenerator.class));
    }

    //省略其他代码...
}
执行测试方法:
3). 使用@Import导入ImportSelector接口实现类:
-
ImportSelector接口实现类
public class MyImportSelector implements ImportSelector {
    public String[] selectImports(AnnotationMetadata importingClassMetadata) {
        //返回值字符串数组(数组中封装了全限定名称的类)
        return new String[]{"com.example.HeaderConfig"};
    }
}-
启动类
@Import(MyImportSelector.class) //导入ImportSelector接口实现类
@SpringBootApplication
public class SpringbootWebConfig2Application {

    public static void main(String[] args) {
        SpringApplication.run(SpringbootWebConfig2Application.class, args);
    }
}
执行测试方法:
我们使用@Import注解通过这三种方式都可以导入第三方依赖中所提供的bean或者是配置类。
思考:如果基于以上方式完成自动配置,当要引入一个第三方依赖时,是不是还要知道第三方依赖中有哪些配置类和哪些Bean对象?
-
答案:是的。 (对程序员来讲,很不友好,而且比较繁琐)
思考:当我们要使用第三方依赖,依赖中到底有哪些bean和配置类,谁最清楚?
-
答案:第三方依赖自身最清楚。
结论:我 们不用自己指定要导入哪些bean对象和配置类了,让第三方依赖它自己来指定 。
怎么让第三方依赖自己指定bean对象和配置类?
-
比较常见的方案就是第三方依赖给我们提供一个注解,这个注解一般都以@EnableXxxx开头的注解,注解中封装的就是@Import注解
4). 使用第三方依赖提供的 @EnableXxxxx注解
-
第三方依赖中提供的注解
@Retention(RetentionPolicy.RUNTIME)
@Target(ElementType.TYPE)
@Import(MyImportSelector.class)//指定要导入哪些bean对象或配置类
public @interface EnableHeaderConfig {
}-
在使用时只需在启动类上加上@EnableXxxxx注解即可
@EnableHeaderConfig  //使用第三方依赖提供的Enable开头的注解
@SpringBootApplication
public class SpringbootWebConfig2Application {
    public static void main(String[] args) {
        SpringApplication.run(SpringbootWebConfig2Application.class, args);
    }
}
执行测试方法:
以上四种方式都可以完成导入操作,但是第4种方式会更方便更优雅,而这种方式也是SpringBoot当中所采用的方式。
3.2.3 原理分析
3.2.3.1 源码跟踪
前面我们讲解了在项目当中引入第三方依赖之后,如何加载第三方依赖中定义好的bean对象以及配置类,从而完成自动配置操作。那下面我们通过源码跟踪的形式来剖析下SpringBoot底层到底是如何完成自动配置的。
源码跟踪技巧:
在跟踪框架源码的时候,一定要 抓住关键点,找到核心流程。一定不要从头到尾一行代码去看,一个方法的去研究,一定要找到关键流程,抓住关键点,先在宏观上对整个流程或者整个原理有一个认识,有精力再去研究其中的细节。
要搞清楚SpringBoot的自动配置原理,要从SpringBoot启动类上使用的核心注解@SpringBootApplication开始分析:


在@SpringBootApplication注解中包含了:
-
元注解(修饰注解的注解)
-
@SpringBootConfiguration
-
@EnableAutoConfiguration
-
@ComponentScan
我们先来看第一个注解:@SpringBootConfiguration

@SpringBootConfiguration注解上 使用了@Configuration,表明SpringBoot启动类就是一个配置类
@Indexed注解,是用来加速应用启动的(不用关心)。
接下来再先看@ComponentScan注解:

@ComponentScan注解是用来 进行组件扫描的,扫描 启动类所在的包及其子包下所有包@Component及其衍生注解声明的类。
SpringBoot启动类,之所以具备扫描包功能,就是因为包含了@ComponentScan注解。
最后我们来看看@EnableAutoConfiguration注解(自动配置核心注解):

使用@Import注解, 导入了实现ImportSelector接口的实现类。
AutoConfigurationImportSelector类是ImportSelector接口的 实现类。

AutoConfigurationImportSelector类中重写了ImportSelector接口的selectImports()方法:

selectImports()方法 底层调用getAutoConfigurationEntry()方法,获取可自动配置的配置类信息集合

getAutoConfigurationEntry()方法通过 调用getCandidateConfigurations(annotationMetadata, attributes)方法获取在配置文件中配置的所有自动配置类的集合

getCandidateConfigurations方法的功能:
获取所有基于META-INF/spring/org.springframework.boot.autoconfigure.AutoConfiguration .imports文件、META-INF/spring.factories文件中 配置类的集合
META-INF/spring/org.springframework.boot.autoconfigure.AutoConfiguration.imports文件和META-INF/spring.factories文件这两个文件在哪里呢?
-
通常在引入的起步依赖中,都有包含以上两个文件


在前面在给大家演示自动配置的时候,我们直接在测试类当中注入了一个叫gson的bean对象,进行JSON格式转换。虽然我们没有配置bean对象,但是我们是可以直接注入使用的。原因就是因为在自动配置类当中做了自动配置。到底是在哪个自动配置类当中做的自动配置呢?我们通过搜索来查询一下。
在META-INF/spring/org.springframework.boot.autoconfigure.AutoConfiguration.imports配置文件中指定了第三方依赖Gson的配置类:GsonAutoConfiguration
第三方依赖中提供的GsonAutoConfiguration类:

在GsonAutoConfiguration类上,添加了注解@AutoConfiguration,通过查看源码,可以明确:GsonAutoConfiguration类是一个配置。

看到这里,大家就应该明白为什么可以完成自动配置了,原理就是在配置类中定义一个@Bean标识的方法,而Spring会自动调用配置类中使用@Bean标识的方法,并把方法的返回值注册到IOC容器中。
自动配置源码小结
自动配置原理源码入口就是@SpringBootApplication注解,在这个注解中封装了3个注解,分别是:
-
@SpringBootConfiguration
-
声明当前类是一个配置类
-
@ComponentScan
-
进行组件扫描(SpringBoot中默认扫描的是启动类所在的当前包及其子包)
-
@EnableAutoConfiguration
-
封装了@Import注解(Import注解中指定了一个ImportSelector接口的实现类)
-
在实现类重写的selectImports()方法,读取当前项目下所有依赖jar包中META-INF/spring.factories、META-INF/spring/org.springframework.boot.autoconfigure. AutoConfiguration.imports两个文件里面定义的配置类(配置类中定义了@Bean注解标识的方法)。
当SpringBoot程序启动时,就会加载配置文件当中所定义的配置类,并将这些配置类信息(类的全限定名)封装到String类型的数组中,最终通过@Import注解将这些配置类全部加载到Spring的IOC容器中,交给IOC容器管理。
最后呢给大家抛出一个问题:在META-INF/spring/org.springframework.boot.autoconfigure. AutoConfiguration.imports文件中定义的配置类非常多,而且每个配置类中又可以定义很多的bean,那这些bean都会注册到Spring的IOC容器中吗?
答案: 并不是。 在声明bean对象时,上面有加一个以@Conditional开头的注解,这种注解的作用就是按照条件进行装配,只有满足条件之后,才会将bean注册到Spring的IOC容器中(下面会详细来讲解)
3.2.3.2 @Conditional
我们在跟踪SpringBoot自动配置的源码的时候,在自动配置类声明bean的时候,除了在方法上加了一个@Bean注解以外,还会经常用到一个注解,就是以Conditional开头的这一类的注解。以Conditional开头的这些注解都是条件装配的注解。下面我们就来介绍下条件装配注解。
@Conditional注解:
-
作用:按照一定的条件进行判断,在满足给定条件后才会注册对应的bean对象到Spring的IOC容器中
-
位置:方法、类

下面我们通过代码来演示下Conditional注解的使用:
-
@ConditionalOnClass注解
@Configuration
public class HeaderConfig {

    @Bean
    @ConditionalOnClass(name="io.jsonwebtoken.Jwts")//环境中存在指定的这个类,才会将该bean加入IOC容器
    public HeaderParser headerParser(){
        return new HeaderParser();
    }
    //省略其他代码...
}-
pom.xml
<!--JWT令牌-->
<dependency>
     <groupId>io.jsonwebtoken</groupId>
     <artifactId>jjwt</artifactId>
     <version>0.9.1</version>
</dependency>-
测试类
@SpringBootTest
public class AutoConfigurationTests {
    @Autowired
    private ApplicationContext applicationContext;

    @Test
    public void testHeaderParser(){
        System.out.println(applicationContext.getBean(HeaderParser.class));
    }

    //省略其他代码...
}
执行testHeaderParser()测试方法:

因为io.jsonwebtoken.Jwts字节码文件在启动SpringBoot程序时已存在,所以创建HeaderParser对象并注册到IOC容器中。
-
@ConditionalOnMissingBean注解
@Configuration
public class HeaderConfig {

    @Bean
    @ConditionalOnMissingBean //不存在该类型的bean,才会将该bean加入IOC容器
    public HeaderParser headerParser(){
        return new HeaderParser();
    }

    //省略其他代码...
}
SpringBoot在调用@Bean标识的headerParser()前,IOC容器中是没有HeaderParser类型的bean,所以HeaderParser对象正常创建,并注册到IOC容器中。
再次修改@ConditionalOnMissingBean注解:
@Configuration
public class HeaderConfig {

    @Bean
    @ConditionalOnMissingBean(name="deptController2")//不存在指定名称的bean,才会将该bean加入IOC容器
    public HeaderParser headerParser(){
        return new HeaderParser();
    }

    //省略其他代码...
}
因为在SpringBoot环境中不存在名字叫deptController2的bean对象,所以创建HeaderParser对象并注册到IOC容器中。
再次修改@ConditionalOnMissingBean注解:
@Configuration
public class HeaderConfig {

    @Bean
    @ConditionalOnMissingBean(HeaderConfig.class)//不存在指定类型的bean,才会将bean加入IOC容器
    public HeaderParser headerParser(){
        return new HeaderParser();
    }
    //省略其他代码...
}
@SpringBootTest
public class AutoConfigurationTests {
    @Autowired
    private ApplicationContext applicationContext;

    @Test
    public void testHeaderParser(){
        System.out.println(applicationContext.getBean(HeaderParser.class));
    }
    //省略其他代码...
}
因为HeaderConfig类中添加@Configuration注解, 而@Configuration注解中包含了@Component,所以SpringBoot启动时会创建HeaderConfig类对象,并注册到IOC容器中。
当IOC容器中有HeaderConfig类型的bean存在时,不会把创建HeaderParser对象注册到IOC容器中。而IOC容器中没有HeaderParser类型的对象时,通过getBean(HeaderParser.class)方法获取bean对象时,引发异常:NoSuchBeanDefinitionException
-
@ConditionalOnProperty注解(这个注解和配置文件当中配置的属性有关系)
先在application.yml配置文件中添加如下的键值对:
name: itheima在声明bean的时候就可以指定一个条件@ConditionalOnProperty
@Configuration
public class HeaderConfig {

    @Bean
    @ConditionalOnProperty(name ="name",havingValue = "itheima")
    //配置文件中存在指定属性名与值,才会将bean加入IOC容器
    public HeaderParser headerParser(){
        return new HeaderParser();
    }

    @Bean
    public HeaderGenerator headerGenerator(){
        return new HeaderGenerator();
    }
}
修改@ConditionalOnProperty注解: havingValue的值修改为"itheima2"
@Bean
@ConditionalOnProperty(name ="name",havingValue = "itheima2")//配置文件中存在指定属性名与值,才会将bean加入IOC容器
public HeaderParser headerParser(){
        return new HeaderParser();
}
因为application.yml配置文件中,不存在: name: itheima2,所以HeaderParser对象在IOC容器中不存在
我们再回头看看之前讲解SpringBoot源码时提到的一个配置类:GsonAutoConfiguration

最后再给大家梳理一下自动配置原理:

自动配置的核心就在@SpringBootApplication注解上,SpringBootApplication这个注解底层包含了3个注解,分别是:
@SpringBootConfiguration
@ComponentScan
@EnableAutoConfiguration
@EnableAutoConfiguration 这个注解才是自动配置的核心。
它封装了一个@Import注解,Import注解里面指定了一个ImportSelector接口的实现类。
在这个实现类中,重写了ImportSelector接口中的selectImports()方法。
那么所有自动配置类的中声明的bean都会加载到Spring的IOC容器中吗? 其实并不会,因为这些配置类中 在声明bean时,通常都会添加@Conditional开头的注解,这个注解就是进行条件装配。而Spring会根据Conditional注解有选择性的进行bean的创建。
3.2.4 案例
3.2.4.1 自定义starter分析
下面我们就通过一个自定义starter案例来加深大家对于自动配置原理的理解。首先介绍一下自定义starter的业务场景,再来分析一下具体的操作步骤。
所谓starter指的就是SpringBoot当中的起步依赖。在SpringBoot当中已经给我们提供了很多的起步依赖了,我们为什么还需要自定义 starter 起步依赖?这是因为在实际的项目开发当中,我们可能会用到很多第三方的技术,并不是所有的第三方的技术官方都给我们提供了与SpringBoot整合的starter起步依赖,但是这些技术又非常的通用,在很多项目组当中都在使用。
业务场景:
-
我们前面案例当中所使用的阿里云OSS对象存储服务,现在阿里云的官方是没有给我们提供对应的起步依赖的,这个时候使用起来就会比较繁琐,我们需要引入对应的依赖。我们还需要在配置文件当中进行配置,还需要基于官方SDK示例来改造对应的工具类,我们在项目当中才可以进行使用。
-
大家想在我们当前项目当中使用了阿里云OSS,我们需要进行这么多步的操作。在别的项目组当中要想使用阿里云OSS,是不是也需要进行这么多步的操作,所以这个时候我们就可以自定义一些公共组件,在这些公共组件当中,我就可以提前把需要配置的bean都提前配置好。将来在项目当中,我要想使用这个技术,我直接将组件对应的坐标直接引入进来,就已经自动配置好了,就可以直接使用了。我们也可以把公共组件提供给别的项目组进行使用,这样就可以大大的简化我们的开发。
在SpringBoot项目中,一般都会将这些公共组件封装为SpringBoot当中的starter,也就是我们所说的起步依赖。

SpringBoot 官方starter命名: spring-boot-starter-xxxx
第三组织提供的starter命名: xxxx-spring-boot-starter

Mybatis提供了配置类,并且也提供了springboot会自动读取的配置文件。 当SpringBoot项目启动时,会读取到spring.factories配置文件中的配置类并加载配置类,生成相关bean对象注册到IOC容器中。
结果:我们可以直接在SpringBoot程序中使用Mybatis自动配置的bean对象。
在自定义一个起步依赖starter的时候,按照规范需要定义两个模块:
-
starter模块(进行依赖管理[把程序开发所需要的依赖都定义在starter起步依赖中])
-
autoconfigure模块(自动配置)
将来在项目当中进行相关功能开发时,只需要引入一个起步依赖就可以了, 因为它会将autocon figure自动配置的依赖给传递下来。
上面我们简单介绍了自定义starter的场景,以及自定义starter时涉及到的模块之后,接下来我们就来完成一个自定义starter的案例。

之前阿里云OSS的使用:
-
配置文件
#配置阿里云OSS参数
aliyun:
  oss:
    endpoint: https://oss-cn-shanghai.aliyuncs.com
    accessKeyId: ***
    accessKeySecret: ***
bucketName: web-framework01-
AliOSSProperties类
@Data
@Component
@ConfigurationProperties(prefix = "aliyun.oss")
public class AliOSSProperties {
    //区域
    private String endpoint;
    //身份ID
    private String accessKeyId ;
    //身份密钥
    private String accessKeySecret ;
    //存储空间
    private String bucketName;
}-
AliOSSUtils工具类
@Component //当前类对象由Spring创建和管理
public class AliOSSUtils {
    @Autowired
    private AliOSSProperties aliOSSProperties;

    /**
     * 实现上传图片到OSS
     */
    public String upload(MultipartFile multipartFile) throws IOException {
        // 获取上传的文件的输入流
        InputStream inputStream = multipartFile.getInputStream();

        // 避免文件覆盖
        String originalFilename = multipartFile.getOriginalFilename();
        String fileName = UUID.randomUUID().toString() + originalFilename.substring(originalFilename.lastIndexOf("."));

        //上传文件到 OSS
        OSS ossClient = new OSSClientBuilder().build(aliOSSProperties.getEndpoint(),
                aliOSSProperties.getAccessKeyId(), aliOSSProperties.getAccessKeySecret());
        ossClient.putObject(aliOSSProperties.getBucketName(), fileName, inputStream);

        //文件访问路径
        String url =aliOSSProperties.getEndpoint().split("//")[0] + "//" + aliOSSProperties.getBucketName() + "." + aliOSSProperties.getEndpoint().split("//")[1] + "/" + fileName;

        // 关闭ossClient
        ossClient.shutdown();
        return url;// 把上传到oss的路径返回
    }
}
当我们在项目当中要使用阿里云OSS,就可以注入AliOSSUtils工具类来进行文件上传。但这种方式其实是比较繁琐的。
大家再思考,现在我们使用阿里云OSS,需要做这么几步,将来大家在开发其他的项目的时候,你使用阿里云OSS,这几步你要不要做?当团队中其他小伙伴也在使用阿里云OSS的时候,步骤 不也是一样的。
所以这个时候我们就可以制作一个公共组件(自定义starter)。starter定义好之后,将来要使用阿里云OSS进行文件上传,只需要将起步依赖引入进来之后,就可以直接注入AliOSSUtils使用了。
需求明确了,接下来我们再来分析一下具体的实现步骤:
-
第1步:创建自定义starter模块(进行依赖管理)
-
把阿里云OSS所有的依赖统一管理起来
-
第2步:创建autoconfigure模块
-
在starter中引入autoconfigure (我们使用时只需要引入starter起步依赖即可)
-
第3步:在autoconfigure中完成自动配置
-
定义一个自动配置类,在自动配置类中将所要配置的bean都提前配置好
-
定义配置文件,把自动配置类的全类名定义在配置文件中
我们分析完自定义阿里云OSS自动配置的操作步骤了,下面我们就按照分析的步骤来实现自定义starter。
3.2.4.2 自定义starter实现
自定义starter的步骤我们刚才已经分析了,接下来我们就按照分析的步骤来完成自定义starter的开发。
首先我们先来创建两个Maven模块:
1). aliyun-oss-spring-boot-starter模块

创建完starter模块后,删除多余的文件,最终保留内容如下:

删除pom.xml文件中多余的内容后:
<?xml version="1.0" encoding="UTF-8"?>
<project xmlns="http://maven.apache.org/POM/4.0.0" xmlns:xsi="http://www.w3.org/2001/XMLSchema-instance"
	xsi:schemaLocation="http://maven.apache.org/POM/4.0.0 https://maven.apache.org/xsd/maven-4.0.0.xsd">
	<modelVersion>4.0.0</modelVersion>
	<parent>
		<groupId>org.springframework.boot</groupId>
		<artifactId>spring-boot-starter-parent</artifactId>
		<version>2.7.5</version>
		<relativePath/> <!-- lookup parent from repository -->
	</parent>

	<groupId>com.aliyun.oss</groupId>
	<artifactId>aliyun-oss-spring-boot-starter</artifactId>
	<version>0.0.1-SNAPSHOT</version>

	<properties>
		<java.version>11</java.version>
	</properties>

	<dependencies>
		<dependency>
			<groupId>org.springframework.boot</groupId>
			<artifactId>spring-boot-starter</artifactId>
		</dependency>
	</dependencies>

</project>
2). aliyun-oss-spring-boot-autoconfigure模块

删除pom.xml文件中多余的内容后:
<?xml version="1.0" encoding="UTF-8"?>
<project xmlns="http://maven.apache.org/POM/4.0.0" xmlns:xsi="http://www.w3.org/2001/XMLSchema-instance"
	xsi:schemaLocation="http://maven.apache.org/POM/4.0.0 https://maven.apache.org/xsd/maven-4.0.0.xsd">
	<modelVersion>4.0.0</modelVersion>
	<parent>
		<groupId>org.springframework.boot</groupId>
		<artifactId>spring-boot-starter-parent</artifactId>
		<version>2.7.5</version>
		<relativePath/> <!-- lookup parent from repository -->
	</parent>

	<groupId>com.aliyun.oss</groupId>
	<artifactId>aliyun-oss-spring-boot-autoconfigure</artifactId>
	<version>0.0.1-SNAPSHOT</version>

	<properties>
		<java.version>11</java.version>
	</properties>

	<dependencies>
        <dependency>
            <groupId>org.springframework.boot</groupId>
            <artifactId>spring-boot-starter</artifactId>
        </dependency>
	</dependencies>

</project>
按照我们之前的分析,是需要在starter模块中来引入autoconfigure这个模块的。打开starter模块中的pom文件:
<?xml version="1.0" encoding="UTF-8"?>
<project xmlns="http://maven.apache.org/POM/4.0.0" xmlns:xsi="http://www.w3.org/2001/XMLSchema-instance"
	xsi:schemaLocation="http://maven.apache.org/POM/4.0.0 https://maven.apache.org/xsd/maven-4.0.0.xsd">
	<modelVersion>4.0.0</modelVersion>
	<parent>
		<groupId>org.springframework.boot</groupId>
		<artifactId>spring-boot-starter-parent</artifactId>
		<version>2.7.5</version>
		<relativePath/> <!-- lookup parent from repository -->
	</parent>

	<groupId>com.aliyun.oss</groupId>
	<artifactId>aliyun-oss-spring-boot-starter</artifactId>
	<version>0.0.1-SNAPSHOT</version>

	<properties>
		<java.version>11</java.version>
	</properties>

	<dependencies>
		<!--引入autoconfigure模块-->
		<dependency>
			<groupId>com.aliyun.oss</groupId>
			<artifactId>aliyun-oss-spring-boot-autoconfigure</artifactId>
			<version>0.0.1-SNAPSHOT</version>
		</dependency>

		<dependency>
			<groupId>org.springframework.boot</groupId>
			<artifactId>spring-boot-starter</artifactId>
		</dependency>
	</dependencies>

</project>
前两步已经完成了,接下来是最关键的就是第三步:
在autoconfigure模块当中来完成自动配置操作。
我们将之前案例中所使用的阿里云OSS部分的代码直接拷贝到autoconfigure模块下,然后进行改造就行了。

拷贝过来后,还缺失一些相关的依赖,需要把相关依赖也拷贝过来:
<?xml version="1.0" encoding="UTF-8"?>
<project xmlns="http://maven.apache.org/POM/4.0.0" xmlns:xsi="http://www.w3.org/2001/XMLSchema-instance"
	xsi:schemaLocation="http://maven.apache.org/POM/4.0.0 https://maven.apache.org/xsd/maven-4.0.0.xsd">
	<modelVersion>4.0.0</modelVersion>
	<parent>
		<groupId>org.springframework.boot</groupId>
		<artifactId>spring-boot-starter-parent</artifactId>
		<version>2.7.5</version>
		<relativePath/> <!-- lookup parent from repository -->
	</parent>

	<groupId>com.aliyun.oss</groupId>
	<artifactId>aliyun-oss-spring-boot-autoconfigure</artifactId>
	<version>0.0.1-SNAPSHOT</version>

	<properties>
		<java.version>11</java.version>
	</properties>

	<dependencies>
        <dependency>
            <groupId>org.springframework.boot</groupId>
            <artifactId>spring-boot-starter</artifactId>
        </dependency>

		<!--引入web起步依赖-->
		<dependency>
			<groupId>org.springframework.boot</groupId>
			<artifactId>spring-boot-starter-web</artifactId>
		</dependency>

		<!--Lombok-->
		<dependency>
			<groupId>org.projectlombok</groupId>
			<artifactId>lombok</artifactId>
		</dependency>

		<!--阿里云OSS-->
		<dependency>
			<groupId>com.aliyun.oss</groupId>
			<artifactId>aliyun-sdk-oss</artifactId>
			<version>3.15.1</version>
		</dependency>

		<dependency>
			<groupId>javax.xml.bind</groupId>
			<artifactId>jaxb-api</artifactId>
			<version>2.3.1</version>
		</dependency>
		<dependency>
			<groupId>javax.activation</groupId>
			<artifactId>activation</artifactId>
			<version>1.1.1</version>
		</dependency>
		<!-- no more than 2.3.3-->
		<dependency>
			<groupId>org.glassfish.jaxb</groupId>
			<artifactId>jaxb-runtime</artifactId>
			<version>2.3.3</version>
		</dependency>
	</dependencies>
</project>现在大家思考下,在类上添加的@Component注解还有用吗?


答案:没用了。 在SpringBoot项目中,并不会去扫描com.aliyun.oss这个包,不扫描这个包那类上的注解也就失去了作用。
@Component注解不需要使用了,可以从类上删除了。
删除后报红色错误,暂时不理会,后面再来处理。
删除AliOSSUtils类中的@Component注解、@Autowired注解
下面我们就要定义一个自动配置类了,在自动配置类当中来声明AliOSSUtils的bean对象。

AliOSSAutoConfiguration类:
@Configuration//当前类为Spring配置类
@EnableConfigurationProperties(AliOSSProperties.class)//导入AliOSSProperties类,并交给SpringIOC管理
public class AliOSSAutoConfiguration {
    //创建AliOSSUtils对象,并交给SpringIOC容器
    @Bean
    public AliOSSUtils aliOSSUtils(AliOSSProperties aliOSSProperties){
        AliOSSUtils aliOSSUtils = new AliOSSUtils();
        aliOSSUtils.setAliOSSProperties(aliOSSProperties);
        return aliOSSUtils;
    }
}
AliOSSProperties类:
/*阿里云OSS相关配置*/
@Data
@ConfigurationProperties(prefix = "aliyun.oss")
public class AliOSSProperties {
    //区域
    private String endpoint;
    //身份ID
    private String accessKeyId ;
    //身份密钥
    private String accessKeySecret ;
    //存储空间
    private String bucketName;
}
AliOSSUtils类:
@Data
public class AliOSSUtils {
    private AliOSSProperties aliOSSProperties;

    /**
     * 实现上传图片到OSS
     */
    public String upload(MultipartFile multipartFile) throws IOException {
        // 获取上传的文件的输入流
        InputStream inputStream = multipartFile.getInputStream();

        // 避免文件覆盖
        String originalFilename = multipartFile.getOriginalFilename();
        String fileName = UUID.randomUUID().toString() + originalFilename.substring(originalFilename.lastIndexOf("."));

        //上传文件到 OSS
        OSS ossClient = new OSSClientBuilder().build(aliOSSProperties.getEndpoint(),
                aliOSSProperties.getAccessKeyId(), aliOSSProperties.getAccessKeySecret());
        ossClient.putObject(aliOSSProperties.getBucketName(), fileName, inputStream);

        //文件访问路径
        String url =aliOSSProperties.getEndpoint().split("//")[0] + "//" + aliOSSProperties.getBucketName() + "." + aliOSSProperties.getEndpoint().split("//")[1] + "/" + fileName;

        // 关闭ossClient
        ossClient.shutdown();
        return url;// 把上传到oss的路径返回
    }
}在aliyun-oss-spring-boot-autoconfigure模块中的resources下,新建自动配置文件:
-
META-INF/spring/org.springframework.boot.autoconfigure.AutoConfiguration.imports
com.aliyun.oss.AliOSSAutoConfiguration
3.2.4.3 自定义starter测试
阿里云OSS的starter我们刚才已经定义好了,接下来我们就来做一个测试。
今天的课程资料当中,提供了一个自定义starter的测试工程。我们直接打开文件夹,里面有一个测试工程。测试工程就是springboot-autoconfiguration-test,我们只需要将测试工程直接导入到Idea当中即可。
测试前准备:
-
在test工程中引入阿里云starter依赖
-
通过依赖传递,会把autoconfigure依赖也引入了
<!--引入阿里云OSS起步依赖-->
<dependency>
    <groupId>com.aliyun.oss</groupId>
    <artifactId>aliyun-oss-spring-boot-starter</artifactId>
    <version>0.0.1-SNAPSHOT</version>
</dependency>-
在test工程中的application.yml文件中,配置阿里云OSS配置参数信息(从以前的工程中拷贝即可)
#配置阿里云OSS参数
aliyun:
  oss:
    endpoint: https://oss-cn-shanghai.aliyuncs.com
    accessKeyId: LTAI5t9MZK8iq5T2Av5GLDxX
    accessKeySecret: C0IrHzKZGKqU8S7YQcevcotD3Zd5Tc
bucketName: web-framework01-
在test工程中的UploadController类编写代码
@RestController
public class UploadController {

    @Autowired
    private AliOSSUtils aliOSSUtils;

    @PostMapping("/upload")
    public String upload(MultipartFile image) throws Exception {
        //上传文件到阿里云 OSS
        String url = aliOSSUtils.upload(image);
        return url;
    }

}
编写完代码后,我们启动当前的SpringBoot测试工程:
-
随着SpringBoot项目启动,自动配置会把AliOSSUtils的bean对象装配到IOC容器中

用postman工具进行文件上传:

通过断点可以看到自动注入AliOSSUtils的bean对象:

4. Web后端开发总结
到此基于SpringBoot进行web后端开发的相关知识我们已经学习完毕了。下面我们一起针对这段web课程做一个总结。我们都学习了哪些内容,以及每一块知识,具体是属于哪个框架的。
web后端开发现在基本上都是基于标准的三层架构进行开发的,在三层架构当中,Controller控制器层负责接收请求响应数据,Service业务层负责具体的业务逻辑处理,而Dao数据访问层也叫持久层,就是用来处理数据访问操作的,来完成数据库当中数据的增删改查操作。

在三层架构当中,前端发起请求首先会到达Controller(不进行逻辑处理),然后 Controller会直接调用Service 进行逻辑处理, Service再调用Dao完成数据访问操作。
如果我们在执行具体的业务处理之前,需要去做一些通用的业务处理,比如:我们要进行统一的登录校验,我们要进行统一的字符编码等这些操作时,我们就可以借助于Javaweb当中三大组件之一的过滤器Filter或者是Spring当中提供的拦截器Interceptor来实现。
而为了实现三层架构层与层之间的解耦,我们学习了Spring框架当中的第一大核心:IOC控制反转与DI依赖注入。
所谓控制反转,指的是 将对象创建的控制权由应用程序自身交给外部容器,这个容器就是我们常说的IOC容器或Spring容器。
而DI依赖注入指的是 容器为程序提供运行时所需要的资源。
除了IOC与DI我们还讲到了AOP面向切面编程,还有Spring中的事务管理、全局异常处理器,以及传递会话技术Cookie、Session以及新的会话跟踪解决方案JWT令牌,阿里云OSS对象存储服务,以及通过Mybatis持久层架构操作数据库等技术。

我们在学习这些web后端开发技术的时候,我们都是基于主流的SpringBoot进行整合使用的。而SpringBoot又是用来简化开发,提高开发效率的。像过滤器、拦截器、IOC、DI、AOP、事务管理等这些技术到底是哪个框架提供的核心功能?

Filter过滤器、Cookie、 Session这些都是传统的JavaWeb提供的技术。
JWT令牌、阿里云OSS对象存储服务,是现在企业项目中常见的一些解决方案。
IOC控制反转、DI依赖注入、AOP面向切面编程、事务管理、全局异常处理、拦截器等,这些技术都是 Spring Framework框架当中提供的核心功能。
Mybatis就是一个持久层的框架,是用来操作数据库的。
在Spring框架的生态中,对web程序开发提供了很好的支持,如:全局异常处理器、拦截器这些都是Spring中web开发模块所提供的功能,而Spring框架的web开发模块,我们也称为:SpringMVC

SpringMVC不是一个单独的框架,它是Spring框架的一部分,是Spring框架中的web开发模块,是用来简化原始的Servlet程序开发的。
外界俗称的SSM,就是由:SpringMVC、Spring Framework、Mybatis三块组成。
基于传统的SSM框架进行整合开发项目会比较繁琐,而且效率也比较低,所以在现在的企业项目开发当中,基本上都是直接基于SpringBoot整合SSM进行项目开发的。
到此我们web后端开发的内容就已经全部讲解结束了。
本文来自博客园,作者:软工菜鸡,转载请注明原文链接:https://www.cnblogs.com/SElearner/p/17676668.html

 浙公网安备 33010602011771号