Day2-CSS 表单
(本文为在---菜鸟教程--中学习之后的笔记,感谢菜鸟教程)
知识补充:
①在表单input属性中 placeholder是设置提示文字,而value是初始化文字
②一般要设置圆角的话都是:border-radius:4px
③如果是在微信小程序中的话,”上交按钮“一般初始化的颜色是 #4caf50 然后hover也就是碰到之后就会变成#45a049
④如果是要浅灰色的话一般都是设置为 #f2f2f2
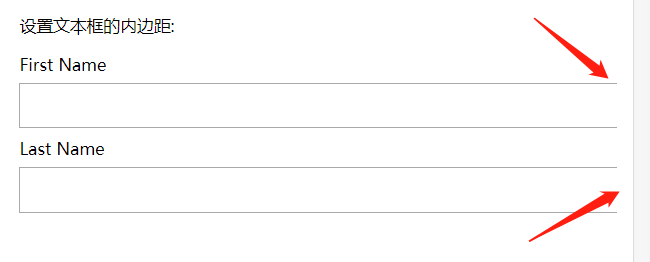
⑤之所以使用 box-sizing: border-box; 是因为如果设置了 比如input width=100%的话,如果不设置这个border-box,
就会导致如下后果(就是右边框因为一直延长,就没有显示出来了
一、CSS表单实例
效果图:

<!DOCTYPE html>
<html lang="en">
<head>
    <meta charset="UTF-8">
    <meta name="viewport" content="width=device-width, initial-scale=1.0">
    <title>Document</title>
    <style>
        input[type=text],select{
            width: 100%;
            padding: 12px 20px;
            margin: 8px 0;
            display: inline-block;
            border: 1px solid #ccc;
            border-radius: 4px;
            box-sizing: border-box;
        }

        input[type=submit]{
            width: 100%;
            background-color: #4caf50;
            color: white;
            padding: 14px 20px;
            margin: 8px 0;
            border: none;
            border-radius: 4px;
            cursor: pointer;
            }
            input[type=submit]:hover{
                background-color: #45a049;
            }
            div{
                border-radius: 5px;
                background-color: #f2f2f2;
                padding: 20px;
            }
    </style>
</head>
<body>
    <h3>使用 CSS 来渲染 HTML 的表单元素</h3>

    <div>
        <form action="">
            <label for="fname">First Name</label>
            <input type="text" id="fname" name="firstname" placeholder="Your name..">

            <label for="lname">Last Name</label>
            <input type="text" id="lname" name="lastname" placeholder="Your last name ..">

            <label for="country">Country</label>
            <select name="country" id="country">
                <option value="australia">Australia</option>
                <option value="canada">Canada</option>
                <option value="usa">USA</option>
            </select>

            <input type="submit" value="Submit">

        </form>
    </div>
</body>
</html>
小扩展(如果想要达到以下的效果的话)
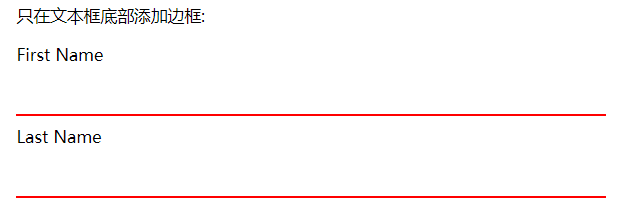
 border: none;
  border-bottom: 2px solid red;
先通过border:none 把全部边框搞死,之后再单独设置下面的边框就可
小扩展(把输入框的背景颜色设置为这个,也比较好看)
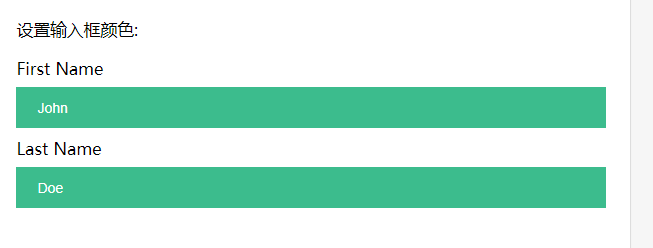
background-color: #3CBC8D;
二、通过:focus来对表单添加样式
小技巧:一般给输入文本框 设置margin的时候都是8px 0;这样的
这里的outline就是设置外边框,和border是不同的,是border的更外面的东西
--因为如果不设置outline==none的话,外边框也会变成淡蓝色的(很难看)
<!DOCTYPE html>
<html lang="en">
<head>
    <meta charset="UTF-8">
    <meta name="viewport" content="width=device-width, initial-scale=1.0">
    <title>Document</title>
    <style>
        input[type=text]{
            width: 100%;
            padding: 12px 20px;
            margin: 8px 0;
            box-sizing: border-box;
            border: 1px solid #555;
            outline: none;
        }
        input[type=text]:focus{  /*这里表示的就是当鼠标点击这里的话就会变成淡蓝色了*/
            background-color: lightblue;
        }
    </style>
</head>
<body>
    <form action="">
        <label for="fname">First Name</label>
        <input type="text" id="fname" name="fname" value="John">
        <label for="lname">Last Name</label>
        <input type="text" id="lname" name="lname" value="Doe">
    </form>
</body>
</html>
三、另外一种也是通过focus(
在这个实例,我们使用 :focus 选择器,在文本框获取焦点时,设置文本框当边框颜色为黑色。
注意,我们使用来 CSS transition 属性来设置边框当颜色 (在 0.5 秒内修改边框当颜色)。)
①知识点:
-webkit-transition: 0.5s;
          transition: 0.5s;
上面的和下面的其实是一样的,但是上面的主要是在safari上面兼容的,都是表示“这个改变”在0.5s之后才算完成
目的:为的就是在改变边框的样式的时候不是机械的直接改变,而是有一个演变的过程让人看起来舒服一点的
outline: none;
这个也是因为在用focus的时候,会让外边框凸显出来,看丑的,就设置外边框none即可了
 input[type=text]:focus {
          border: 3px solid #555;
        }
只要是点击了这个input框的话就会让边框的样式发生改变了

<!DOCTYPE html>
<html lang="en">
<head>
    <meta charset="UTF-8">
    <meta name="viewport" content="width=device-width, initial-scale=1.0">
    <title>Document</title>
    <style>
        input[type=text] {
          width: 100%;
          padding: 12px 20px;
          margin: 8px 0;
          box-sizing: border-box;
          border: 3px solid #ccc;
          -webkit-transition: 0.5s;
          transition: 0.5s;
          outline: none;
        }

        input[type=text]:focus {
          border: 3px solid #555;
        }
        </style>
</head>
<body>
    <p>在这个实例,我们使用 :focus 选择器,在文本框获取焦点时,设置文本框当边框颜色为黑色。</p>
<p>注意,我们使用来 CSS transition 属性来设置边框当颜色 (在 0.5 秒内修改边框当颜色)。</p>

<form>
  <label for="fname">First Name</label>
  <input type="text" id="fname" name="fname" value="John">
  <label for="lname">Last Name</label>
  <input type="text" id="lname" name="lname" value="Doe">
</form>
</body>
</html>
四、给输入框(input)添加图标
下面是以“搜索框”为例的
①效果如下:
②知识点:
1、通过background-image引入一个背景
background-image: url("../image/搜索.png");
2、再通过position对这个引入的背景图进行定位,repeat主要是那种可以同一幅画可以连在一起的效果,这里不用所有no
 background-position: 0 0;
 background-repeat: no-repeat;
不然就是这个效果:
 完整代码
完整代码
<!DOCTYPE html>
<html lang="en">
<head>
    <meta charset="UTF-8">
    <meta name="viewport" content="width=device-width, initial-scale=1.0">
    <title>Document</title>
    <style>
        input[type=text]{
            width: 100%;
            box-sizing: border-box;
            border: 2px solid #ccc;
            border-radius: 4px;
            font-size: 16px;
            background-color: white;
            background-image: url("../image/搜索.png");
            background-position: 0 0;
            /* background-repeat: no-repeat; */
            padding: 12px 20px 12px 40px;
        }
    </style>
</head>
<body>
    <p>输入框按钮:</p>
    <form action="">
        <input type="text" name="search" placeholder="搜索..">
    </form>
</body>
</html>
五、带动画的搜索框
①技术:一般带动画的,比如点击之后变化的,都是用focus来实现的,设置变化的时间,一个演变的过程,就好像是动画一样了
②效果:当点击这个搜索框的时候,这个框就会变成,然后边框会变成淡蓝色

③知识点:
1、这里通过transition 特有的就是,由于我们是对框的宽度进行改变,所以用ease-in-out,
 -webkit-transition: width 0.4s ease-in-out;
  transition: width 0.4s ease-in-out;
⑤代码实现
<!DOCTYPE html>
<html lang="en">
<head>
    <meta charset="UTF-8">
    <meta name="viewport" content="width=device-width, initial-scale=1.0">
    <title>Document</title>
    <style>
        input[type=text]{
            width: 130px;
            box-sizing: border-box;
            border: 2px solid #ccc;
            border-radius: 4px;
            font-size: 16px;
            background-color: white;
            background-image: url("../image/搜索.png");
            background-position: 0 0;
            background-repeat:no-repeat;
            padding: 12px 20px 12px 40px;
            -webkit-transition: width 0.4s ease-in-out;
            transition: width 0.4s ease-in-out;

        }
        input[type=text]:focus{
            width: 100%;
        }
    </style>
</head>
<body>
    <p>搜索输入框带动画:</p>
    <form action="">
        <input type="text" name="search" placeholder="搜索...">
    </form>
</body>
</html>
六、textarea样式-resize的使用
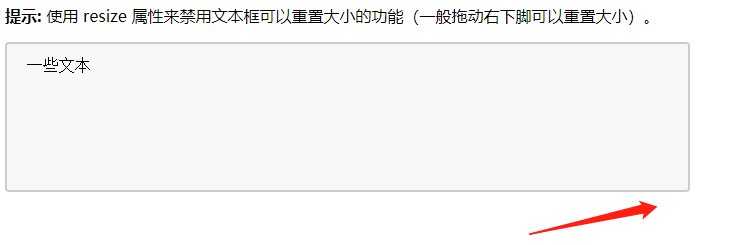
-----使用 resize 属性来禁用文本框可以重置大小的功能(一般拖动右下脚可以重置大小)
①效果图:
resize默认的时候:(是可以拉动右下角来设置这个文本框的大小的)

resize:none (拉动不了了)
<!DOCTYPE html>
<html lang="en">
<head>
    <meta charset="UTF-8">
    <meta name="viewport" content="width=device-width, initial-scale=1.0">
    <title>Document</title>
    <style>
        textarea{
            width: 50%;
  height: 150px;
  padding: 12px 20px;
  box-sizing: border-box;
  border: 2px solid #ccc;
  border-radius: 4px;
  background-color: #f8f8f8;
  font-size: 16px;
  /* resize: none; */
        }
    </style>
</head>
<body>
    <p><strong>提示:</strong> 使用 resize 属性来禁用文本框可以重置大小的功能(一般拖动右下脚可以重置大小)。</p>
    <form action="">
        <textarea name="" id="" cols="30" rows="10">一些文本</textarea>
    </form>
</body>
</html>
七、下拉select的CSS样式
①效果图:

②完整代码

<!DOCTYPE html>
<html>
<head>
<meta charset="utf-8">
<title>菜鸟教程(runoob.com)</title>
<style>
select {
  width: 50%;
  padding: 16px 20px;
  border: none;
  border-radius: 4px;
  background-color: #f1f1f1;
}
</style>
</head>
<body>

<p>下拉菜单</p>

<form>
  <select id="country" name="country">
  <option value="au">Australia</option>
  <option value="ca">Canada</option>
  <option value="usa">USA</option>
  </select>
</form>

</body>
</html>
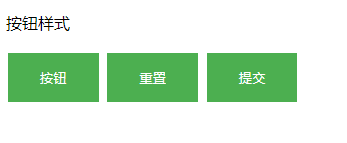
八、按钮CSS样式
效果图:

<!DOCTYPE html>
<html>
<head>
<meta charset="utf-8">
<title>菜鸟教程(runoob.com)</title>
<style>
input[type=button], input[type=submit], input[type=reset] {
  background-color: #4CAF50;
  border: none;
  color: white;
  padding: 16px 32px;
  text-decoration: none;
  margin: 4px 2px;
  cursor: pointer;
}
</style>
</head>
<body>

<p>按钮样式</p>

<input type="button" value="按钮">
<input type="reset" value="重置">
<input type="submit" value="提交">

</body>
</html>


