swift中的UITableView学习总结 - Swift
UITableView - Swift
在这里就不过多的去介绍object-c中的UITableView与Swift的区别了,直接总结在Swift中的用法,我也是在学习有不足的地方可以共同探讨。
Swift中使用TableView和object-c中的流程一样,同样需要注册cell、实现相关的代理方法、cell的重用机制。
import UIKit
let cell_identifier: String = "Cell"
/*
var infoTableView = UITableView()
var itemArr = NSMutableArray()
*/
class SecondViewController: UIViewController,
UITableViewDelegate,
UITableViewDataSource {
var infoTableView:UITableView? = nil //声明tableView变量
var itemArr:NSMutableArray = [] //声明可变数组变量
override func viewWillAppear(_ animated: Bool) {
super.viewWillAppear(animated)
}
override func viewDidLoad() {
super.viewDidLoad()
// Do any additional setup after loading the view.
view.backgroundColor = UIColor.white
self.createSubViews()
}
func createSubViews() {
self.itemArr = NSMutableArray.init(array: ["郑州","开封","洛阳","焦作","新乡","周口","济源","漯河","信阳","安阳","许昌"])
//UITableView 初始化
self.infoTableView = UITableView (frame: view.bounds,style: UITableViewStyle.plain)
self.infoTableView?.tableFooterView = UIView()
self.infoTableView?.dataSource = self
self.infoTableView?.delegate = self
self.infoTableView?.setEditing(true, animated: true)
self.view.addSubview(self.infoTableView!)
//注册 cell
self.infoTableView?.register(UITableViewCell.self, forCellReuseIdentifier: cell_identifier)
//这种注册cell的方法也可以
//infoTableView.register(UITableViewCell.classForCoder(), forCellReuseIdentifier: cell_identifier)
}
func tableView(_ tableView: UITableView, numberOfRowsInSection section: Int) -> Int {
return itemArr.count
}
func tableView(_ tableView: UITableView, heightForRowAt indexPath: IndexPath) -> CGFloat {
return 60.0
}
func tableView(_ tableView: UITableView, cellForRowAt indexPath: IndexPath) -> UITableViewCell {
let cell = tableView.dequeueReusableCell(withIdentifier: cell_identifier, for: indexPath)
cell.textLabel?.text = (itemArr[indexPath.row] as! String)
return cell
}
//分割线从左端顶部显示(使cell的)分割线与屏幕的左右两端对齐显示
func tableView(_ tableView: UITableView, willDisplay cell: UITableViewCell, forRowAt indexPath: IndexPath) {
if(cell.responds(to: #selector(setter: UITableViewCell.separatorInset))){
cell.separatorInset = .zero
}
if(cell.responds(to: #selector(setter: UITableViewCell.layoutMargins))){
cell.layoutMargins = .zero
}
}
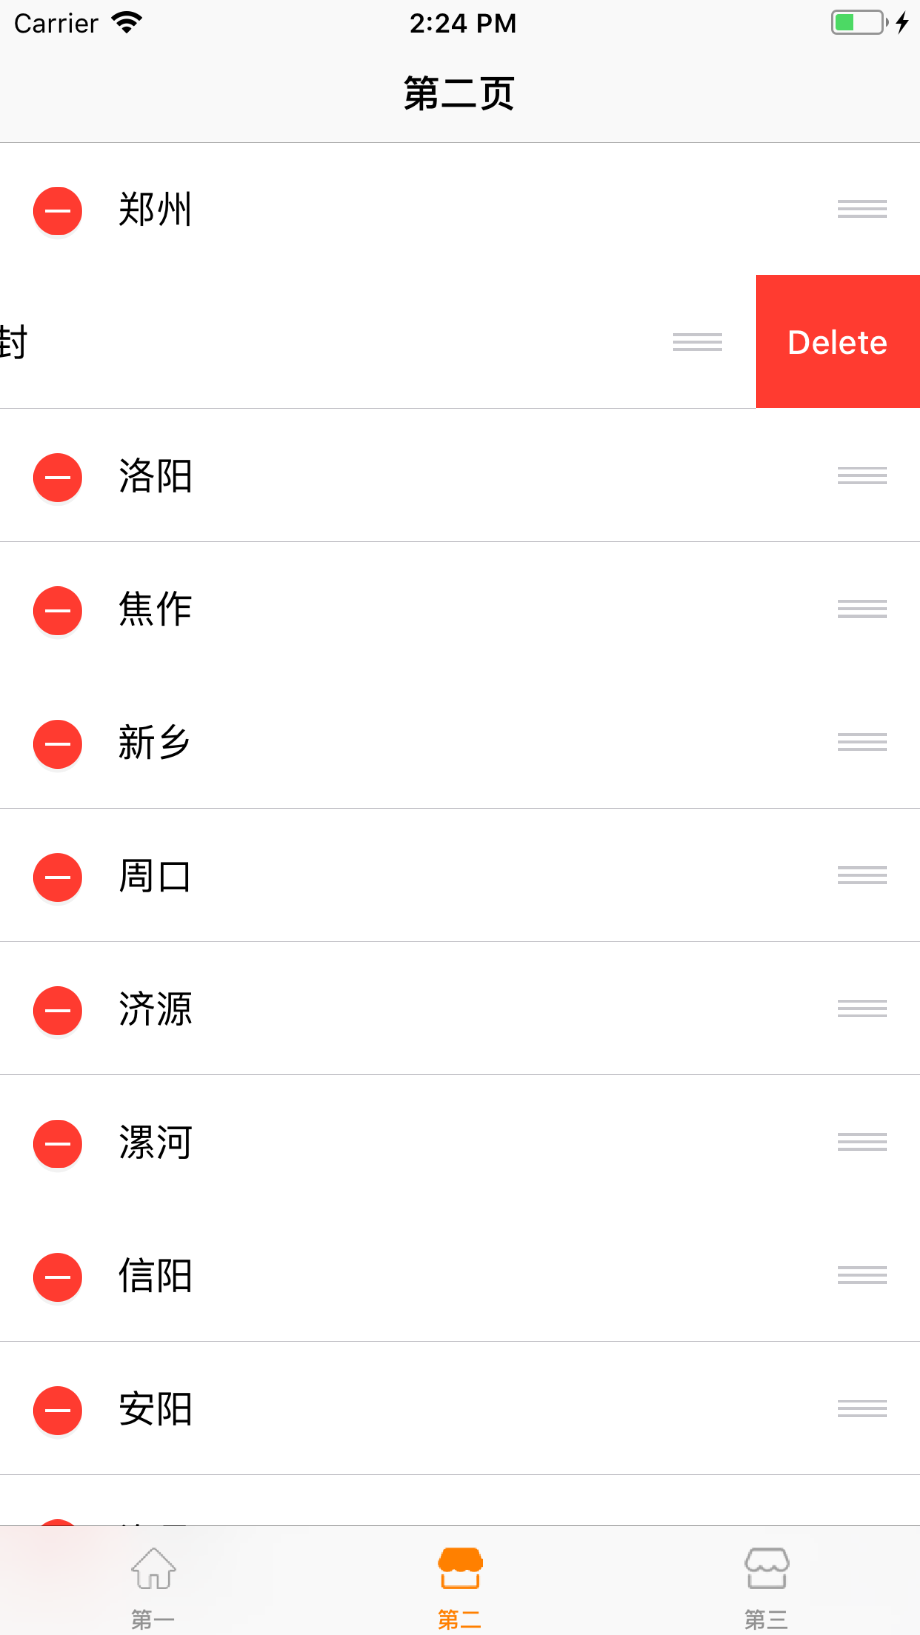
public func tableView(_ tableView: UITableView, commit editingStyle: UITableViewCellEditingStyle, forRowAt indexPath: IndexPath){
//单独删除单元格
if editingStyle == UITableViewCellEditingStyle.delete{
self.itemArr.remove(at: indexPath.row)
tableView.deleteRows(at: [indexPath], with:.top)
print("单独删除cell单元格响应!")
let alertCon = UIAlertController.init(title: "提示", message: "您正在进行UItableViewCell的删除操作,是否删除?", preferredStyle:UIAlertControllerStyle.actionSheet)
let doneAction = UIAlertAction.init(title: "删除", style: UIAlertActionStyle.destructive, handler: { (UIAlertAction) -> Void in
print("alertView确定响应!")
})
let cancleAction = UIAlertAction.init(title: "放弃", style: UIAlertActionStyle.default, handler: { (UIAlertAction) -> Void in
print("alertView取消响应!")
})
alertCon.addAction(doneAction)
alertCon.addAction(cancleAction)
self.present(alertCon, animated: true, completion: nil)
//插入一个单元格数据
}else if editingStyle == UITableViewCellEditingStyle.insert{
print("insert响应!")
let alertCon = UIAlertController.init(title: "提示", message: "您正在进行UItableViewCell的插入操作?", preferredStyle:UIAlertControllerStyle.alert)
let doneAction = UIAlertAction.init(title: "确定", style: UIAlertActionStyle.default, handler: { (UIAlertAction) -> Void in
print("alertView确定响应!")
self.itemArr .insert("郑州(新增)", at: indexPath.row)
self.infoTableView?.reloadData()
})
let cancleAction = UIAlertAction.init(title: "取消", style: UIAlertActionStyle.default, handler: { (UIAlertAction) -> Void in
print("alertView取消响应!")
})
alertCon.addAction(doneAction)
alertCon.addAction(cancleAction)
self.present(alertCon, animated: true, completion: nil)
}
}
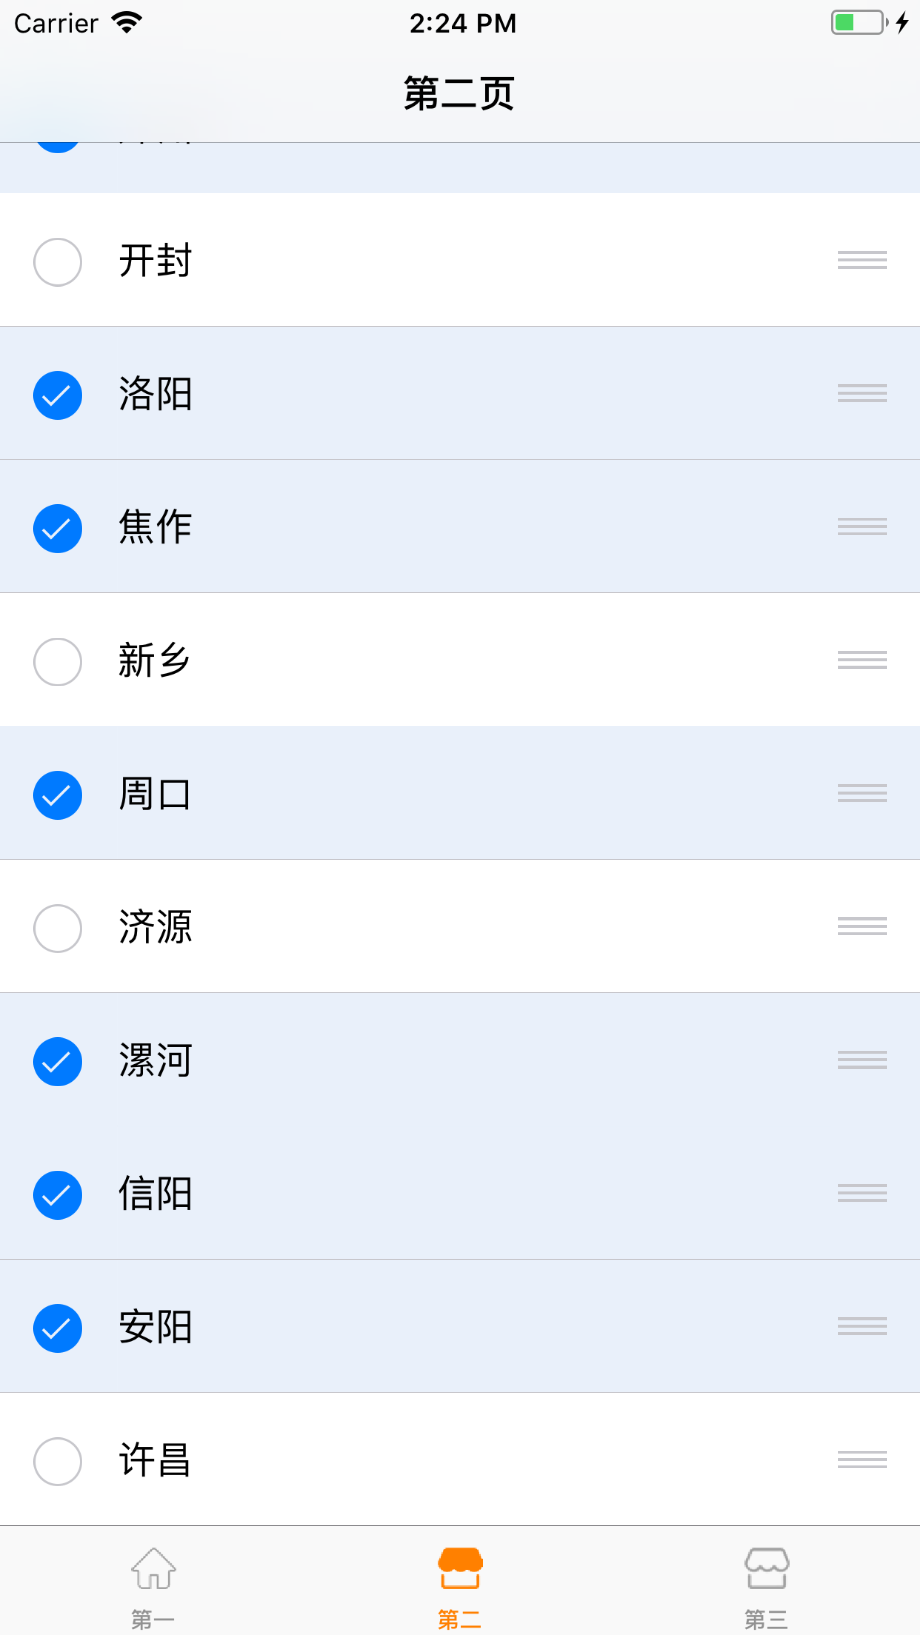
public func tableView(_ tableView: UITableView, editingStyleForRowAt indexPath: IndexPath) -> UITableViewCellEditingStyle{
print("单元格cell删除设置响应")
//返回的cell的样式 是带有选择按钮的样式
//return UITableViewCellEditingStyle(rawValue: UITableViewCellEditingStyle.RawValue(UInt8(UITableViewCellEditingStyle.insert.rawValue)|UInt8(UITableViewCellEditingStyle.delete.rawValue)))!
return UITableViewCellEditingStyle.delete
}
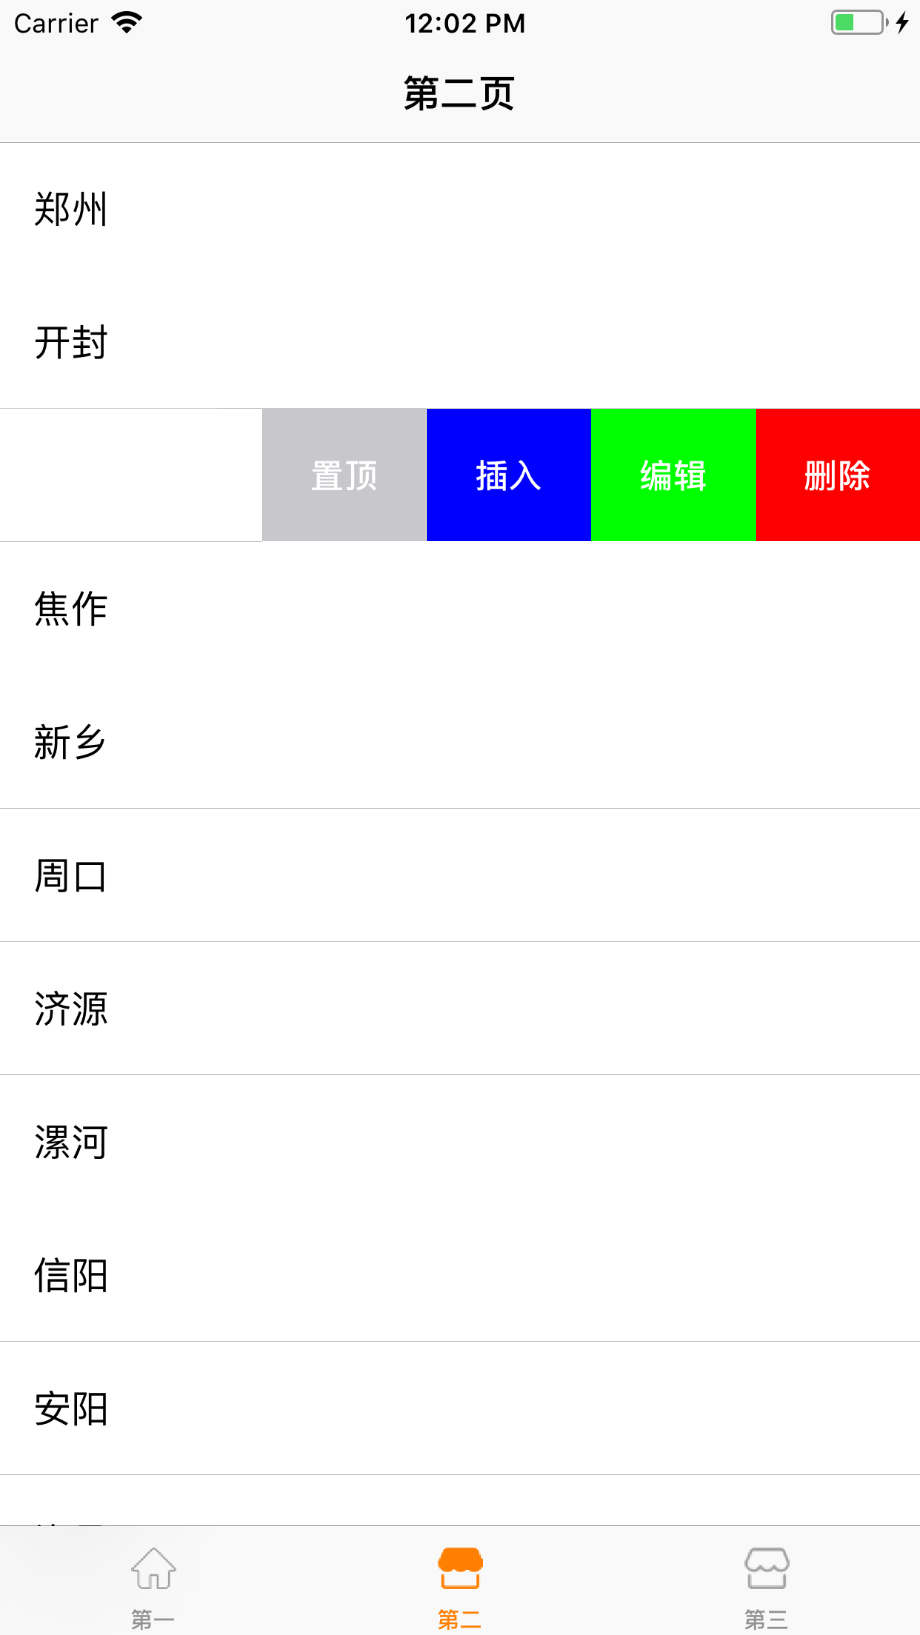
//自定义左滑显示项目 (实现此代理方法时需要设置TableView的setEditing为NO 否则没有实际的效果, 也可以设置代理editingStyleForRowAt返回UITableViewCellEditingStyle.delete 此时点击cell左侧的按钮cell会自动向左侧滑呼出自定义的操作按钮)
/*func tableView(_ tableView: UITableView, editActionsForRowAt indexPath: IndexPath) -> [UITableViewRowAction]? {
//删除操作
let deleteAction = UITableViewRowAction.init(style: .default, title: "删除", handler: {_,_ in
})
deleteAction.backgroundColor = UIColor.red
let editAction = UITableViewRowAction.init(style: UITableViewRowActionStyle.normal, title: "编辑", handler: {_,_ in
})
let insertAction = UITableViewRowAction.init(style: UITableViewRowActionStyle.normal, title: "插入", handler: {_,_ in
})
insertAction.backgroundColor = UIColor.blue
let topAction = UITableViewRowAction.init(style: UITableViewRowActionStyle.normal, title: "置顶", handler: {_,_ in
})
editAction.backgroundColor = UIColor.green
return [deleteAction,editAction,insertAction,topAction]
}*/
//是否允许cell进行编辑 默认允许
func tableView(_ tableView: UITableView, canEditRowAt indexPath: IndexPath) -> Bool {
return true
}
//是否允许cell排序
func tableView(_ tableView: UITableView, canMoveRowAt indexPath: IndexPath) -> Bool {
print("是否允许cell排序的响应!")
return true
}
//cell排序操作
func tableView(_ tableView: UITableView, moveRowAt sourceIndexPath: IndexPath, to destinationIndexPath: IndexPath) {
self.infoTableView?.moveRow(at: sourceIndexPath, to: destinationIndexPath)
self.itemArr.exchangeObject(at: sourceIndexPath.row, withObjectAt: destinationIndexPath.row)
print("cell排序响应!")
}
//选中某个 cell
func tableView(_ tableView: UITableView, didSelectRowAt indexPath: IndexPath) {
print("cell点击响应")
}
//如果需要实现cell按下高亮,手放开恢复原状态,则实现如下方法即可:
func tableView(_ tableView: UITableView, didDeselectRowAt indexPath: IndexPath) {
tableView.deselectRow(at: indexPath, animated: true)
}
override func didReceiveMemoryWarning() {
super.didReceiveMemoryWarning()
// Dispose of any resources that can be recreated.
}
/*
// MARK: - Navigation
// In a storyboard-based application, you will often want to do a little preparation before navigation
override func prepare(for segue: UIStoryboardSegue, sender: Any?) {
// Get the new view controller using segue.destinationViewController.
// Pass the selected object to the new view controller.
}
*/
}
效果如下图所示:

自定义cell侧滑操作按钮效果:
public func tableView(_ tableView: UITableView, editingStyleForRowAt indexPath: IndexPath) -> UITableViewCellEditingStyle{
        //返回的cell的样式 是带有选择按钮的样式
        return UITableViewCellEditingStyle(rawValue: UITableViewCellEditingStyle.RawValue(UInt8(UITableViewCellEditingStyle.insert.rawValue)|UInt8(UITableViewCellEditingStyle.delete.rawValue)))!
     }
效果如下:
- (UITableViewCellEditingStyle)tableView:(UITableView *)tableView editingStyleForRowAtIndexPath:(NSIndexPath *)indexPath;

//此代理方法 返回UITableViewCellEditingStyle.delete cell是删除的效果如下图1

//返回UITableViewCellEditingStyle.insert 是插入添加的效果 如下图2
图一:
图二: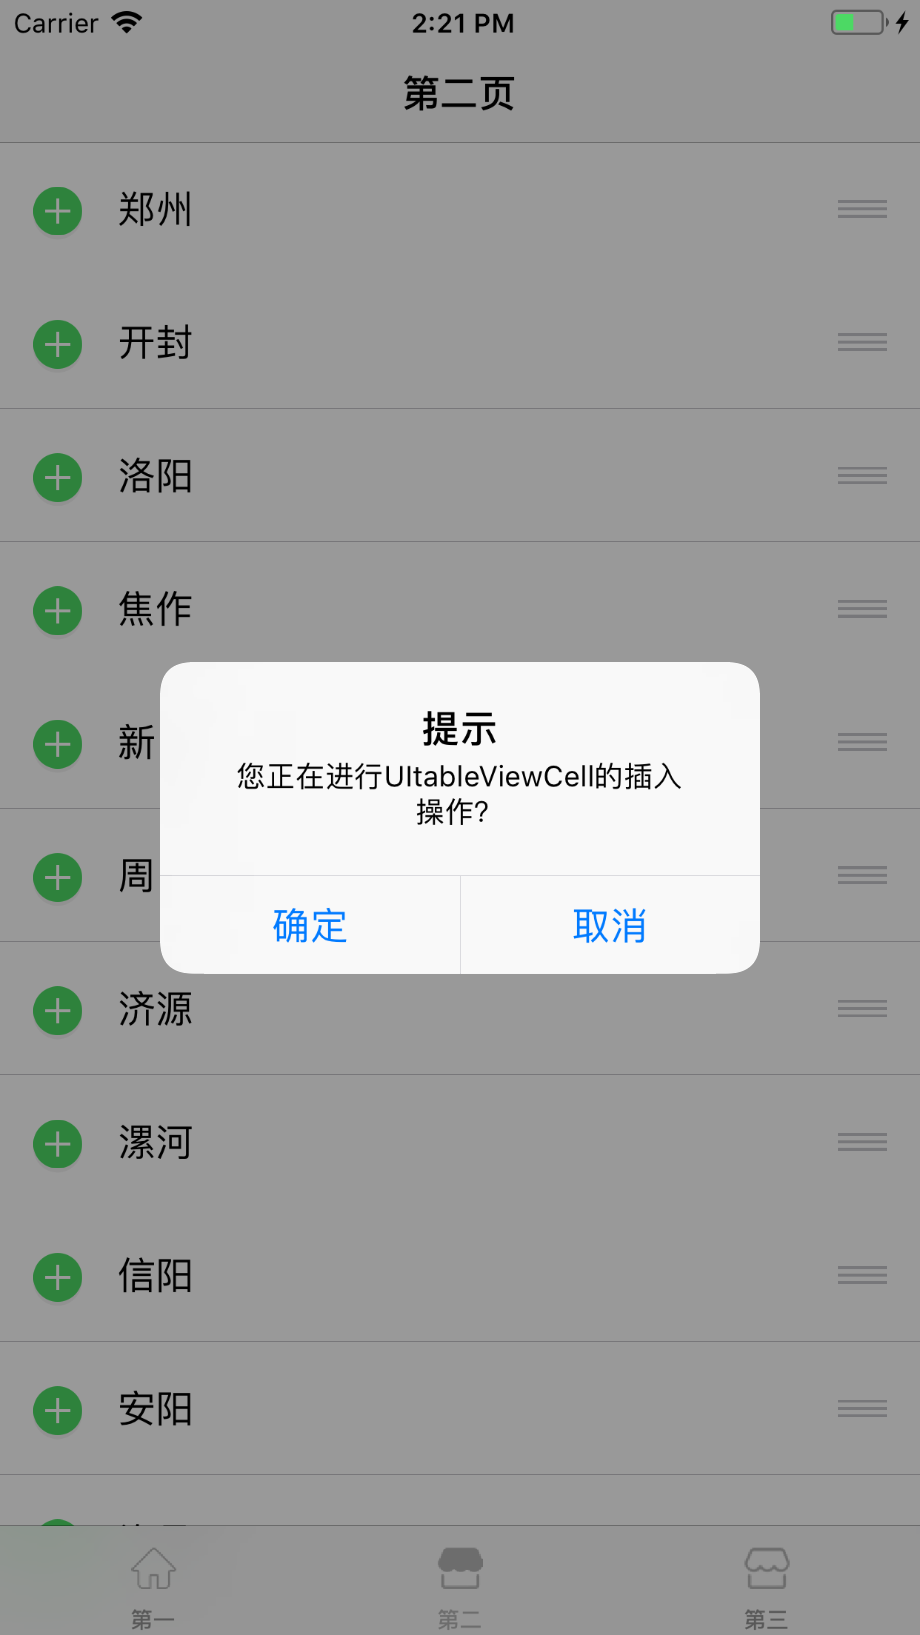
欢迎大家的骚扰
感谢您的访问!
若对您有帮助或有兴趣请关注博客:http://www.cnblogs.com/Rong-Shengcom/

 浙公网安备 33010602011771号