自我学习笔记06
1、自建yum仓库,分别为网络源和本地源
本地源
准备要素:
1.RPM包
2.repodate文件夹(元数据)因为光盘本身自带了这两个,所以直接加载光盘配置为yum本地源即可。
1.1 准备数据源
首先把光盘cd1加载到系统当中。
使用命令扫描光盘。让其加载到系统当中
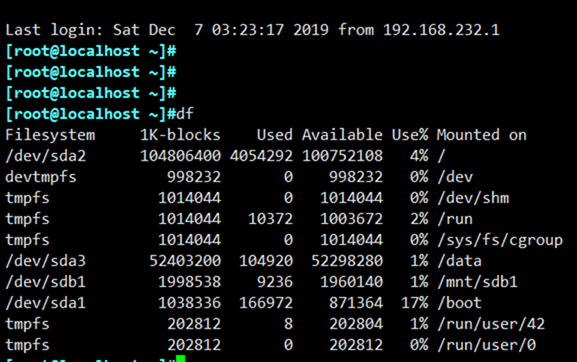
1.2 查看CD是否已加载到系统当中
[root@localhost ~]#df
Filesystem     1K-blocks    Used Available Use% Mounted on
/dev/sda2      104806400 4428872 100377528   5% /
devtmpfs          998232       0    998232   0% /dev
tmpfs            1014044       0   1014044   0% /dev/shm
tmpfs            1014044   10396   1003648   2% /run
tmpfs            1014044       0   1014044   0% /sys/fs/cgroup
/dev/sda3       52403200 1136436  51266764   3% /data
/dev/sda1        1038336  166980    871356  17% /boot
tmpfs             202812      12    202800   1% /run/user/42
tmpfs             202812       0    202812   0% /run/user/0
1.3 安装autofs程序。autofs自动挂载服务是一种Linux系统守护进程,当检测到用户视图访问一个尚未挂载的文件系统时,会自动挂载该文件系统。简单来说,将挂载信息写入/etc/fstab文件中,系统在每次开机时都会自动挂载,而autofs服务则是在用户需要使用该文件系统时才去动态挂载,从而节约了网络资源和服务器硬件资源的开销。
首先检查一下是否安装。如果未安装预先安装一下。我这边显示已经安装OK
[root@localhost ~]#rpm -q autofs
autofs-5.0.7-99.el7.x86_64
1.4 可以使用命令让其自动重启并设置下次自动开机启动。
[root@localhost ~]#systemctl start autofs # 启动自动挂载功能
[root@localhost ~]#systemctl enable autofs # 下次开机自动开启自动挂载功能
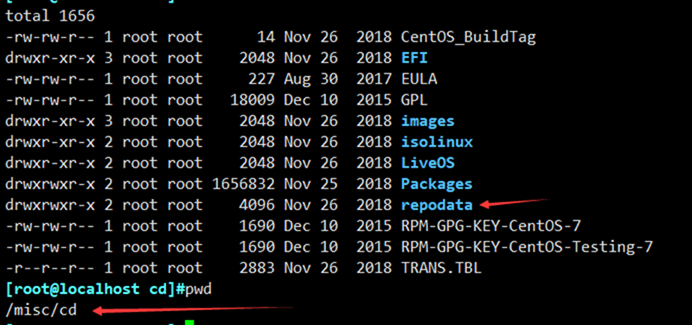
然后访问cd /misc/cd 就可以访问到CD的文件数据了
[root@localhost ~]#cd /misc/cd
[root@localhost cd]#ll
total 1656
-rw-rw-r-- 1 root root      14 Nov 26  2018 CentOS_BuildTag
drwxr-xr-x 3 root root    2048 Nov 26  2018 EFI
-rw-rw-r-- 1 root root     227 Aug 30  2017 EULA
-rw-rw-r-- 1 root root   18009 Dec 10  2015 GPL
drwxr-xr-x 3 root root    2048 Nov 26  2018 images
drwxr-xr-x 2 root root    2048 Nov 26  2018 isolinux
drwxr-xr-x 2 root root    2048 Nov 26  2018 LiveOS
drwxrwxr-x 2 root root 1656832 Nov 25  2018 Packages
drwxrwxr-x 2 root root    4096 Nov 26  2018 repodata
-rw-rw-r-- 1 root root    1690 Dec 10  2015 RPM-GPG-KEY-CentOS-7
-rw-rw-r-- 1 root root    1690 Dec 10  2015 RPM-GPG-KEY-CentOS-Testing-7
-r--r--r-- 1 root root    2883 Nov 26  2018 TRANS.TBL
1.5 根据repodate的路径设置yum路径-父目录为yum源的路径
1.6 配置yum配置文件。首先把系统自带的配置文件移动到他处。这里我建立一个bak的文件夹存储系统原始的配置文件(因为我们要手动配置一个本地yum源)
[root@localhost cd]#cd /etc/yum.repos.d/
[root@localhost yum.repos.d]#ll
total 32
-rw-r--r--. 1 root root 1664 Nov 23  2018 CentOS-Base.repo
-rw-r--r--. 1 root root 1309 Nov 23  2018 CentOS-CR.repo
-rw-r--r--. 1 root root  649 Nov 23  2018 CentOS-Debuginfo.repo
-rw-r--r--. 1 root root  314 Nov 23  2018 CentOS-fasttrack.repo
-rw-r--r--. 1 root root  630 Nov 23  2018 CentOS-Media.repo
-rw-r--r--. 1 root root 1331 Nov 23  2018 CentOS-Sources.repo
-rw-r--r--. 1 root root 5701 Nov 23  2018 CentOS-Vault.repo
[root@localhost yum.repos.d]#ls
CentOS-Base.repo  CentOS-Debuginfo.repo  CentOS-Media.repo    CentOS-Vault.repo
CentOS-CR.repo    CentOS-fasttrack.repo  CentOS-Sources.repo
[root@localhost yum.repos.d]#pwd
/etc/yum.repos.d
[root@localhost yum.repos.d]#mkdir bak;mv *.repo bak/
1.7 下来就是创建一个配置文件。配置文件要主要的几个配置参数
[base] # 仓库ID(唯一) 主要是为了识别仓库名 后期查看软件时便于查询
name=CentOS-$releasever – Base # 描述。表示仓库是用什么用或解释性文字
mirrorlist=http://mirrorlist.centos.org/?release=$releasever&arch=$basearch&repo=os&infra=$infra # 仓库的路径(4种仓库路径。1.HTTP 2.HTTPS 3.FTP 4.本地路径FILE)
#baseurl=http://mirror.centos.org/centos/$releasever/os/$basearch/ # 同mirrorlist(二选一) $releasever # 操作系统主版本号 $basearch # 操作系统的架构 32位或64位 通过使用变量可以使配置文件通用性更强
gpgcheck=1 # 效验安装包来源是否安全
gpgkey=file:///etc/pki/rpm-gpg/RPM-GPG-KEY-CentOS-7 # 配合gpgcheck使用秘钥的路径也可以使用命令导入或写成路径enabled=0 # 0表示此仓库禁用 多用于多个仓库使用。1为不禁用或者不添加此选项
1.8 创建一个yum配置文件。文件名可以随便取。但是后缀需写成*.repo 按照以下配置保存。
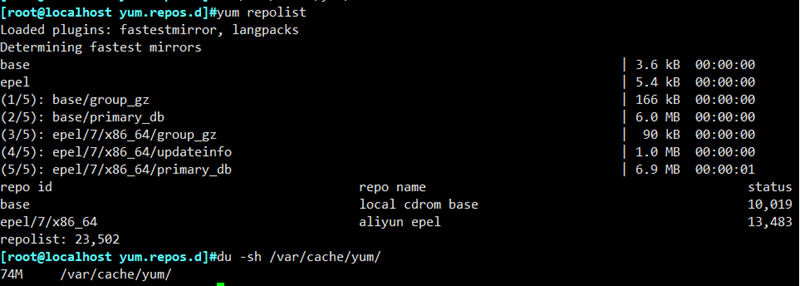
[root@localhost yum.repos.d]#vim yumbase.repo[base] #仓库名 name=local cdrom base #描述 baseurl=file:///misc/cd #文件路径注意是/// 因为file://是文件访问协议。/为根目录 gpgcheck=0 #因为cdrom是本地的cdrom 所以我这边就不检查了1.9 使用yum repolist 列出仓库信息
配置epel源(第三方源)
EPEL的全称叫 Extra Packages for Enterprise Linux 。EPEL是由 Fedora 社区打造,为 RHEL 及衍生发行版如 CentOS、Scientific Linux 等提供高质量软件包的项目。装上了 EPEL之后,就相当于添加了一个第三方源。
[epel]  #仓库名
name=aliyun epel #仓库描述
baseurl=https://mirrors.aliyun.com/epel/$releasever/$basearch/ #这里使用变量是为了通用性
gpgcheck=0 #不效验安全性
enabled=1 # 这里选择启用
因为之前有系统自带的yum源数据 所以清除旧的yum数据,在使用yum repolist 生成新的缓存数据
[root@localhost yum.repos.d]#ls /var/cache/yum/x86_64/7/
base  epel  extras  timedhosts  timedhosts.txt  updates
[root@localhost yum.repos.d]#rm -rf /var/cache/yum/* [root@localhost yum.repos.d]#du -sh /var/cache/yum/ 0 /var/cache/yum/再运行一下yun repolist 使epel源数据缓存到本地
如yum路径或者配置文件更改有时使用yum安装会出现安装失败。所以为了稳妥起见。运行一下yum clean all清除一下缓存为好。再执行yum repolist生成新的缓存元数据。
网络源
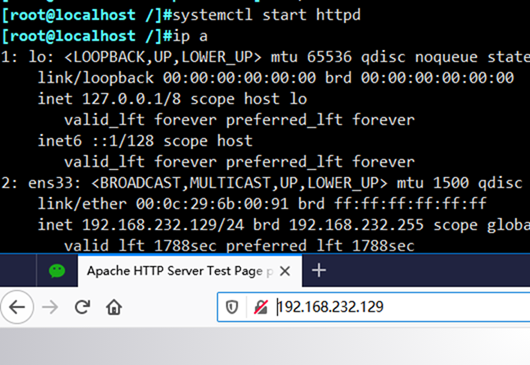
1.因为网络源需要http服务来支撑。所以先安装http服务。因为配置了本地yum源。所以我这边就直接安装http服务
2.启动http服务[root@localhost httpd-2.4.25]#yum install -y httpd [root@localhost httpd-2.4.25]#rpm -qi httpd Name : httpd Version : 2.4.6 Release : 88.el7.centos Architecture: x86_64 Install Date: Sun 08 Dec 2019 09:17:18 AM CST Group : System Environment/Daemons Size : 9817309 License : ASL 2.0 Signature : RSA/SHA256, Mon 12 Nov 2018 10:28:53 PM CST, Key ID 24c6a8a7f4a80eb5 Source RPM : httpd-2.4.6-88.el7.centos.src.rpm Build Date : Mon 05 Nov 2018 09:48:57 AM CST Build Host : x86-01.bsys.centos.org Relocations : (not relocatable) Packager : CentOS BuildSystem <http://bugs.centos.org> Vendor : CentOS URL : http://httpd.apache.org/ Summary : Apache HTTP Server Description : The Apache HTTP Server is a powerful, efficient, and extensible web server.3.创建网络源的资源路径。http的服务的根目录是/var/www/html.所以资源路径需要在此目录下建立
[root@localhost html]#mkdir -pv centos/{6,7}/os/x86_64/
mkdir: created directory ‘centos’
mkdir: created directory ‘centos/6’
mkdir: created directory ‘centos/6/os’
mkdir: created directory ‘centos/6/os/x86_64/’
mkdir: created directory ‘centos/7’
mkdir: created directory ‘centos/7/os’
mkdir: created directory ‘centos/7/os/x86_64/’
[root@localhost html]#tree
.
└── centos
    ├── 6
    │?? └── os
    │??     └── x86_64
    └── 7
        └── os
            └── x86_64

7 directories, 0 files
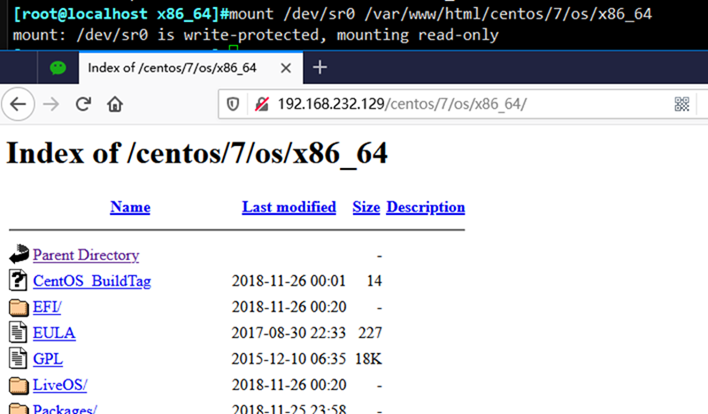
4.准备yum资源到文件夹中。我这边准备的是光盘的文件。直接挂载到x86_64这个文件夹中。这里演示是临时挂载永久挂载的可写入到配置文件/etc/fstab中。
[root@localhost html]#lsblk
NAME            MAJ:MIN RM  SIZE RO TYPE MOUNTPOINT
sda               8:0    0  200G  0 disk
├─sda1            8:1    0    1G  0 part /boot
├─sda2            8:2    0  100G  0 part /
├─sda3            8:3    0   50G  0 part /data
├─sda4            8:4    0    1K  0 part
└─sda5            8:5    0    4G  0 part [SWAP]
sdb               8:16   0   10G  0 disk
└─testvg-testlv 253:0    0    5G  0 lvm  /users
sdc               8:32   0   10G  0 disk
sr0              11:0    1   10G  0 rom  /misc/cd
[root@localhost x86_64]#mount /dev/sr0 /var/www/html/centos/7/os/x86_64
mount: /dev/sr0 is write-protected, mounting read-only
5.检查网络yum源是否配置完成。找一台测试机编辑配置文件
$releasever 系统的大版本 如centos7 或6
$系统架构 如x86_64
此配置适配6和7系统
[root@localhost yum.repos.d]#yum repolist all
Loaded plugins: fastestmirror, langpacks
Loading mirror speeds from cached hostfile
repo id                                               repo name                                     status
netyum/7/x86_64                                       net yum                                       enabled: 10,019
repolist: 10,019
至此安装完成。
2、编译安装http2.4,实现可以正常访问,并将编译步骤和结果提交。
2.1关闭防火墙和selinux
2.2准备安装包文件httpd-2.4.39.tar.bz2,并下载到本地
wget https://archive.apache.org/dist/httpd/httpd-2.4.25.tar.bz2&&tar xvf httpd-2.4.25.tar.bz2进入文件夹查看INSTALL文件
$ ./configure --prefix=PREFIX
$ make
$ make install
$ PREFIX/bin/apachectl start为了以后方便管理所有的安装文件地址存放在一起
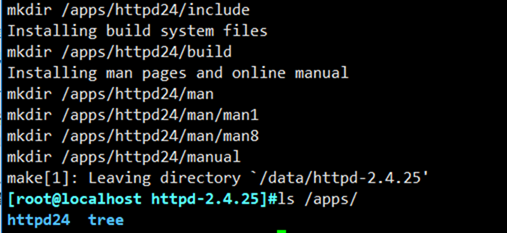
2.4进入文件夹httpd-2.4.25编译安装httpd./configure --prefix=/apps/httpd24 --enable-ssl --enable-so2.5根据系统提示缺少包 按照错误提示排错即可
[root@localhost httpd-2.4.25]#./configure \
> --prefix=/apps/httpd24 \
> --enable-ssl \
> --enable-so
checking for chosen layout... Apache
checking for working mkdir -p... yes
checking for grep that handles long lines and -e... /usr/bin/grep
checking for egrep... /usr/bin/grep -E
checking build system type... x86_64-unknown-linux-gnu
checking host system type... x86_64-unknown-linux-gnu
checking target system type... x86_64-unknown-linux-gnu
configure:
configure: Configuring Apache Portable Runtime library...
configure:
checking for APR... no
configure: error: APR not found.  Please read the documentation.
2.6以下为安装httpd需要安装的devel包 。
yum install –y gcc apr-devel apr-util-devel pcre-devel openssl-devel2.7再次编译安装直到完成
./configure --prefix=/apps/httpd24 --enable-ssl --enable-so2.8接下来就是make安装和-j可以根据内核提供并行编译,速度会大幅提升
make -j 4 && make install
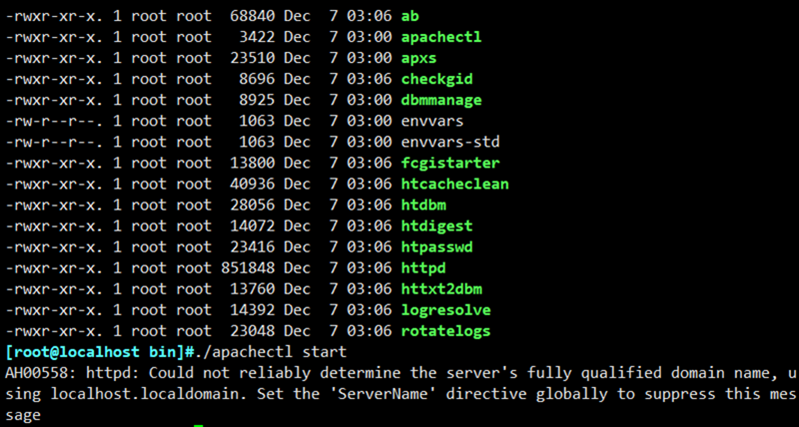
2.9接下来就是启动就可以使用该服务了,根据前面我们看到的INSTALL文件第四步。访问安装路径的PREFIX/bin/apachectl start就可以启动服务了
/apps/httpd24/bin/apachectl start
注:如无法访问请检查防火墙和selinux
3、创建一个2G的文件系统,块大小为2048byte,预留1%可用空间,文件系统 ext4,卷标为TEST,要求此分区开机后自动挂载至/test目录,且默认有acl挂载选项
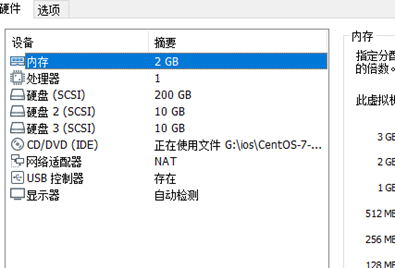
1.首先给虚拟机分配一个空的硬盘我这边挂载了一个10G的空磁盘
挂载好磁盘可以不需要重启扫描磁盘。使用命令直接扫描磁盘。
echo "- - -"> /sys/class/scsi_host/host2/scan2.如果执行命令后磁盘还是未显示可以更改host0或者host1试试
如:
echo "- - -"> /sys/class/scsi_host/host0/scan
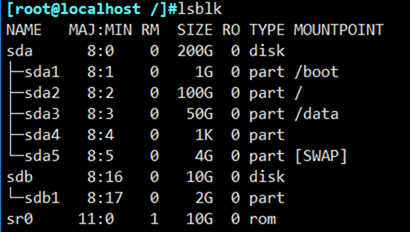
3.通过命令lsblk查看磁盘空间情况
[root@localhost /]#lsblk
NAME   MAJ:MIN RM  SIZE RO TYPE MOUNTPOINT
sda      8:0    0  200G  0 disk
├─sda1   8:1    0    1G  0 part /boot
├─sda2   8:2    0  100G  0 part /
├─sda3   8:3    0   50G  0 part /data
├─sda4   8:4    0    1K  0 part
└─sda5   8:5    0    4G  0 part [SWAP]
sdb      8:16   0   10G  0 disk
sr0     11:0    1   10G  0 rom
4.通过命令fdisk分区工具分出2G大小空间
[root@localhost /]#fdisk /dev/sdb
Command (m for help): n
Select (default p): p
Partition number (1-4, default 1):
First sector (2048-20971519, default 2048):
Using default value 2048
Last sector, +sectors or +size{K,M,G} (2048-20971519, default 20971519): +2G
Partition 1 of type Linux and of size 2 GiB is set
Command (m for help): w
5. 2G的分区已经完成了,接下来就是创建文件系统
6. 创建ext4文件系统,-b 2048 设置块大小,-m 1 设置预留空间1%,-L ‘TEST’ 设置卷标为TEST。
[root@localhost /]#mkfs.ext4 -b 2048 -m 1 -L 'TEST' /dev/sdb1
mke2fs 1.42.9 (28-Dec-2013)
Filesystem label=TEST
OS type: Linux
Block size=2048 (log=1)
Fragment size=2048 (log=1)
Stride=0 blocks, Stripe width=0 blocks
131072 inodes, 1048576 blocks
10485 blocks (1.00%) reserved for the super user
First data block=0
Maximum filesystem blocks=269484032
64 block groups
16384 blocks per group, 16384 fragments per group
2048 inodes per group
Superblock backups stored on blocks:
    16384, 49152, 81920, 114688, 147456, 409600, 442368, 802816

Allocating group tables: done
Writing inode tables: done
Creating journal (32768 blocks): done
Writing superblocks and filesystem accounting information: done
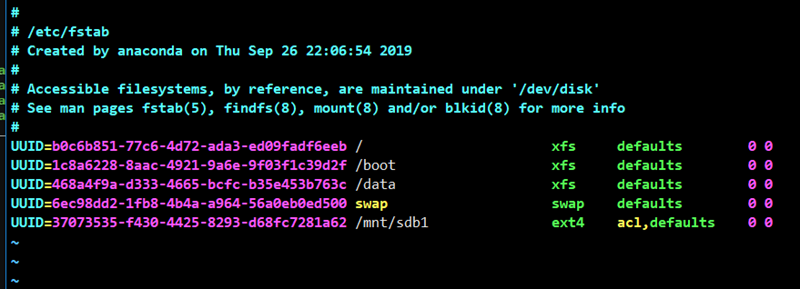
7. 创建好文件系统后先临时挂载,然后要设置自动挂载分区需要把硬盘信息写入到文件系统/etc/fstab当中即可。默认Centos7挂载自带acl,Centos6挂载时需要指定。
临时挂载:
永久挂载:mkdir –o acl /mnt/sdb1;mount /dev/sdb1 /mnt/sdb1/按照配置文件写入相关信息保存重启验证一下。默认Centos7挂载自带acl,Centos6挂载时需要指定。
保存退出后,重启系统后检查是否会自动挂载.
4、创建一个至少有两个PV组成的大小为20G的名为testvg的VG;要求PE大小 为16MB, 而后在卷组中创建大小为5G的逻辑卷testlv;挂载至/users目录
1.虚拟机挂载2块各位10G的硬盘。然后通过命令扫描
echo "- - -"> /sys/class/scsi_host/host2/scan2.创建物理卷
[root@localhost ~]#pvcreate /dev/sdb /dev/sdc
  Physical volume "/dev/sdb" successfully created.
  Physical volume "/dev/sdc" successfully created.
[root@localhost ~]#pvs
  PV         VG Fmt  Attr PSize  PFree
  /dev/sdb      lvm2 ---  10.00g 10.00g
  /dev/sdc      lvm2 ---  10.00g 10.00g
3.创建卷组testvg并把物理卷加入其中。指定PE大小16M
[root@localhost ~]#vgcreate testvg -s 16m /dev/sdb /dev/sdc
  Volume group "testvg" successfully created
[root@localhost ~]#pvs
  PV         VG     Fmt  Attr PSize PFree
  /dev/sdb   testvg lvm2 a--  9.98g 9.98g
  /dev/sdc   testvg lvm2 a--  9.98g 9.98g
[root@localhost ~]#vgdisplay
  --- Volume group ---
  VG Name               testvg
  System ID
  Format                lvm2
  Metadata Areas        2
  Metadata Sequence No  1
  VG Access             read/write
  VG Status             resizable
  MAX LV                0
  Cur LV                0
  Open LV               0
  Max PV                0
  Cur PV                2
  Act PV                2
  VG Size               <19.97 GiB
  PE Size               16.00 MiB
  Total PE              1278
  Alloc PE / Size       0 / 0
  Free  PE / Size       1278 / <19.97 GiB
  VG UUID               4TYlfP-nlhD-g69o-uO4D-2G4h-OB5C-Z7dGow
4.创建卷组testlv并设定大小5G.
[root@localhost ~]#lvcreate -n testlv -L 5G testvg
  Logical volume "testlv" created.
[root@localhost ~]#lvs
  LV     VG     Attr       LSize Pool Origin Data%  Meta%  Move Log Cpy%Sync Convert
  testlv testvg -wi-a----- 5.00g
[root@localhost ~]#lvdisplay
  --- Logical volume ---
  LV Path                /dev/testvg/testlv
  LV Name                testlv
  VG Name                testvg
  LV UUID                VJ6RRx-A02s-iemJ-RwNh-OEMr-ProW-B5iBeR
  LV Write Access        read/write
  LV Creation host, time localhost.localdomain, 2019-12-08 08:49:08 +0800
  LV Status              available
  # open                 0
  LV Size                5.00 GiB
  Current LE             320
  Segments               1
  Allocation             inherit
  Read ahead sectors     auto
  - currently set to     8192
  Block device           253:0
5.创建文件系统xfs
[root@localhost ~]#mkfs.xfs /dev/testvg/testlv
meta-data=/dev/testvg/testlv     isize=512    agcount=4, agsize=327680 blks
         =                       sectsz=512   attr=2, projid32bit=1
         =                       crc=1        finobt=0, sparse=0
data     =                       bsize=4096   blocks=1310720, imaxpct=25
         =                       sunit=0      swidth=0 blks
naming   =version 2              bsize=4096   ascii-ci=0 ftype=1
log      =internal log           bsize=4096   blocks=2560, version=2
         =                       sectsz=512   sunit=0 blks, lazy-count=1
realtime =none                   extsz=4096   blocks=0, rtextents=0
[root@localhost ~]#blkid
/dev/sr0: UUID="2018-11-26-14-22-58-00" LABEL="CentOS 7 x86_64" TYPE="iso9660" PTTYPE="dos"
/dev/sda1: UUID="1c8a6228-8aac-4921-9a6e-9f03f1c39d2f" TYPE="xfs"
/dev/sda2: UUID="b0c6b851-77c6-4d72-ada3-ed09fadf6eeb" TYPE="xfs"
/dev/sda3: UUID="468a4f9a-d333-4665-bcfc-b35e453b763c" TYPE="xfs"
/dev/sda5: UUID="6ec98dd2-1fb8-4b4a-a964-56a0eb0ed500" TYPE="swap"
/dev/sdb: UUID="NSYSzw-YwHC-4X9u-dODB-pFEa-J4wb-h5SHaP" TYPE="LVM2_member"
/dev/sdc: UUID="wBD6a3-fy5w-fZxa-OXdF-BAD6-RQYa-O7eV6V" TYPE="LVM2_member"
/dev/mapper/testvg-testlv: UUID="a519c08c-916c-4195-a435-b4a329fe3734" TYPE="xfs"
6.挂载文件系统到/users
临时挂载:
[root@localhost ~]#mkdir /users;mount /dev/testvg/testlv /users
[root@localhost ~]#df -h
Filesystem                 Size  Used Avail Use% Mounted on
/dev/sda2                  100G  3.9G   97G   4% /
devtmpfs                   975M     0  975M   0% /dev
tmpfs                      991M     0  991M   0% /dev/shm
tmpfs                      991M   11M  981M   2% /run
tmpfs                      991M     0  991M   0% /sys/fs/cgroup
/dev/sda3                   50G  103M   50G   1% /data
/dev/sda1                 1014M  164M  851M  17% /boot
tmpfs                      199M   12K  199M   1% /run/user/42
tmpfs                      199M     0  199M   0% /run/user/0
/dev/mapper/testvg-testlv  5.0G   33M  5.0G   1% /users
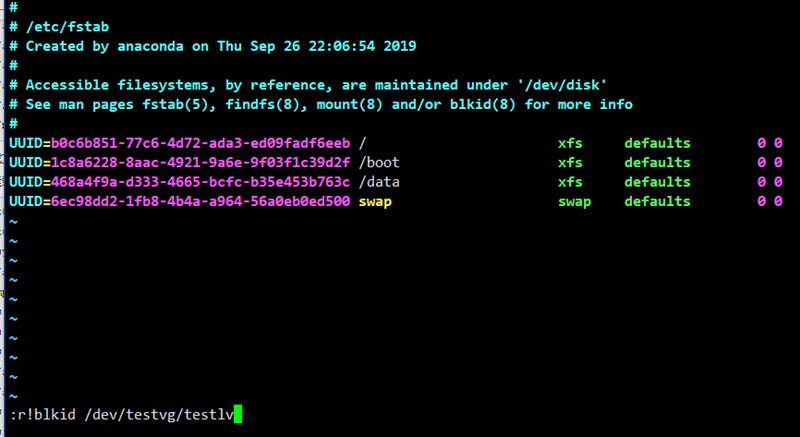
写入信息到/etc/fstab中永久挂载:
重启后检查一下是否会自动挂载。


