ubuntu+xen的编译
目前具体操作是在win10下VirtualBox虚拟机中实现部署
在部署Xen的时候采用的是Ubuntu18.04(英文版) + Xen4.11
由于安装Ubuntu后,使用国外的源比较慢,修改为国内源,这样速度快很多。
Ubuntu换源
我采用的是修改阿里源为Ubuntu18.04的源
备份 sources.list
cp /etc/apt/sources.list /etc/apt/sources.list.bak
添加阿里源
在/etc/apt/sources.list
deb http://mirrors.aliyun.com/ubuntu/ bionic main restricted universe multiverse
deb http://mirrors.aliyun.com/ubuntu/ bionic-security main restricted universe multiverse
deb http://mirrors.aliyun.com/ubuntu/ bionic-updates main restricted universe multiverse
deb http://mirrors.aliyun.com/ubuntu/ bionic-proposed main restricted universe multiverse
deb http://mirrors.aliyun.com/ubuntu/ bionic-backports main restricted universe multiverse
deb-src http://mirrors.aliyun.com/ubuntu/ bionic main restricted universe multiverse
deb-src http://mirrors.aliyun.com/ubuntu/ bionic-security main restricted universe multiverse
deb-src http://mirrors.aliyun.com/ubuntu/ bionic-updates main restricted universe multiverse
deb-src http://mirrors.aliyun.com/ubuntu/ bionic-proposed main restricted universe multiverse
deb-src http://mirrors.aliyun.com/ubuntu/ bionic-backports main restricted universe multiverse
sudo apt-get update
sudo apt-get upgrade
安装依赖包
For Ubuntu 18.04:
apt-get install build-essential
apt-get install bcc bin86 gawk bridge-utils iproute2 libcurl4 libcurl4-openssl-dev bzip2 module-init-tools transfig tgif
apt-get install texinfo texlive-latex-base texlive-latex-recommended texlive-fonts-extra texlive-fonts-recommended pciutils-dev mercurial
apt-get install make gcc libc6-dev zlib1g-dev python python-dev python-twisted libncurses5-dev patch libvncserver-dev libsdl-dev libjpeg-dev
apt-get install libnl-route-3-200 libnl-3-dev libnl-cli-3-dev libnl-genl-3-dev libnl-route-3-dev
apt-get install iasl libbz2-dev e2fslibs-dev git-core uuid-dev ocaml ocaml-findlib libx11-dev bison flex xz-utils libyajl-dev
apt-get install gettext libpixman-1-dev libaio-dev markdown pandoc

apt-get install libc6-dev-i386
apt-get install lzma lzma-dev liblzma-dev
apt-get install libsystemd-dev
下载Xen4.11代码
git clone git://xenbits.xen.org/xen.git
cd xen
git checkout origin/stable-4.11
或者
git clone -b stable-4.11 git://xenbits.xen.org/xen.git
Install
解压之后进入Xen目录下
./configure --enable-systemd
make dist // 也可以使用 make world(same like make clean && make dist).
mkae install
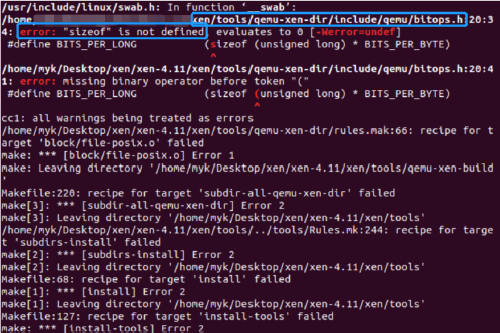
可能会遇到的问题
解决方法:
 #define BITS_PER_LONG           (sizeof (unsigned long) * BITS_PER_BYTE)
 改成
 #define BITS_PER_LONG           (__SIZEOF_LONG__ * BITS_PER_BYTE)
解决完问题后,重复安装过程。
Post-Install
Reload dynamic libraries: /sbin/ldconfig
Grub-Settings
mkdir -p /etc/default/grub.d
Create /etc/default/grub.d/xen.cfg:
gedit /etc/default/grub.d/xen.cfg
在打开的文本中添加下面内容
Be careful! The last settings depends on your system-language!
GRUB_DISABLE_OS_PROBER=true
GRUB_CMDLINE_XEN_DEFAULT="dom0_mem=2560M,max:2560M"
GRUB_DEFAULT="Ubuntu GNU/Linux, with Xen-Hypervisor"
Update grub: update-grub
删除xendomains
当前版本有一个小bug,需要删除一个xendomains文件: rm /etc/init.d/xendomains
安装Xen-tools
apt install lvm2 debootstrap libconfig-inifiles-perl libdata-validate-domain-perl libdata-validate-ip-perl libdata-validate-uri-perl libfile-slurp-perl libfile-which-perl libsort-versions-perl libterm-ui-perl libtext-template-perl openssh-client perl debian-archive-keyring rinse libtest-notabs-perl
git clone https://github.com/xen-tools/xen-tools.git
cd xen-tools
make install
开启Xen services
systemctl enable xen-qemu-dom0-disk-backend.service
systemctl enable xen-init-dom0.service
systemctl enable xenconsoled.service
systemctl enable xenstored.service
systemctl enable xendomains.service
systemctl enable xen-watchdog.service
Reboot
重启选择带有xen-hypervisor 4.11 启动
安装成功与否测试
xentop

References
[4] qemu 安装 error
本人计算机小白一枚,对编程有浓厚兴趣,在此贴出自己的计算机学习历程,还有很多不足,望多多指教!
读书后发现好多的内容与具体专业有偏差,没来得及完成,虽然“有时间我就会做...”是人生最大的谎言,但有时间我会继续搞定未完成的内容,有始有终,兴趣使然!


 浙公网安备 33010602011771号