

redhat7+nginx+mysql+php
一、 源码安装nginx
1.安装基础依赖包
yum -y install gcc automake autoconf libtool make gcc gcc-c++ openssl openssl-devel
2. 添加nginx用户和用户组
groupadd -r nginx
useradd -r -g nginx nginx
2. 安装pcre
/usr/local/src/
wget https://sourceforge.net/projects/pcre/files/pcre/8.41/pcre-8.41.tar.gz
tar -zxvf pcre-8.41.tar.gz
wget https://sourceforge.net/projects/libpng/files/zlib/1.2.11/zlib-1.2.11.tar.gz
tar –zxvf zlib-1.2.11.tar.gz
wget https://www.openssl.org/source/openssl-1.1.0b.tar.gz
tar –zxvf openssl-1.1.0b.tar.gz
3. 安装nginx
编译:
./configure \
--prefix=/usr/local/nginx/ \
--sbin-path=/usr/local/nginx/sbin/nginx \
--conf-path=/usr/local/nginx/nginx.conf \
--pid-path=/usr/local/nginx/nginx.pid \
--user=nginx \
--group=nginx \
--with-http_ssl_module \
--with-http_flv_module \
--with-http_mp4_module \
--with-http_stub_status_module \
--with-http_gzip_static_module \
--http-client-body-temp-path=/var/tmp/nginx/client/ \
--http-proxy-temp-path=/var/tmp/nginx/proxy \
--http-fastcgi-temp-path=/var/tmp/nginx/fcgi \
--http-uwsgi-temp-path=/var/tmp/nginx/uwsgi \
--http-scgi-temp-path=/var/tmp/nginx/scgi \
--with-pcre=/usr/local/src/pcre-8.44 \
--with-zlib=/usr/local/src/zlib-1.2.11 \
--with-openssl=/usr/local/src/openssl-1.1.0g
注:
当前所在目录一定要是/usr/local/src/nginx-1.10.2
--with-pcre=/usr/local/src/pcre-8.41 指的是pcre-8.41 的源码路径。
--with-zlib=/usr/local/src/zlib-1.2.11 指的是zlib-1.2.11 的源码路径。
--with-openssl=/usr/local/src/openssl-1.1.0g 指的是openssl-1.1.0g 的源码路径。
make && make install
3. 在/etc/init.d/ 添加nginx启动脚本


#! /bin/bash
# chkconfig: - 85 15
PATH=/usr/local/nginx
DESC="nginx daemon"
NAME=nginx
DAEMON=$PATH/sbin/$NAME
CONFIGFILE=$PATH/$NAME.conf
PIDFILE=$PATH/logs/$NAME.pid
SCRIPTNAME=/etc/init.d/$NAME
set -e
[ -x "$DAEMON" ] || exit 0
do_start() {
$DAEMON -c $CONFIGFILE || echo -n "nginx already running"
}
do_stop() {
$DAEMON -s stop || echo -n "nginx not running"
}
do_reload() {
$DAEMON -s reload || echo -n "nginx can't reload"
}
case "$1" in
start)
echo -n "Starting $DESC: $NAME"
do_start
echo "."
;;
stop)
echo -n "Stopping $DESC: $NAME"
do_stop
echo "."
;;
reload|graceful)
echo -n "Reloading $DESC configuration..."
do_reload
echo "."
;;
restart)
echo -n "Restarting $DESC: $NAME"
do_stop
do_start
echo "."
;;
*)
echo "Usage: $SCRIPTNAME {start|stop|reload|restart}" >&2
exit 3
;;
esac
exit 0
chmod a+x /etc/init.d/nginx
chkconfig --add nginx
chkconfig nginx on
4. start/stop/status nginx service
#启动nginx服务
systemctl start nginx.service
#停止nginx服务
systemctl stop nginx.service
#重启nginx服务
systemctl restart nginx.service
#重新读取nginx配置(这个最常用, 不用停止nginx服务就能使修改的配置生效)
systemctl reload nginx.service
二、 编译php
21. 安装基础依赖包
yum -y install gcc gcc-c++ glibc libXpm-devel postgresql-devel libxml2 libxml2-devel openssl openssl-devel curl-devel libjpeg.x86_64 libpng.x86_64 freetype.x86_64 libjpeg-devel.x86_64 libpng-devel.x86_64 freetype-devel.x86_64 libjpeg-devel bzip2-devel.x86_64 libXpm-devel gmp-devel icu libicu libicu-devel php-mcrypt libmcrypt libmcrypt-devel postgresql-devel libxslt-devel
2.2. 编译php
遇到如下错误
1)checkconfig php 报错 configure: error: mcrypt.h not found. Please reinstall libmcrypt.?
yum -y install libXpm-devel
2)如果出现错误:--ENABLE-OPCACHE=NO
时执行export LD_LIBRARY_PATH=/usr/local/mysql/lib或export LD_LIBRARY_PATH=/lib/:/usr/lib/:/usr/local/lib
'./configure' '--prefix=/usr/local/php' '--with-pdo-pgsql' '--with-zlib-dir' '--with-freetype-dir' '--enable-mbstring' '--with-libxml-dir=/usr' '--enable-soap' '--enable-calendar' '--with-curl' '--with-mcrypt' '--with-gd' '--with-pgsql' '--disable-rpath' '--enable-inline-optimization' '--with-bz2' '--with-zlib' '--enable-sockets' '--enable-sysvsem' '--enable-sysvshm' '--enable-pcntl' '--enable-mbregex' '--enable-exif' '--enable-bcmath' '--with-mhash' '--enable-zip' '--with-pcre-regex' '--with-pdo-mysql' '--with-mysqli' '--with-jpeg-dir=/usr' '--with-png-dir=/usr' '--enable-gd-native-ttf' '--with-openssl' '--with-fpm-user=www-data' '--with-fpm-group=www-data' '--with-libdir=/lib/x86_64-linux-gnu/' '--enable-ftp' '--with-gettext' '--with-xmlrpc' '--with-xsl' '--enable-opcache' '--enable-fpm' '--with-iconv' '--with-xpm-dir=/usr'
make && make install
2.3 copy 配置文件
cp /usr/local/src/php-7.1.6/php.ini-development /usr/local/php/lib/php.ini
cp /usr/local/php/etc/php-fpm.conf.default /usr/local/php/etc/php-fpm.conf
cp /usr/local/php/etc/php-fpm.d/www.conf.default /usr/local/php/etc/php-fpm.d/www.conf
cp /usr/local/src/php-7.1.6/sapi/fpm/init.d.php-fpm /etc/init.d/php-fpm
2.4 修改vim /etc/profile文件使其永久性生效,并对所有系统用户生效,在文件末尾加上如下两行代码
PATH=$PATH:/usr/local/php/bin
export PATH
source /etc/profile
启动php-fpm: useradd www-data; /usr/local/php/sbin/php-fpm
2.5 php-fpm设置开机自启 systemctl enable php-fpm
四、nginx(负载均衡)
4.1. 配置nginx yum 源
cat /etc/yum.repos.d/nginx.repo
[nginx]
name=nginx repo
baseurl=http://nginx.org/packages/centos/7/$basearch/
gpgcheck=0
enabled=1
4。2. 安装nginx
yum install nginx -y
4.3 配置nginx 负载均衡
1)cat /etc/nginx/nginx.conf
upstream web{
server 192.168.1.134;
server 192.168.1.137;
}
2) cat /etc/nginx/conf.d/default.conf(192.168.1.148)
server {
listen 80;
server_name 192.168.1.148;
#charset koi8-r;
#access_log /var/log/nginx/host.access.log main;
location / {
#root /usr/share/nginx/html;
index index.html index.php index.htm;
proxy_pass http://web;
}
3) cat /etc/nginx/conf.d/default.conf(192.168.1.149)
server {
listen 80;
server_name 192.168.1.149;
#charset koi8-r;
#access_log /var/log/nginx/host.access.log main;
location / {
#root /usr/share/nginx/html;
index index.html index.php index.htm;
proxy_pass http://web;
}
4.4 测试分别148/149正常访问web服务(134/137)
curl 192.168.1.148
curl 192.168.1.149
五、 部署keepalived(实现web集群高可用 148主 149 备)
5.1 安装keepalived(分别在148和149 安装)
yum install wget make gcc gcc-c++ openssl-devel
wget http://www.keepalived.org/software/keepalived-2.0.7.tar.gz
tar zxvf keepalived-2.0.7.tar.gz
cd keepalived-2.0.7
./configure --prefix=/opt/keepalived
如果报以下警告:
*** WARNING - this build will not support IPVS with IPv6. Please install libnl/libnl-3 dev libraries to support IPv6 with IPVS.
不用担心,我们只需要用到VRRP功能,不需要用IPVS功能,所以请确保以下三项是yes就行了。
Use VRRP Framework : Yes
Use VRRP VMAC : Yes
Use VRRP authentication : Yes
make && make install
5.2 配置keepalived
mkdir /etc/keepalived
cp /data/keepalived/etc/keepalived/keepalived.conf /etc/keepalived/
systemctl enable keepalived
1) keepalived matser和backup 配置
cat /etc/keepalived/keepalived.conf
! Configuration File for keepalived

global_defs {
   notification_email {
     acassen@firewall.loc
     failover@firewall.loc
     sysadmin@firewall.loc
   }
   notification_email_from Alexandre.Cassen@firewall.loc
   smtp_server 192.168.200.1
   smtp_connect_timeout 30
   router_id LVS_DEVEL
   vrrp_skip_check_adv_addr
   vrrp_strict
   vrrp_garp_interval 0
   vrrp_gna_interval 0
}
vrrp_script chk_nginx {
    script "/etc/keepalived/nginx_pid.sh"   # 检查nginx状态的脚本
    interval 2
    weight 3

 }

vrrp_instance VI_1 {
    state MASTER
    interface ens33
    virtual_router_id 51
    priority 100
    advert_int 1
    authentication {
        auth_type PASS
        auth_pass 1111
    }
    virtual_ipaddress {
        192.168.1.66
    }
    track_script {
        chk_nginx
    }
}
cat /etc/keepalived/keepalived.conf
! Configuration File for keepalived

global_defs {
   notification_email {
     acassen@firewall.loc
     failover@firewall.loc
     sysadmin@firewall.loc
   }
   notification_email_from Alexandre.Cassen@firewall.loc
   smtp_server 192.168.200.1
   smtp_connect_timeout 30
   router_id LVS_DEVEL
   vrrp_skip_check_adv_addr
   vrrp_strict
   vrrp_garp_interval 0
   vrrp_gna_interval 0
}

vrrp_script chk_nginx {
    script "/etc/keepalived/nginx_pid.sh"   # 检查nginx状态的脚本
    interval 2
    weight 3
}

vrrp_instance VI_1 {
    state BACKUP
    interface ens33
    virtual_router_id 51
    priority 91
    advert_int 1
    authentication {
        auth_type PASS
        auth_pass 1111
    }
    virtual_ipaddress {
        192.168.1.66
    }
    track_script {
        chk_nginx
    }
}
2)监控nginx脚本
cat /etc/keepalived/nginx_pid.sh
#!/bin/bash
#version 0.0.1
#
A=`ps -C nginx --no-header |wc -l`
if [ $A -eq 0 ];then
     systemctl restart nginx.service
      sleep 3
            if [ `ps -C nginx --no-header |wc -l` -eq 0 ];then
                  systemctl stop keepalived
fi
fi
5.4 配置firewalld防火墙允许vrrp协议
VRRP(Virtual Router Redundancy Protocol,虚拟路由器冗余协议)
主(148):
systemctl start firewalld.service
systemctl enable firewalld.service
firewall-cmd --permanent --add-rich-rule="rule family="ipv4" source address="192.168.1.149" protocol value="vrrp" accept"
firewall-cmd --reload
备(149):
systemctl start firewalld.service
systemctl enable firewalld.service
firewall-cmd --permanent --add-rich-rule="rule family="ipv4" source address="192.168.1.149" protocol value="vrrp" accept"
firewall-cmd --reload
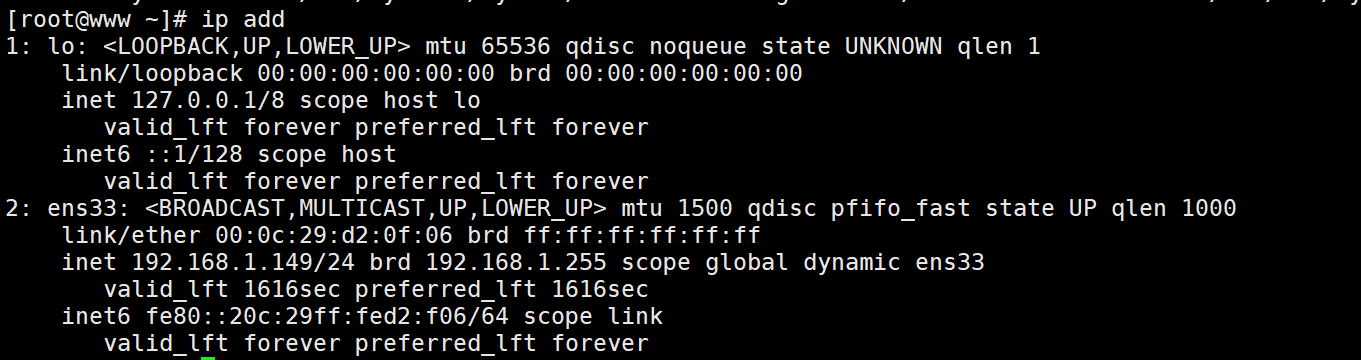
5.3 启动keepalived ,测试主备vip飘移
systemctl start keepalived
1) 当NGINX_MASTER、NGINX_BACKUP服务器nginx均正常工作时
mater:
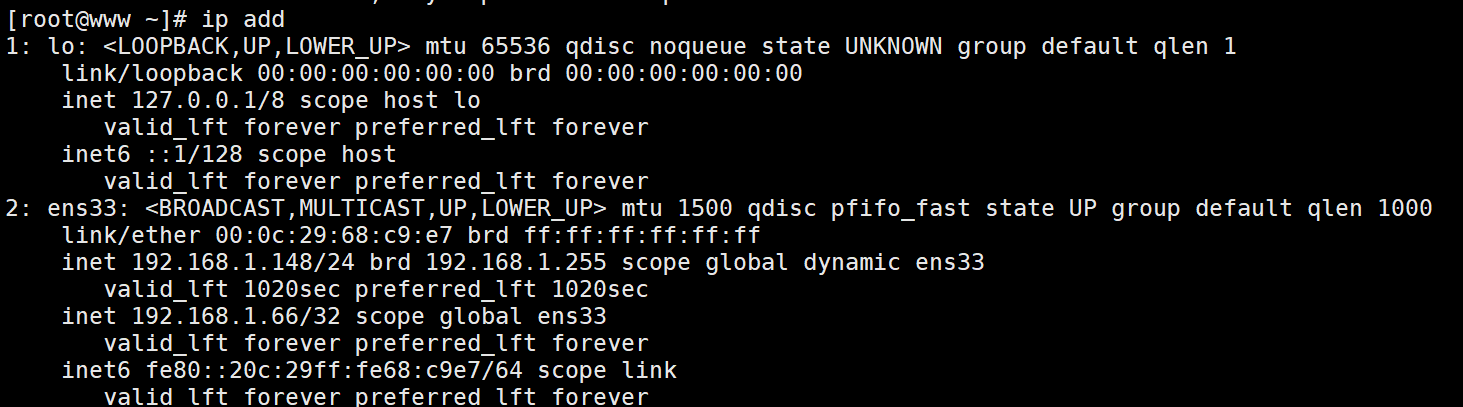
tailf message
backup:
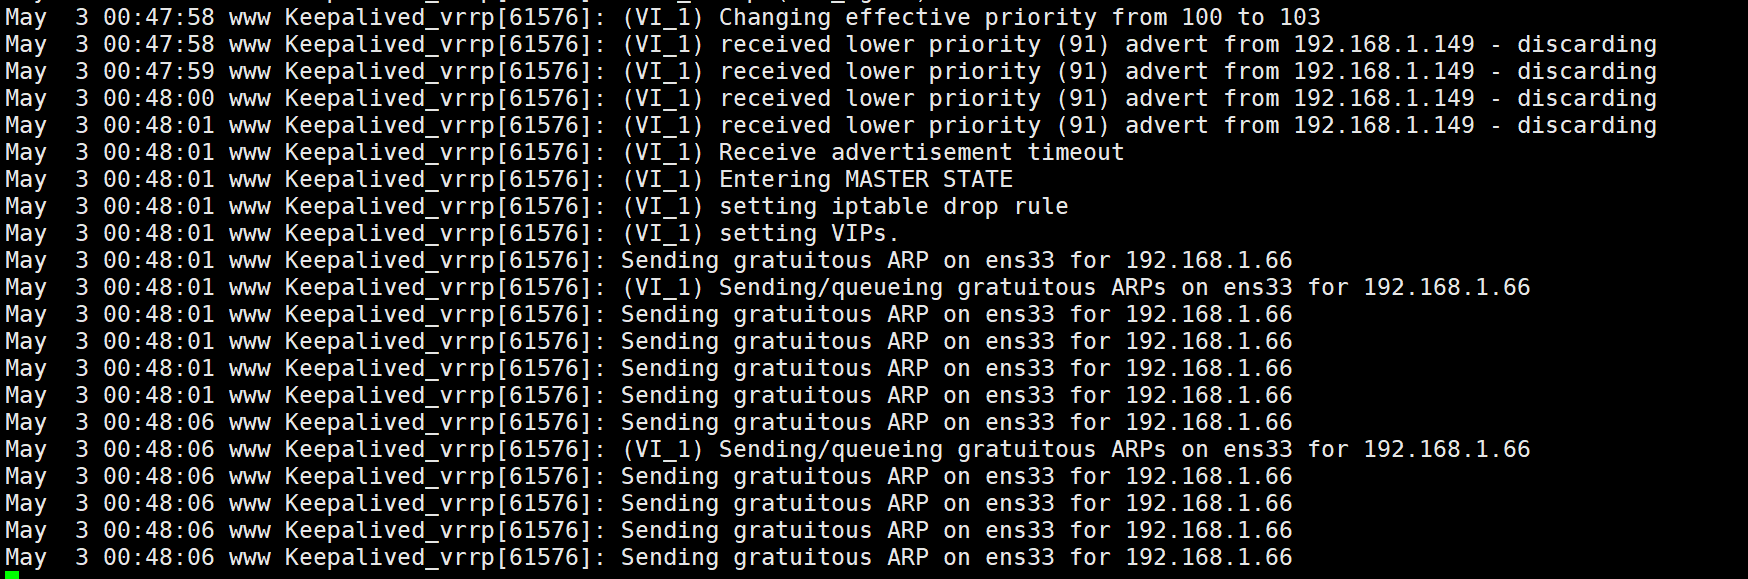
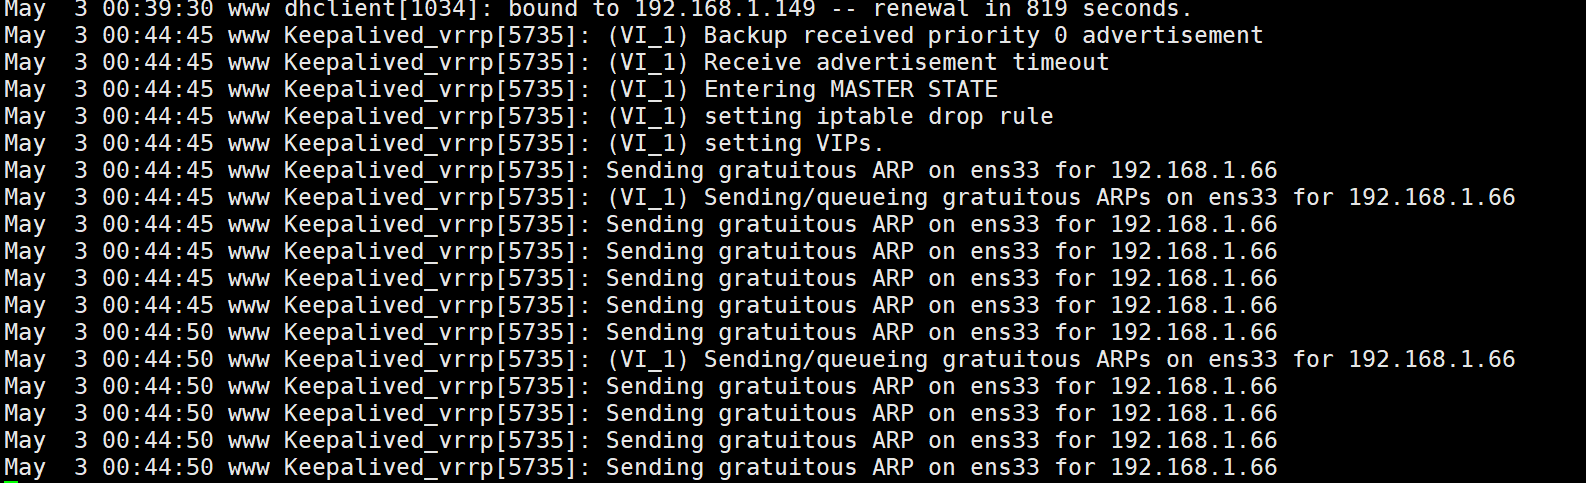
2) 关闭NGINX_MASTER的keepalived服务
主:
systemctl stop keepalived

备:
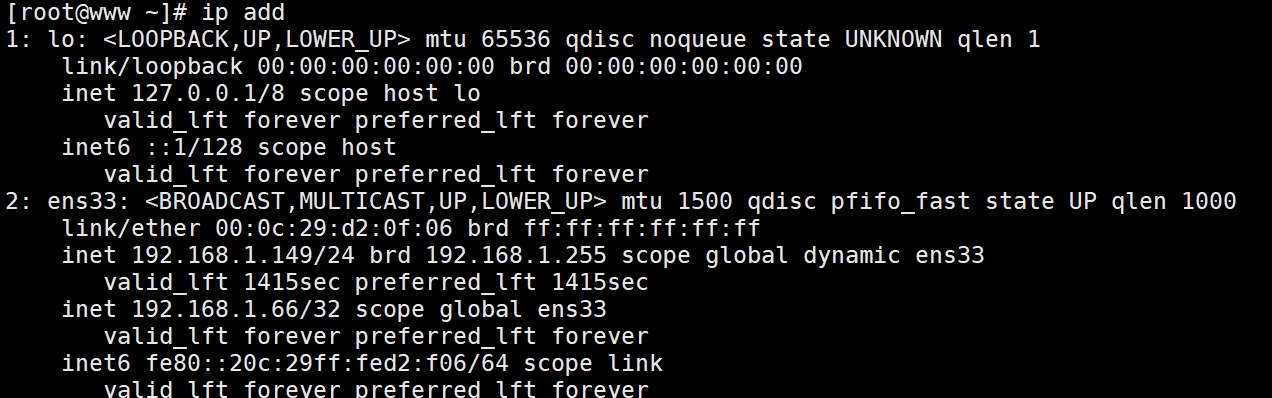
tailf messages
六、 添加防火墙规则
firewall-cmd --zone=public --add-port=80/tcp --permanent
firewall-cmd --reload
本文来自博客园,作者:鱼丸粗面没鱼丸,转载请注明原文链接:https://www.cnblogs.com/Robi-9662/p/12821523.html
