【Spring Framework】5、依赖注入
1、构造器注入
User 实体类
package com.xg.pojo;

public class User {
    private String name;

    public User(String name) {
        this.name = name;
    }

    public String getName() {
        return name;
    }

    public void setName(String name) {
        this.name = name;
    }

    public void show() {
        System.out.println("name:" + name);
    }
}
1.1、使用下标创建
<?xml version="1.0" encoding="UTF-8"?>
<beans xmlns="http://www.springframework.org/schema/beans"
       xmlns:xsi="http://www.w3.org/2001/XMLSchema-instance"
       xsi:schemaLocation="http://www.springframework.org/schema/beans
        https://www.springframework.org/schema/beans/spring-beans.xsd">

    <bean id="user" class="com.xg.pojo.User">
        <constructor-arg index="0" value="遇见星光"/>
    </bean>

</beans>
1.2、使用类型创建
不建议使用
<?xml version="1.0" encoding="UTF-8"?>
<beans xmlns="http://www.springframework.org/schema/beans"
       xmlns:xsi="http://www.w3.org/2001/XMLSchema-instance"
       xsi:schemaLocation="http://www.springframework.org/schema/beans
        https://www.springframework.org/schema/beans/spring-beans.xsd">

    <bean id="user" class="com.xg.pojo.User">
        <constructor-arg type="java.lang.String" value="遇见星光"/>
    </bean>

</beans>
1.3、通过参数名直接创建
<?xml version="1.0" encoding="UTF-8"?>
<beans xmlns="http://www.springframework.org/schema/beans"
       xmlns:xsi="http://www.w3.org/2001/XMLSchema-instance"
       xsi:schemaLocation="http://www.springframework.org/schema/beans
        https://www.springframework.org/schema/beans/spring-beans.xsd">

    <bean id="user" class="com.xg.pojo.User">
        <constructor-arg name="name" value="遇见星光"/>
    </bean>

</beans>
2、Set方式注入【重点】
- 依赖注入:Set注入!
- 依赖:bean对象的创建依赖于容器
- 注入:bean对象的所有属性,由容器来注入
2.1、环境搭建
1、复杂类型
Student
package com.xg.pojo;

import java.util.*;

public class Student {
    private String name;
    private Address address;
    private String[] books;
    private List<String> hobby;
    private Map<String,String> card;
    private Set<String> game;
    private Properties info;
    private String wife;

    public String getName() {
        return name;
    }

    public void setName(String name) {
        this.name = name;
    }

    public Address getAddress() {
        return address;
    }

    public void setAddress(Address address) {
        this.address = address;
    }

    public String[] getBooks() {
        return books;
    }

    public void setBooks(String[] books) {
        this.books = books;
    }

    public List<String> getHobby() {
        return hobby;
    }

    public void setHobby(List<String> hobby) {
        this.hobby = hobby;
    }

    public Map<String, String> getCard() {
        return card;
    }

    public void setCard(Map<String, String> card) {
        this.card = card;
    }

    public Set<String> getGame() {
        return game;
    }

    public void setGame(Set<String> game) {
        this.game = game;
    }

    public Properties getInfo() {
        return info;
    }

    public void setInfo(Properties info) {
        this.info = info;
    }

    public String getWife() {
        return wife;
    }

    public void setWife(String wife) {
        this.wife = wife;
    }

    @Override
    public String toString() {
        return "Student{" +
                "name='" + name + '\'' +
                ", address=" + address +
                ", books=" + Arrays.toString(books) +
                ", hobby=" + hobby +
                ", card=" + card +
                ", game=" + game +
                ", info=" + info +
                ", wife='" + wife + '\'' +
                '}';
    }
}
2、真实测试对象
Address
package com.xg.pojo;

public class Address {
    private String name;

    public String getName() {
        return name;
    }

    public void setName(String name) {
        this.name = name;
    }

    @Override
    public String toString() {
        return "Address{" +
                "name='" + name + '\'' +
                '}';
    }
}
3、beans.xml
<?xml version="1.0" encoding="UTF-8"?>
<beans xmlns="http://www.springframework.org/schema/beans"
       xmlns:xsi="http://www.w3.org/2001/XMLSchema-instance"
       xsi:schemaLocation="http://www.springframework.org/schema/beans
        https://www.springframework.org/schema/beans/spring-beans.xsd">

    <bean id="address" class="com.xg.pojo.Address">
        <property name="name" value="默认地址"/>
    </bean>

    <bean id="student" class="com.xg.pojo.Student">
        <!-- 普通注入 value-->
        <property name="name" value="遇见星光"/>

        <!--  bean注入 ref-->
        <property name="address" ref="address"/>

        <!-- 数组-->
        <property name="books">
            <array>
                <value>红楼梦</value>
                <value>三国演义</value>
                <value>西游记</value>
                <value>水浒传</value>
            </array>
        </property>

        <!-- List -->
        <property name="hobby">
            <list>
                <value>听歌</value>
                <value>看电影</value>
                <value>敲代码</value>
            </list>
        </property>

        <!-- Map-->
        <property name="card">
            <map>
                <entry key="身份证" value="***************************"/>
                <entry key="手机" value="123****1231"/>
            </map>
        </property>

        <!-- Set-->
        <property name="game">
            <set>
                <value>LOL</value>
                <value>COC</value>
            </set>
        </property>

        <!-- null-->
        <property name="wife">
            <null/>
        </property>

        <!-- Properties-->
        <property name="info">
            <props>
                <prop key="user">Admin</prop>
                <prop key="password">123456</prop>
                <prop key="sex">男</prop>
            </props>
        </property>
    </bean>

</beans>
4、测试类
import com.xg.pojo.Student;
import org.springframework.context.ApplicationContext;
import org.springframework.context.support.ClassPathXmlApplicationContext;

public class MyTest {
    public static void main(String[] args) {
        ApplicationContext context = new ClassPathXmlApplicationContext("beans.xml");

        Student student = context.getBean("student", Student.class);
        System.out.println(student.toString());
    }
}

/*
Student{
	name='遇见星光',
	address=Address{name='默认地址'},
	books=[红楼梦, 三国演义, 西游记, 水浒传],
	hobby=[听歌, 看电影, 敲代码],
	card={
		身份证=***************************,
		手机=123****1231
	},
	game=[LOL, COC],
	info={user=Admin, password=123456, sex=男},
	wife='null'
}
*/
3、拓展方式注入
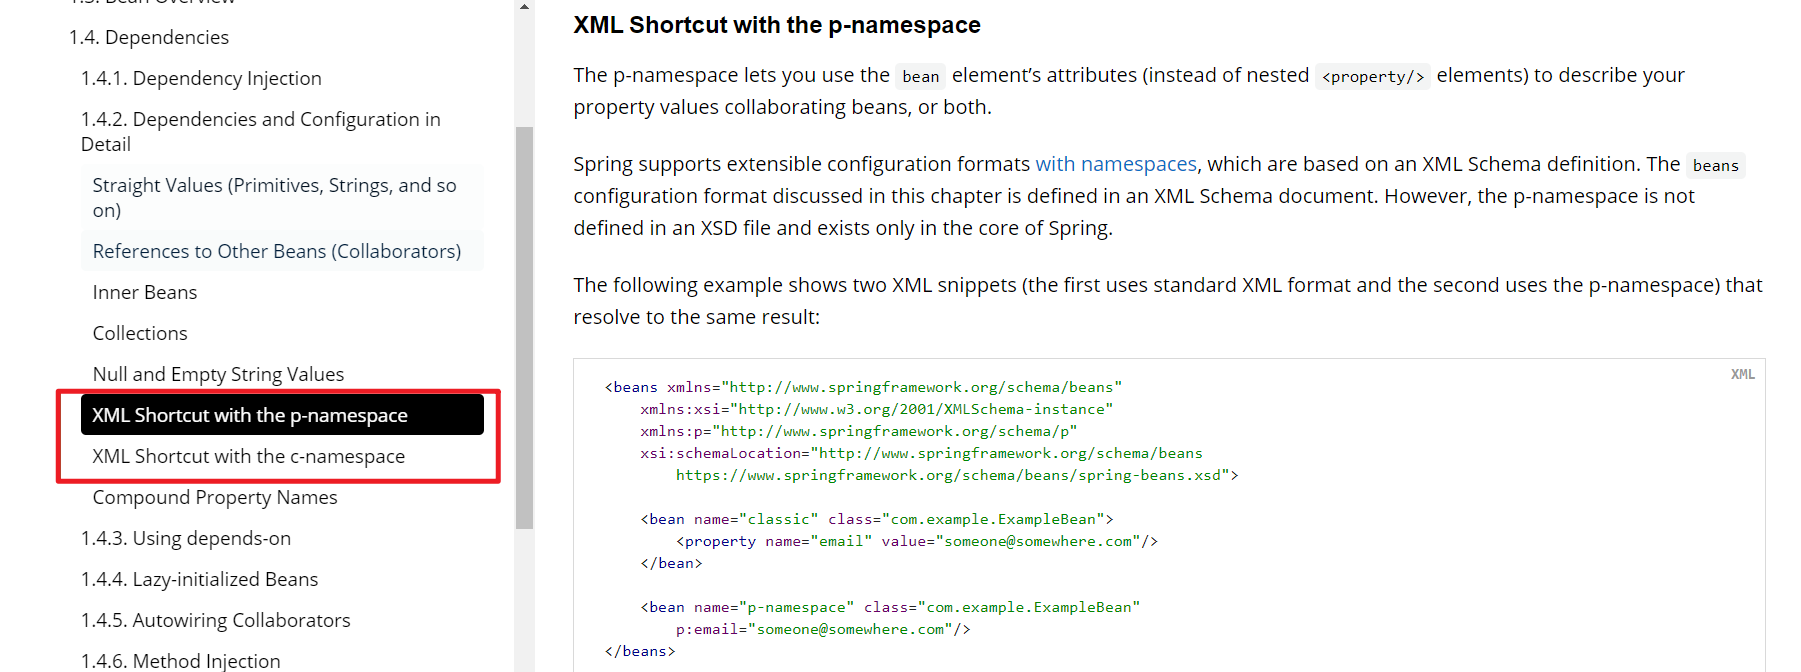
可以使用p命名空间和c命名空间进行注入
userBeans.xml
<?xml version="1.0" encoding="UTF-8"?>
<beans xmlns="http://www.springframework.org/schema/beans"
       xmlns:xsi="http://www.w3.org/2001/XMLSchema-instance"
       xmlns:p="http://www.springframework.org/schema/p"
       xmlns:c="http://www.springframework.org/schema/c"
       xsi:schemaLocation="http://www.springframework.org/schema/beans
        https://www.springframework.org/schema/beans/spring-beans.xsd">

    <!-- p命名空间注入, 可以直接注入一些简单的值: property-->
    <bean id="user" class="com.xg.pojo.User" p:name="遇见星光"/>

    <!-- c命名空间注入, 通过构造器注入: constructor-arg-->
    <bean id="user2" class="com.xg.pojo.User" c:name="遇见星光" c:age="18"/>

</beans>
测试
@Test
public void userTest() {
    ApplicationContext context = new ClassPathXmlApplicationContext("userBeans.xml");
    User user = context.getBean("user", User.class);
    System.out.println(user.toString());
}

@Test
public void user2Test(){
    ApplicationContext context = new ClassPathXmlApplicationContext("userBeans.xml");
    User user = context.getBean("user2", User.class);
    System.out.println(user.toString());
}
注意点
使用p命名空间和c命名空间需要导入对应的xml约束!
-
p命名空间
-
xmlns:p="http://www.springframework.org/schema/p"
-
-
c命名空间
-
xmlns:c="http://www.springframework.org/schema/c"
-

 浙公网安备 33010602011771号