【Spring Framework】3、Hello Spring & IOC创建对象的方式
https://www.bilibili.com/video/BV1WE411d7Dv?t=334&p=5
1、第一个Spring程序
1、建立Maven项目
2、导入依赖
<dependencies>
    <dependency>
        <groupId>org.springframework</groupId>
        <artifactId>spring-webmvc</artifactId>
        <version>5.3.6</version>
    </dependency>
</dependencies>
3、编写实体类 Hello
package com.xg.pojo;

public class Hello {
    private String name;

    public String getName() {
        return name;
    }

    public void setName(String name) {
        this.name = name;
    }

    @Override
    public String toString() {
        return "Hello{" +
                "name='" + name + '\'' +
                '}';
    }
}
4、Spring 配置文件 beans.xml
<?xml version="1.0" encoding="UTF-8"?>
<beans xmlns="http://www.springframework.org/schema/beans"
       xmlns:xsi="http://www.w3.org/2001/XMLSchema-instance"
       xsi:schemaLocation="http://www.springframework.org/schema/beans
        https://www.springframework.org/schema/beans/spring-beans.xsd">

</beans>
5、利用Spring来创建对象
<?xml version="1.0" encoding="UTF-8"?>
<beans xmlns="http://www.springframework.org/schema/beans"
       xmlns:xsi="http://www.w3.org/2001/XMLSchema-instance"
       xsi:schemaLocation="http://www.springframework.org/schema/beans
        https://www.springframework.org/schema/beans/spring-beans.xsd">

    <!--  一个 bean 就实例化了一个对象  -->
    <bean id="hello" class="com.xg.pojo.Hello">
        <property name="name" value="遇见星光"/>
    </bean>
</beans>
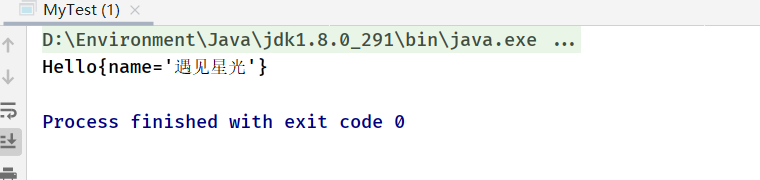
4、测试类 MyTest
import com.xg.pojo.Hello;
import org.springframework.context.ApplicationContext;
import org.springframework.context.support.ClassPathXmlApplicationContext;

public class MyTest {
    public static void main(String[] args) {
        // 获取 Spring 上下文对象
        ApplicationContext context = new ClassPathXmlApplicationContext("beans.xml");

        // hello  是在 beans.xml 中 bean 的 id
        Hello hello = context.getBean("hello", Hello.class);

        System.out.println(hello.toString());
    }
}
1.1、思考问题
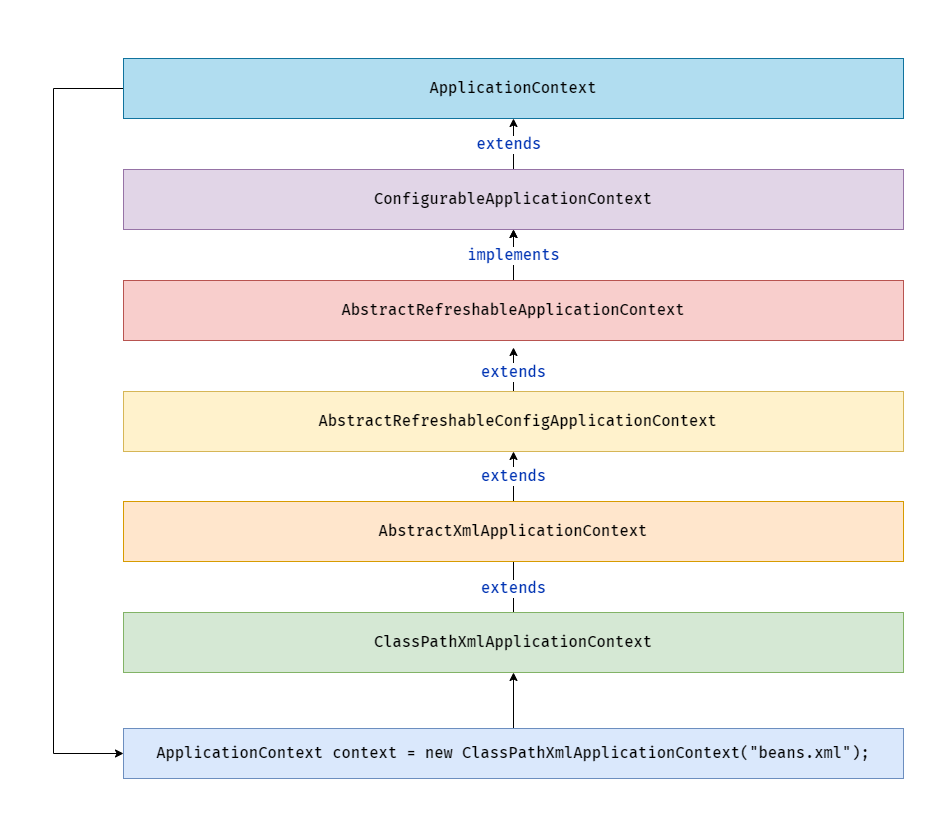
1.1.1、ApplicationContext 怎么来的
通过new ClassPathXmlApplicationContext去浏览一下底层源码
1.1.2、Hello 对象是谁创建的 ? 对象的属性是怎么设置的 ?
hello 对象是由Spring创建的,对象的属性也是由Spring容器设置的
<!--
类型 变量名 = new 类型();
Hello hello = new Hello();

bean = 对象      new Hello()
id = 变量名
class = new 的对象
property 相当于给对象中的属性设置一个值
-->

<bean id="hello" class="com.xg.pojo.Hello">
	<property name="name" value="遇见星光"/>
</bean>
1.2、总结
控制反转(IOC):
- 控制 : 谁来控制对象的创建,传统应用程序的对象是由程序本身控制创建的,使用Spring后,对象是由Spring来创建的。
- 反转 : 程序本身不创建对象,而变成被动的接收对象。
依赖注入 : 就是利用set方法来进行注入的。
IOC是一种编程思想,由主动的编程变成被动的接收
现在,我们彻底不用再程序中去改动了,要实现不同的操作,只需要在xml配置文件中进行修改。
所谓的IoC,一句话搞定:对象由Spring 来创建,管理,装配 !
2、IOC创建对象的方式
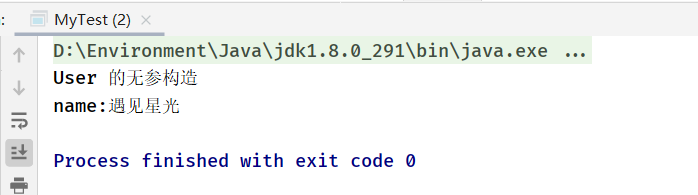
2.1、使用无参构造创建对象
User 实体类
package com.xg.pojo;

public class User {
    private String name;

    public User(){
        System.out.println("User 的无参构造");
    }

    public String getName() {
        return name;
    }

    public void setName(String name) {
        this.name = name;
    }

    public void show() {
        System.out.println("name:" + name);
    }
}
beans.xml
<?xml version="1.0" encoding="UTF-8"?>
<beans xmlns="http://www.springframework.org/schema/beans"
       xmlns:xsi="http://www.w3.org/2001/XMLSchema-instance"
       xsi:schemaLocation="http://www.springframework.org/schema/beans
        https://www.springframework.org/schema/beans/spring-beans.xsd">

    <bean id="user" class="com.xg.pojo.User">
        <property name="name" value="遇见星光"/>
    </bean>

</beans>
测试类
import com.xg.pojo.User;
import org.springframework.context.ApplicationContext;
import org.springframework.context.support.ClassPathXmlApplicationContext;

public class MyTest {
    public static void main(String[] args) {
        ApplicationContext context = new ClassPathXmlApplicationContext("beans.xml");
        User user = context.getBean("user", User.class);

        user.show();
    }
}
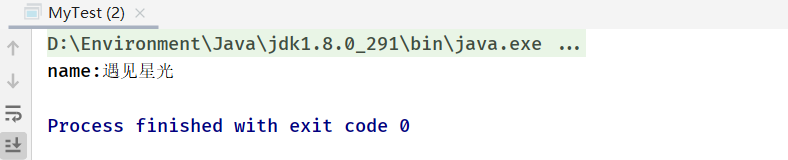
2.2、使用有参构造创建对象
User 实体类
package com.xg.pojo;

public class User {
    private String name;

    public User(String name) {
        this.name = name;
    }

    public String getName() {
        return name;
    }

    public void setName(String name) {
        this.name = name;
    }

    public void show() {
        System.out.println("name:" + name);
    }
}
beans.xml
2.2.1、使用下标创建
<?xml version="1.0" encoding="UTF-8"?>
<beans xmlns="http://www.springframework.org/schema/beans"
       xmlns:xsi="http://www.w3.org/2001/XMLSchema-instance"
       xsi:schemaLocation="http://www.springframework.org/schema/beans
        https://www.springframework.org/schema/beans/spring-beans.xsd">

    <bean id="user" class="com.xg.pojo.User">
        <constructor-arg index="0" value="遇见星光"/>
    </bean>

</beans>
2.2.2、使用类型创建
不建议使用
<?xml version="1.0" encoding="UTF-8"?>
<beans xmlns="http://www.springframework.org/schema/beans"
       xmlns:xsi="http://www.w3.org/2001/XMLSchema-instance"
       xsi:schemaLocation="http://www.springframework.org/schema/beans
        https://www.springframework.org/schema/beans/spring-beans.xsd">

    <bean id="user" class="com.xg.pojo.User">
        <constructor-arg type="java.lang.String" value="遇见星光"/>
    </bean>

</beans>
2.2.3、通过参数名直接创建
<?xml version="1.0" encoding="UTF-8"?>
<beans xmlns="http://www.springframework.org/schema/beans"
       xmlns:xsi="http://www.w3.org/2001/XMLSchema-instance"
       xsi:schemaLocation="http://www.springframework.org/schema/beans
        https://www.springframework.org/schema/beans/spring-beans.xsd">

    <bean id="user" class="com.xg.pojo.User">
        <constructor-arg name="name" value="遇见星光"/>
    </bean>

</beans>
测试类
import com.xg.pojo.User;
import org.springframework.context.ApplicationContext;
import org.springframework.context.support.ClassPathXmlApplicationContext;

public class MyTest {
    public static void main(String[] args) {
        ApplicationContext context = new ClassPathXmlApplicationContext("beans.xml");
        User user = context.getBean("user", User.class);

        user.show();
    }
}
2.3、总结
- 通过有参构造
- 通过下标
- 通过参数名 【推荐】
- 通过参数类型
- 通过无参构造
- 默认会用无参构造
在配置加载的时候,容器中管理的对象就已经初始化了在配置加载的时候,容器中管理的对象就已经初始化了
注意点:一定要有一个无参构造方法

 浙公网安备 33010602011771号