小程序授权登录设计
参考文章:
微信小程序授权登录---“允许”或“拒绝”等等操作(附源码)
-
首先在app.js文件的OnLoad方法里执行微信的登录方法:
wx.login()内容如下:// 登录 wx.login({ success: res => { // 发送 res.code 到后台换取 openId, sessionKey, unionId console.log(res) if(res.code) { // 这里连接后台数据库,查询有无用户信息 util.get(api.LoginUrl.replace('{id}','2')).then((res) => { console.log(res) if(用户信息为空,说明从未授权登录过) { wx.showModal({ title: '警告', content: '尚未进行授权,请点击确定跳转到授权页面进行授权。', success: function (res) { if (res.confirm) { // 如果没有授权,则会弹出跳转至授权的弹框,点击允许之后跳转至授权页面 wx.navigateTo({url: '../authorization/authorization',}) } } }); } // that.globalData.openid = res.data.openid // that.globalData.userInfo=res.data }).catch((errMsg) => { console.log(errMsg) //错误提示信息 wx.showToast({ title: errMsg, icon: "none" }); }) } else { console.log('获取用户登录态失败!' + res.errMsg) } } })
微信登录方法执行之后,连接后台数据库,查询有无用户信息,如果用户信息为空,说明从未授权登录过,如果没有授权,则会弹出跳转至授权的弹框,点击允许之后跳转至授权页面
-
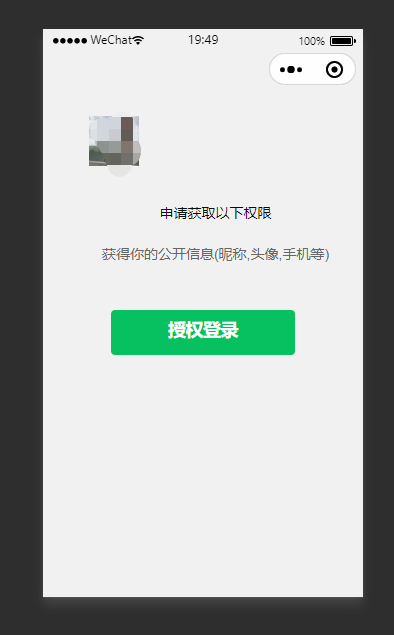
授权页面
授权页面的HTML代码如下:
    <view wx:if="{{canIUse}}">

              <view class='headView'>

                <view class='headImageView'>
<!--       <image class='headImage' src='../../images/navator/person.jpg' mode='scaleToFill'></image> -->
<!-- 通过open-data展示用户头像 -->
      <open-data class='headImage' type="userAvatarUrl"></open-data>
                </view>

                <view class='titleText'>申请获取以下权限</view>

                <view class='contentText'>获得你的公开信息(昵称,头像,手机等)</view>

                <button class='authBtn' type='primary' open-type='getUserInfo' bindgetuserinfo='bindGetUserInfo'>授权登录</button>

              </view>

</view>

<view wx:else>请升级微信版本</view>
该页面html代码是通过一个open-data标签来获取用户头像,如下:
wxss代码如下:
.headView {
        margin: 90rpx 50rpx 90rpx 50rpx; /*上右下左*/
    }
.headImageView {
        display: block;
        margin-left: 25px;
        margin-top: 25px;
        margin-right: 25px;
        margin-bottom: 0px;
        height: 50px;
    }

.headImage{
        display: flex;
        width: 50px;
        height: 50px;
    }
.titleText {
        margin-left: 25px;
        margin-top: 25px;
        margin-bottom: 10px;
        font-size: 14px;
        color: #020e0f;
        text-align: center;
    }

.contentText {
        margin-left: 25px;
        margin-top: 0px;
        margin-bottom: 0px;
        font-size: 14px;
        color: #666;
        text-align: center;
    }

.authBtn {
        margin-top: 35px;
        margin-left: 25px;
        margin-right: 25px;
        height: 45px;
        font-size: 17.5px;
    }
js代码如下:
    // pages/authorization/authorization.js
    Page({

        /**
         * 页面的初始数据
         */
        data: {
            //判断小程序的API,回调,参数,组件等是否在当前版本可用。
            canIUse: wx.canIUse('button.open-type.getUserInfo'),//获取用户信息是否在当前版本可用
                    isHide: false
        },

        /**
         * 生命周期函数--监听页面加载
         */
        onLoad: function (options) {
            var that = this;

    //查看是否授权

    wx.getSetting({

                          success: function(res) {
                console.log(res)
        if (res.authSetting['scope.userInfo']) {

          console.log("用户授权了");
        } else {
          //用户没有授权
          console.log("用户没有授权");
        }
      }

    });
        },

        /**
         * 生命周期函数--监听页面初次渲染完成
         */
        onReady: function () {

        },

        /**
         * 生命周期函数--监听页面显示
         */
        onShow: function () {

        },

        /**
         * 生命周期函数--监听页面隐藏
         */
        onHide: function () {

        },

        /**
         * 生命周期函数--监听页面卸载
         */
        onUnload: function () {

        },

        /**
         * 页面相关事件处理函数--监听用户下拉动作
         */
        onPullDownRefresh: function () {

        },

        /**
         * 页面上拉触底事件的处理函数
         */
        onReachBottom: function () {

        },

        /**
         * 用户点击右上角分享
         */
        onShareAppMessage: function () {

        },
        bindGetUserInfo: function(res) {

        if (res.detail.userInfo) {

          //用户按了允许授权按钮

          var that = this;

          // 获取到用户的信息了,打印到控制台上看下

          console.log("用户的信息如下:");

          console.log(res.detail.userInfo);
          const {userInfo} = res.detail.userInfo;
                console.log(userInfo)
                wx.setStorageSync("userInfo", res.detail.userInfo);
                console.log(wx.getStorageSync('userInfo'))
          //授权成功后,通过改变 isHide 的值,让实现页面显示出来,把授权页面隐藏起来

          that.setData({

                                isHide: false

          });
                wx.switchTab({
                        url: '../myPage/myPage',
          })

        } else {

          //用户按了拒绝按钮

          wx.showModal({

                                title: '警告',

            content: '您点击了拒绝授权,将无法进入小程序,请授权之后再进入!!!',

            showCancel: false,

            confirmText: '返回授权',

            success: function(res) {

              // 用户没有授权成功,不需要改变 isHide 的值

              if (res.confirm) {

                console.log('用户点击了“返回授权”');

              }

            }

          });

        }

     },
    })
js代码主要是bindGetUserInfo这个方法,如果点击了授权允许的按钮,就保存用户的信息到缓存,并跳转至我的页面
json文件代码:
{
"navigationBarTitleText": "授权登录",
"usingComponents": {}
}
但是一开始按照bindGetUserInfo来执行是可以跳出授权弹框的,但是一周之后再运行就跳转不出来,并且获取的用户信息nickname是“微信用户"
这里参考了文章 附解决方案,小程序获取的用户信息中昵称图然变成了“微信用户”,而且头像也显示不了?
在authorization.wxml文件中把 bindgetuserinfo='bindGetUserInfo' 更改为bindtap='getUserProfile' ,在js文件中增加getUserProfile方法,方法内容如下:
getUserProfile() {
    var that = this;
    wx.getUserProfile({
            desc: '用于完善用户资料', // 声明获取用户个人信息后的用途,后续会展示在弹窗中,请谨慎填写
            success: (res) => {
        console.log("获取用户信息成功", res)
        console.log("用户的信息如下:");
        console.log(res.userInfo);
        wx.setStorageSync("userInfo", res.userInfo);
        console.log(wx.getStorageSync('userInfo'))
        //授权成功后,通过改变 isHide 的值,让实现页面显示出来,把授权页面隐藏起来
        that.setData({
                isHide: false
    });
        wx.switchTab({
                url: '../myPage/myPage',
    })
    },
    fail: res => {
        console.log("获取用户信息失败", res)
    }
})
}
这个wx.getUserProfile和我们之前使用button结合open-type="getUserInfo" 和bindgetuserinfo事件获取用户信息没有太大区别,点击事件里调用wx.getUserProfile就可以调起授权弹窗,没必要非得在button组件里使用点击事件了。用户同意后返回用户信息:userInfo

 浙公网安备 33010602011771号