
RabbitMQ
RabbitMQ
一、RabbitMQ概述
1. MQ
-
MQ(Message Queue):消息队列中间件主要用于实现高性能,高可用,可伸缩和最终一致性的架构
常见的MQ产品:RabbitMQ,RocketMQ,ActiveMQ,ZeroMQ,Kafka
-
MQ解决的问题
-
异步处理:从数据库中读取数据后依次执行的任务,改变为将这些任务交给消息队列来异步处理,减少处理多个任务的时间
-
应用解耦:从一个系统中向另一个系统调用接口,改变为中间加入消息队列来存储请求,实现了两个应用间的解耦
生产者消费者模型:生产者不断的向消息队列中生产消息,消费者不断的从队列中获取消息;因为消息的生产和消费都是异步的,而且只关心消息的发送和接收,没有业务逻辑的入侵,这样就实现了生产者和消费者的解耦
-
流量削峰:高并发场景下,流量过大可能导致应用挂掉,服务器接收到请求后先存储在消息队列中(请求量超过队列长度时不再接收请求),后端应用根据规则在消息队列中读取请求
-
2. AMQP
- AMQP(Advanced Message Queue Protocol)定义了统一的数据交换格式,基于该协议的客户端可以与消息中间件传递消息
3. JMS
- JMS(Java Message Server)定义了统一的接口(Java消息服务应用程序接口),与JDBC类似
- JMS是一个Java平台中关于面向消息中间件的API,用于在两个应用程序之间,或分布式系统中发送消息,进行异步通信
4. RabbitMQ主要组件
-
Broker:消息队列服务器
-
Virtual Host:Broker上的虚拟主机(默认的vhost是
/,也可自行创建vhost,必须在连接时指定),拥有以下组件-
Exchange:用于接收Publisher的消息,路由给Virtual Host中的Queue
-
Banding:用于Exchange和Queue之间的关联
-
Queue:作为消息容器,等待Consumer连接到这个Queue将其取走
一个消息可投入一个或多个Queue
-
-
-
Connection:是Broker和Consumer之间的TCP连接
-
Channel:是建立在TCP中的虚拟连接
对操作系统来说,建立和销毁TCP连接开销很大,所以使用一个/多个Channel来复用TCP连接
-
-
主要工作流程
Publisher(发送Message)->Broker(Exchange->Queue)->Connection(Channel)->Consumer
Publisher:消息生产者,向Exchange发布消息的客户端应用
Consumer:消息消费者,从Queue中取出消息的客户端应用
Message:由消息头和消息体组成
5. RabbitMQ优势
-
易于管理:支持Web管理页面
-
功能强大:支持消息持久化、消息确认机制、灵活的任务分发机制;集群扩展很容易,并且可以通过增加节点实现成倍的性能提升
-
可靠性高:消息持久化机制和消费者的ACK确认机制可以避免消息丢失
RabbitMQ保持高可靠性的同时性能弱于Kafka和ZeroMQ
二、RabbitMQ使用方式
1. 启动和关闭
-
启动前关闭防火墙
systemctl stop firewalld.servicesystemctl stop firewalld -
启动后台管理插件
后台管理页面:
服务器IP:15672,需要关闭服务器防火墙客户端API连接端口:
5672集群端口:
25672rabbitmq-plugins enable rabbitmq_management -
启动服务
systemctl start rabbitmq-server.service -
查看服务状态
systemctl status rabbitmq-server.service -
查看RabbitMQ进程
ps -ef | grep rabbitmq -
重启服务
systemctl restart rabbitmq-server.service -
停止服务
systemctl stop rabbitmq-server.service
2. 客户端API
-
连接工具类和测试连接
默认的vhost是
/,也可在管理页面自行创建vhost,必须在连接时指定public class ConnectionUtil { public static Connection getConnection() throws Exception{ // 创建连接工厂 ConnectionFactory connectionFactory = new ConnectionFactory(); // 在工厂对象中设置 MQ 的连接信息(IP, port, vhost, username, password) connectionFactory.setHost("192.168.197.128"); connectionFactory.setPort(5672); connectionFactory.setVirtualHost("/test"); connectionFactory.setUsername("cony"); connectionFactory.setPassword("123456"); // 通过工厂获取与 MQ 的连接 Connection connection = connectionFactory.newConnection(); return connection; } public static void main(String[] args) throws Exception { Connection connection = getConnection(); System.out.println("connection: " + connection); connection.close(); } } /* connection: amqp://cony@192.168.197.128:5672//test */
三、RabbitMQ消息模型
1. RabbitMQ模型概述
-
主要模型有6种:5消息模型+1RPC
Reference:https://www.rabbitmq.com/getstarted.html
-
消息模型分类(两种类型的区别是P2P不需要通过Exchange就可以实现):
-
P2P:Sender->Queue->Receiver
每个消息只有一个消费者,消息一旦被消费后就不在队列中了
适用模型:简单模型、队列模型
-
Pub/Sub:Publisher->Exchange->Subscriber
Subscriber需要订阅Exchange,每个消息可以有多个订阅
适用模型:发布/订阅模型、路由模型、通配符模型
-
-
消息模型的使用场景:
- P2P:适用于发送的每个消息都会被成功处理
- Pub/Sub:适用于发送的消息被多个消费者处理
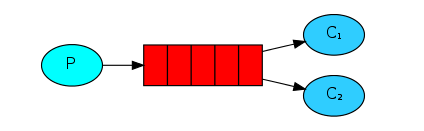
2. 简单模型
-
主要流程
生产者发送信息给Queue,Queue将信息通过Channel发送给一个消费者进行消费

-
Sender和Receiver示例
public class Sender {
    public static void main(String[] args) throws Exception{
        String msg = "Hello, RabbitMQ";
        // get Connection object from util, and create Channel object
        Connection connection = ConnectionUtil.getConnection();
        Channel channel = connection.createChannel();
        // create a mq
        channel.queueDeclare("queue1", false, false, false, null);
        // send message for a mq
        channel.basicPublish("", "queue1", null, msg.getBytes());
        System.out.println("msg: " + msg);
        // close channel and connection
        channel.close();
        connection.close();
    }
}
public class Receiver { public static void main(String[] args) throws Exception{ // create Connection object from util, and create Channel object Connection connection = ConnectionUtil.getConnection(); Channel channel = connection.createChannel(); // get message from channel DefaultConsumer consumer = new DefaultConsumer(channel) { @Override public void handleDelivery(String consumerTag, Envelope envelope, AMQP.BasicProperties properties, byte[] body) throws IOException { String s = new String(body); System.out.println("receive: " + s); } }; // listen to a certain queue, and ACK automatically channel.basicConsume("queue1", true, consumer); } } -
手动ACK(Acknowledge Character)和自动ACK
-
如果消息非常重要,最好消费完成手动ACK;如果自动ACK消费后,RabbitMQ就会把消息从队列中删除,如果此时消费者抛异常宕机,那么消息就永久丢失了
-
Receiver自动ACK转手动ACK的实现方式:DefaultConsumer对象重写方法
handleDelivery中添加basicAck方法调用,同时在basicConsume方法中设置为手动提交public class Receiver { public static void main(String[] args) throws Exception{ // create Connection object from util, and create Channel object Connection connection = ConnectionUtil.getConnection(); Channel channel = connection.createChannel(); // get message from channel DefaultConsumer consumer = new DefaultConsumer(channel) { @Override public void handleDelivery(String consumerTag, Envelope envelope, AMQP.BasicProperties properties, byte[] body) throws IOException { String s = new String(body); System.out.println("receive: " + s); // ** manually ack(2nd parameter: receive multiple message or not) channel.basicAck(envelope.getDeliveryTag(), false); } }; // ** listen to a certain queue, and ACK manually channel.basicConsume("queue1", false, consumer); } }
-
3. 队列模型
-
主要流程
生产者发送信息给Queue,Queue将信息通过Channel发送给多个消费者进行消费
当运行许多消费者程序时,消息队列中的任务会被众多消费者共享,但其中某一个消息只会被一个消费者获取
-
公平分配(并非均匀地分配消息,根据实际ACK情况分配)
RabbitMQ默认只在消息进入队列时发送消息,这会导致消费者还未确认就发送消息,在消费者声明队列后使用
channel.basicQos(1)可以使生产者再收到确认后才发消息,否则发送给下一个空闲的消费者公平分配的使用前提是消费者采用手动ACK
-
Sender和Receiver示例
Receiver启动后,再启动Sender来一次发送100条Message
public class Sender {
    public static void main(String[] args) throws Exception{

        // get Connection object from util, and create Channel object
        Connection connection = ConnectionUtil.getConnection();
        Channel channel = connection.createChannel();
        // create a mq
        channel.queueDeclare("test_work_queue", false, false, false, null);


        for (int i = 0; i < 100; i++) {
            String msg = "msg_num = " + i;
            // send message for a mq
            channel.basicPublish("", "test_work_queue", null, msg.getBytes());
            System.out.println("msg: " + msg);
        }

        // close channel and connection
        channel.close();
        connection.close();
    }
}
/* 共发送了100个message
msg: msg_num = 0
msg: msg_num = 1
...
msg: msg_num = 99
*/
两个Receiver代码相同,都配置了
channel.basicQos(1),采用公平分配其中采用和Sender中相同的
queueDeclare方法声明了队列,防止先运行Receiver控制台报异常public class Receiver1 { static int receive_msg_cnt = 1; public static void main(String[] args) throws Exception{ // create Connection object from util, and create Channel object Connection connection = ConnectionUtil.getConnection(); final Channel channel = connection.createChannel(); // declare a queue, not create a mq channel.queueDeclare("test_work_queue", false, false, false, null); // set the prefetchCount = 1, so that we can ack a message and receive the next one channel.basicQos(1); // get message from channel Consumer consumer = new DefaultConsumer(channel) { @Override public void handleDelivery(String consumerTag, Envelope envelope, AMQP.BasicProperties properties, byte[] body) throws IOException { String s = new String(body); System.out.println("receive_content: " + s + ", and receive_msg_cnt = " + receive_msg_cnt++); // manually ack(receive multiple message or not) channel.basicAck(envelope.getDeliveryTag(), false); } }; // listen to a certain queue, and ACK manually channel.basicConsume("test_work_queue", false, consumer); } } /* 共收到了55个message receive_content: msg_num = 0, and receive_msg_cnt = 1 receive_content: msg_num = 2, and receive_msg_cnt = 2 receive_content: msg_num = 3, and receive_msg_cnt = 3 receive_content: msg_num = 4, and receive_msg_cnt = 4 receive_content: msg_num = 5, and receive_msg_cnt = 5 ... receive_content: msg_num = 96, and receive_msg_cnt = 54 receive_content: msg_num = 98, and receive_msg_cnt = 55 */public class Receiver2 { static int receive_msg_cnt = 1; public static void main(String[] args) throws Exception{ // create Connection object from util, and create Channel object Connection connection = ConnectionUtil.getConnection(); final Channel channel = connection.createChannel(); // declare a queue, not create a mq channel.queueDeclare("test_work_queue", false, false, false, null); // set the prefetchCount = 1, so that we can ack a message and receive the next one channel.basicQos(1); // get message from channel Consumer consumer = new DefaultConsumer(channel) { @Override public void handleDelivery(String consumerTag, Envelope envelope, AMQP.BasicProperties properties, byte[] body) throws IOException { String s = new String(body); System.out.println("receive_content: " + s + ", and receive_msg_cnt = " + receive_msg_cnt++); // manually ack(receive multiple message or not) channel.basicAck(envelope.getDeliveryTag(), false); } }; // listen to a certain queue, and ACK manually channel.basicConsume("test_work_queue", false, consumer); } } /* 共收到了45个message receive_content: msg_num = 1, and receive_msg_cnt = 1 receive_content: msg_num = 12, and receive_msg_cnt = 2 receive_content: msg_num = 14, and receive_msg_cnt = 3 receive_content: msg_num = 16, and receive_msg_cnt = 4 receive_content: msg_num = 17, and receive_msg_cnt = 5 ... receive_content: msg_num = 95, and receive_msg_cnt = 43 receive_content: msg_num = 97, and receive_msg_cnt = 44 receive_content: msg_num = 99, and receive_msg_cnt = 45 */
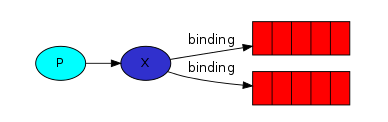
4. 发布/订阅模型
-
主要流程
生产者发送信息给Exchange,Exchange将信息转发给绑定的Queue,Queue将信息通过Channel发送给消费者进行消费
-
使用方式
-
Sender和Receiver
Sender:创建Exchange类型为fanout,发送Message时传入Exchange名并保留Queue名为
""fanout:不处理路由键(只需要将队列绑定到路由上,发送到路由的消息都会被转发到与该路由绑定的消息队列上)
Receiver:声明Queue,并将Queue与Exchange绑定
-
Sender和Receiver的运行顺序
- 执行Sender一次:创建类型为fanout的Exchange,发送消息给Exchange
- 执行Receiver一次:需要将声明后的Queue与Exchange绑定
- 执行Sender一次/多次:向Receiver发送Message
-
-
Sender和Receiver示例
public class Sender {
    public static void main(String[] args) throws Exception{
        // get Connection object from util, and create Channel object
        Connection connection = ConnectionUtil.getConnection();
        Channel channel = connection.createChannel();
        // create a exchange, not a queue
        channel.exchangeDeclare("test_exchange_fanout", "fanout");

        String msg = "hello, test pub/sub, this message is from sender";
        // send message for an exchange. The 2nd parameter stands for a certain queue, so keep it like a "".
        channel.basicPublish("test_exchange_fanout", "", null, msg.getBytes());
        System.out.println("msg: " + msg);

        // close channel and connection
        channel.close();
        connection.close();
    }
}
/*
msg: hello, test pub/sub, this message is from sender
*/
public class Receiver1 { public static void main(String[] args) throws Exception { // create Connection object from util, and create Channel object Connection connection = ConnectionUtil.getConnection(); Channel channel = connection.createChannel(); // declare a queue, not create a mq channel.queueDeclare("test_exchange_fanout_queue1", false, false, false, null); // exchange binding with the declared queue channel.queueBind("test_exchange_fanout_queue1", "test_exchange_fanout", ""); // get message from channel DefaultConsumer consumer = new DefaultConsumer(channel) { @Override public void handleDelivery(String consumerTag, Envelope envelope, AMQP.BasicProperties properties, byte[] body) throws IOException { String s = new String(body); System.out.println("receiver 1: " + s); // manually ack(receive multiple message or not) channel.basicAck(envelope.getDeliveryTag(), false); } }; // listen to a certain queue, and ACK manually channel.basicConsume("test_exchange_fanout_queue1", false, consumer); } } /* receiver 1: hello, test pub/sub, this message is from sender */public class Receiver2 { public static void main(String[] args) throws Exception { // create Connection object from util, and create Channel object Connection connection = ConnectionUtil.getConnection(); Channel channel = connection.createChannel(); // declare a queue, not create a mq channel.queueDeclare("test_exchange_fanout_queue2", false, false, false, null); // exchange binding with the declared queue channel.queueBind("test_exchange_fanout_queue2", "test_exchange_fanout", ""); // get message from channel DefaultConsumer consumer = new DefaultConsumer(channel) { @Override public void handleDelivery(String consumerTag, Envelope envelope, AMQP.BasicProperties properties, byte[] body) throws IOException { String s = new String(body); System.out.println("receiver 2: " + s); // manually ack(receive multiple message or not) channel.basicAck(envelope.getDeliveryTag(), false); } }; // listen to a certain queue, and ACK manually channel.basicConsume("test_exchange_fanout_queue2", false, consumer); } } /* receiver 2: hello, test pub/sub, this message is from sender */
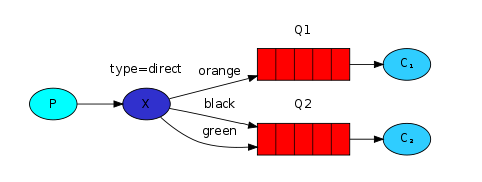
5. 路由模型
-
主要流程
生产者发送信息给Exchange,Exchange通过路由键将信息转发给指定的Queue,Queue将信息通过Channel发送给消费者进行消费
通过Exchange将消息进行定向分发(生产者发送消息给指定的消费者)
-
使用方式
-
Sender和Receiver
Sender:创建类型为direct的Exchange,发送Message时传入Exchange名和指定的路由键
direct:根据路由键进行定向分发消息
Receiver:声明Queue,并将Queue与Exchange绑定,并指定当前Queue对应的路由键
-
Sender和Receiver的运行顺序
- 执行Sender一次:创建类型为direct的Exchange,发送消息给Exchange
- 执行Receiver一次:需要将声明后的Queue通过不同类型的路由键与Exchange绑定
- 执行Sender一次/多次:向Receiver发送Message
-
-
Sender和Receiver示例
public class Sender {
    public static void main(String[] args) throws Exception{
        // get Connection object from util, and create Channel object
        Connection connection = ConnectionUtil.getConnection();
        Channel channel = connection.createChannel();
        // create a exchange, not a queue
        channel.exchangeDeclare("test_exchange_direct", "direct");

        String msg = "hello, test direct, exchange key is select";
        // send message for an exchange. The 2nd parameter stands for exchange key.
        channel.basicPublish("test_exchange_direct", "select", null, msg.getBytes());
        System.out.println("msg: " + msg);

        // close channel and connection
        channel.close();
        connection.close();
    }
}
/*
msg: hello, test direct, exchange key is select
*/
public class Receiver1 { public static void main(String[] args) throws Exception { // create Connection object from util, and create Channel object Connection connection = ConnectionUtil.getConnection(); Channel channel = connection.createChannel(); // declare a queue, not create a mq channel.queueDeclare("test_exchange_direct_queue1", false, false, false, null); // exchange binding with the declared queue, exchange sends message to queue with a certain exchange key channel.queueBind("test_exchange_direct_queue1", "test_exchange_direct", "insert"); channel.queueBind("test_exchange_direct_queue1", "test_exchange_direct", "delete"); channel.queueBind("test_exchange_direct_queue1", "test_exchange_direct", "update"); // get message from channel DefaultConsumer consumer = new DefaultConsumer(channel) { @Override public void handleDelivery(String consumerTag, Envelope envelope, AMQP.BasicProperties properties, byte[] body) throws IOException { String s = new String(body); System.out.println("receiver 1: " + s); } }; // listen to a certain queue, and ACK automatically channel.basicConsume("test_exchange_direct_queue1", true, consumer); } } /* 未收到消息 */public class Receiver2 { public static void main(String[] args) throws Exception { // create Connection object from util, and create Channel object Connection connection = ConnectionUtil.getConnection(); Channel channel = connection.createChannel(); // declare a queue, not create a mq channel.queueDeclare("test_exchange_direct_queue2", false, false, false, null); // exchange binding with the declared queue, exchange sends message to queue with a certain exchange key channel.queueBind("test_exchange_direct_queue2", "test_exchange_direct", "select"); // get message from channel DefaultConsumer consumer = new DefaultConsumer(channel) { @Override public void handleDelivery(String consumerTag, Envelope envelope, AMQP.BasicProperties properties, byte[] body) throws IOException { String s = new String(body); System.out.println("receiver 2: " + s); } }; // listen to a certain queue, and ACK automatically channel.basicConsume("test_exchange_direct_queue2", true, consumer); } } /* receiver 2: hello, test direct, exchange key is select */
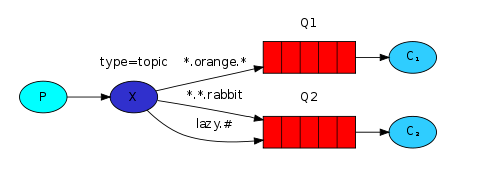
6. 通配符模型
-
主要流程
生产者发送信息给Exchange,Exchange通过匹配的路由键将信息转发给指定的Queue,Queue将信息通过Channel发送给消费者进行消费
-
使用方式
-
Sender和Receiver
Sender:创建类型为topic的Exchange,发送Message时传入Exchange名和指定的路由键
topic:对路由键进行模糊匹配的定向分发
Receiver:声明Queue,并将Queue与Exchange绑定,并添加路由键匹配规则
-
Sender和Receiver的运行顺序
- 执行Sender一次:创建类型为topic的Exchange,发送消息给Exchange
- 执行Receiver一次:需要将声明后的Queue与Exchange绑定
- 执行Sender一次/多次:向Receiver发送Message
-
-
Sender和Receiver示例
public class Sender {
    public static void main(String[] args) throws Exception{
        // get Connection object from util, and create Channel object
        Connection connection = ConnectionUtil.getConnection();
        Channel channel = connection.createChannel();
        // create a exchange, not a queue
        channel.exchangeDeclare("test_exchange_topic", "topic");

        String msg = "hello, test topic, exchange key is user.register";
        // send message for an exchange. The 2nd parameter stands for exchange key.
        channel.basicPublish("test_exchange_topic", "user.register", null, msg.getBytes());
        System.out.println("msg: " + msg);

        // close channel and connection
        channel.close();
        connection.close();
    }
}
/*
msg: hello, test topic, exchange key is user.register
*/
public class Receiver1 { public static void main(String[] args) throws Exception { // create Connection object from util, and create Channel object Connection connection = ConnectionUtil.getConnection(); Channel channel = connection.createChannel(); // declare a queue, not create a mq channel.queueDeclare("test_exchange_topic_queue1", false, false, false, null); // exchange binding with the declared queue, exchange sends message to queue with a certain exchange key channel.queueBind("test_exchange_topic_queue1", "test_exchange_topic", "user.#"); // get message from channel DefaultConsumer consumer = new DefaultConsumer(channel) { @Override public void handleDelivery(String consumerTag, Envelope envelope, AMQP.BasicProperties properties, byte[] body) throws IOException { String s = new String(body); System.out.println("receiver 1: " + s); } }; // listen to a certain queue, and ACK automatically channel.basicConsume("test_exchange_topic_queue1", true, consumer); } } /* receiver 1: hello, test topic, exchange key is user.register */public class Receiver2 { public static void main(String[] args) throws Exception { // create Connection object from util, and create Channel object Connection connection = ConnectionUtil.getConnection(); Channel channel = connection.createChannel(); // declare a queue, not create a mq channel.queueDeclare("test_exchange_topic_queue2", false, false, false, null); // exchange binding with the declared queue, exchange sends message to queue with a certain exchange key channel.queueBind("test_exchange_topic_queue2", "test_exchange_topic", "product.#"); channel.queueBind("test_exchange_topic_queue2", "test_exchange_topic", "order.#"); // get message from channel DefaultConsumer consumer = new DefaultConsumer(channel) { @Override public void handleDelivery(String consumerTag, Envelope envelope, AMQP.BasicProperties properties, byte[] body) throws IOException { String s = new String(body); System.out.println("receiver 2: " + s); } }; // listen to a certain queue, and ACK automatically channel.basicConsume("test_exchange_topic_queue2", true, consumer); } } /* 未收到消息 */
四、消息持久化机制
-
每次关闭或重启rabbitmq-server后,Exchange、Queue都会被移除,通过对Exchange、Queue、Message的持久化配置,避免消息丢失
systemctl restart rabbitmq-server.service -
实现方式
配置消息持久化的同时需要将Exchange和Queue都进行持久化配置
Exchange持久化:
exchangeDeclare方法中参数3传入trueMessage持久化:
basicPublish方法中参数3传入MessageProperties.PERSISTENT_TEXT_PLAINQueue持久化:
queueDeclare方法中参数1传入true -
示例Code
public class Sender {
    public static void main(String[] args) throws Exception{
        // get Connection object from util, and create Channel object
        Connection connection = ConnectionUtil.getConnection();
        Channel channel = connection.createChannel();
        // create a exchange, not a queue
        channel.exchangeDeclare("test_exchange_topic", "topic", true);

        String msg = "hello, test topic, exchange key is user.new";
        // send message for an exchange. The 2nd parameter stands for exchange key.
        channel.basicPublish("test_exchange_topic", "user.new", MessageProperties.PERSISTENT_TEXT_PLAIN, msg.getBytes());
        System.out.println("msg: " + msg);

        // close channel and connection
        channel.close();
        connection.close();
    }
}
public class Receiver1 { public static void main(String[] args) throws Exception { // create Connection object from util, and create Channel object Connection connection = ConnectionUtil.getConnection(); Channel channel = connection.createChannel(); // declare a queue, not create a mq channel.queueDeclare("test_exchange_topic_queue1", true, false, false, null); // exchange binding with the declared queue, exchange sends message to queue with a certain exchange key channel.queueBind("test_exchange_topic_queue1", "test_exchange_topic", "user.#"); // get message from channel DefaultConsumer consumer = new DefaultConsumer(channel) { @Override public void handleDelivery(String consumerTag, Envelope envelope, AMQP.BasicProperties properties, byte[] body) throws IOException { String s = new String(body); System.out.println("receiver 1: " + s); } }; // listen to a certain queue, and ACK automatically channel.basicConsume("test_exchange_topic_queue1", true, consumer); } }
五、Spring整合RabbitMQ
-
Spring AMQP 是基于 Spring 框架的AMQP消息解决方案,提供模板化的发送和接收消息的抽象层,提供基于消息驱动的 POJO 的消息监听等,简化了对于RabbitMQ相关程序的开发
开发中常采用的是消息模型中的通配符模型
-
示例Code
Producer端Code
主要配置了rabbitmq模板,将bean id为rabbitTemplate的对象放入IOC容器中,其中需要注入连接工厂对象、exchange对象(其中指定了路由键的匹配规则和绑定了对应的队列;一个exchange可以配置多个对应队列)、JSON转换的工具类对象
<?xml version="1.0" encoding="UTF-8"?>
<beans xmlns="http://www.springframework.org/schema/beans"
       xmlns:xsi="http://www.w3.org/2001/XMLSchema-instance"
       xmlns:rabbit="http://www.springframework.org/schema/rabbit"
       xsi:schemaLocation="
       http://www.springframework.org/schema/beans
       http://www.springframework.org/schema/beans/spring-beans.xsd
       http://www.springframework.org/schema/rabbit
       http://www.springframework.org/schema/rabbit/spring-rabbit.xsd">
<!--配置连接-->
    <rabbit:connection-factory id="connectionFactory"
                               host="192.168.197.128"
                               port="5672"
                               username="cony"
                               password="123456"
                               virtual-host="/test"/>
<!--配置队列-->
    <rabbit:queue name="test_spring_queue_1"/>
<!--配置rabbitAdmin:主要用于在Java代码中对队列的管理,用来创建,绑定,删除队列与交换机,发送消息-->
    <rabbit:admin connection-factory="connectionFactory"/>
<!--配置交换机,topic类型-->
    <rabbit:topic-exchange name="spring_topic_exchange">
        <rabbit:bindings>
            <rabbit:binding pattern="msg.#" queue="test_spring_queue_1"></rabbit:binding>
        </rabbit:bindings>
    </rabbit:topic-exchange>
<!--配置JSON转换的工具-->
    <bean id="jsonMessageConverter" class="org.springframework.amqp.support.converter.Jackson2JsonMessageConverter"></bean>
<!--配置rabbitmq模板-->
    <rabbit:template id="rabbitTemplate"
                     connection-factory="connectionFactory"
                     exchange="spring_topic_exchange"
                     message-converter="jsonMessageConverter"/>
</beans>
从容器中获取rabbit模板对象,使用该对象发送消息,若暂时没有Consumer消息会被暂存入指定的队列中
public class Sender {
    public static void main(String[] args) {
        // 创建spring容器
        ClassPathXmlApplicationContext context = new ClassPathXmlApplicationContext("spring/spring-rabbitmq-producer.xml");
        // 从容器中获取rabbit模板对象
        RabbitTemplate rabbitTemplate = context.getBean(RabbitTemplate.class);
        // 发消息
        HashMap<String, String> map = new HashMap<>();
        map.put("name", "Jack");
        map.put("email", "helloworld@123.com");
        rabbitTemplate.convertAndSend("msg.user", map);
        context.close();
    }
}
Consumer端Code
为监听器准备一个MessageListener的实现类对象,其中重写onMessage方法,用于当消息到达后执行具体操作
@Component
public class ConsumerListener implements MessageListener {
    // jackson提供序列化和反序列化中使用最多的类,用来转换json
    private static final ObjectMapper MAPPER = new ObjectMapper();

    @Override
    public void onMessage(Message message) {
        try {
            JsonNode jsonNode = MAPPER.readTree(message.getBody());
            String name = jsonNode.get("name").asText();
            String email = jsonNode.get("email").asText();
            System.out.println("name = " + name + ", email = " + email);
        } catch (IOException e) {
            e.printStackTrace();
        }
    }
}
配置监听容器时,注入连接工厂对象;在监听容器内配置监听器,需要注入MessageListener的实现类对象,并指定队列
<?xml version="1.0" encoding="UTF-8"?>
<beans xmlns="http://www.springframework.org/schema/beans"
       xmlns:xsi="http://www.w3.org/2001/XMLSchema-instance"
       xmlns:rabbit="http://www.springframework.org/schema/rabbit"
       xmlns:context="http://www.springframework.org/schema/context"
       xsi:schemaLocation="
       http://www.springframework.org/schema/beans
       http://www.springframework.org/schema/beans/spring-beans.xsd
       http://www.springframework.org/schema/rabbit
       http://www.springframework.org/schema/rabbit/spring-rabbit.xsd
       http://www.springframework.org/schema/context
       http://www.springframework.org/schema/context/spring-context.xsd">
<!--配置连接, 需要指定virtual host-->
    <rabbit:connection-factory id="connectionFactory"
                               host="192.168.197.128"
                               port="5672"
                               username="cony"
                               password="123456"
                               virtual-host="/test"/>
<!--配置队列-->
    <rabbit:queue name="test_spring_queue_1"/>
<!--配置rabbitAdmin:主要用于在Java代码中对队列的管理,用来创建,绑定,删除队列与交换机,发送消息-->
    <rabbit:admin connection-factory="connectionFactory"/>
<!--注解扫描包-->
    <context:component-scan base-package="listener"/>
<!--配置监听-->
    <rabbit:listener-container connection-factory="connectionFactory">
        <rabbit:listener ref="consumerListener" queue-names="test_spring_queue_1"/>
    </rabbit:listener-container>
</beans>
读取Spring配置文件以启用监听容器中的监听器,让程序阻塞查看控制台信息
public class TestRunner {
    public static void main(String[] args) throws Exception{
        // 获取容器
        ClassPathXmlApplicationContext context = new ClassPathXmlApplicationContext("spring/spring-rabbitmq-consumer.xml");
        // 让程序一直运行,别终止
        System.in.read();
    }
}
/*
name = Jack, email = helloworld@123.com
*/
六、消息确认机制
1. AMQP事务控制
-
事务控制是AMQP协议提供的一种保证消息成功投递的方式,通过信道开启Transactional模式
Spring将RabbitMQ事务控制方法进行了封装,以下是常用的原始的事务控制方法
开启事务:
channel.txSelect()提交事务:
channel.txCommit()回滚事务:
channel.txRollback() -
事务控制的缺点
- 效率很低:10条消息,前9条成功,如果第10条失败,那么9条消息要全部撤销回滚
-
示例Code
public class Sender {
    public static void main(String[] args) throws Exception{
        // get Connection object from util, and create Channel object
        Connection connection = ConnectionUtil.getConnection();
        Channel channel = connection.createChannel();

        // create a exchange, not a queue
        channel.exchangeDeclare("test_transaction", "topic", false);
        // start transaction
        channel.txSelect();

        try {
            String msg1 = "hello, test transaction msg1, exchange key is product.price";
            String msg2 = "hello, test transaction msg2, exchange key is product.price";
            // send message for an exchange. The 2nd parameter stands for exchange key.
            channel.basicPublish("test_transaction", "product.price", null, msg1.getBytes());
            System.out.println(1/0);
            channel.basicPublish("test_transaction", "product.price", null, msg2.getBytes());
            System.out.println("msg1: " + msg1);
            System.out.println("msg2: " + msg2);
            // commit transaction
            channel.txCommit();
        } catch (Exception e) {
            // rollback transaction
            System.out.println("rollback transaction");
            channel.txRollback();
            e.printStackTrace();
        } finally {
            // close channel and connection
            channel.close();
            connection.close();
        }
    }
}
/*
rollback transaction
java.lang.ArithmeticException: / by zero
	at transaction.Sender.main(Sender.java:26)
*/
public class Receiver { public static void main(String[] args) throws Exception { // create Connection object from util, and create Channel object Connection connection = ConnectionUtil.getConnection(); Channel channel = connection.createChannel(); // declare a queue, not create a mq channel.queueDeclare("test_transaction_queue1", false, false, false, null); // exchange binding with the declared queue, exchange sends message to queue with a certain exchange key channel.queueBind("test_transaction_queue1", "test_transaction", "product.#"); // get message from channel DefaultConsumer consumer = new DefaultConsumer(channel) { @Override public void handleDelivery(String consumerTag, Envelope envelope, AMQP.BasicProperties properties, byte[] body) throws IOException { String s = new String(body); System.out.println("receiver 1: " + s); } }; // listen to a certain queue, and ACK automatically channel.basicConsume("test_transaction_queue1", true, consumer); } } /* 未收到消息 */
2. 发布确认机制
-
采用事务控制会大大降低消息的吞吐量,使用发布确认机制对没有确认的消息可以进行补发
消息补发方式:
- 采用固定次数的递归进行补发
- Redis和定时任务(JDK Timer或Quartz)
-
示例Code
Producer
准备一个RabbitTemplate.ConfirmCallback实现类
public class MessageConfirm implements RabbitTemplate.ConfirmCallback {
    @Override
    public void confirm(CorrelationData correlationData, boolean b, String s) {
        if (b) {
            System.out.println("succeed to ack message");
            System.out.println(s);
        } else {
            System.out.println("fail to ack message");
            System.out.println(s);
            /*
            	这里添加消息补发方式
            */
        }
    }
}
首先在rabbit:connection-factory中添加publisher-confirms属性开启确认机制;
然后在rabbit:template中添加confirm-callback属性,并注入RabbitTemplate.ConfirmCallback实现类的对象
confirmCallback这个回调方法,主要作用是确认生产端的消息有没有发送到交换机。消息有发送到交换机,返回为true;消息没有发送给交换机,返回就是false。没有发送给交换机有多种情况,有可能是MQ服务器挂了,也有可能是发送消息给MQ的时候,交换机名称写错了。消费端启动与否,跟生产端的confirmCallback回调方法没有关系
<?xml version="1.0" encoding="UTF-8"?>
<beans xmlns="http://www.springframework.org/schema/beans"
       xmlns:xsi="http://www.w3.org/2001/XMLSchema-instance"
       xmlns:rabbit="http://www.springframework.org/schema/rabbit"
       xsi:schemaLocation="
       http://www.springframework.org/schema/beans
       http://www.springframework.org/schema/beans/spring-beans.xsd
       http://www.springframework.org/schema/rabbit
       http://www.springframework.org/schema/rabbit/spring-rabbit.xsd">
<!--配置连接-->
    <rabbit:connection-factory id="connectionFactory"
                               host="192.168.197.128"
                               port="5672"
                               username="cony"
                               password="123456"
                               virtual-host="/test"
                               publisher-confirms="true"/>
<!--配置队列-->
    <rabbit:queue name="test_spring_queue_1"/>
<!--配置rabbitAdmin:主要用于在Java代码中对队列的管理,用来创建,绑定,删除队列与交换机,发送消息-->
    <rabbit:admin connection-factory="connectionFactory"/>
<!--配置交换机,topic类型-->
    <rabbit:topic-exchange name="spring_topic_exchange">
        <rabbit:bindings>
            <rabbit:binding pattern="msg.#" queue="test_spring_queue_1"></rabbit:binding>
        </rabbit:bindings>
    </rabbit:topic-exchange>
<!--配置JSON转换的工具-->
    <bean id="jsonMessageConverter" class="org.springframework.amqp.support.converter.Jackson2JsonMessageConverter"></bean>
<!--配置rabbitmq模板-->
    <rabbit:template id="rabbitTemplate"
                     connection-factory="connectionFactory"
                     exchange="spring_topic_exchange"
                     message-converter="jsonMessageConverter"
                     confirm-callback="msgSendConfirmCallBack"/>
<!--消息确认处理类对象-->
    <bean id="msgSendConfirmCallBack" class="confirm.MessageConfirm"/>
</beans>
在convertAndSend中传入不存在的Exchange(若没有这个参数默认使用Producer端Spring配置中的Exchange),
执行main方法发送消息,出现channel error,在Consumer端也没有打印接收消息的信息
public class Sender {
    public static void main(String[] args) {
        // 创建spring容器
        ClassPathXmlApplicationContext context = new ClassPathXmlApplicationContext("spring/spring-rabbitmq-producer.xml");
        // 从容器中获取rabbit模板对象
        RabbitTemplate rabbitTemplate = context.getBean(RabbitTemplate.class);
        // 发消息
        HashMap<String, String> map = new HashMap<>();
        map.put("name", "Jackie");
        map.put("email", "helloworld@123.com");
        rabbitTemplate.convertAndSend("xxxtestxxx","msg.product", map);
        System.out.println("Message has been sent");
        context.close();
    }
}
/*
Message has been sent
fail to ack message
channel error; protocol method: #method<channel.close>(reply-code=404, reply-text=NOT_FOUND - no exchange 'xxxtestxxx' in vhost '/test', class-id=60, method-id=40)
*/
Consumer
@Component
public class ConsumerListener implements MessageListener {
    // jackson提供序列化和反序列化中使用最多的类,用来转换json
    private static final ObjectMapper MAPPER = new ObjectMapper();

    @Override
    public void onMessage(Message message) {
        try {
            JsonNode jsonNode = MAPPER.readTree(message.getBody());
            String name = jsonNode.get("name").asText();
            String email = jsonNode.get("email").asText();
            System.out.println("name = " + name + ", email = " + email);
        } catch (IOException e) {
            e.printStackTrace();
        }
    }
}
<?xml version="1.0" encoding="UTF-8"?> <beans xmlns="http://www.springframework.org/schema/beans" xmlns:xsi="http://www.w3.org/2001/XMLSchema-instance" xmlns:rabbit="http://www.springframework.org/schema/rabbit" xmlns:context="http://www.springframework.org/schema/context" xsi:schemaLocation=" http://www.springframework.org/schema/beans http://www.springframework.org/schema/beans/spring-beans.xsd http://www.springframework.org/schema/rabbit http://www.springframework.org/schema/rabbit/spring-rabbit.xsd http://www.springframework.org/schema/context http://www.springframework.org/schema/context/spring-context.xsd"> <!--配置连接--> <rabbit:connection-factory id="connectionFactory" host="192.168.197.128" port="5672" username="cony" password="123456" virtual-host="/test"/> <!--配置队列--> <rabbit:queue name="test_spring_queue_1"/> <!--配置rabbitAdmin:主要用于在Java代码中对队列的管理,用来创建,绑定,删除队列与交换机,发送消息--> <rabbit:admin connection-factory="connectionFactory"/> <!--注解扫描包--> <context:component-scan base-package="listener"/> <!--配置监听--> <rabbit:listener-container connection-factory="connectionFactory"> <rabbit:listener ref="consumerListener" queue-names="test_spring_queue_1"/> </rabbit:listener-container> </beans>public class TestRunner { public static void main(String[] args) throws Exception{ // 获取容器 ClassPathXmlApplicationContext context = new ClassPathXmlApplicationContext("spring/spring-rabbitmq-consumer.xml"); // 让程序一直运行,别终止 System.in.read(); } } /* 未打印任何消息 */
七、消费端限流
-
当数据量特别大的时候,我们对生产端限流肯定是不科学的,因为有时候并发量就是特别大,有时候并发量又特别少,这是用户的行为,我们是无法约束的,所以我们应该对消费端限流,用于保持消费端的稳定
-
RabbitMQ 提供了一种 Qos (Quality of Service,服务质量)服务质量保证功能
即在非自动确认消息的前提下,如果一定数目的消息未被确认前,不再进行消费新的消息
-
示例Code
将发送端改为一次发送多条消息,运行Producer端main方法
public class Sender {
    public static void main(String[] args) {
        // 创建spring容器
        ClassPathXmlApplicationContext context = new ClassPathXmlApplicationContext("spring/spring-rabbitmq-producer.xml");
        // 从容器中获取rabbit模板对象
        RabbitTemplate rabbitTemplate = context.getBean(RabbitTemplate.class);
        // 发消息
        HashMap<String, String> map = new HashMap<>();
        map.put("name", "Jackie");
        map.put("email", "helloworld@123.com");
        for (int i = 0; i < 10; i++) {
            rabbitTemplate.convertAndSend("msg.product", map);
            System.out.println("Message has been sent");
        }
        context.close();
    }
}
准备一个AbstractAdaptableMessageListener的子类,用于注入监听器,在Spring容器接收到消息后用于处理消息
@Component
public class ConsumerListener extends AbstractAdaptableMessageListener {
    // jackson提供序列化和反序列化中使用最多的类,用来转换json
    private static final ObjectMapper MAPPER = new ObjectMapper();

    @Override
    public void onMessage(Message message, Channel channel) throws Exception {
        try {
            JsonNode jsonNode = MAPPER.readTree(message.getBody());
            String name = jsonNode.get("name").asText();
            String email = jsonNode.get("email").asText();
            System.out.println("name: " + name + ", email: " + email);
            // deliveryTag当前消息的ID,是一个单调递增的正整数值
            long msgId = message.getMessageProperties().getDeliveryTag();
            // 为了减少网络流量,手动确认可以被批处理,当该参数为true时,则可以一次性确认小于等于msgId传入值的所有消息
            channel.basicAck(msgId, true);
            Thread.sleep(3000);
            System.out.println("ACK and break");
        } catch (Exception e) {
            e.printStackTrace();
        }
    }
}
在监听容器中配置prefetch(每次确认个数)和acknowledge(确认方式)属性,表示不要同时给一个消费者推送多于n个消息,一旦有n个消息还没有ACK,则该Consumer将阻塞,直到消息被ACK
监听容器中配置acknowledge属性为manual时,需要在AbstractAdaptableMessageListener的子类的重写方法onMessage中使用basicAck进行手动提交;
若未进行手动提交处理,当Consumer端监听器关闭后队列中的部分消息会从Unacked状态转回Ready状态
(Consumer端开启监听后队列中的部分消息将从Ready状态转换为Unacked状态)
<?xml version="1.0" encoding="UTF-8"?>
<beans xmlns="http://www.springframework.org/schema/beans"
       xmlns:xsi="http://www.w3.org/2001/XMLSchema-instance"
       xmlns:rabbit="http://www.springframework.org/schema/rabbit"
       xmlns:context="http://www.springframework.org/schema/context"
       xsi:schemaLocation="
       http://www.springframework.org/schema/beans
       http://www.springframework.org/schema/beans/spring-beans.xsd
       http://www.springframework.org/schema/rabbit
       http://www.springframework.org/schema/rabbit/spring-rabbit.xsd
       http://www.springframework.org/schema/context
       http://www.springframework.org/schema/context/spring-context.xsd">
<!--配置连接-->
    <rabbit:connection-factory id="connectionFactory"
                               host="192.168.197.128"
                               port="5672"
                               username="cony"
                               password="123456"
                               virtual-host="/test"/>
<!--配置队列-->
    <rabbit:queue name="test_spring_queue_1"/>
<!--配置rabbitAdmin:主要用于在Java代码中对队列的管理,用来创建,绑定,删除队列与交换机,发送消息-->
    <rabbit:admin connection-factory="connectionFactory"/>
<!--注解扫描包-->
    <context:component-scan base-package="listener"/>
<!--配置监听-->
    <rabbit:listener-container connection-factory="connectionFactory" prefetch="3" acknowledge="manual">
        <rabbit:listener ref="consumerListener" queue-names="test_spring_queue_1"/>
    </rabbit:listener-container>
</beans>
运行Consumer端main方法,将读取Spring配置文件以启用监听容器中的监听器,让程序阻塞查看控制台信息
public class TestRunner {
    public static void main(String[] args) throws Exception{
        // 获取容器
        ClassPathXmlApplicationContext context = new ClassPathXmlApplicationContext("spring/spring-rabbitmq-consumer.xml");
        // 让程序一直运行,别终止
        System.in.read();
    }
}
八、过期时间
1. 设置队列消息TTL
-
通过队列设置,队列中所有消息都有相同的过期时间
-
示例Code
rabbit:queue中配置队列参数,key为TTL信息字符串,value为过期时间值(单位ms);
在Producer运行后消息会存在队列中在过期时间后队列将会清除所有消息
<?xml version="1.0" encoding="UTF-8"?>
<beans xmlns="http://www.springframework.org/schema/beans"
       xmlns:xsi="http://www.w3.org/2001/XMLSchema-instance"
       xmlns:rabbit="http://www.springframework.org/schema/rabbit"
       xsi:schemaLocation="
       http://www.springframework.org/schema/beans
       http://www.springframework.org/schema/beans/spring-beans.xsd
       http://www.springframework.org/schema/rabbit
       http://www.springframework.org/schema/rabbit/spring-rabbit.xsd">
<!--配置连接-->
    <rabbit:connection-factory id="connectionFactory"
                               host="192.168.197.128"
                               port="5672"
                               username="cony"
                               password="123456"
                               virtual-host="/test"
                               publisher-confirms="true"/>
<!--配置队列-->
<!--    <rabbit:queue name="test_spring_queue_1"/>-->
    <rabbit:queue name="test_spring_queue_ttl" auto-declare="true">
        <rabbit:queue-arguments>
            <entry key="x-message-ttl" value-type="long" value="5000"></entry>
        </rabbit:queue-arguments>
    </rabbit:queue>
<!--配置rabbitAdmin:主要用于在Java代码中对队列的管理,用来创建,绑定,删除队列与交换机,发送消息-->
    <rabbit:admin connection-factory="connectionFactory"/>
<!--配置交换机,topic类型-->
    <rabbit:topic-exchange name="spring_topic_exchange">
        <rabbit:bindings>
            <rabbit:binding pattern="msg.#" queue="test_spring_queue_ttl"></rabbit:binding>
        </rabbit:bindings>
    </rabbit:topic-exchange>
<!--配置JSON转换的工具-->
    <bean id="jsonMessageConverter" class="org.springframework.amqp.support.converter.Jackson2JsonMessageConverter"></bean>
<!--配置rabbitmq模板-->
    <rabbit:template id="rabbitTemplate"
                     connection-factory="connectionFactory"
                     exchange="spring_topic_exchange"
                     message-converter="jsonMessageConverter"
                     confirm-callback="msgSendConfirmCallBack"/>
<!--消息确认处理类对象-->
    <bean id="msgSendConfirmCallBack" class="confirm.MessageConfirm"/>
</beans>
2. 设置每条消息TTL
-
对消息单独设置,每条消息的TTL可以不同(更颗粒化)
-
示例Code
无需在rabbit:queue中配置队列参数,只需要在创建发送消息时指定即可,该消息会在指定队列中保存直到过期时间
public class Sender {
    public static void main(String[] args) {
        // 创建spring容器
        ClassPathXmlApplicationContext context = new ClassPathXmlApplicationContext("spring/spring-rabbitmq-producer.xml");
        // 从容器中获取rabbit模板对象
        RabbitTemplate rabbitTemplate = context.getBean(RabbitTemplate.class);

        // 创建消息配置对象
        MessageProperties messageProperties = new MessageProperties();
        // 设置消息过期时间
        messageProperties.setExpiration("6000");
        // 创建消息
        Message message = new Message("it will be removed after 6 s".getBytes(), messageProperties);
        // 发送消息
        rabbitTemplate.convertAndSend("msg.user", message);
        System.out.println("Message has been sent");

        context.close();
    }
}
九、死信队列和延迟队列
1. 死信队列
-
Dead Message:消息在队列中没有被及时消费会变成死信(Dead Message),这些消息会被分发到DLX(Dead Letter Exchanges)交换机中,绑定DLX的队列被称为死信队列
常见的消息未被消费的原因:
- 消息被拒绝,并且不再重新投递
- 消息超时未消费
- 消息达到最大队列长度
-
示例Code
配置测试交换机并根据路由键分别绑定两个队列test_ttl_queue和test_max_queue,队列中的消息达到条件投入死信交换机,
死信交换机根据两个路由键绑定到同一个死信队列dlx_queue
<?xml version="1.0" encoding="UTF-8"?>
<beans xmlns="http://www.springframework.org/schema/beans"
       xmlns:xsi="http://www.w3.org/2001/XMLSchema-instance"
       xmlns:rabbit="http://www.springframework.org/schema/rabbit"
       xsi:schemaLocation="
       http://www.springframework.org/schema/beans
       http://www.springframework.org/schema/beans/spring-beans.xsd
       http://www.springframework.org/schema/rabbit
       http://www.springframework.org/schema/rabbit/spring-rabbit.xsd">
<!--配置连接-->
    <rabbit:connection-factory id="connectionFactory"
                               host="192.168.197.128"
                               port="5672"
                               username="cony"
                               password="123456"
                               virtual-host="/test"/>
<!--配置rabbitAdmin:主要用于在Java代码中对队列的管理,用来创建,绑定,删除队列与交换机,发送消息-->
    <rabbit:admin connection-factory="connectionFactory"/>
<!--配置rabbitmq模板-->
    <rabbit:template id="rabbitTemplate"
                     connection-factory="connectionFactory"
                     exchange="my_exchange"/>

    <!--设置测试用交换机-->
    <rabbit:direct-exchange name="my_exchange">
        <rabbit:bindings>
            <rabbit:binding key="dlx_ttl" queue="test_ttl_queue"/>
            <rabbit:binding key="dlx_max" queue="test_max_queue"/>
        </rabbit:bindings>
    </rabbit:direct-exchange>

    <!--配置过期的消息队列-->
    <rabbit:queue name="test_ttl_queue">
        <rabbit:queue-arguments>
            <!--设置队列过期时间-->
            <entry key="x-message-ttl" value-type="long" value="6000"/>
            <!--消息超时,会将消息投递给死信交换机-->
            <entry key="x-dead-letter-exchange" value="dlx_exchange"/>
        </rabbit:queue-arguments>
    </rabbit:queue>

    <!--配置超出长度的消息队列-->
    <rabbit:queue name="test_max_queue">
        <rabbit:queue-arguments>
            <!--设置队列的额定长度(本队列最多装2个消息)-->
            <entry key="x-max-length" value-type="long" value="2"/>
            <!--消息超时,会将消息投递给死信交换机-->
            <entry key="x-dead-letter-exchange" value="dlx_exchange"/>
        </rabbit:queue-arguments>
    </rabbit:queue>

    <!--配置死信交换机-->
    <rabbit:direct-exchange name="dlx_exchange">
        <rabbit:bindings>
            <rabbit:binding key="dlx_ttl" queue="dlx_queue"/>
            <rabbit:binding key="dlx_max" queue="dlx_queue"/>
        </rabbit:bindings>
    </rabbit:direct-exchange>

    <!--配置死信队列-->
    <rabbit:queue name="dlx_queue"/>
</beans>
Producer中发送消息,测试超时消息(dlx_ttl),消息会被保存在test_ttl_queue中达到过期时间后被放入dlx_queue中
public class Sender2 {
    public static void main(String[] args) {
        // 创建spring容器
        ClassPathXmlApplicationContext context = new ClassPathXmlApplicationContext("spring/spring-rabbitmq-producer-dlx.xml");
        // 从容器中获取rabbit模板对象
        RabbitTemplate rabbitTemplate = context.getBean(RabbitTemplate.class);

        // 发送消息
        rabbitTemplate.convertAndSend("dlx_ttl", "测试超时".getBytes());
        System.out.println("Message has been sent");

        context.close();
    }
}
Producer中发送消息,测试消息超过最大队列长度(dlx_max),
消息会被保存在test_max_queue中,超过test_max_queue队列消息最大长度的消息,将会被被放入dlx_queue中
public class Sender2 {
    public static void main(String[] args) {
        // 创建spring容器
        ClassPathXmlApplicationContext context = new ClassPathXmlApplicationContext("spring/spring-rabbitmq-producer-dlx.xml");
        // 从容器中获取rabbit模板对象
        RabbitTemplate rabbitTemplate = context.getBean(RabbitTemplate.class);

        // 发送消息
        rabbitTemplate.convertAndSend("dlx_max", "测试超过队列长度".getBytes());
        rabbitTemplate.convertAndSend("dlx_max", "测试超过队列长度".getBytes());
        rabbitTemplate.convertAndSend("dlx_max", "测试超过队列长度".getBytes());
        System.out.println("Message has been sent");

        context.close();
    }
}
2. 延迟队列
-
延迟队列是基于死信队列,利用死信队列其中超时消息的特性,并结合Consumer端时可以将该队列看作一般队列进行消费
延迟队列案例:
对购物车中超过时间限制未付款的订单进行处理(先放入ttl队列,超过时间后放入dlx队列,Consumer端监听到后进行处理)
-
示例Code
Producer端
<?xml version="1.0" encoding="UTF-8"?>
<beans xmlns="http://www.springframework.org/schema/beans"
       xmlns:xsi="http://www.w3.org/2001/XMLSchema-instance"
       xmlns:rabbit="http://www.springframework.org/schema/rabbit"
       xsi:schemaLocation="
       http://www.springframework.org/schema/beans
       http://www.springframework.org/schema/beans/spring-beans.xsd
       http://www.springframework.org/schema/rabbit
       http://www.springframework.org/schema/rabbit/spring-rabbit.xsd">
<!--配置连接-->
    <rabbit:connection-factory id="connectionFactory"
                               host="192.168.197.128"
                               port="5672"
                               username="cony"
                               password="123456"
                               virtual-host="/test"/>
<!--配置rabbitAdmin:主要用于在Java代码中对队列的管理,用来创建,绑定,删除队列与交换机,发送消息-->
    <rabbit:admin connection-factory="connectionFactory"/>
<!--配置rabbitmq模板-->
    <rabbit:template id="rabbitTemplate"
                     connection-factory="connectionFactory"
                     exchange="my_exchange"/>

    <!--设置测试用交换机-->
    <rabbit:direct-exchange name="my_exchange">
        <rabbit:bindings>
            <rabbit:binding key="dlx_ttl" queue="test_ttl_queue"/>
            <rabbit:binding key="dlx_max" queue="test_max_queue"/>
        </rabbit:bindings>
    </rabbit:direct-exchange>

    <!--配置过期的消息队列-->
    <rabbit:queue name="test_ttl_queue">
        <rabbit:queue-arguments>
            <!--设置队列过期时间-->
            <entry key="x-message-ttl" value-type="long" value="6000"/>
            <!--消息超时,会将消息投递给死信交换机-->
            <entry key="x-dead-letter-exchange" value="dlx_exchange"/>
        </rabbit:queue-arguments>
    </rabbit:queue>

    <!--配置超出长度的消息队列-->
    <rabbit:queue name="test_max_queue">
        <rabbit:queue-arguments>
            <!--设置队列的额定长度(本队列最多装2个消息)-->
            <entry key="x-max-length" value-type="long" value="2"/>
            <!--消息超时,会将消息投递给死信交换机-->
            <entry key="x-dead-letter-exchange" value="dlx_exchange"/>
        </rabbit:queue-arguments>
    </rabbit:queue>

    <!--配置死信交换机-->
    <rabbit:direct-exchange name="dlx_exchange">
        <rabbit:bindings>
            <rabbit:binding key="dlx_ttl" queue="dlx_queue"/>
            <rabbit:binding key="dlx_max" queue="dlx_queue"/>
        </rabbit:bindings>
    </rabbit:direct-exchange>

    <!--配置死信队列-->
    <rabbit:queue name="dlx_queue"/>
</beans>
在Producer端发送消息,消息先被放入test_ttl_queue中,超过过期时间后放入dlx_queue
(Consumer端未开启监听器时dlx_queue中该消息状态为Ready,开启监听器后该消息从dlx_queue中移除)
public class Sender2 {
    public static void main(String[] args) {
        // 创建spring容器
        ClassPathXmlApplicationContext context = new ClassPathXmlApplicationContext("spring/spring-rabbitmq-producer-dlx.xml");
        // 从容器中获取rabbit模板对象
        RabbitTemplate rabbitTemplate = context.getBean(RabbitTemplate.class);

        // 发送消息
        rabbitTemplate.convertAndSend("dlx_ttl", "测试超时".getBytes());
        System.out.println("Message has been sent");

        context.close();
    }
}
Consumer端
需要准备AbstractAdaptableMessageListener子类,来处理消息(进行手动确认和在控制台打印信息内容)
@Component
public class ConsumerListener extends AbstractAdaptableMessageListener {
    // jackson提供序列化和反序列化中使用最多的类,用来转换json
    private static final ObjectMapper MAPPER = new ObjectMapper();

    @Override
    public void onMessage(Message message, Channel channel) throws Exception {
        try {
//            1. 打印Producer发送的Map需要使用JSON来处理
//            --------------------------------
//            JsonNode jsonNode = MAPPER.readTree(message.getBody());
//            String name = jsonNode.get("name").asText();
//            String email = jsonNode.get("email").asText();
//            System.out.println("name: " + name + ", email: " + email);
//            // deliveryTag当前消息的ID,是一个单调递增的正整数值
//            long msgId = message.getMessageProperties().getDeliveryTag();
//            System.out.println("msgId = " + msgId);
//            // 为了减少网络流量,手动确认可以被批处理,当该参数为true时,则可以一次性确认小于等于msgId传入值的所有消息
//            channel.basicAck(msgId, true);
//            Thread.sleep(1000);
//            System.out.println("ACK and break");

//            2. 打印Producer发送的字符串需要使用将字节数组转为字符串
//            --------------------------------------
            // msgId当前消息的ID,是一个单调递增的正整数值
            long msgId = message.getMessageProperties().getDeliveryTag();
            // 为了减少网络流量,手动确认可以被批处理,当该参数为true时,则可以一次性确认小于等于msgId传入值的所有消息
            channel.basicAck(msgId, true);
            String str = new String(message.getBody());
            System.out.println("str = " + str);
        } catch (Exception e) {
            e.printStackTrace();
        }
    }
}
需要为监听器容器开启手动确认,然后将AbstractAdaptableMessageListener子类对象注入监听器中,并指定监听死信队列
<?xml version="1.0" encoding="UTF-8"?>
<beans xmlns="http://www.springframework.org/schema/beans"
       xmlns:xsi="http://www.w3.org/2001/XMLSchema-instance"
       xmlns:rabbit="http://www.springframework.org/schema/rabbit"
       xmlns:context="http://www.springframework.org/schema/context"
       xsi:schemaLocation="
       http://www.springframework.org/schema/beans
       http://www.springframework.org/schema/beans/spring-beans.xsd
       http://www.springframework.org/schema/rabbit
       http://www.springframework.org/schema/rabbit/spring-rabbit.xsd
       http://www.springframework.org/schema/context
       http://www.springframework.org/schema/context/spring-context.xsd">
<!--配置连接-->
    <rabbit:connection-factory id="connectionFactory"
                               host="192.168.197.128"
                               port="5672"
                               username="cony"
                               password="123456"
                               virtual-host="/test"/>

<!--配置rabbitAdmin:主要用于在Java代码中对队列的管理,用来创建,绑定,删除队列与交换机,发送消息-->
    <rabbit:admin connection-factory="connectionFactory"/>
<!--注解扫描包-->
    <context:component-scan base-package="listener"/>
<!--配置监听-->
    <rabbit:listener-container connection-factory="connectionFactory" prefetch="3" acknowledge="manual">
        <rabbit:listener ref="consumerListener" queue-names="dlx_queue"/>
    </rabbit:listener-container>
</beans>
运行Consumer端main方法,将读取Spring配置文件以启用监听容器中的监听器,让程序阻塞查看控制台信息
public class TestRunner {
    public static void main(String[] args) throws Exception{
        // 获取容器
        ClassPathXmlApplicationContext context = new ClassPathXmlApplicationContext("spring/spring-rabbitmq-consumer.xml");
        // 让程序一直运行,别终止
        System.in.read();
    }
}
十、RabbitMQ集群
1. 集群架构模式概述
-
单一模式:单机使用RabbitMQ,不适合实际开发
-
普通模式(默认模式):Producer端和Consumer端各一个节点,各自通过队列创建临时通道进行消息传输
Producer端故障后,若之前未做持久化处理,就会出现消息丢失现象
-
镜像模式:高可用解决方案,采用2-3个节点实现数据同步,采用3个节点可实现100%数据可靠性解决方案
-
主备模式:所谓备就是备份的作用,在使用中是不提供读写工作的,只是一个备用的服务,当主节点挂了的时候备用节点就上线充当主节点的角色,提供一个高可用的机制,保证服务正常使用
主备架构与主从架构不同,主从架构一般主节点可以读写,而从节点可以只读
-
远程模式(Shovel模式):实现双活的模式,可以实现把消息进行不同数据中心的复制工作,跨地域地让两个MQ集群互联
-
多活模式:也是实现异地数据中心消息复制,Shovel模式配置较为复杂,一般实现异地集群都是使用这种双活或多活模型
2. 普通模式集群搭建
-
搭建集群结构之后,之前创建的交换机、队列、用户、vhost都属于单一结构,在新的集群环境中是不能用的
当节点脱离集群还原成单一结构后,交换机,队列,用户和vhost等数据都会重新回来
新的集群中需要重新手动添加用户(任意节点添加,所有节点共享)来登录管理页面
-
普通模式集群可靠性不高,会出现消息丢失现象
-
搭建步骤
- 修改两台服务器上的hosts文件,将IP都添加到hosts中
- 跨服务器拷贝
.erlang.cookie文件,使得RabbitMQ的cookie文件保持一致 - 在其中一台上执行加入集群命令(带上另一台服务器的IP)
3. 设置镜像模式
-
在普通模式集群的基础之上,将所有队列设置为镜像队列,即队列会被复制到各个节点,各个节点状态一致
rabbitmqctl set_policy {name} {pattern} {definition}
4. HAProxy实现镜像队列负载均衡
-
HAProxy(High Available)和nginx使用场景
-
HAProxy作为生产者和RabbitMQ集群之间,用于负载均衡的代理服务器
-
nginx更适合用于Web项目中作为反向代理和负载均衡服务器
-
-
HAProxy优势
- HAProxy工作在网络传输层和应用层,支持TCP与HTTP协议;对于HTTP协议,HAProxy处理效率比nginx高
- 效率上来讲HAProxy更会比nginx有更出色的负载均衡速度,在并发处理上也是优于nginx的
- 支持8种负载均衡策略,支持心跳检测
-
实现方式
使用一台安装HAProxy的服务器,在haproxy.cfg中配置负载均衡策略,HAProxy和RabbitMQ集群各个主机的IP和端口号
配置完成后项目Producer端发消息,只需要将rabbit:connection-factory中host修改为HAProxy所在服务器IP即可,其余不变;所有的请求都会交给HAProxy,由其负载均衡给每个RabbitMQ服务器
5. Keepalived实现高可用HAProxy集群
-
Keepalived作用
- 为负载均衡集群提供健康检查
- 实现负载均衡器失效备援
防止HAProxy在使用过程中挂掉,需要利用Keepalived将HAProxy做成高可用集群
-
实现方式
在每台安装HAProxy的服务器(至少2台)上安装Keepalived,在两台服务器上修改hosts文件地址映射,将IP都添加到hosts中;
配置虚拟IP(VIP)和端口号,当前服务器的IP和端口号,创建执行脚本haproxy_check.sh,启动每台服务器的Keepalived
配置完成后项目Producer端发消息,只需要将rabbit:connection-factory中host修改为VIP即可,其余不变;
VIP漂移:当某台服务器上的Keepalived停用后,VIP会漂移到其他服务器上

 浙公网安备 33010602011771号