

J2EE 02(EL、JSTL、Filter、Listener)
J2EE 02
一、EL(Expression Language)
1. EL概述
-
作用:主要用于取代JSP中的表达式代码
-
用法:依次访问pageContext(当前页面有效)、request(当前请求有效)、session(当前会话有效)和application(当前服务器中有效)作用域对象存储的数据
作用域从左到右依次增大
-
EL可以直接打印在页面上,相当于JSP中的表达式
<%= xxx %>,EL和这种方式一样都不带换行,需要手动加<br/> -
EL中的常用内置对象
2. 用EL访问JSP内置对象的属性
-
可以用
${xxx}代替.getAttribute("xxx")若访问的属性名被多种内置对象所占用,优先取作用域低的来访问
<%-- Created by IntelliJ IDEA. --%> <%@ page contentType="text/html;charset=UTF-8" language="java" %> <html> <head> <title>实现从内置对象中获取数据并打印</title> </head> <body> <% /*pageContext.setAttribute("name1", "pageContext对象中的属性值:zhangfei"); request.setAttribute("name2", "request对象中的属性值:guanyu"); session.setAttribute("name3", "session对象中的属性值:liubei"); application.setAttribute("name4", "session对象中的属性值:zhaoyun");*/ //pageContext.setAttribute("name", "pageContext对象中的属性值:zhangfei"); //request.setAttribute("name", "request对象中的属性值:guanyu"); //session.setAttribute("name", "session对象中的属性值:liubei"); application.setAttribute("name", "session对象中的属性值:zhaoyun"); %> <%-- 使用JSP中原始方式获取数据和打印 --%> <%--<%= "name1的数值为:" + pageContext.getAttribute("name1") %><br/> <%– zhangfei –%> <%= "name2的数值为:" + request.getAttribute("name2") %><br/> <%– guanyu –%> <%= "name3的数值为:" + session.getAttribute("name3") %><br/> <%– liubei –%> <%= "name4的数值为:" + application.getAttribute("name4") %><br/> <%– zhaoyun –%>--%> <%-- 使用EL表达式实现获取数据和打印 --%> <%--<h1>name1的数值为:${name1}</h1><br/> name2的数值为:${name2}<br/> name3的数值为:${name3}<br/> name4的数值为:${name4}<br/>--%> <h1>name的数值为:${name}</h1><br/> </body> </html>
3. 用EL获取请求参数的值
-
可以用
${param.name}代替request.getParameter(name);param:接收的参数是一个String对象
可以用
${paramValues.name[index]}代替request.getParameterValues(name);paramValues:接收的参数是一个String类型的数组
<%--
  Created by IntelliJ IDEA.
--%>
<%@ page contentType="text/html;charset=UTF-8" language="java" %>
<html>
<head>
    <title>实现一个简单页面负责向JSP页面传递参数param.jsp</title>
</head>
<body>
<form action="el_param.jsp" method="post">
    姓名:<input type="text" name="name"/><br/>
    爱好:<input type="checkbox" name="hobby" value="唱歌"/>唱歌<br/>
         <input type="checkbox" name="hobby" value="跳舞"/>跳舞<br/>
         <input type="checkbox" name="hobby" value="学习"/>学习<br/>
    <input type="submit" value="提交"/><br/>
</form>
</body>
</html>
<%@ page import="java.util.Arrays" %><%-- Created by IntelliJ IDEA. --%> <%@ page contentType="text/html;charset=UTF-8" language="java" %> <html> <head> <title>实现请求参数数值的获取el_param.jsp</title> </head> <body> <% request.setCharacterEncoding("utf-8"); %> <%-- 使用JSP语法中的原始方式获取请求参数值 --%> <%--<%= "姓名是:" + request.getParameter("name") %><br/> <%= "爱好是:" + Arrays.toString(request.getParameterValues("hobby")) %><br/>--%> <%-- 使用EL表达式中的方式获取请求参数值 --%> 姓名是:${param.name}<br/> 爱好是:${paramValues.hobby[0]}<br/> </body> </html>
4. 用EL访问JavaBean对象的属性
-
方式一:
${对象名.属性名},例如:${user.name}方式二:
${对象名["属性名"]},例如:${user["name"]}方式一不支持属性名中带有特殊字符,如:
.方式二可以支持动态获取对象属性值:通过JSP内置对象的属性名(作为临时变量)和属性值(代表Bean成员变量名)
注意:JSP内置对象的属性名和属性值都是字符串,EL中传入的是临时变量字符串的内容
<%@ page import="com.example.demo01.Person" %><%--
  Created by IntelliJ IDEA.
--%>
<%@ page contentType="text/html;charset=UTF-8" language="java" %>
<html>
<head>
    <title>实现Bean对象中属性的获取和打印</title>
</head>
<body>
<%-- 使用JSP语法规则中的原始方式实现对象的创建和设置以及输出 --%>
<%
    Person person = new Person();
    person.setName("zhangfei");
    person.setAge(30);
    pageContext.setAttribute("person", person);

    pageContext.setAttribute("var1", "name");// 将Bean的成员变量名name设定为内置对象的属性值
    pageContext.setAttribute("var2", "age");// 将Bean的成员变量名age设定为内置对象的属性值
%>

<%--<%= "获取到的姓名为:" + person.getName() %><br/>
<%= "获取到的年龄为:" + person.getAge()  %><br/>--%>

<%-- 使用EL表达式实现属性的获取和打印 --%>
<%--获取到的姓名是:${person.name}<br/>
	获取到的年龄是:${person.age}<br/>--%>

<%-- 另外一种写法 --%>
<%--${person["name"]}<br/>
	${person["age"]}<br/>--%>

<%-- 测试一下动态取值的效果--%>
动态取值的结果为:${person[var1]}
</body>
</html>
5. 用EL访问集合中的数据
-
通过索引获取List中的数据;通过传入key字符串获取Map中的数据
<%@ page import="java.util.LinkedList" %>
<%@ page import="java.util.List" %>
<%@ page import="java.util.HashMap" %>
<%@ page import="java.util.Map" %><%--
  Created by IntelliJ IDEA.
--%>
<%@ page contentType="text/html;charset=UTF-8" language="java" %>
<html>
<head>
    <title>实现集合中数据内容的获取和打印</title>
</head>
<body>
<%
    // 准备一个List集合并添加数据内容
    List<String> list = new LinkedList<>();
    list.add("two");
    list.add("one");
    list.add("three");
    // 将整个集合放入指定的内置对象中
    pageContext.setAttribute("list", list);

    // 准备一个Map集合并添加数据
    Map<String, Integer> map = new HashMap<>();
    map.put("one", 1);
    map.put("two", 2);
    map.put("th.ree", 3);
    // 将整个集合放入指定的内置对象中
    pageContext.setAttribute("map", map);
%>

<%-- 使用EL表达式实现集合中数据内容的获取 --%>
集合中下标为0的元素是:${list[0]}<br/>    <%-- two --%>
集合中下标为1的元素是:${list[1]}<br/>    <%-- one --%>
集合中下标为2的元素是:${list[2]}<br/>    <%-- three --%>
<hr/>

<%-- 使用EL表达式实现Map集合中数据内容的获取 不支持下标 --%>
整个Map集合中的元素有:${map}<br/>
获取带有特殊字符key对应的数值为:${map["th.ree"]}<br/>   <%-- 3 --%>
</body>
</html>
6. 用EL输出运算结果
-
用EL输出运算结果必要条件:通过内置对象设置属性的方式来准备操作数或字符串
使用内置对象属性名的内容代替操作数/字符串传入EL中进行运算
-
算术运算符
EL中整数的除法运算结果会保留小数
-
关系运算符
可用字母代替,如
>用gt代替 -
逻辑运算符
可用字母代替
-
条件运算符(三目运算符)
-
验证运算符
${empty 表达式}返回布尔值判断表达式是否为"空"值,null值、无元素的集合或数组、长度为零的String被认为是空值。
-
示例Code
<%@ page import="java.util.List" %>
<%@ page import="java.util.LinkedList" %>
<%@ page import="java.util.Arrays" %><%--
  Created by IntelliJ IDEA.
--%>
<%@ page contentType="text/html;charset=UTF-8" language="java" %>
<html>
<head>
    <title>实现常用运算符的使用</title>
</head>
<body>
<%
    // 通过内置对象设置属性的方式来准备操作数
    request.setAttribute("ia", 5);
    request.setAttribute("ib", 2);
    request.setAttribute("b1", true);
    request.setAttribute("b2", false);
%>

<%-- 实现上述所有操作数的获取和打印 --%>
ia的数值为:${ia}<br/>      <%-- 5 --%>
ib的数值为:${ib}<br/>      <%-- 2 --%>
b1的数值为:${b1}<br/>      <%-- true --%>
b2的数值为:${b2}<br/>      <%-- false --%>
<hr/>

<%-- 实现算术运算符的使用 --%>
ia+ib的结果为:${ia+ib}<br/>    <%-- 7 --%>
ia-ib的结果为:${ia-ib}<br/>    <%-- 3 --%>
ia*ib的结果为:${ia*ib}<br/>    <%-- 10 --%>
ia/ib的结果为:${ia/ib}<br/>    <%-- 2.5 --%>
ia%ib的结果为:${ia%ib}<br/>    <%-- 1 --%>
<hr/>

<%-- 实现关系运算符的使用 --%>
ia大于ib的结果为:${ia > ib}<br/>  <%-- true --%>
ia大于等于ib的结果为:${ia >= ib}<br/>  <%-- true --%>
ia小于ib的结果为:${ia < ib}<br/>  <%-- false --%>
ia小于等于ib的结果为:${ia <= ib}<br/>  <%-- false --%>
ia等于ib的结果为:${ia == ib}<br/>  <%-- false --%>
ia不等于ib的结果为:${ia != ib}<br/>  <%-- true --%>
<hr/>

<%-- 实现逻辑运算符的使用 --%>
b1并且b2的结果为:${b1 && b2}<br/>  <%-- false --%>
b1或者b2的结果为:${b1 || b2}<br/>  <%-- true --%>
b1取反的结果为:${ !b1 }<br/>  <%-- false --%>
b2取反的结果为:${ !b2 }<br/>  <%-- true --%>
<hr/>

<%
    String str1 = null;
    String str2 = "";
    String str3 = "hello";

    List<Integer> list1 = new LinkedList<>();
    List<Integer> list2 = Arrays.asList(11, 22, 33, 44, 55);

    request.setAttribute("str1", str1);
    request.setAttribute("str2", str2);
    request.setAttribute("str3", str3);
    request.setAttribute("list1", list1);
    request.setAttribute("list2", list2);

%>
<%-- 实现条件运算符和验证运算符的使用 --%>
ia和ib之间的最大值为:${ia>ib? ia: ib}<br/>
判断是否为空的结果是:${empty str1}<br/>    <%-- true --%>
判断是否为空的结果是:${empty str2}<br/>    <%-- true --%>
判断是否为空的结果是:${empty str3}<br/>    <%-- false --%>
判断是否为空的结果是:${empty list1}<br/>    <%-- true --%>
判断是否为空的结果是:${empty list2}<br/>    <%-- false --%>

</body>
</html>
二、JSTL(JSP Standard Tag Library)
1. JSTL概述
-
开发者可以利用这些标签取代JSP页面上的Java代码,从而提高程序的可读性,降低程序的维护难度
-
在JSP页面中使用taglib指定引入JSTL标签库(IDEA中自动生成)
<!-- prefix属性用于指定库前缀 --> <!-- uri属性用于指定库的标识 --> <%@ taglib prefix="c" uri="http://java.sun.com/jsp/jstl/core" %> -
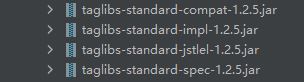
必要的jar包
2. JSTL核心标签
-
输出标签
<c:out value="xxx"></c:out>可以将获取属性值的EL作为参数传入输出标签进行输出
</c:out>结束标签可以省略<%@ taglib prefix="c" uri="http://java.sun.com/jsp/jstl/core" %> <%-- Created by IntelliJ IDEA. --%> <%@ page contentType="text/html;charset=UTF-8" language="java" %> <html> <head> <title>实现out输出标签的使用</title> </head> <body> <c:out value="Hello World"></c:out> </body> </html> -
设置标签
<c:set></c:set>可以用来设置内置对象的属性值、JavaBean的属性值若不指定scope默认作用域是page
<%@ taglib prefix="c" uri="http://java.sun.com/jsp/jstl/core" %> <%-- Created by IntelliJ IDEA. --%> <%@ page contentType="text/html;charset=UTF-8" language="java" %> <html> <head> <title>实现set标签的使用</title> </head> <body> <%-- 1. 表示设置一个名字为name的属性,对应的数值为zhangfei,有效范围为:page --%> <%-- pageContext.setAttibute("name", "zhangfei") --%> <c:set var="name" value="zhangfei" scope="page"></c:set> <%-- 使用out标签打印出来 --%> <c:out value="${name}"></c:out> <hr/> <%-- 2. 设置一个对象的属性值并打印出来 --%> <jsp:useBean id="person" class="com.example.demo01.Person" scope="page"></jsp:useBean> <c:set property="name" value="guanyu" target="${person}"></c:set> <c:set property="age" value="35" target="${person}"></c:set> <c:out value="${person.name}"></c:out> <c:out value="${person.age}"></c:out> </body> </html> -
删除标签
<c:remove></c:remove>用来删除指定数据的标签c:out标签中:添加default属性,当待删除的属性值不存在时,就打印默认值
<%@ taglib prefix="c" uri="http://java.sun.com/jsp/jstl/core" %> <%-- Created by IntelliJ IDEA. --%> <%@ page contentType="text/html;charset=UTF-8" language="java" %> <html> <head> <title>实现remove标签的使用</title> </head> <body> <%-- 设置一个属性值并打印 --%> <c:set var="name" value="liubei" scope="page"></c:set> <c:out value="${name}"></c:out> <hr/> <%-- 删除这个属性值后再次打印 --%> <c:remove var="name" scope="page"></c:remove> <c:out value="${name}" default="无名"></c:out> </body> </html> -
单条件判断标签
<c:if test ="EL条件表达式">
    满足条件执行
</c:if >
<%@ taglib prefix="c" uri="http://java.sun.com/jsp/jstl/core" %> <%-- Created by IntelliJ IDEA. --%> <%@ page contentType="text/html;charset=UTF-8" language="java" %> <html> <head> <title>实现if标签的使用</title> </head> <body> <%-- 设置一个变量以及对应的数值 --%> <c:set var="age" value="17" scope="page"></c:set> <c:out value="${age}"></c:out> <hr/> <%-- 判断该年龄是否成年,若成年则提示已经成年了 --%> <c:if test="${age >= 18}"> <c:out value="已经成年了!"></c:out> </c:if> </body> </html> -
多条件判断标签
<c:choose >
    <c:when test =“EL表达式”>
        满足条件执行
    </c:when>
    …
    <c:otherwise>
    	不满足上述when条件时执行
    </c:otherwise>
</c:choose >
<%@ taglib prefix="c" uri="http://java.sun.com/jsp/jstl/core" %> <%-- Created by IntelliJ IDEA. --%> <%@ page contentType="text/html;charset=UTF-8" language="java" %> <html> <head> <title>实现choose标签的使用</title> </head> <body> <%-- 设置一个变量代表考试的成绩并指定数值 --%> <c:set var="score" value="59" scope="page"></c:set> <c:out value="${score}"></c:out> <hr/> <%-- 进行多条件判断和处理 --%> <c:choose> <c:when test="${score > 60}"> <c:out value="成绩不错,继续加油哦!"></c:out> </c:when> <c:when test="${score == 60}"> <c:out value="60分万岁,多一份浪费!"></c:out> </c:when> <c:otherwise> <c:out value="革命尚未成功,同志仍需努力!"></c:out> </c:otherwise> </c:choose> </body> </html> -
循环标签
<c:forEach var="循环变量" items="集合">
    …
</c:forEach>
<%@ taglib prefix="c" uri="http://java.sun.com/jsp/jstl/core" %> <%-- Created by IntelliJ IDEA. --%> <%@ page contentType="text/html;charset=UTF-8" language="java" %> <html> <head> <title>实现循环标签的使用</title> </head> <body> <% // 准备一个数组并初始化 String[] sArr = {"11", "22", "33", "44", "55"}; pageContext.setAttribute("sArr", sArr); %> <%-- 使用循环标签遍历数组中的所有元素 --%> <c:forEach var="ts" items="${sArr}"> <c:out value="${ts}"></c:out> </c:forEach> <hr/> <%-- 跳跃性遍历 间隔为2 也就是跳过一个遍历一个 --%> <c:forEach var="ts" items="${sArr}" step="2"> <c:out value="${ts}"></c:out> </c:forEach> <hr/> <%-- 指定起始和结尾位置 从下标1开始到3结束,包含1和3--%> <c:forEach var="ts" items="${sArr}" begin="1" end="3"> <c:out value="${ts}"></c:out> </c:forEach> </body> </html>
3. JSTL函数标签
-
函数标签
<%@ taglib prefix="fn" uri="http://java.sun.com/jsp/jstl/functions" %> -
标签函数的使用
<%@ taglib prefix="fn" uri="http://java.sun.com/jsp/jstl/functions" %>
<%--
  Created by IntelliJ IDEA.
--%>
<%@ page contentType="text/html;charset=UTF-8" language="java" %>
<html>
<head>
    <title>实现常用函数标签的使用</title>
</head>
<body>
<%
    pageContext.setAttribute("var", "Hello World!");
%>
原始字符串为:${var}<br/>    <%-- HelloWorld --%>
判断该字符串是否包含指定字符串的结果为:${fn:contains(var, "Hello")}<br/>   <%-- true --%>
将字符串中所有字符转换为大写的结果为:${fn:toUpperCase(var)}<br/>           <%-- HELLO WORLD!--%>
将字符串中所有字符转换为小写的结果为:${fn:toLowerCase(var)}<br/>           <%-- hello world!--%>
</body>
</html>
4. JSTL格式化标签
-
格式化标签
<%@ taglib prefix="fmt" uri="http://java.sun.com/jsp/jstl/fmt" %> -
格式标签的使用
<%@ page import="java.util.Date" %>
<%@ taglib prefix="fmt" uri="http://java.sun.com/jsp/jstl/fmt" %>
<%--
  Created by IntelliJ IDEA.
--%>
<%@ page contentType="text/html;charset=UTF-8" language="java" %>
<html>
<head>
    <title>实现格式标签的使用</title>
</head>
<body>
<%
    // 获取当前系统时间
    Date date = new Date();
    pageContext.setAttribute("date", date);
%>

当前系统时间为:${date}
<hr/>
<fmt:formatDate value="${date}" pattern="yyyy-MM-dd HH:mm:ss"></fmt:formatDate>
</body>
</html>
5. JSTL自定义标签
三、Filter
1. Filter概述
- Filter是JavaWeb的三大组件之一,三大组件为:Servlet、Filter、Listener
- 过滤器相当于浏览器与Web资源之间的一道过滤网,在访问资源之前通过一系列的过滤器对请求进行修改、判断以及拦截等,也可以对响应进行修改、判断以及拦截等
- 过滤器解决的问题:没有设置过滤器,将导致可以跳过需要用户登录验证的页面直接访问页面内容
2. 工作方式
- 浏览器和服务器之间通过添加过滤器,使用过滤器进行身份认证、资源审核和资源加密访问
- 过滤器接收浏览器请求并会给浏览器发送响应
- 服务器接收过滤器的请求并会给过滤器发送响应
3. 主要使用方式
-
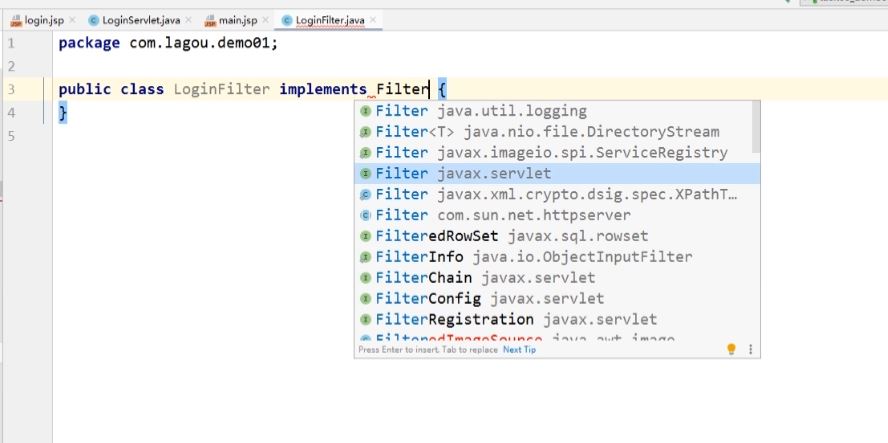
自定义类实现javax.servlet.Filter接口并重写doFilter、init、destroy
doFilter方法中,在
chain.doFilter(request,response);方法调用前加入处理逻辑该方法的调用可以为加了Filter的路径,提供浏览器直接访问的权限,相当于“放行”操作
-
在web.xml文件中配置过滤器(过滤器别名、过滤器路径)
配置的过滤器路径是登录后即将访问的路径,可以是一个JSP文件、HTML文件,还可以写
*.文件类型表示对这一类文件进行过滤,写*表示对所有的文件进行过滤添加、修改配置文件需要重启服务器
<?xml version="1.0" encoding="UTF-8"?> <web-app xmlns="http://xmlns.jcp.org/xml/ns/javaee" xmlns:xsi="http://www.w3.org/2001/XMLSchema-instance" xsi:schemaLocation="http://xmlns.jcp.org/xml/ns/javaee http://xmlns.jcp.org/xml/ns/javaee/web-app_4_0.xsd" version="4.0"> <filter> <filter-name>LoginFilter</filter-name> <filter-class>com.example.studentmanagementsystem.filter.LoginFilter</filter-class> </filter> <filter-mapping> <filter-name>LoginFilter</filter-name> <!--项目案例:添加过滤路径,只保留 /sms/index.jsp 和 /sms/login--> <url-pattern>/sm/*</url-pattern> <url-pattern>/cm/*</url-pattern> <url-pattern>/logout/*</url-pattern> </filter-mapping> </web-app> -
使用案例:未登录前若直接访问登录后跳转的页面,则会先跳转到登录页面
4. Filter接口
-
主要方法
-
init:该方法在服务器重新部署或重启的之后进行调用
-
doFilter:添加一些处理操作,在访问到一些进行过滤后路径(XML中配置的文件或路径),会执行该方法,阻止访问;
服务器运行期间,该方法可以被多次调用(过滤)
doFilter方法中,加入
chain.doFilter(request,response);方法调用,可以提供浏览器直接访问的权限 -
destroy:该方法在服务器重新部署或重启的时候进行调用
-
5. FilterConfig接口
-
String getFilterName()获取web.xml中描述的Filter别名
-
String getInitParameter(String name)获取指定的初始化参数信息
-
Enumeration getInitParameterNames()获取后的Enumeration可以调用
.hasMoreElements(),nextElement()在web.xml中可以加入多个初始化参数,使用该方法获取这些参数名称
<?xml version="1.0" encoding="UTF-8"?> <web-app xmlns="http://xmlns.jcp.org/xml/ns/javaee" xmlns:xsi="http://www.w3.org/2001/XMLSchema-instance" xsi:schemaLocation="http://xmlns.jcp.org/xml/ns/javaee http://xmlns.jcp.org/xml/ns/javaee/web-app_4_0.xsd" version="4.0"> <filter> <filter-name>LifeFilter</filter-name> <filter-class>com.example.demo02.LifeFilter</filter-class> <init-param> <param-name>userName</param-name> <param-value>admin</param-value> </init-param> <init-param> <param-name>password</param-name> <param-value>123456</param-value> </init-param> </filter> <filter-mapping> <filter-name>LifeFilter</filter-name> <url-pattern>*.html</url-pattern> </filter-mapping> </web-app> -
ServletContext getServletContext()获取ServletContext对象
6. 多个过滤器
-
如果有多个过滤器都满足过滤的条件,则容器依据
<filter-mapping>映射的先后顺序来调用各个过滤器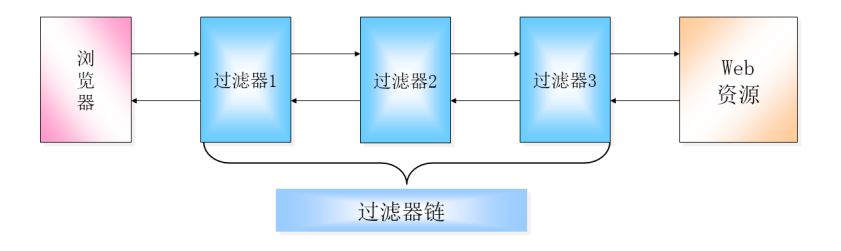
-
示例Code
两个Filter实现类中分别调用
chain.doFilter(request,response);方法之前的执行顺序:BFilter->AFilter,两个Filter实现类中分别调用
chain.doFilter(request,response);方法之后的执行顺序:AFilter->BFilter<?xml version="1.0" encoding="UTF-8"?> <web-app xmlns="http://xmlns.jcp.org/xml/ns/javaee" xmlns:xsi="http://www.w3.org/2001/XMLSchema-instance" xsi:schemaLocation="http://xmlns.jcp.org/xml/ns/javaee http://xmlns.jcp.org/xml/ns/javaee/web-app_4_0.xsd" version="4.0"> <filter> <filter-name>BFilter</filter-name> <filter-class>com.example.demo02.BFilter</filter-class> </filter> <filter-mapping> <filter-name>BFilter</filter-name> <url-pattern>*.avi</url-pattern> </filter-mapping> <filter> <filter-name>AFilter</filter-name> <filter-class>com.example.demo02.AFilter</filter-class> </filter> <filter-mapping> <filter-name>AFilter</filter-name> <url-pattern>*.avi</url-pattern> </filter-mapping> </web-app>
7. 过滤器的优点
-
实现代码的“可插拔性”,即增加或减少某个功能模块,不会影响程序的正常执行
-
可以将多个相同处理逻辑的模块集中写在过滤器里面,可实现重复利用、也方便代码的维护
将公共的代码提取出来,统一写在过滤器中,可以统一进行修改
四、Listener
1. Listener概述
- 作用:用于监听有没有动作或事件的发生,当有事件发生时触发监听器中的方法
- 常见的事件
- 生命周期事件
- 属性状态事件:属性增删改时发生的事件
- 存值状态事件:对象的绑定与解除
- 底层实现:接口的回调模式
2. 常见的监听器
2.1 ServletRequestListener接口
-
抽象方法:
void requestInitialized(ServletRequestEvent sre)监听ServletRequest对象的初始化,初始化时触发方法中的处理流程
void requestDestroyed(ServletRequestEvent sre)监听ServletRequest对象的销毁,销毁时触发方法中的处理流程
IDEA默认启动服务器和打开浏览器会进行两次请求对象的初始化和请求对象的销毁
解决方法:IDEA服务器配置中Open Browser中去除After Launch勾选
之后启动服务器没有初始化和销毁,需要手动发送请求后,就会先对请求对象初始化,然后对请求对象进行销毁
-
使用方式:
完成实现类
public class MyRequestListener implements ServletRequestListener {
    @Override
    public void requestDestroyed(ServletRequestEvent servletRequestEvent) {
        System.out.println("请求销毁了...");
    }

    @Override
    public void requestInitialized(ServletRequestEvent servletRequestEvent) {
        System.out.println("创建请求...");
    }
}
完成配置
<?xml version="1.0" encoding="UTF-8"?>
<web-app xmlns="http://xmlns.jcp.org/xml/ns/javaee"
         xmlns:xsi="http://www.w3.org/2001/XMLSchema-instance"
         xsi:schemaLocation="http://xmlns.jcp.org/xml/ns/javaee http://xmlns.jcp.org/xml/ns/javaee/web-app_4_0.xsd"
         version="4.0">

    <listener>
        <listener-class>com.example.demo03.MyRequestListener</listener-class>
    </listener>
</web-app>
2.2 ServletRequestAttributeListener接口
-
抽象方法:
void attributeAdded(ServletRequestAttributeEvent srae)增加属性时触发
void attributeReplaced(ServletRequestAttributeEvent srae)修改属性时触发
void attributeRemoved(ServletRequestAttributeEvent srae)删除属性时触发
-
使用方式:
完成实现类
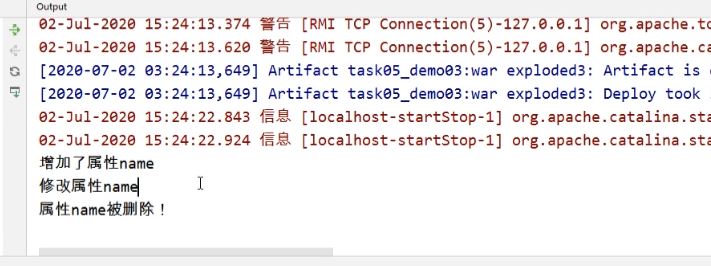
public class MyRequestAttributeListener implements ServletRequestAttributeListener {
    @Override
    public void attributeAdded(ServletRequestAttributeEvent servletRequestAttributeEvent) {
        System.out.println("增加了属性" + servletRequestAttributeEvent.getName());
    }

    @Override
    public void attributeRemoved(ServletRequestAttributeEvent servletRequestAttributeEvent) {
        System.out.println("属性" + servletRequestAttributeEvent.getName() + "被删除了" );
    }

    @Override
    public void attributeReplaced(ServletRequestAttributeEvent servletRequestAttributeEvent) {
        System.out.println("修改属性" + servletRequestAttributeEvent.getName());
    }
}
完成配置
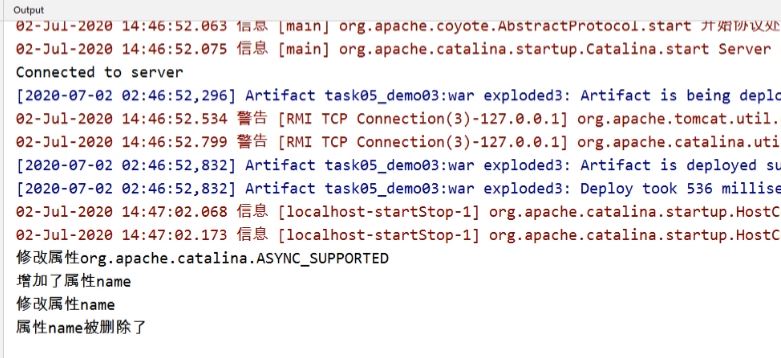
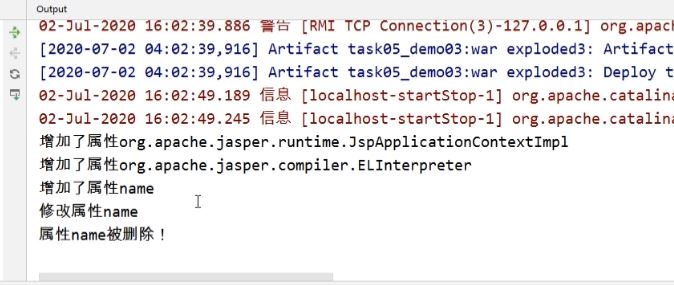
<?xml version="1.0" encoding="UTF-8"?>
<web-app xmlns="http://xmlns.jcp.org/xml/ns/javaee"
         xmlns:xsi="http://www.w3.org/2001/XMLSchema-instance"
         xsi:schemaLocation="http://xmlns.jcp.org/xml/ns/javaee http://xmlns.jcp.org/xml/ns/javaee/web-app_4_0.xsd"
         version="4.0">
    <listener>
        <listener-class>com.example.demo03.MyRequestAttributeListener</listener-class>
    </listener>
</web-app>
完成属性状态事件
<%--
  Created by IntelliJ IDEA.
--%>
<%@ page contentType="text/html;charset=UTF-8" language="java" %>
<html>
<head>
    <title>实现请求中属性状态的改变</title>
</head>
<body>
<%
    // 实现属性的添加
    request.setAttribute("name", "zhangfei");
    // 实现属性的修改
    request.setAttribute("name", "guanyu");
    // 实现属性的删除
    request.removeAttribute("name");
%>
</body>
</html>
浏览器通过访问带事件的JSP发送请求后的Server Console上的输出结果
2.3 HttpSessionListener接口
-
当一个HttpSession刚被创建或者失效(invalidate)的时候,将会通知HttpSessionListener监听器
-
抽象方法:
void sessionCreated(HttpSessionEvent se)当一个HttpSession对象被创建时会调用这个方法
void sessionDestroyed(HttpSessionEvent se)当一个HttpSession超时或者调用HttpSession的invalidate()方法让它销毁时,将会调用这个方法
-
使用方式:
完成实现类
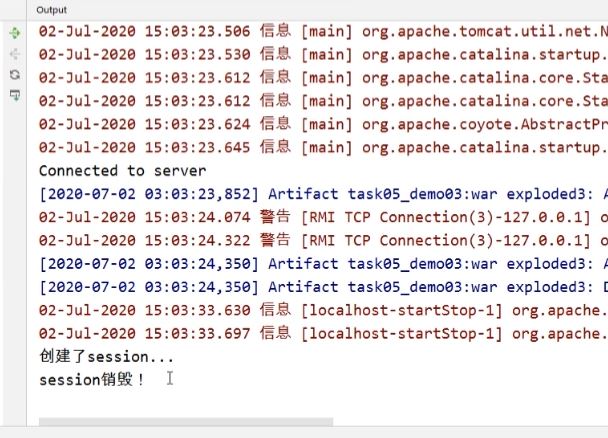
public class MySessionListener implements HttpSessionListener {
    @Override
    public void sessionCreated(HttpSessionEvent httpSessionEvent) {
        System.out.println("创建了session...");
    }

    @Override
    public void sessionDestroyed(HttpSessionEvent httpSessionEvent) {
        System.out.println("session销毁!");
    }
}
完成配置(同时配置Session的有效期3分钟)
<?xml version="1.0" encoding="UTF-8"?>
<web-app xmlns="http://xmlns.jcp.org/xml/ns/javaee"
         xmlns:xsi="http://www.w3.org/2001/XMLSchema-instance"
         xsi:schemaLocation="http://xmlns.jcp.org/xml/ns/javaee http://xmlns.jcp.org/xml/ns/javaee/web-app_4_0.xsd"
         version="4.0">

    <listener>
        <listener-class>com.example.demo03.MySessionListener</listener-class>
    </listener>

    <session-config>
        <!--设置Session的过期时间,单位:分钟-->
    <session-timeout>3</session-timeout>
    </session-config>-->
</web-app>
通过访问
index.jsp从浏览器发送请求,Server Console上的输出"创建了session..."本次访问后在服务器内存中开辟一段内存空间,再向浏览器发送属性为SessionID的Cookie,作为下次访问的标记
关闭服务器断开会话不会进行立即删除,Session默认存在服务器中的时间是30分钟;
可以在XML中手动配置
<session-timeout>,用来控制删除Session的时间Session到达timeout后Server Console上的输出结果
2.4 HttpSessionAttributeListener接口
-
HttpSession中添加、删除或者替换一个属性的时候,将会通知HttpSessionAttributeListener监听器
-
抽象方法:
void attributeAdded(HttpSessionBindingEvent se)当往会话中加入一个属性的时候会调用这个方法
void attributeRemoved(HttpSessionBindingEvent se)当从会话中删除一个属性的时候会调用这个方法
void attributeReplaced(HttpSessionBindingEvent se)当改变会话中的属性的时候会调用这个方法
-
使用方式:
完成实现类
public class MySessionAttributeListener implements HttpSessionAttributeListener {
    @Override
    public void attributeAdded(HttpSessionBindingEvent httpSessionBindingEvent) {
        System.out.println("增加了属性" + httpSessionBindingEvent.getName());
    }

    @Override
    public void attributeRemoved(HttpSessionBindingEvent httpSessionBindingEvent) {
        System.out.println("属性" + httpSessionBindingEvent.getName() + "被删除!");
    }

    @Override
    public void attributeReplaced(HttpSessionBindingEvent httpSessionBindingEvent) {
        System.out.println("修改属性" + httpSessionBindingEvent.getName());
    }
}
完成配置
<?xml version="1.0" encoding="UTF-8"?>
<web-app xmlns="http://xmlns.jcp.org/xml/ns/javaee"
         xmlns:xsi="http://www.w3.org/2001/XMLSchema-instance"
         xsi:schemaLocation="http://xmlns.jcp.org/xml/ns/javaee http://xmlns.jcp.org/xml/ns/javaee/web-app_4_0.xsd"
         version="4.0">

    <listener>
        <listener-class>com.example.demo03.MySessionAttributeListener</listener-class>
    </listener>
</web-app>
完成属性状态事件
<%--
  Created by IntelliJ IDEA.
--%>
<%@ page contentType="text/html;charset=UTF-8" language="java" %>
<html>
<head>
    <title>实现会话中属性状态的改变</title>
</head>
<body>
<%
    // 增加属性
    session.setAttribute("name", "caocao");
    // 修改属性
    session.setAttribute("name", "caoren");
    // 删除属性
    session.removeAttribute("name");
%>
</body>
</html>
浏览器通过访问带事件的JSP发送请求后的Server Console上的输出结果
2.5 ServletContextListener接口
-
在ServletContext创建和关闭时都会通知ServletContextListener监听器
每个Servlet工程都会仅有一个ServletContext对象,开启服务器同时运行Servlet时创建该对象,关闭服务器时销毁该对象
-
抽象方法:
void contextInitialized(ServletContextEvent sce)当ServletContext创建的时候,将会调用这个方法
void contextDestroyed(ServletContextEvent sce)当ServletContext销毁的时候(例如关闭应用服务器或者重新加载应用),将会调用这个方法
-
使用方式:
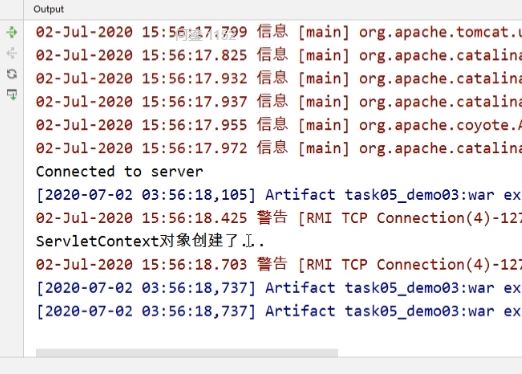
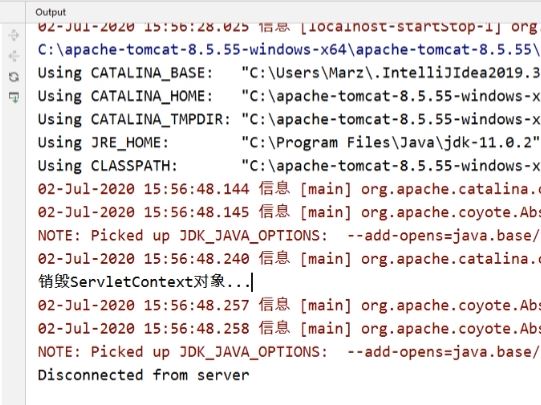
完成实现类
public class MyContextListener implements ServletContextListener {
    @Override
    public void contextInitialized(ServletContextEvent servletContextEvent) {
        System.out.println("ServletContext对象创建了...");
    }

    @Override
    public void contextDestroyed(ServletContextEvent servletContextEvent) {
        System.out.println("销毁ServletContext对象...");
    }
}
完成配置
<?xml version="1.0" encoding="UTF-8"?>
<web-app xmlns="http://xmlns.jcp.org/xml/ns/javaee"
         xmlns:xsi="http://www.w3.org/2001/XMLSchema-instance"
         xsi:schemaLocation="http://xmlns.jcp.org/xml/ns/javaee http://xmlns.jcp.org/xml/ns/javaee/web-app_4_0.xsd"
         version="4.0">

    <listener>
        <listener-class>com.example.demo03.MyContextListener</listener-class>
    </listener>
</web-app>
启动服务器时Server Console上的输出结果
关闭服务器时Server Console上的输出结果
2.6 ServletContextAttributeListener接口
-
向ServletContext添加、删除或者替换一个属性的时候,将会通知ServletContextAttributesListener监听器
-
抽象方法:
void attributeAdded(ServletContextAttributeEvent scae)往ServletContext中加入一个属性的时候触发
void attributeRemoved(ServletContextAttributeEvent scae)从ServletContext中删除一个属性的时候触发
void attributeReplaced(ServletContextAttributeEvent scae)改变ServletContext中属性的时候触发
-
使用方式:
完成实现类
public class MyContextAttributeListener implements ServletContextAttributeListener {
    @Override
    public void attributeAdded(ServletContextAttributeEvent servletContextAttributeEvent) {
        System.out.println("增加了属性" + servletContextAttributeEvent.getName());
    }

    @Override
    public void attributeRemoved(ServletContextAttributeEvent servletContextAttributeEvent) {
        System.out.println("属性" + servletContextAttributeEvent.getName() + "被删除!");
    }

    @Override
    public void attributeReplaced(ServletContextAttributeEvent servletContextAttributeEvent) {
        System.out.println("修改属性" + servletContextAttributeEvent.getName());
    }
}
完成配置
<?xml version="1.0" encoding="UTF-8"?>
<web-app xmlns="http://xmlns.jcp.org/xml/ns/javaee"
         xmlns:xsi="http://www.w3.org/2001/XMLSchema-instance"
         xsi:schemaLocation="http://xmlns.jcp.org/xml/ns/javaee http://xmlns.jcp.org/xml/ns/javaee/web-app_4_0.xsd"
         version="4.0">

    <!--<listener>
        <listener-class>com.example.demo03.MyContextAttributeListener</listener-class>
    </listener>-->
</web-app>
完成属性状态事件
<%--
  Created by IntelliJ IDEA.
--%>
<%@ page contentType="text/html;charset=UTF-8" language="java" %>
<html>
<head>
    <title>实现ServletContext对象属性的改变</title>
</head>
<body>
<%
    // 增加属性
    application.setAttribute("name", "sunquan");
    // 修改属性
    application.setAttribute("name", "zhouyu");
    // 删除属性
    application.removeAttribute("name");
%>
</body>
</html>
启动服务器后并用浏览器访问带事件的JSP后Server Console上的输出结果
2.7 HttpSessionBindingListener接口
-
HttpSession中绑定和解除绑定时,将会通知HttpSessionListener监听器
监听器和一个类进行绑定,当该类的对象与Session绑定(属性设置)和解绑(属性移出)触发实现类的重写方法
-
抽象方法:
void valueBound(HttpSessionBindingEvent event)有对象绑定时调用该方法
void valueUnbound(HttpSessionBindingEvent event)有对象解除绑定时调用该方法
-
使用方式:
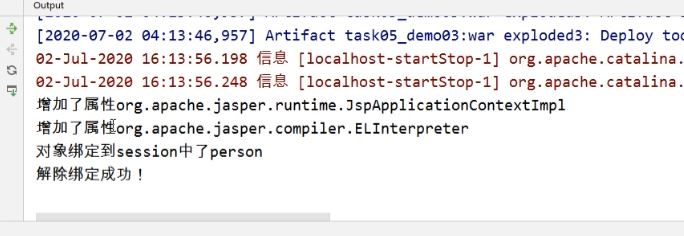
完成实现类(JavaBean实现接口)
public class Person implements HttpSessionBindingListener {
    private String name;
    private int age;

    public Person() {
    }

    public Person(String name, int age) {
        this.name = name;
        this.age = age;
    }

    public String getName() {
        return name;
    }

    public void setName(String name) {
        this.name = name;
    }

    public int getAge() {
        return age;
    }

    public void setAge(int age) {
        this.age = age;
    }

    @Override
    public String toString() {
        return "Person{" +
                "name='" + name + '\'' +
                ", age=" + age +
                '}';
    }

    @Override
    public void valueBound(HttpSessionBindingEvent httpSessionBindingEvent) {
        System.out.println("对象绑定到session中了" + httpSessionBindingEvent.getName());
    }

    @Override
    public void valueUnbound(HttpSessionBindingEvent httpSessionBindingEvent) {
        System.out.println("解除绑定成功!");
    }
}
不需要进行配置
<?xml version="1.0" encoding="UTF-8"?>
<web-app xmlns="http://xmlns.jcp.org/xml/ns/javaee"
         xmlns:xsi="http://www.w3.org/2001/XMLSchema-instance"
         xsi:schemaLocation="http://xmlns.jcp.org/xml/ns/javaee http://xmlns.jcp.org/xml/ns/javaee/web-app_4_0.xsd"
         version="4.0">

    <!--<listener>
        <listener-class>com.example.demo03.MyContextAttributeListener</listener-class>
    </listener>-->
</web-app>
完成与session的绑定、解绑
<%@ page import="com.example.demo03.Person" %><%--
  Created by IntelliJ IDEA.
--%>
<%@ page contentType="text/html;charset=UTF-8" language="java" %>
<html>
<head>
    <title>实现session中对象的绑定和解除</title>
</head>
<body>
<%
    // 准备一个Person类型的对象
    Person person = new Person();
    person.setName("zhangfei");
    person.setAge(30);
    // 将对象与session对象进行绑定
    session.setAttribute("person", person);
    // 解除绑定
    session.removeAttribute("person");
%>
</body>
</html>
浏览器中访问JSP后Server Console上的输出结果
(增加属性的打印信息是配置了ServletContextAttributeListener,使用HttpSessionBindingListener一般不需要配置)
2.8 HttpSessionActivationListener接口
-
当有session数值的钝化(序列化)和活化(反序列化)操作时,将会通知HttpSessionActivationListener监听器
服务器内存中开辟一段内存空间,在服务器关闭后过了保存时间的Session会被删除,希望将其持久化存储一般用钝化
-
钝化和活化
- 钝化:关闭服务器时将内存中的文件存储到硬盘中
- 活化:启动服务器时将硬盘中的文件读取到内存中
钝化到活化实现持久化存储和读取的过程:数据->Session->硬盘->Session->数据
-
抽象方法:
void sessionWillPassivate(HttpSessionEvent se)有钝化操作时调用该方法
void sessionDidActivate(HttpSessionEvent se)有活化操作时调用该方法
-
钝化使用方式:
完成实现类
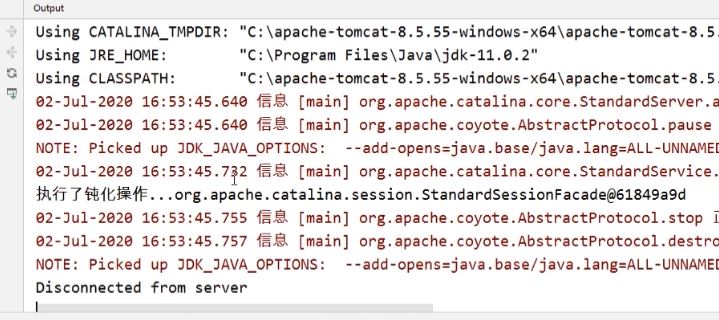
public class Student implements Serializable, HttpSessionActivationListener {
    private String name;

    public Student() {
    }

    public Student(String name) {
        this.name = name;
    }

    public String getName() {
        return name;
    }

    public void setName(String name) {
        this.name = name;
    }

    @Override
    public String toString() {
        return "Student{" +
                "name='" + name + '\'' +
                '}';
    }

    @Override
    public void sessionWillPassivate(HttpSessionEvent httpSessionEvent) {
        System.out.println("执行了钝化操作..." + httpSessionEvent.getSession());
    }

    @Override
    public void sessionDidActivate(HttpSessionEvent httpSessionEvent) {
        System.out.println("活化操作进行中...");
    }
}
完成属性状态事件
<%@ page import="com.example.demo03.Student" %><%--
  Created by IntelliJ IDEA.
--%>
<%@ page contentType="text/html;charset=UTF-8" language="java" %>
<html>
<head>
    <title>实现session中数据的钝化和活化操作</title>
</head>
<body>
<%
    // 创建Student类型的对象
    Student student = new Student();
    student.setName("zhangfei");
    // 将数据放入到session中
    session.setAttribute("student", student);
%>

</body>
</html>
浏览器中访问JSP后Server Console上的输出无结果,关闭服务器开始执行钝化操作(Session内容由内存转到硬盘中)
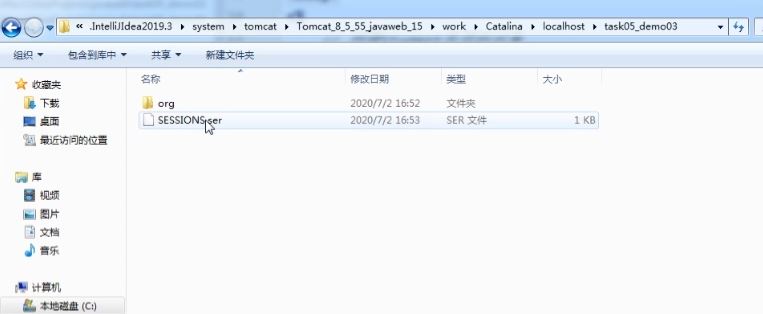
钝化后文件存储的位置(work目录下:JSP编译转为Servlet后会存储在该目录下)
-
活化使用方式
3. OnlineUser案例
-
OnlineUser类:监听器实现在线用户数量的统计
-
Session对象的特性:每个浏览器访问服务器会有一个Session,多个浏览器就是多个Session,
所以每当一个Session销毁,用户-1;每当一个Session创建,用户+1
-
ServletContext对象的特性:一个Web工程对应唯一的一个ServletContext对象,可用于存储在服务器运行期间的的变量
-
示例Code
public class OnlineUser implements HttpSessionListener, ServletContextListener {
    // 声明一个ServletContex类型的引用负责作为全局对象来记录当前在线用户的数量,通过属性记录
    private ServletContext servletContext = null;

    @Override
    public void contextInitialized(ServletContextEvent servletContextEvent) {
        servletContext = servletContextEvent.getServletContext();
    }

    @Override
    public void contextDestroyed(ServletContextEvent servletContextEvent) {
        servletContext = null;
    }

    @Override
    public void sessionCreated(HttpSessionEvent httpSessionEvent) {
        System.out.println("有新用户上线了...");
        Object count = servletContext.getAttribute("count");
        // 若当前用户为第一个用户,则将全局对象中的属性值设置为1即可
        if (null == count) {
            servletContext.setAttribute("count", 1);
        }
        // 若当前用户不是第一个用户,则将全局对象中原有的数据取出来加1后再设置进去
        else {
            Integer integer = (Integer)count;
            integer++;
            servletContext.setAttribute("count", integer);
        }
        System.out.println("当前在线用户数量为:" + servletContext.getAttribute("count"));
    }

    @Override
    public void sessionDestroyed(HttpSessionEvent httpSessionEvent) {
        System.out.println("有用户已下线...");
    }
}
<?xml version="1.0" encoding="UTF-8"?> <web-app xmlns="http://xmlns.jcp.org/xml/ns/javaee" xmlns:xsi="http://www.w3.org/2001/XMLSchema-instance" xsi:schemaLocation="http://xmlns.jcp.org/xml/ns/javaee http://xmlns.jcp.org/xml/ns/javaee/web-app_4_0.xsd" version="4.0"> <listener> <listener-class>com.example.demo04.OnlineUser</listener-class> </listener> </web-app><%-- Created by IntelliJ IDEA. --%> <%@ page contentType="text/html;charset=UTF-8" language="java" %> <html> <head> <title>实现当前在线的用户数量</title> </head> <body> <h1>当前在线用户人数为:${applicationScope.count}</h1> </body> </html>


【推荐】国内首个AI IDE,深度理解中文开发场景,立即下载体验Trae
【推荐】编程新体验,更懂你的AI,立即体验豆包MarsCode编程助手
【推荐】抖音旗下AI助手豆包,你的智能百科全书,全免费不限次数
【推荐】轻量又高性能的 SSH 工具 IShell:AI 加持,快人一步
· 阿里最新开源QwQ-32B,效果媲美deepseek-r1满血版,部署成本又又又降低了!
· 开源Multi-agent AI智能体框架aevatar.ai,欢迎大家贡献代码
· Manus重磅发布:全球首款通用AI代理技术深度解析与实战指南
· 被坑几百块钱后,我竟然真的恢复了删除的微信聊天记录!
· AI技术革命,工作效率10个最佳AI工具