Vue项目创建和使用
Vue项目创建
# 第一步:安装node:http://nodejs.cn/download/,一路下一步,加入环境变量
    -node :等同于 python
    -npm  :等同于 pip

# 第二步:安装脚手架
    cnpm install -g @vue/cli
    # 等同于pip install djagno ,释放出djagnoadmin可执行文件
    # 释放出vue可执行文件
    # 补充  使用npm 安装第三方模块,速度比较慢,使用国内镜像
    npm install -g cnpm --registry=https://registry.npm.taobao.org
    以后使用cnpm代替npm,速度快

# 第三步:创建vue项目
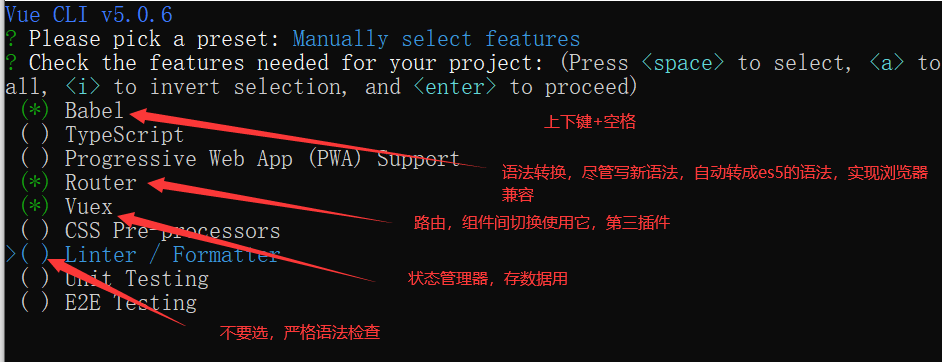
	-第一种:使用命令行
		vue create 项目名,步骤如下图
    -第二种:使用图形化界面创建项目
    	vue ui  #本质是用node起了一个服务,web程序,可以在web程序中点点点创建项目

# 第四步:使用pycharm打开项目
	-配置使用pycharm运行vue项目
    -方式一:在terminal中敲  npm run serve
    -方式二:配置,点击绿色箭头


vue项目目录结构
myfirstvue            # 项目名字
    -node_modules     # 有很多小文件,该项目的依赖,项目传给别人,这个文件夹要删掉,如果这个文件夹没有, npm install 生成,并且装好该项目的依赖
    -public           #文件夹
        -favicon.ico  # 网站顶部小图标
        -index.html   # 单页面开发,整个项目就这一个html
    -src              #文件夹,内容重要,以后咱们代码主要在这写,组件,js,css。。
        assets        #公共图片,js,css,都可以放在这里
        components    #小组件,放在页面组件中使用的小组件, xx.vue
        store         # 安装了vuex,就会生成,下面有个index.js
        router        # 安装了vue-router,就会生成,下面有个index.js
        views         # 页面组件,放了一个个页面组件
        App.vue       # 根组件
        main.js       # 整个项目的入口
    .gitignore        # git版本管理忽略文件
    babel.config.js   # babel的配置,不用管
    jsconfig.json
    package.json      # 项目的配置,和依赖模块都在这
    package-lock.json
    README.md         # 项目的介绍
    vue.config.js     # vue的配置信息


 # 重点是src文件夹下的所有东西
es6导入导出语法
在一个js中使用另一个js中的代码(变量,函数)
每个模块中,只允许使用一次export default,否则会报错
# 导出
	export default js对象类型
# 导入
	import 别名(传过来的对象名)  from 'js文件'
    import {add}(单独取js对象类型中一个值) from './common'

# js创建包,包下可以写一个index.js  等同于 python的__init__
# 之后导入的时候,只要导到包这一层即可


# require导入(了解)
	-es6之前,没有模块化,不能写包,第三方requirejs支持模块化,导入导出
    -es6加入了导入导出
案例
// test.js
var name = 'rain'
var age = 18

function count(num1, num2){
    return num1+num2
}

export default {name:name,age:age,count:count}

// 导入文件.js
import test from "@/assets/test";
console.log(test.name)
console.log(test.age)
console.log(test.count(7,8))
单页面组件写法
在组件化开发中,只需要写vue的组件即可
vue项目中一个文件就是一个组件:单文件组件 ---- xxx.vue
#第一部分:html内容
    <template>
    </template>
# 第二部分:js内容
    <script>
    </script>
 #第三部分:css样式
    <style>
    </style>
案例
<template>
  <div class="home">
    <img alt="Vue logo" src="../assets/logo.png">
    <h1>{{name}}</h1>
    <buttnon @click="handleClick">点击查看白月光</buttnon>
  </div>
</template>

<script>
import HelloWorld from '@/components/HelloWorld.vue'

export default {
  name: 'HomeView',
  data(){
    return{
      name : '白月光'
    }
  },
  methods:{
    handleClick(){
      alert('白月光')
    }
  },
  components: {
    HelloWorld
  }
}
</script>

<!--scoped 只在当前组件中生效-->
<style scoped>
h1{
  background-color: pink;
  font-size: 50px;
}
</style>
vue-router路由使用
使用第三方插件:vue-router,实现组件的切换
# 在 App.vue 中
<template>
  <div id="app">
    <router-view/>
  </div>
</template>

# 配置路由,在router/index.js中配置
const routes = [
    {
        path: '/demo',
        name: 'demo',
        component: DemoView
    }
]

# 在页面中设置一个点击事件
# 方式1(html)
<template>
<router-link :to="toUrl">
  <button @click="handleClick">点击跳转</button>
</router-link>
</template>

<script>
export default {
  data(){
    return{
      toUrl:'/demo'
    }
  }
}
</script>
# 方式2(js)
<template>
<button @click="handleClick">点击跳转</button>
</template>

<script>
export default {
  methods:{
    handleClick(){
      this.$router.push('/demo')
    }
  }
}
</script>

# 不可以跳转第三方路径
# 使用点击事件触发Bom的location对象,实现第三方路径跳转
location.href='http://www.baidu.com'
vue项目中使用bootstrap,jquery,elementui
'使用elementui'
# 安装
    cnpm i element-ui -S
# -S表示安装到当前项目下,并添加到依赖中,package.json

# 配置
# 在main.js中配置
    import ElementUI from 'element-ui';
    import 'element-ui/lib/theme-chalk/index.css';
    Vue.use(ElementUI);

# 使用:去官网,复制,粘贴,调整大小即可

'使用bootstrap和jq'
# 安装
    cnpm install jquery  -S
    cnpm install bootstrap@3 -S
# main.js配置
    import 'bootstrap'
    import 'bootstrap/dist/css/bootstrap.min.css'
分类:
vue


【推荐】国内首个AI IDE,深度理解中文开发场景,立即下载体验Trae
【推荐】编程新体验,更懂你的AI,立即体验豆包MarsCode编程助手
【推荐】抖音旗下AI助手豆包,你的智能百科全书,全免费不限次数
【推荐】轻量又高性能的 SSH 工具 IShell:AI 加持,快人一步
· 震惊!C++程序真的从main开始吗?99%的程序员都答错了
· 别再用vector<bool>了!Google高级工程师:这可能是STL最大的设计失误
· 单元测试从入门到精通
· 【硬核科普】Trae如何「偷看」你的代码?零基础破解AI编程运行原理
· 上周热点回顾(3.3-3.9)