
qt qss的使用,针对QTreeWidget,QHeaderView,水平滚动条,垂直滚动条的案例, QTreeWidget点击事件关于QHeaderView无法点击的问题的处理
一个学习库
https://www.cnblogs.com/IntelligencePointer/p/18443758
https://geekdaxue.co/read/manbuyihai@qt/bu6qba
参考 去焦点(虚线框)
https://blog.csdn.net/love_dear/article/details/128482219
参考 自定义标题栏
https://blog.csdn.net/wang_chao118/article/details/126582831
注意 继承QWidget的类若想使用qss需要在构造函数中设置如下
setAttribute(Qt::WA_StyledBackground, true); // 允许样式表绘制背景
使用案例
参考

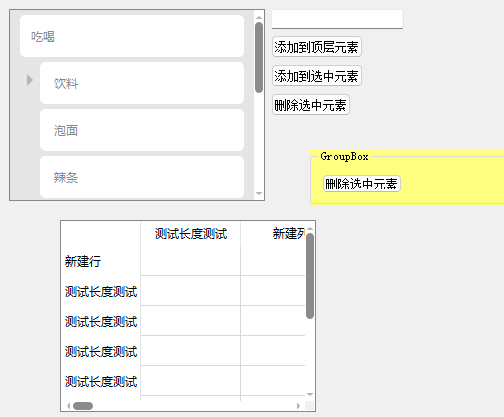
可得如下结果
表示QTreeWidget里面的QHeaderView
滚动条未做限制,表示是全局的滚动图
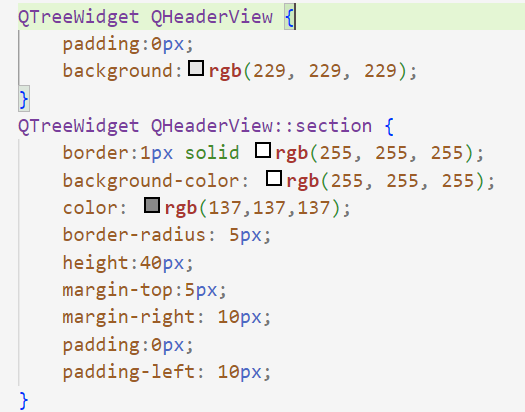
qss代码
点击查看代码
/* QHeaderView */
QTreeWidget{
 	padding-left:10px;
    background:rgb(229, 229, 229);
    outline:none;
}
QTreeWidget QHeaderView {
    padding:0px;
    background:rgb(229, 229, 229);
}
QTreeWidget QHeaderView::section {
    border:1px solid rgb(255, 255, 255);
    background-color: rgb(255, 255, 255);
    color: rgb(137,137,137);
    border-radius: 5px;
	height:40px;
	margin-top:5px;
    margin-right: 10px;
 	padding:0px;
    padding-left: 10px;
}

QTreeWidget::item {
    border:1px solid rgb(255, 255, 255);
    background-color: rgb(255, 255, 255);
    color: rgb(137,137,137);
    border-radius: 5px;
	height:40px;
	margin-top:5px;
    margin-right: 10px;
 	padding:0px;
    padding-left: 10px;
}

QTreeWidget::item:hover {
	/* show-decoration-selected:1; */
    border:2px solid rgb(250, 250, 250);
	background-color: rgb(202,225,251);
	selection-background-color: rgb(202,225,251);
	color: rgb(137,137,137);
}

QTreeWidget::item:selected {
    background-color: rgb(202,225,251);
	/* show-decoration-selected:1; */
	selection-background-color: rgb(202,225,251);
	color: rgb(137,137,137);
}
QTreeView::branch:closed:has-children{
    image: url(./image/treeclose.png);
}
QTreeView::branch:open:has-children{
    image: url(./image/treeopen.png);
}


/* 滚动条(垂直) */
QScrollBar:vertical{
    margin:12px 0px 12px 0px;
    background-color:rgb(255,255,255);
    border:0px;
    width:10px;
}
QScrollBar::handle:vertical{
    background-color:rgb(139,139,139);
    border-radius:4px;
    margin-left: 1px;
    margin-right: 1px;
}
QScrollBar::handle:vertical:hover{
    background-color:rgb(120,120,120);
    border-radius:4px;
    margin-left: 1px;
    margin-right: 1px;
}
QScrollBar::sub-line:vertical{
    subcontrol-position:top;
    subcontrol-origin:margin;
    background-color:rgb(255,255,255);
    border:1px solid rgb(255,255,255);
    height:12px;
}
QScrollBar::add-line:vertical{
    subcontrol-position:bottom;
    subcontrol-origin:margin;
    background-color:rgb(255,255,255);
    border:1px solid rgb(255,255,255);
    height:12px;
}
QScrollBar::up-arrow:vertical{
    border-image:url(./image/arrowUp.png);
    width:10px;
    height:5px;
}
QScrollBar::down-arrow:vertical{
    border-image:url(./image/arrowDown.png);
    width:10px;
    height:5px;
}
QScrollBar::sub-page:vertical,QScrollBar::add-page:vertical{
    background-color:rgb(255,255,255);
}


/* 滚动条(水平) */
QScrollBar:horizontal{
    margin:0px 12px 0px 12px;
    background-color:rgb(255,255,255);
    border:0px;
    height:10px;
}
QScrollBar::handle:horizontal{
    background-color:rgb(139,139,139);
    border-radius:4px;
    margin-top: 1px;
    margin-bottom: 1px;
}
QScrollBar::handle:horizontal:hover{
    background-color:rgb(120,120,120);
    border-radius:4px;
    margin-top: 1px;
    margin-bottom: 1px;
}
QScrollBar::sub-line:horizontal{
    subcontrol-position:left;
    subcontrol-origin:margin;
    background-color:rgb(255,255,255);
    border:1px solid rgb(255,255,255);
    width:12px;
}
QScrollBar::add-line:horizontal{
    subcontrol-position:right;
    subcontrol-origin:margin;
    background-color:rgb(255,255,255);
    border:1px solid rgb(255,255,255);
    width:12px;
}
QScrollBar::left-arrow:horizontal{
    border-image:url(./image/arrowLeft.png);
    width:5px;
    height:10px;
}
QScrollBar::right-arrow:horizontal{
    border-image:url(./image/arrowRight.png);
    width:5px;
    height:10px;
}
QScrollBar::sub-page:horizontal,QScrollBar::add-page:horizontal{
    background-color:rgb(255,255,255);
}
c语言中调用代码
    QFile file("./style.qss");
    if(file.open(QFile::ReadOnly)){
        QString res=file.readAll();
        file.close();
        qDebug()<<res;
        setStyleSheet(res);
    }
qss中用到的 image 文件夹下的文件如下


.ui中元素
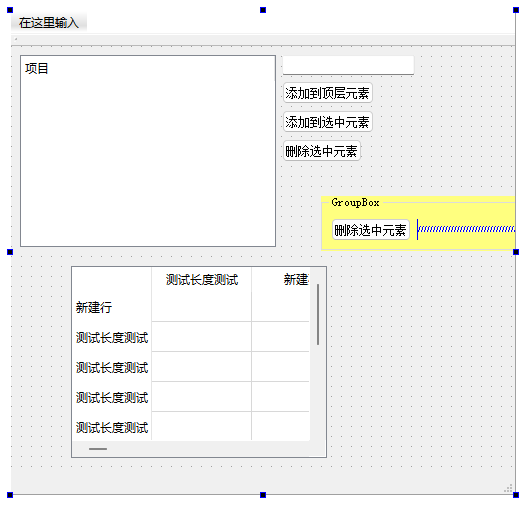
最终呈现结果
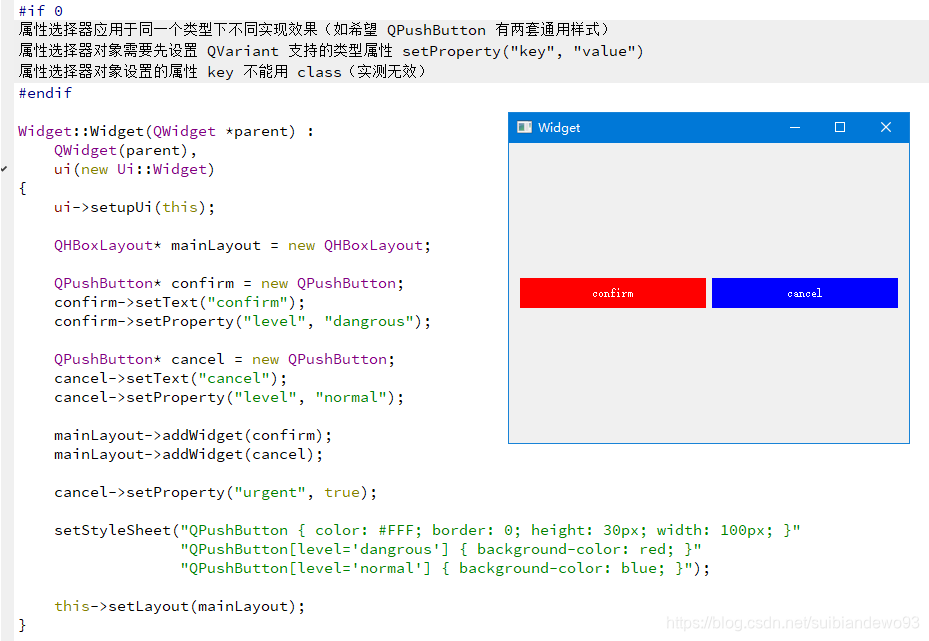
属性选择器使用案例
参考 https://blog.csdn.net/suibiandewo93/article/details/118785226
类选择器使用
参考 https://blog.csdn.net/c1s2d3n4cs/article/details/131003344
//=========第一步,设置样式
//具体用对象本身还是this抑或是qApp,请参考上一个说明
btnAA->setStyleSheet(
                ".GreenState {background-color:green;}"
                ".RedState {background-color:red;}"
                ".YellowState {background-color:yellow;}");

//=====第二步,在需要的位置根据逻辑设置属性类名
btn->setProperty("class","GreenState");
btn->setProperty("class","RedState");
btn->setProperty("class","YellowState");
btn->setProperty("class",QVariant());

//第三步,具体说明请参考上一个说明
btn->style()->unpolish(btn);
btn->style()->polish(btn);
QTreeWidget点击事件关于QHeaderView无法点击的问题的处理
方案1
class CustomHeaderView : public QHeaderView {
    Q_OBJECT
public:
    explicit CustomHeaderView(Qt::Orientation orientation, QWidget *parent = nullptr): QHeaderView(orientation, parent) {}
protected:
    void mousePressEvent(QMouseEvent *event) override {
        emit sigClickedHeaderView();
        // qDebug() << "Mouse clicked on custom header:" << event;// 处理鼠标点击事件
        QHeaderView::mousePressEvent(event); // 调用基类方法以保持默认行为
    }
signals:
    sigClickedHeaderView();
};

//CustomHeaderView *customHeader = new CustomHeaderView(Qt::Horizontal, treeWidget);
//customHeader->setStretchLastSection(true);//最后一列填充整行
//treeWidget->setHorizontalHeader(customHeader);


// 实际使用
        CustomHeaderView *customHeader = new CustomHeaderView(Qt::Horizontal, ui->data_tree_ui);
        customHeader->setStretchLastSection(true);//最后一列填充整行
        ui->data_tree_ui->setHeader(customHeader);
        connect(customHeader,&CustomHeaderView::sigClickedHeaderView,this,[=]() mutable{
            ui->data_tree_ui->clearSelection();//取消选中
        });

        connect(ui->data_tree_ui,&QTreeWidget::clicked,this,[=]() mutable{
            myDebug;
        });

        ui->data_tree_ui->expandAll();//全部展开
        ui->data_tree_ui->setItemsExpandable(false);//禁止展开,禁止关闭
方案2
ui->data_tree_ui->header()->setStretchLastSection(true);
ui->data_tree_ui->header()->setDefaultAlignment(Qt::AlignHCenter|Qt::AlignVCenter);//文字居中
ui->data_tree_ui->header()->setSectionsClickable(true);
connect(ui->data_tree_ui->header(),&QHeaderView::sectionClicked,this,[=]() mutable{ ui->data_tree_ui->clearSelection(); });
connect(ui->data_tree_ui,&QTreeWidget::clicked,this,[=]() mutable{
    myDebug;
});
QTreeWidget常用的属性
参考 https://blog.csdn.net/h1530687053/article/details/111460799
ui->treeWidget->clear(); // 清空树形数据
ui->treeWidget->setHeaderLabels(header_list); // 添加表头
ui->treeWidget->setHeaderHidden(false); // 是否隐藏表头
ui->treeWidget->setColumnCount(header_list.length()); // 设置树形的列数
ui->treeWidget->setColumnWidth(0, 200); // 列宽
ui->treeWidget->setColumnHidden(0, false); // 列隐藏
ui->treeWidget->header()->setDefaultAlignment(Qt::AlignHCenter); // 设置头部默认居中
ui->treeWidget->header()->setFirstSectionMovable(true); //默认第一列不可移动
ui->treeWidget->header()->setSectionsMovable(true); // 设置列移动
ui->treeWidget->header()->setHighlightSections(true); // 设置选中高亮
ui->treeWidget->header()->setSectionResizeMode(QHeaderView::Stretch); // 头部平分
ui->treeWidget->header()->setStretchLastSection(true); // 最后一项充满
ui->treeWidget->header()->setSortIndicatorShown(true); // 是否显示排序箭头
ui->treeWidget->setAlternatingRowColors(true); // 设置隔行颜色间隔
ui->treeWidget->setSelectionMode(QAbstractItemView::SingleSelection); // 是否可以选择多个项目
ui->treeWidget->setSelectionBehavior(QAbstractItemView::SelectColumns); // 设置选择行或者列

//    ui->treeWidget->topLevelItem(0)->setExpanded(false); // 指定层级展开  此属性要在有数据才可用
//    ui->treeWidget->expandAll(); // 全部展开


ui->treeWidget->setRootIsDecorated(true); // 设置最顶层的节点是否显示前面小箭头
ui->treeWidget->setFrameStyle(true); // 暂时没发现有什么效果,其他地方说的隐藏边框
ui->treeWidget->setFrameShadow(QFrame::Raised); // 说的可以设置阴影但是没看到效果
ui->treeWidget->setHorizontalScrollBarPolicy(Qt::ScrollBarAsNeeded); // 设置是否开启滚动条,一般都是默认值
一个注意事项(qss失效的一个点)
/* 正常显示.因为前面有个相对应的一个设置 */
QStackedWidget#stackedWidget > QWidget > QGroupBox#groupBox_export{
    border:1px solid rgb(222,222,222);
}
/* 无法显示,可能被前面的覆盖了,(即这个写法,等级更低) */
QGroupBox#groupBox_export{
    border:1px solid rgb(222,222,222);
}

 浙公网安备 33010602011771号