设计模式:结构型(Structural)
适配器模式(Adapter Pattern)
适配器模式是一种结构型设计模式,用于将一个类的接口转换为客户端所期望的另一种接口,以便可以使用不兼容的类协同工作。
适配器模式包含三个核心角色:
- 目标接口(Target):客户端所期望的接口。
- 源接口(Adaptee):需要被转换的接口。
- 适配器(Adapter):将源接口转换成目标接口的类。
电压转换的例子:
 1 public class Adaptee {
 2
 3     public int output220v() {
 4         return 220;
 5     }
 6
 7 }
 8
 9 public interface Target {
10
11     int output5v();
12
13 }
14
15
16 public class Adapter implements Target {
17     private Adaptee adaptee;
18
19     public Adapter(Adaptee adaptee) {
20         this.adaptee = adaptee;
21     }
22
23     @Override
24     public int output5v() {
25         int i = adaptee.output220v();
26         System.out.println(String.format("原始电压:%d v -> 输出电压:%d v", i, 5));
27         return 5;
28     }
29
30 }
31
32
33 public class UseAdapter {
34
35     public static void main(String[] args) {
36         Adaptee adaptee = new Adaptee();
37         Target target = new Adapter(adaptee);
38         target.output5v();
39     }
40
41 }
解决的问题:适配器模式主要解决两个不兼容接口之间的转换问题。
例如,一个系统需要使用一个新的日志框架,但是原有的代码使用的是旧的日志框架,这时可以使用适配器模式。可以创建一个适配器类,该类实现新的日志框架的接口,并在其内部调用旧的日志框架的接口。这样,原有的代码就可以使用新的日志框架了,而不需要修改原有的代码。
第一,确定目标接口
系统原来的日志接口如下
1 public interface LogFactory {
2     void debug(String tag, String message);
3 }
第二,三方库接口及实现
下面是第三方库提供的日志功能,但是其接口与二狗他们系统目前使用的不兼容。
 1 public interface NbLogger {
 2     void d(int priority, String message, Object ... obj);
 3 }
 4 //具体提供日志功能的实现类
 5 public class NbLoggerImp implements NbLogger {
 6     @Override
 7     public void d(int priority, String message, Object... obj) {
 8         System.out.println(String.format("牛逼logger记录:%s",message));
 9     }
10 }
第三,构建适配器类
这个类是适配器模式的核心,通过此类就可以将三方库提供的接口转换为系统的目标接口。
 1 public class LogAdapter implements LogFactory {
 2     private NbLogger nbLogger;
 3
 4     public LogAdapter(NbLogger nbLogger) {
 5         this.nbLogger = nbLogger;
 6     }
 7
 8     @Override
 9     public void debug(String tag, String message) {
10         Objects.requireNonNull(nbLogger);
11         nbLogger.d(1, message);
12     }
13 }
LogAdapter 实现了系统的目标接口,同时持有三方库NbLogger的引用。
第四,客户端使用
public class AdapterClient {
    public void recordLog() {
        LogFactory logFactory = new LogAdapter(new NbLoggerImp());
        logFactory.debug("Test", "我将使用牛逼logger打印log");
    }
}
可以看到,通过适配器客户端就可以很轻松的切换到新的日志系统了。
桥接模式(Bridge Pattern)
桥接模式(Bridge Pattern)是一种结构型设计模式,它将抽象部分和实现部分分离开来,以便两者可以独立地变化。桥接模式的核心思想是将一个系统分成多个维度,每个维度单独考虑,从而简化系统,提高可扩展性和可维护性。
解决的问题:类的爆炸性增长,类与实现之间的紧耦合。例如通过应用桥接模式,可以将抽象部分(形状)和实现部分(绘制方式)解耦,使得它们可以独立地变化。
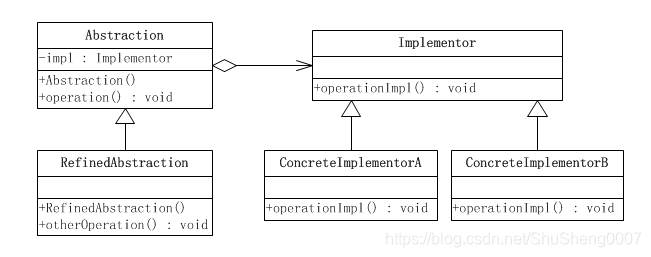
桥接模式所涉及的角色有:
- Abstraction:抽象类
- RefinedAbstraction:扩充抽象类
- Implementor:实现类接口
- ConcreteImplementor:具体实现类
举个例子,假设有一个形状接口 Shape 和一个颜色接口 Color,如果需要实现各种形状和各种颜色的组合,传统的做法是定义大量的子类,如 RedCircle、GreenCircle、BlueCircle、RedRectangle、GreenRectangle、BlueRectangle 等等。而使用桥接模式,可以把形状和颜色分别抽象出来,分别作为抽象类 Shape 和 Color 的实现类,然后将它们组合起来即可,如 RedCircle、GreenRectangle 等等。这样,在新增一种形状或颜色时,只需要新增一个实现类即可,不需要修改现有的代码,从而提高了代码的可扩展性和维护性。这里是一个简单的 Java 代码示例,演示了如何使用桥接模式来实现 Shape 和 Color 的组合,而不需要定义大量的子类:
 1 // 定义颜色接口
 2 public interface Color {
 3     void fill();
 4 }
 5
 6 // 实现 Red Color
 7 public class Red implements Color {
 8
 9     @Override
10     public void fill() {
11         System.out.println("Filling with red color...");
12     }
13 }
14
15 // 实现 Green Color
16 public class Green implements Color {
17
18     @Override
19     public void fill() {
20         System.out.println("Filling with green color...");
21     }
22 }
23
24 // 定义形状抽象类
25 public abstract class Shape {
26     protected Color color;
27
28     public Shape(Color color) {
29         this.color = color;
30     }
31
32     abstract void draw();
33 }
34
35 // 实现 Circle 形状
36 public class Circle extends Shape {
37
38     public Circle(Color color) {
39         super(color);
40     }
41
42     @Override
43     void draw() {
44         System.out.print("Drawing circle with ");
45         color.fill();
46     }
47 }
48
49 // 实现 Rectangle 形状
50 public class Rectangle extends Shape {
51
52     public Rectangle(Color color) {
53         super(color);
54     }
55
56     @Override
57     void draw() {
58         System.out.print("Drawing rectangle with ");
59         color.fill();
60     }
61 }
62
63 // 测试
64 public class BridgePatternDemo {
65
66     public static void main(String[] args) {
67         Color red = new Red();
68         Shape circle = new Circle(red);
69         circle.draw();
70
71         Color green = new Green();
72         Shape rectangle = new Rectangle(green);
73         rectangle.draw();
74     }
75 }
组合模式(Composite Pattern)
组合模式是一种结构型设计模式,它将对象组织成树形结构,使得客户端可以以一致的方式处理单个对象和对象组合。
组合模式由以下两种对象组成:
- 叶子节点:表示树形结构中的单个对象。
- 组合节点:表示树形结构中的对象组合,它可以包含其他组合节点和叶子节点。

组合模式的核心思想是将对象组织成树形结构,并且让客户端能够以一致的方式处理单个对象和对象组合。这种结构可以使得客户端将组合对象和单个对象一视同仁,从而简化了客户端的代码。此外,组合模式还可以通过递归方式访问整个树形结构,使得我们可以方便地对树形结构中的对象进行操作。
一个常见的例子是文件系统,文件系统由目录和文件两种元素组成,目录可以包含子目录和文件,而文件只能包含数据。
我们可以使用组合模式来构建文件系统的结构。首先定义一个抽象类 AbstractFile,表示文件和目录的基类,包含了一些基本的操作方法。然后定义 File 类和 Directory 类,分别表示文件和目录。Directory 类维护了一个子节点的列表,可以添加、删除子节点,以及对子节点进行操作。这样就可以通过组合方式来构建出任意复杂的目录结构。
示例代码如下:
 1 // 抽象文件类
 2 abstract class AbstractFile {
 3     public abstract void add(AbstractFile file);
 4     public abstract void remove(AbstractFile file);
 5     public abstract AbstractFile getChild(int index);
 6     public abstract void operation();
 7 }
 8
 9 // 文件类
10 class File extends AbstractFile {
11     private String name;
12
13     public File(String name) {
14         this.name = name;
15     }
16
17     public void add(AbstractFile file) {
18         System.out.println("不支持该方法");
19     }
20
21     public void remove(AbstractFile file) {
22         System.out.println("不支持该方法");
23     }
24
25     public AbstractFile getChild(int index) {
26         System.out.println("不支持该方法");
27         return null;
28     }
29
30     public void operation() {
31         System.out.println("访问文件 " + name);
32     }
33 }
34
35 // 目录类
36 class Directory extends AbstractFile {
37     private List<AbstractFile> files = new ArrayList<>();
38     private String name;
39
40     public Directory(String name) {
41         this.name = name;
42     }
43
44     public void add(AbstractFile file) {
45         files.add(file);
46     }
47
48     public void remove(AbstractFile file) {
49         files.remove(file);
50     }
51
52     public AbstractFile getChild(int index) {
53         return files.get(index);
54     }
55
56     public void operation() {
57         System.out.println("访问目录 " + name);
58         for (AbstractFile file : files) {
59             file.operation();
60         }
61     }
62 }
使用组合模式可以方便地构建出任意复杂的文件系统结构,增加、删除和操作文件和目录也十分简单。
装饰者模式(Decorator Pattern)
装饰者模式(Decorator Pattern)是一种结构型设计模式,它允许在不修改现有代码的情况下,通过将对象包装在装饰器对象中来动态地添加新的行为和功能。


 1 public interface Coffee {
 2     String getDescription();
 3     double getCost();
 4 }
 5
 6 public class Espresso implements Coffee {
 7     @Override
 8     public String getDescription() {
 9         return "Espresso";
10     }
11
12     @Override
13     public double getCost() {
14         return 1.99;
15     }
16 }
17
18 public abstract class CoffeeDecorator implements Coffee {
19     protected Coffee coffee;
20
21     public CoffeeDecorator(Coffee coffee) {
22         this.coffee = coffee;
23     }
24
25     @Override
26     public String getDescription() {
27         return coffee.getDescription();
28     }
29
30     @Override
31     public double getCost() {
32         return coffee.getCost();
33     }
34 }
35
36 public class Milk extends CoffeeDecorator {
37     public Milk(Coffee coffee) {
38         super(coffee);
39     }
40
41     @Override
42     public String getDescription() {
43         return coffee.getDescription() + ", Milk";
44     }
45
46     @Override
47     public double getCost() {
48         return coffee.getCost() + 0.5;
49     }
50 }
51
52 public class Syrup extends CoffeeDecorator {
53     public Syrup(Coffee coffee) {
54         super(coffee);
55     }
56
57     @Override
58     public String getDescription() {
59         return coffee.getDescription() + ", Syrup";
60     }
61
62     @Override
63     public double getCost() {
64         return coffee.getCost() + 0.25;
65     }
66 }
67
68 // 创建一个 Espresso 对象
69 Coffee espresso = new Espresso();
70 System.out.println("Description: " + espresso.getDescription());
71 System.out.println("Cost: " + espresso.getCost());
72
73 // 为 Espresso 添加 Milk 和 Syrup 装饰者
74 Coffee espressoWithMilkAndSyrup = new Milk(new Syrup(new Espresso()));
75 System.out.println("Description: " + espressoWithMilkAndSyrup.getDescription());
76 System.out.println("Cost: " + espressoWithMilkAndSyrup.getCost());
外观模式(Facade Pattern)
外观模式(Facade Pattern)是一种结构型设计模式,它提供了一个简化复杂系统的接口,用于隐藏系统的复杂性,使得客户端可以更加方便地与系统进行交互,同时降低了客户端与系统之间的耦合度。
外观模式的主要目的是通过一个外观类(Facade Class)将一个复杂系统的子系统(或多个对象)进行封装,提供一个统一的高层接口,以便客户端可以通过这个简化的接口来访问系统,而不需要了解系统的复杂内部结构。
外观模式的核心思想是将复杂的系统划分为多个子系统,然后通过一个外观类来对这些子系统进行封装,从而提供一个简化的接口给客户端。外观类通常包含了对各个子系统的引用,并且对子系统的调用进行了适当的封装,对外提供了一个简洁、易用的接口。
 1 // 子系统:窗口管理
 2 class WindowManager {
 3     public void createWindow(String title, int width, int height) {
 4         System.out.println("Create window with title: " + title + ", width: " + width + ", height: " + height);
 5     }
 6
 7     public void closeWindow(String title) {
 8         System.out.println("Close window with title: " + title);
 9     }
10 }
11
12 // 子系统:绘图
13 class Graphics {
14     public void drawLine(int x1, int y1, int x2, int y2) {
15         System.out.println("Draw line from (" + x1 + ", " + y1 + ") to (" + x2 + ", " + y2 + ")");
16     }
17
18     public void drawRectangle(int x, int y, int width, int height) {
19         System.out.println("Draw rectangle at (" + x + ", " + y + ") with width: " + width + ", height: " + height);
20     }
21 }
22
23 // 子系统:事件处理
24 class EventManager {
25     public void registerEvent(String eventType, EventListener listener) {
26         System.out.println("Register event type: " + eventType + " with listener: " + listener);
27     }
28
29     public void unregisterEvent(String eventType, EventListener listener) {
30         System.out.println("Unregister event type: " + eventType + " with listener: " + listener);
31     }
32
33     public void handleEvent(String eventType) {
34         System.out.println("Handle event type: " + eventType);
35     }
36 }
37
38 // 外观类:图形界面库外观
39 class GUIFacade {
40     private WindowManager windowManager;
41     private Graphics graphics;
42     private EventManager eventManager;
43
44     public GUIFacade() {
45         windowManager = new WindowManager();
46         graphics = new Graphics();
47         eventManager = new EventManager();
48     }
49
50     // 提供简化的接口供客户端使用
51     public void createWindow(String title, int width, int height) {
52         windowManager.createWindow(title, width, height);
53     }
54
55     public void closeWindow(String title) {
56         windowManager.closeWindow(title);
57     }
58
59     public void drawLine(int x1, int y1, int x2, int y2) {
60         graphics.drawLine(x1, y1, x2, y2);
61     }
62
63     public void drawRectangle(int x, int y, int width, int height) {
64         graphics.drawRectangle(x, y, width, height);
65     }
66
67     public void registerEvent(String eventType, EventListener listener) {
68         eventManager.registerEvent(eventType, listener);
69     }
70
71     public void unregisterEvent(String eventType, EventListener listener) {
72         eventManager.unregisterEvent(eventType, listener);
73     }
74
75     public void handleEvent(String eventType) {
76         eventManager.handleEvent(eventType);
77     }
78 }
享元模式(Flyweight Pattern)
享元模式(Flyweight Pattern)是一种结构型设计模式,旨在通过共享对象的方式来减少内存使用和提高性能。享元模式适用于需要创建大量相似对象,且这些对象中有很多可以共享的状态或属性的场景,从而避免创建过多的重复对象,节省内存开销。
享元模式的核心思想是将对象的状态划分为内部状态(Intrinsic State)和外部状态(Extrinsic State)。内部状态是对象共享的部分,它不随外部环境的变化而变化,可以被多个对象共享;而外部状态是对象特定的部分,它随外部环境的变化而变化,每个对象都有自己的外部状态。
享元模式的主要角色包括:
- 享元接口(Flyweight):定义了共享对象的接口,包含了享元对象的共享方法。
- 具体享元(Concrete Flyweight):实现了享元接口,表示具体的享元对象。
- 享元工厂(Flyweight Factory):负责创建和管理享元对象的工厂,通过池化的方式来管理和共享对象。
- 客户端(Client):使用享元模式的客户端,通过享元工厂获取享元对象,并通过外部状态来定制享元对象的行为。
 1 import java.util.HashMap;
 2 import java.util.Map;
 3
 4 // 享元接口
 5 interface ChessPiece {
 6     void move(int x, int y);
 7 }
 8
 9 // 具体享元
10 class ConcreteChessPiece implements ChessPiece {
11     private String type; // 内部状态
12
13     public ConcreteChessPiece(String type) {
14         this.type = type;
15     }
16
17     public void move(int x, int y) {
18         System.out.println("Move " + type + " to (" + x + ", " + y + ")");
19     }
20 }
21
22 // 享元工厂
23 class ChessPieceFactory {
24     private Map<String, ChessPiece> chessPieces = new HashMap<>();
25
26     public ChessPiece getChessPiece(String type) {
27         if (!chessPieces.containsKey(type)) {
28             chessPieces.put(type, new ConcreteChessPiece(type));
29         }
30         return chessPieces.get(type);
31     }
32 }
33
34 // 客户端
35 public class FlyweightExample {
36     public static void main(String[] args) {
37         ChessPieceFactory factory = new ChessPieceFactory();
38         ChessPiece blackPawn = factory.getChessPiece("blackPawn");
39         ChessPiece whitePawn = factory.getChessPiece("whitePawn");
40
41         blackPawn.move(2, 3);
42         whitePawn.move(4, 5);
43     }
44 }
代理模式(Proxy Pattern)
代理模式(Proxy Pattern)是一种结构型设计模式,用于在访问对象时引入一个中间层(代理)以控制对目标对象的访问。代理模式可以为目标对象提供额外的功能或者控制对目标对象的访问方式,同时隐藏目标对象的具体实现细节。
代理模式通常涉及三种角色:
-
目标对象(Subject):定义了代理和真实对象共同实现的接口,代理模式的目标对象是客户端最终要访问的对象。
-
代理对象(Proxy):实现了目标对象的接口,并在其内部持有一个真实对象的引用。代理对象可以在访问目标对象之前或之后执行一些额外的操作,例如权限控制、缓存、日志记录等。
-
客户端(Client):通过代理对象来访问目标对象,无需直接与目标对象交互。
代理模式主要解决了以下几个问题:
-
隐藏目标对象的具体实现细节,将其与客户端分离,提供了更加简洁的接口,降低了系统的耦合度。
-
在访问目标对象之前或之后可以执行额外的操作,例如权限控制、缓存、日志记录等,从而对目标对象的访问进行了控制和增强。
-
可以为目标对象提供代理,从而实现一些懒加载、延迟初始化等优化策略。
一个简单的代理模式的示例是数据库连接池,其中代理对象(连接池代理)可以在访问真实的数据库连接之前进行连接的获取和释放、连接的复用、连接的管理等操作,从而对数据库连接的访问进行了控制和优化。
 1 // 目标对象接口
 2 interface Server {
 3     void doSomething();
 4 }
 5
 6 // 目标对象的实现类
 7 class RealServer implements Server {
 8     public void doSomething() {
 9         System.out.println("RealServer: Doing something...");
10     }
11 }
12
13 // 代理对象
14 class ServerProxy implements Server {
15     private RealServer realServer; // 持有真实对象的引用
16
17     public void doSomething() {
18         // 在访问目标对象之前可以执行一些额外的操作
19         System.out.println("ServerProxy: Before doing something...");
20
21         // 懒加载,只在需要时才创建真实对象
22         if (realServer == null) {
23             realServer = new RealServer();
24         }
25
26         // 调用真实对象的方法
27         realServer.doSomething();
28
29         // 在访问目标对象之后可以执行一些额外的操作
30         System.out.println("ServerProxy: After doing something...");
31     }
32 }
33
34 // 客户端
35 public class Client {
36     public static void main(String[] args) {
37         Server server = new ServerProxy();
38         server.doSomething();
39     }
40 }
动态代理是一种在运行时动态生成代理对象的方式,它是代理模式的一种实现方式。与静态代理不同,静态代理需要编写具体的代理类,而动态代理则可以在运行时通过反射等方式动态生成代理对象,从而减少了手动编写大量代理类的工作。
在 Java 中,动态代理主要通过 Java 的反射机制来实现。Java 提供了两种方式来实现动态代理:基于接口的 JDK 动态代理和基于类的 CGLIB 动态代理。
JDK 动态代理基于接口,通过 java.lang.reflect.Proxy 类和 java.lang.reflect.InvocationHandler 接口来实现。使用 JDK 动态代理时,需要定义一个 InvocationHandler 实现类,该类负责处理代理对象的方法调用,并通过 Proxy.newProxyInstance() 方法生成代理对象。
 1 import java.lang.reflect.InvocationHandler;
 2 import java.lang.reflect.Method;
 3 import java.lang.reflect.Proxy;
 4
 5 interface Subject {
 6     void doSomething();
 7 }
 8
 9 class RealSubject implements Subject {
10     public void doSomething() {
11         System.out.println("RealSubject doSomething");
12     }
13 }
14
15 class DynamicProxyHandler implements InvocationHandler {
16     private Object target;
17
18     public DynamicProxyHandler(Object target) {
19         this.target = target;
20     }
21
22     public Object invoke(Object proxy, Method method, Object[] args) throws Throwable {
23         System.out.println("Before calling method: " + method.getName());
24         Object result = method.invoke(target, args);
25         System.out.println("After calling method: " + method.getName());
26         return result;
27     }
28 }
29
30 public class DynamicProxyExample {
31     public static void main(String[] args) {
32         RealSubject realSubject = new RealSubject();
33         DynamicProxyHandler handler = new DynamicProxyHandler(realSubject);
34         Subject proxySubject = (Subject) Proxy.newProxyInstance(
35                 realSubject.getClass().getClassLoader(),
36                 realSubject.getClass().getInterfaces(),
37                 handler
38         );
39         proxySubject.doSomething();
40     }
41 }

 浙公网安备 33010602011771号