一文弄懂Pytorch的DataLoader, DataSet, Sampler之间的关系
转载于:https://www.cnblogs.com/marsggbo/p/11308889.html
以下内容都是针对Pytorch 1.0-1.1介绍。
很多文章都是从Dataset等对象自下往上进行介绍,但是对于初学者而言,其实这并不好理解,因为有的时候会不自觉地陷入到一些细枝末节中去,而不能把握重点,所以本文将会自上而下地对Pytorch数据读取方法进行介绍。
1.自上而下理解三者关系
首先我们看一下DataLoader.next的源代码长什么样,为方便理解我只选取了num_works为0的情况(num_works简单理解就是能够并行化地读取数据)。
class DataLoader(object):
    ...

    def __next__(self):
        if self.num_workers == 0:
            indices = next(self.sample_iter)  # Sampler
            batch = self.collate_fn([self.dataset[i] for i in indices]) # Dataset
            if self.pin_memory:
                batch = _utils.pin_memory.pin_memory_batch(batch)
            return batch
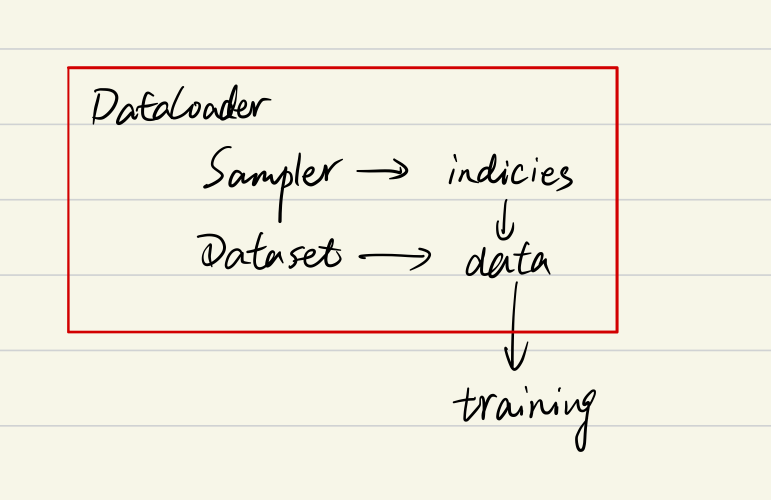
在阅读上面代码前,我们可以假设我们的数据是一组图像,每一张图像对应一个index,那么如果我们要读取数据就只需要对应的index即可,即上面代码中的indices,而选取index的方式有多种,有按顺序的,也有乱序的,所以这个工作需要Sampler完成,现在你不需要具体的细节,后面会介绍,你只需要知道DataLoader和Sampler在这里产生关系。
那么Dataset和DataLoader在什么时候产生关系呢?没错就是下面一行。我们已经拿到了indices,那么下一步我们只需要根据index对数据进行读取即可了。
再下面的if语句的作用简单理解就是,如果pin_memory=True,那么Pytorch会采取一系列操作把数据拷贝到GPU,总之就是为了加速。
综上可以知道DataLoader,Sampler和Dataset三者关系如下:

在阅读后文的过程中,你始终需要将上面的关系记在心里,这样能帮助你更好地理解。
2.Sampler
2.1 参数传递
要更加细致地理解Sampler原理,我们需要先阅读一下DataLoader 的源代码,如下:
class DataLoader(object):
    def __init__(self, dataset, batch_size=1, shuffle=False, sampler=None,
                 batch_sampler=None, num_workers=0, collate_fn=default_collate,
                 pin_memory=False, drop_last=False, timeout=0,
                 worker_init_fn=None)
可以看到初始化参数里有两种sampler:sampler和batch_sampler,都默认为None。前者的作用是生成一系列的index,而batch_sampler则是将sampler生成的indices打包分组,得到一个又一个batch的index。例如下面示例中,BatchSampler将SequentialSampler生成的index按照指定的batch size分组。
>>>in : list(BatchSampler(SequentialSampler(range(10)), batch_size=3, drop_last=False))
>>>out: [[0, 1, 2], [3, 4, 5], [6, 7, 8], [9]]
Pytorch中已经实现的Sampler有如下几种:
SequentialSamplerRandomSamplerWeightedSamplerSubsetRandomSampler
需要注意的是DataLoader的部分初始化参数之间存在互斥关系,这个你可以通过阅读源码更深地理解,这里只做总结:
- 如果你自定义了
batch_sampler,那么这些参数都必须使用默认值:batch_size,shuffle,sampler,drop_last. - 如果你自定义了
sampler,那么shuffle需要设置为False - 如果
sampler和batch_sampler都为None,那么batch_sampler使用Pytorch已经实现好的BatchSampler,而sampler分两种情况:- 若
shuffle=True,则sampler=RandomSampler(dataset) - 若
shuffle=False,则sampler=SequentialSampler(dataset)
- 若
2.2 如何自定义Sampler和BatchSampler?
仔细查看源代码其实可以发现,所有采样器其实都继承自同一个父类,即Sampler,其代码定义如下:
class Sampler(object):
    r"""Base class for all Samplers.
    Every Sampler subclass has to provide an :meth:`__iter__` method, providing a
    way to iterate over indices of dataset elements, and a :meth:`__len__` method
    that returns the length of the returned iterators.
    .. note:: The :meth:`__len__` method isn't strictly required by
              :class:`~torch.utils.data.DataLoader`, but is expected in any
              calculation involving the length of a :class:`~torch.utils.data.DataLoader`.
    """

    def __init__(self, data_source):
        pass

    def __iter__(self):
        raise NotImplementedError

    def __len__(self):
        return len(self.data_source)
所以你要做的就是定义好__iter__(self)函数,不过要注意的是该函数的返回值需要是可迭代的。例如SequentialSampler返回的是iter(range(len(self.data_source)))。
另外BatchSampler与其他Sampler的主要区别是它需要将Sampler作为参数进行打包,进而每次迭代返回以batch size为大小的index列表。也就是说在后面的读取数据过程中使用的都是batch sampler。
3.Dataset
Dataset定义方式如下:
class Dataset(object):
    def __init__(self):
        ...

    def __getitem__(self, index):
        return ...

    def __len__(self):
        return ...
上面三个方法是最基本的,其中__getitem__是最主要的方法,它规定了如何读取数据。但是它又不同于一般的方法,因为它是python built-in方法,其主要作用是能让该类可以像list一样通过索引值对数据进行访问。假如你定义好了一个dataset,那么你可以直接通过dataset[0]来访问第一个数据。在此之前我一直没弄清楚__getitem__是什么作用,所以一直不知道该怎么进入到这个函数进行调试。现在如果你想对__getitem__方法进行调试,你可以写一个for循环遍历dataset来进行调试了,而不用构建dataloader等一大堆东西了,建议学会使用ipdb这个库,非常实用!!!以后有时间再写一篇ipdb的使用教程。另外,其实我们通过最前面的Dataloader的__next__函数可以看到DataLoader对数据的读取其实就是用了for循环来遍历数据,不用往上翻了,我直接复制了一遍,如下:
class DataLoader(object):
    ...

    def __next__(self):
        if self.num_workers == 0:
            indices = next(self.sample_iter)
            batch = self.collate_fn([self.dataset[i] for i in indices]) # this line
            if self.pin_memory:
                batch = _utils.pin_memory.pin_memory_batch(batch)
            return batch
我们仔细看可以发现,前面还有一个self.collate_fn方法,这个是干嘛用的呢?在介绍前我们需要知道每个参数的意义:
indices: 表示每一个iteration,sampler返回的indices,即一个batch size大小的索引列表self.dataset[i]: 前面已经介绍了,这里就是对第i个数据进行读取操作,一般来说self.dataset[i]=(img, label)
看到这不难猜出collate_fn的作用就是将一个batch的数据进行合并操作。默认的collate_fn是将img和label分别合并成imgs和labels,所以如果你的__getitem__方法只是返回 img, label,那么你可以使用默认的collate_fn方法,但是如果你每次读取的数据有img, box, label等等,那你就需要自定义collate_fn来将对应数据合并成一个batch数据,方便后续的训练步骤。


