使用纯Java搭建SSM框架
基于Java形式的项目配置,相比于基于配置文件的形式更直接,更简洁,更简单。使用配置文件,比如xml,json,properties等形式,都是用代码去解析配置文件内的信息,然后根据其信息设置相应配置类的属性。而Java形式的配置是跳过配置文件,直接将配置信息赋值到相应的配置类里。俗话说的好:在java中没什么是加一层(XML文件)解决不了的,但我们也是需要知道它的运行过程和细节的。
第一步:配置SpringDao层
package com.xiaobai.config;

import com.mchange.v2.c3p0.ComboPooledDataSource;
import org.mybatis.spring.SqlSessionFactoryBean;
import org.mybatis.spring.mapper.MapperScannerConfigurer;
import org.springframework.beans.factory.annotation.Autowired;
import org.springframework.context.annotation.Bean;
import org.springframework.context.annotation.ComponentScan;
import org.springframework.context.annotation.Configuration;
import org.springframework.context.annotation.PropertySource;
import org.springframework.core.env.Environment;
import org.springframework.core.io.ClassPathResource;
import org.springframework.core.io.support.PathMatchingResourcePatternResolver;
import org.springframework.web.servlet.view.InternalResourceViewResolver;
import org.springframework.web.servlet.view.JstlView;
import org.springframework.core.io.Resource;

import javax.sql.DataSource;
import java.beans.PropertyVetoException;
import java.io.IOException;

@Configuration
/*@ComponentScan("com.xiaobai")*/
@PropertySource(value = {"classpath:jdbc.properties"})
public class SpringDaoConfig {

    /* @Value("${jdbc.driver}")
        String driver;
        @Value("${jdbc.url}")
        String url;
        @Value("${jdbc.user}")
        String user;
        @Value("${jdbc.password}")
        String password;
    */
    /*获取properties为后缀名的文件
     *
     * 第一种方法
     * @PropertySource注解 和Environment类(spring的)一起用
     *
     * 第二种方法
     *
     *
     * */
    @Autowired
    private Environment env;

    /*定义这个方法后就可以使用
     * 这样写: "${jdbc.url}"
     * */

    @Bean
    public DataSource dataSource() throws PropertyVetoException {
        //MyBatis数据源
        ComboPooledDataSource source = new ComboPooledDataSource();
        source.setDriverClass("org.mariadb.jdbc.Driver");
        source.setJdbcUrl("jdbc:mariadb://localhost:3306/test");
        source.setUser("root");
        source.setPassword("Qi1007..");


//        dataSource.setJdbcUrl("${jdbc.url}");
//        dataSource.setDriverClass("${jdbc.driver}");
//        dataSource.setUser("${jdbc.user}");
//        dataSource.setPassword("${jdbc.password}");
/*        dataSource.setJdbcUrl(this.url);
        dataSource.setDriverClass(this.driver);
        dataSource.setUser(this.user);
        dataSource.setPassword(this.password);*/

        return source;
    }

    @Bean
    public SqlSessionFactoryBean sqlSessionFactory() throws PropertyVetoException, IOException {
        SqlSessionFactoryBean sqlSessionFactoryBean = new SqlSessionFactoryBean();

        sqlSessionFactoryBean.setDataSource(this.dataSource());
        sqlSessionFactoryBean.setTypeAliasesPackage("com.xiaobai.entity");
        //sqlSessionFactoryBean.setConfigLocation(new ClassPathResource("mybatis-config.xml"));
        //PathMatchingResourcePatternResolver resolver = new PathMatchingResourcePatternResolver();
        //sqlSessionFactoryBean.setMapperLocations(resolver.getResources("classpath:mapper/*.class"));

        sqlSessionFactoryBean.setMapperLocations(new Resource[]{new ClassPathResource("mapper/StudentMapper.xml")});

        return sqlSessionFactoryBean;
    }

    @Bean
    public MapperScannerConfigurer mapperScannerConfigurer() throws PropertyVetoException {
        MapperScannerConfigurer mapperScannerConfigurer = new MapperScannerConfigurer();
        mapperScannerConfigurer.setSqlSessionFactoryBeanName("sqlSessionFactory");
        mapperScannerConfigurer.setBasePackage("com.xiaobai.dao");
        return mapperScannerConfigurer;
    }

}
第二步:配置SpringWeb
package com.xiaobai.config;

import org.springframework.context.annotation.Bean;
import org.springframework.context.annotation.ComponentScan;
import org.springframework.context.annotation.Configuration;
import org.springframework.web.servlet.config.annotation.EnableWebMvc;
import org.springframework.web.servlet.config.annotation.WebMvcConfigurer;
import org.springframework.web.servlet.view.InternalResourceViewResolver;
import org.springframework.web.servlet.view.JstlView;

@Configuration
/**/
@EnableWebMvc
@ComponentScan("com.xiaobai.controller")
public class SpringWebConfig {

    @Bean
    public InternalResourceViewResolver viewResolver() {
        InternalResourceViewResolver viewResolver = new InternalResourceViewResolver();
        viewResolver.setPrefix("/WEB-INF/jsp/");
        viewResolver.setSuffix(".jsp");
        viewResolver.setViewClass(JstlView.class);
        viewResolver.setExposeContextBeansAsAttributes(true);
        return viewResolver;
    }

}
上面的代码,简单来说就是把我们备注文件中的bean拿出来用java代码实现。
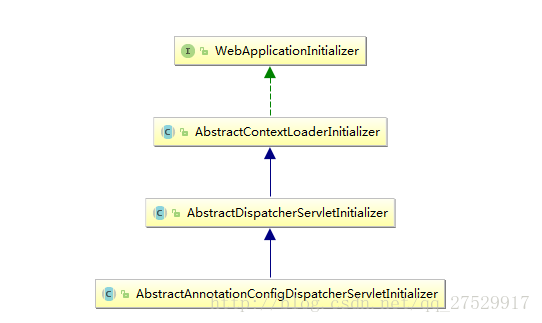
SpringServletContainerInitializer 类上有一个@HandlesTypes,值是WebApplicationInitializer.class,tomcat在启动时,搜索org.springframework.web.SpringServletContainerInitializer这个类,解析器上的@HandlesTypes注解的value,按类型获取项目内所有的实现类,然后将这些实现类和Servlet上下文单做参数传入onStartup()方法,然后执行此方法。

当我们定义了一个类去继承AbstractAnnotationConfigDispatcherServletInitializer,看如下代码:
package com.xiaobai.config.webConfig;

import com.xiaobai.config.SpringWebConfig;
import org.springframework.web.servlet.support.AbstractAnnotationConfigDispatcherServletInitializer;

/*此类相当于配置了web.xml*/
public class WebInit extends AbstractAnnotationConfigDispatcherServletInitializer {
    @Override
    protected Class<?>[] getRootConfigClasses() {
        return new Class<?>[] { ContextConfig.class };
    }

    @Override
    protected Class<?>[] getServletConfigClasses() {
        return new Class<?>[] { SpringWebConfig.class };
    }

    @Override
    protected String[] getServletMappings() {
        return new String[] { "/" };
    }
}
package com.xiaobai.config.webConfig;

import org.springframework.context.annotation.ComponentScan;
import org.springframework.context.annotation.Configuration;
import org.springframework.context.annotation.FilterType;
import org.springframework.web.bind.annotation.ControllerAdvice;
import org.springframework.web.servlet.config.annotation.EnableWebMvc;

@Configuration
@ComponentScan(basePackages = {"com.xiaobai.config"},
        excludeFilters = {@ComponentScan.Filter(type = FilterType.ANNOTATION, value = EnableWebMvc.class)}
)

public class ContextConfig {

}
代码下载链接:https://github.com/Xiaobai1007/Learning_Spring


 浙公网安备 33010602011771号