vue.js
1. vue.js的快速入门使用
1.1 vue.js库的下载
另外几个常见的工具库:react.js /angular.js
官方网站:
官方文档:https://cn.vuejs.org/v2/guide/
vue.js目前有1.x、2.x和3.x 版本,我们学习2.x版本的。
1.2 vue.js库的基本使用
在github下载:
在官网下载地址: https://cn.vuejs.org/v2/guide/installation.html
vue的引入类似于jQuery,开发中可以使用开发版本vue.js,产品上线要换成vue.min.js。
下图是github网站下载的vue.js目录

<!DOCTYPE html>
<html lang="en">
<head>
    <meta charset="UTF-8">
    <title>Document</title>
    <script src="js/vue.js"></script>
    <script>
    window.onload = function(){
          // vue.js的代码开始于一个Vue对象。所以每次操作数据都要声明Vue对象开始。
        var vm = new Vue({
            el:'#app',   // 设置当前vue对象要控制的标签范围。
            data:{  // data是将要展示到HTML标签元素中的数据。
              message: 'hello world!',
            }
        });
    }
    </script>
</head>
<body>
<div id="app">
    <!-- {{ message }} 表示把vue对象里面data属性中的对应数据输出到页面中 -->
    <!-- 在双标签中显示数据要通过{{  }}来完成 -->
    <p>{{ message }}</p>
</div>
</body>
</html>
总结:
1. vue的使用要从创建Vue对象开始
   var vm = new Vue();

2. 创建vue对象的时候,需要传递参数,是json对象,json对象对象必须至少有两个属性成员
   var vm = new Vue({
     el:"#app",
          data: {
         数据变量:"变量值",
         数据变量:"变量值",
         数据变量:"变量值",
     },
   });

   el:设置vue可以操作的html内容范围,值一般就是css的id选择器。
   data: 保存vue.js中要显示到html页面的数据。

3. vue.js要控制器的内容外围,必须先通过id来设置。
  <div id="app">
      <h1>{{message}}</h1>
      <p>{{message}}</p>
  </div>
MVVM  是Model-View-ViewModel 的缩写,它是一种基于前端开发的架构模式。
Model 指代的就是vue对象的data属性里面的数据。这里的数据要显示到页面中。
View  指代的就是vue中数据要显示的HTML页面,在vue中,也称之为“视图模板” 。
ViewModel  指代的是vue.js中我们编写代码时的vm对象了,它是vue.js的核心,负责连接 View 和 Model,保证视图和数据的一致性,所以前面代码中,data里面的数据被显示中p标签中就是vm对象自动完成的。
MVVM:

<!DOCTYPE html>
<html lang="en">
<head>
    <meta charset="UTF-8">
    <title>Title</title>
    <script src="js/vue.min.js"></script>
    <script>
    window.onload = function(){
        // 创建vm对象
        var vm = new Vue({
            el: "#app",
            data: {
                name:"大标题",
                age:16,
            },
        })
    }
    </script>
</head>
<body>
    <div id="app">
        <!-- 在双标签中显示数据要通过{{  }}来完成 -->
        <h1>{{name}}</h1>
        <p>{{age}}</p>
        <!-- 在表单输入框中显示数据要使用v-model来完成,模板语法的时候,我们会详细学习 -->
        <input type="text" v-model="name">
    </div>
</body>
</html>
在浏览器中可以在 console.log通过 vm对象可以直接访问el和data属性,甚至可以访问data里面的数据
console.log(vm.$el)     # #box  vm对象可以控制的范围
console.log(vm.$data);  # vm对象要显示到页面中的数据
console.log(vm.$data.message);  # 访问data里面的数据
console.log(vm.message);# 这个 message就是data里面声明的数据,也可以使用 vm.变量名显示其他数据,message只是举例.
总结:
1. 如果要输出data里面的数据作为普通标签的内容,需要使用{{  }}
   用法:
      vue对象的data属性:
          data:{
            name:"小明",
          }
      标签元素:
              <h1>{{ name }}</h1>
2. 如果要输出data里面的数据作为表单元素的值,需要使用vue.js提供的元素属性v-model
   用法:
      vue对象的data属性:
          data:{
            name:"小明",
          }
      表单元素:
              <input v-model="name">

   使用v-model把data里面的数据显示到表单元素以后,一旦用户修改表单元素的值,则data里面对应数据的值也会随之发生改变,甚至,页面中凡是使用了这个数据都会发生变化。
-
-
在表单输入框中显示数据要使用v-model来完成数据显示

<!DOCTYPE html>
<html lang="en">
<head>
    <meta charset="UTF-8">
    <title>Title</title>
    <script src="js/vue.min.js"></script>
    <script>
      window.onload = function(){
        var vm = new Vue({
          el:"#app",
          data:{
            str1: "hello",
            num: 20,
            url1: "http://www.baidu.com",
            url2: "http://www.taobao.com"
          }
        })
        }
    </script>
</head>
<body>
    <p>{{ str1 }}</p>
    <p>{{ str1.split("").reverse().join("") }}</p>
    <p>num和num2中比较大的数是:{{ num>num2? num:num2 }}</p>
    <input type="text" v-model="name">
</body>
</html>
双花括号仅用输出文本内容,如果要输出html代码,则不能使用这个.要使用v-html来输出.

<!DOCTYPE html>
<html lang="en">
<head>
    <meta charset="UTF-8">
    <title>Title</title>
    <script src="js/vue.js"></script>
</head>
<body>
    <div class="app">
        <h1>{{title}}</h1>
        <h3>{{url1}}</h3>
        {{img}}<br>
        <span v-html="img"></span>
    </div>
    <script>
        let vm = new Vue({
            el:".app",
            data:{
                title:"我的vue",
                url1:"我的收获地址",
                img:'<img src="images/shendan.png">',
            }
        })
    </script>
</body>
</html>
总结:
1. 可以在普通标签中使用{{  }} 或者 v-html 来输出data里面的数据
   <h1>{{message}}</h1>

2. 可以在表单标签中使用v-model属性来输出data里面的数据,同时还可以修改data里面的数据
   <input type="text" v-model="username">
在输出内容到普通标签的使用{{ }}
v-model或者v-html等vue提供的属性,或者 {{}} 都支持js代码。
    <h1>{{str1.split("").reverse().join("")}}</h1>
    <!-- 3.2 支持js的运算符-->
    <h1>{{num1+3}}</h1>

    <!-- 3.3 js还有一种运算符,三元运算符,类似于python里面的三元表达式
        三元运算符的语法:
         判断条件 ? 条件为true : 条件为false的结果

        python 三元表达式[三目运算符]的语法:
        a if 条件 else b
     -->
    <h1>num1和num2之间进行比较,最大值:{{ num2>num1?num2:num1 }}</h1>
例子:

<!DOCTYPE html>
<html lang="en">
<head>
    <meta charset="UTF-8">
    <title>Vue的快速使用</title>
    <script src="js/vue.js"></script>
</head>
<body>
<div id="app">
    <p>{{url}}</p>
    <div>{{text}}</div>
    <div v-html="text"></div>
    <input v-model="url">
    <div>num是{{num%2==0?'偶数':'奇数'}}</div>
    <div>num的下一个数字:{{num-0+1}}</div>
    <input type="text" v-model="num">
    <div>{{message.split("").reverse().join("")}}</div>
    <input type="text" v-model="message.split('').reverse().join('')">
</div>
    <script>
    var vm = new Vue({
        el:"#app", // 设置vue对象控制的标签范围
        data:{     // vue要操作的数据
            url:"http://www.luffycity.com",
            text:"<h1>大标题</h1>",
            num: 100,
            message:"abcdef",
        }
    })
    </script>
</body>
</html>
例子
vue快速使用

<!DOCTYPE html>
<html lang="en">
<head>
    <meta charset="UTF-8">
    <title>Title</title>
    <script src="js/vue.js"></script>
    <script>
        window.onload = function () {
            // vue的基本使用分3步:
            // 1. 使用以下代码,通过new Vue对象来创建
            // 2. 给vue对象传参数,一个json对象,对象有el属性绑定html中的一个已经存在的元素标签
            // 3. 通过vue对象的其他属性
            var vm = new Vue({
                el:'#app',
                data:{
                    message:'hello , vue',
                    num:100,
                }
            });
            console.log(vm)
        }
    </script>
</head>
<body>
<div id="app">
    {{message}}
    {{num}}
</div>


</body>
</html>
mvvm

<!DOCTYPE html>
<html lang="en">
<head>
    <meta charset="UTF-8">
    <title>Title</title>
    <script src="js/vue.js"></script>
    <script>
        window.onload = function(){
            // vm视图控制对象,会实时监控,时刻保证data属性中的数据和html视图中的内容保持一致:
            vm = new Vue({
                el: "#app",
                data:{
                    img: "logo.png",
                    num: 1,
                    content:"<h1>大标题</h1>",
                    url:"http://www.luffycity.com"
                },
                // 事件触发时调用的方法,或者其他属性方法中调用的内部方法
                methods:{
                    show(){
                        alert("hello")
                    }
                }
            });

        }

        // js中也有三元表达式,也叫三元运算符
        // 格式:
        //   条件?true:false;

    </script>
</head>
<body>
<div id="app">
    <input type="text" v-model="img">
    {{"图片地址是:"+img}}
    <span v-html="img.toLocaleUpperCase()"></span>
    <img :src="img" alt="">
    {{num%2==0?"偶数":"奇数"}}<br>
    <p v-html="content"></p>
    <p v-text="content"></p>
    {{content}}<br>
    <a v-bind:href="url">路飞</a>
    <a :href="url">路飞</a>

    <p @click="show">内容</p>
    <p v-on:click="show">内容</p>
</div>
</body>
</html>
显示密码

<!DOCTYPE html>
<html lang="en">
<head>
    <meta charset="UTF-8">
    <title>Title</title>
    <script src="js/vue.js"></script>
</head>
<body>
    <div id="app">
        <input :type="tp" v-model="pwd">
        <input type="button" @mousedown="down" @mouseup="up" v-model="message">
    </div>
    <script>
        var vm = new Vue({
            el:"#app",
            data:{
                message:"显示密码",
                pwd:"",
                tp:"password",
            },
            methods:{
                down(){
                    // 在methods中的子方法里面要操作data的属性,可以使用this.属性值
                    this.tp="text";
                    this.message="隐藏密码";
                },
                up(){
                    this.tp="password";
                    this.message="显示密码";
                }
            }
        })
    </script>
</body>
</html>
指令 (Directives) 是带有“v-”前缀的特殊属性。每一个指令在vue中都有固定的作用。
在vue中,提供了很多指令,常用的有:v-if、v-model、v-for等等。
指令会在vm对象的data属性的数据发生变化时,会同时改变元素中的其控制的内容或属性。
因为vue的历史版本原因,所以有一部分指令都有两种写法:
vue1.x写法              vue2.x的写法
v-html         ---->   {{ 普通文本 }}   # vue2.x 也支持v-html,v-text,输出html代码的内容
v-bind:属性名   ---->   :属性
v-on:事件名     ---->   @事件名
格式:
<标签名 :标签属性="data属性"></标签名>
<p :title="str1">{{ str1 }}</p> <!-- 也可以使用v-html显示双标签的内容,{{  }} 是简写 -->
<a :href="url2">淘宝</a>
<a v-bind:href="url1">百度</a>  <!-- v-bind是vue1.x版本的写法 -->
显示wifi密码效果:

<!DOCTYPE html>
<html lang="en">
<head>
    <meta charset="UTF-8">
    <title>Title</title>
    <script src="js/vue.js"></script>
</head>
<body>

<div id="index">
    <img :src="url" :alt="title"><br>
    <input :type="type" placeholder="请输入wifi密码"> <button @click="type='text'">显示密码</button>
</div>

<script>
    let vm = new Vue({
        el:"#index",
        data:{
          url:"https://www.luffycity.com/static/img/head-logo.a7cedf3.svg",
          title:"路飞学成",
          type:"password"
        }
    })
</script>
</body>
</html>
有两种事件操作的写法,@事件名 和 v-on:事件名
<button v-on:click="num++">按钮</button>   <!-- v-on 是vue1.x版本的写法 -->
<button @click="num+=5">按钮2</button>
总结:
1. 使用@事件名来进行事件的绑定
   语法:
      <h1 @click="num++">{{num}}</h1>

2. 绑定的事件的事件名,全部都是js的事件名:
   @submit   --->  onsubmit
   @focus    --->  onfocus
   ....
步骤:
-
给vue对象添加操作数据的方法
-
在标签中使用指令调用操作数据的方法

<!DOCTYPE html>
<html lang="en">
<head>
    <meta charset="UTF-8">
    <title>Title</title>
    <script src="js/vue.js"></script>
</head>
<body>
    <div id="box">
        <button @click="++num">+</button>
        <input type="text" v-model="num">
        <button @click="sub">-</button>
    </div>

    <script>
        let vm = new Vue({
            el:"#box",
            data:{
                num:0,
            },
            methods:{
                sub(){
                    if(this.num<=1){
                        this.num=0;
                    }else{
                        this.num--;
                    }
                }
            }
        })
    </script>
</body>
</html>

<!--#box>(button+input+button) tab键-->
格式:
   <h1 :class="值">元素</h1>  值可以是字符串、对象、对象名、数组

<!DOCTYPE html>
<html lang="en">
<head>
    <meta charset="UTF-8">
    <title>Title</title>
    <script src="js/vue.js"></script>
    <style>
    .box1{
        color: red;
        border: 1px solid #000;
    }
    .box2{
        background-color: orange;
        font-size: 32px;
    }
    </style>
</head>
<body>
    <div id="box">
        <!--- 添加class类名,值是一个对象
        {
         class类1:布尔值变量1,
         class类2:布尔值变量2,
        }
         -->
        <p :class="{box1:myclass1}">一个段落</p>
        <p @click="myclass3=!myclass3" :class="{box1:myclass2,box2:myclass3}">一个段落</p>
    </div>
    <script>
        let vm1=new Vue({
            el:"#box",
            data:{
                myclass1:false, // 布尔值变量如果是false,则不会添加对象的属性名作为样式
                myclass2:true,  // 布尔值变量如果是true,则不会添加对象的属性名作为样式
                myclass3:false,
            },
        })
    </script>

    <!-- 上面的代码可以:class的值保存到data里面的一个变量,然后使用该变量作为:class的值 -->
    <style>
    .box4{
        background-color: red;
    }
    .box5{
        color: green;
    }
    </style>
    <div id="app">
        <button @click="mycls.box4=!mycls.box4">改变背景</button>
        <button @click="mycls.box5=!mycls.box5">改变字体颜色</button>
        <p :class="mycls">第二个段落</p>
    </div>
    <script>
        let vm2 = new Vue({
            el:"#app",
            data:{
                mycls:{
                    box4:false,
                    box5:true
                },
            }
        })
    </script>

    <!-- 批量给元素增加多个class样式类 -->
    <style>
    .box6{
        background-color: red;
    }
    .box7{
        color: green;
    }
    .box8{
        border: 1px solid yellow;
    }
    </style>
    <div id="app2">
            <p :class="[mycls1,mycls2]">第三个段落</p>
    </div>
    <script>
        let vm3 = new Vue({
            el:"#app2",
            data:{
                mycls1:{
                    box6:true,
                    box7:true,
                },
                mycls2:{
                    box8:true,
                }
            }
        })
    </script>
</body>
</html>
总结:
1. 给元素绑定class类名,最常用的就是第二种。
    vue对象的data数据:
        data:{
          myObj:{
            complete:true,
            uncomplete:false,
          }
        }
        html元素:
            <div class="box" :class="myObj">2222</div>
    最终浏览器效果:
            <div class="box complete">2222</div>
格式1:值是json对象,对象写在元素的:style属性中
<div :style="{color: activeColor, fontSize: fontSize + 'px' }"></div>

格式2:值是对象变量名,对象在data中进行声明标签元素:
<div v-bind:style="styleObject"></div>

格式3:值是数组 标签元素:
<div v-bind:style="[style1, style2]"></div>

格式1:值是json对象,对象写在元素的:style属性中
     标签元素:
             <div :style="{color: activeColor, fontSize: fontSize + 'px' }"></div>
     data数据如下:
         data: {
             activeColor: 'red',
             fontSize: 30
         }
格式2:值是对象变量名,对象在data中进行声明
   标签元素:
               <div v-bind:style="styleObject"></div>
   data数据如下:
         data: {
                styleObject: {
                     color: 'red',
                     fontSize: '13px'
                  }
        }

格式3:值是数组
  标签元素:
                <div v-bind:style="[style1, style2]"></div>
    data数据如下:
                data: {
                     style1:{
                       color:"red"
                     },
                     style2:{
                       background:"yellow",
                       fontSize: "21px"
                     }
                }
新闻列表

<!DOCTYPE html>
<html lang="en">
<head>
    <meta charset="UTF-8">
    <title>Title</title>
    <style>
        #card{
            width: 500px;
            height: 350px;
        }
        .title{
            height:50px;
        }
        .title span{
            width: 100px;
            height: 50px;
            background-color:#ccc;
            display: inline-block;
            line-height: 50px; /* 设置行和当前元素的高度相等,就可以让文本内容上下居中 */
            text-align:center;
        }
        .content .list{
            width: 500px;
            height: 300px;
            background-color: yellow;
            display: none;
        }
        .content .active{
            display: block;
        }

        .title .current{
            background-color: yellow;
        }
    </style>
    <script src="js/vue.js"></script>
</head>
<body>

    <div id="card">
        <div class="title">
            <span @click="num=0" :class="num==0?'current':''">国内新闻</span>
            <span @click="num=1" :class="num==1?'current':''">国际新闻</span>
            <span @click="num=2" :class="num==2?'current':''">银河新闻</span>
            <!--<span>{{num}}</span>-->
        </div>
        <div class="content">
            <div class="list" :class="num==0?'active':''">国内新闻列表</div>
            <div class="list" :class="num==1?'active':''">国际新闻列表</div>
            <div class="list" :class="num==2?'active':''">银河新闻列表</div>
        </div>
    </div>
    <script>
        // 思路:
        // 当用户点击标题栏的按钮[span]时,显示对应索引下标的内容块[.list]
        // 代码实现:
        var card = new Vue({
            el:"#card",
            data:{
                num:0,
            },
        });
    </script>

</body>
</html>
vue中提供了两个指令可以用于判断是否要显示元素,分别是v-if和v-show。
  标签元素:
      <!-- vue对象最终会把条件的结果变成布尔值 -->
            <h1 v-if="ok">Yes</h1>
  data数据:
          data:{
              ok:false    // true则是显示,false是隐藏
      }
v-else指令来表示 v-if 的“else 块”,v-else 元素必须紧跟在带 v-if 或者 v-else-if 的元素的后面,否则它将不会被识别。
  标签元素:
            <h1 v-if="ok">Yes</h1>
            <h1 v-else>No</h1>
  data数据:
          data:{
              ok:false    // true则是显示,false是隐藏
      }
可以出现多个v-else-if语句,但是v-else-if之前必须有一个v-if开头。后面可以跟着v-else,也可以没有。
  标签元素:
            <h1 v-if="num==1">num的值为1</h1>
            <h1 v-else-if="num==2">num的值为2</h1>
          <h1 v-else>num的值是{{num}}</h1>
  data数据:
          data:{
              num:2
      }
用法和v-if大致一样,区别在于2点:
-
v-show后面不能v-else或者v-else-if
-
v-show隐藏元素时,使用的是display:none来隐藏的,而v-if是直接从HTML文档中移除元素[ DOM操作中的remove ]
  标签元素:
            <h1 v-show="ok">Hello!</h1>
  data数据:
          data:{
              ok:false    // true则是显示,false是隐藏
      }
在vue中,可以通过v-for指令可以将一组数据渲染到页面中,数据可以是数组或者对象。

数据是数组:
        <ul>
            <!--book是列表的每一个元素-->
            <li v-for="book in book_list">{{book.title}}</li>
        </ul>

        <ul>
            <!--book是列表的每一个元素,index是每个元素的下标-->
            <li v-for="book, index in book_list">第{{ index+1}}本图书:{{book.title}}</li>
        </ul>


        <script>
            var vm1 = new Vue({
                el:"#app",
                data:{
                    book_list:[
                        {"id":1,"title":"图书名称1","price":200},
                        {"id":2,"title":"图书名称2","price":200},
                        {"id":3,"title":"图书名称3","price":200},
                        {"id":4,"title":"图书名称4","price":200},
                    ]
                }
            })
        </script>

数据是对象:
        <ul>
            <!--i是每一个value值-->
            <li v-for="value in book">{{value}}</li>
        </ul>
        <ul>
            <!--i是每一个value值,j是每一个键名-->
            <li v-for="attr, value in book">{{attr}}:{{value}}</li>
        </ul>
        <script>
            var vm1 = new Vue({
                el:"#app",
                data:{
                    book: {
                        // "attr":"value"
                        "id":11,
                        "title":"图书名称1",
                        "price":200
                    },
                },
            })
        </script>
例子

<!DOCTYPE html>
<html lang="en">
<head>
    <meta charset="UTF-8">
    <title>Title</title>
    <script src="js/vue.js"></script>
</head>
<body>
<div id="app">
    <button @click="add">+</button>
    <input type="text" v-model="num">
    <button @click="sub">-</button>
    单价:{{price}}
    <p>总计:{{total.toFixed(2)}}</p>
</div>
<script>
    var vm = new Vue({
        el:"#app",
        data:{
            num: 1,
            price: 39.8,
            total: 39.8,
        },
        methods:{
            add(){
                // 增加数量
                this.num = parseInt(this.num) + 1;
                this.calc();
            },
            sub(){
               // 减少数量
               if(this.num<=1){
                   return;
               }
               this.num -= 1;
               this.calc();
            },
            calc(){
               // 计算总价
               this.total = this.price * this.num;
            }
        }
    })
</script>
</body>
</html>
操作样式

<!DOCTYPE html>
<html lang="en">
<head>
    <meta charset="UTF-8">
    <title>Title</title>
    <script src="js/vue.js"></script>
    <style>
    .bg{
        width: 300px;
        height: 1000px;
    }
    .baitian{
        background-color: white;
    }
    .heiye{
        background-color: #666;
    }
    </style>
</head>
<body>
<div id="app" class="bg" :class="{baitian:is_show,heiye:is_show_2}">
    <button @click="change">关灯</button>
</div>
<script>
    var vm = new Vue({
        el:"#app",
        data:{
            is_show:true,
            is_show_2:false
        },
        methods:{
            change(){
                if(this.is_show==true){
                    this.is_show=false;
                    this.is_show_2=true;
                }else{
                    this.is_show=true;
                    this.is_show_2=false;
                }
            }
        }
    })
</script>
</body>
</html>

<!DOCTYPE html>
<html lang="en">
<head>
    <meta charset="UTF-8">
    <title>Title</title>
    <script src="js/vue.js"></script>
    <style>
    .bg{
        width: 300px;
        height: 1000px;
    }
    .baitian{
        background-color: white;
    }
    .heiye{
        background-color: #666;
    }
    </style>
</head>
<body>
<div id="app" class="bg" :class="{baitian:is_show,heiye:is_show_2}">
    <button @click="change">关灯</button>
</div>
<script>
    var vm = new Vue({
        el:"#app",
        data:{
            is_show:true,
            is_show_2:false
        },
        methods:{
            change(){
                if(this.is_show==true){
                    this.is_show=false;
                    this.is_show_2=true;
                }else{
                    this.is_show=true;
                    this.is_show_2=false;
                }
            }
        }
    })
</script>
</body>
</html>

<!DOCTYPE html>
<html lang="en">
<head>
    <meta charset="UTF-8">
    <title>Title</title>
    <script src="js/vue.js"></script>
</head>
<body>
<div id="app">
    <div style="width:100px;height:100px;" :style="{backgroundColor:`#6f6`}"></div>
    <div style="" :style="box"></div>
    <div style="" :style="[box,box2]"></div>
</div>
<script>
    var vm = new Vue({
        el:"#app",
        data:{
            box:{
                backgroundColor:`#6f6`,
                width:"100px",
                height:"100px",
            },
            box2:{
                borderRadius:"50px", // borderRadius 边框圆角
            }
        },

    })
</script>
</body>
</html>

<!DOCTYPE html>
<html lang="en">
<head>
    <meta charset="UTF-8">
    <title>Title</title>
    <style>
        #card{
            width: 500px;
            height: 350px;
        }
        .title{
            height:50px;
        }
        .title span{
            width: 100px;
            height: 50px;
            background-color:#ccc;
            display: inline-block;
            line-height: 50px; /* 设置行和当前元素的高度相等,就可以让文本内容上下居中 */
            text-align:center;
        }
        .content .list{
            width: 500px;
            height: 300px;
            background-color: yellow;
            display: none;
        }
        .content .active{
            display: block;
        }
        .title .current{
            background-color:yellow;
        }
    </style>
    <script src="js/vue.js"></script>
</head>
<body>

    <div id="card">
        <div class="title">
            <span @mouseover="num=1" :class="num==1?'current':''">国内新闻</span>
            <span @mouseover="num=2" :class="num==2?'current':''">国际新闻</span>
            <span @mouseover="num=3" :class="num==3?'current':''">银河新闻</span>
        </div>
        <div class="content">
            <div class="list" :class="num==1?'active':''">国内新闻列表</div>
            <div class="list" :class="num==2?'active':''">国际新闻列表</div>
            <div class="list" :class="num==3?'active':''">银河新闻列表</div>
        </div>
    </div>
    <script>
        // 实现一个js的特效时:关键是找出3个数据出来
        // 1. 用户操作的元素
        // 2. 用户触发的事件
        // 3. 事件触发以后的效果是什么?
        var vm = new Vue({
            el:"#card",
            data:{
                num:1,
            }
        })
    </script>

</body>
</html>
控制指令[条件指令]

<!DOCTYPE html>
<html lang="en">
<head>
    <meta charset="UTF-8">
    <title>Title</title>
    <script src="js/vue.js"></script>
    <style>
    .box{
        width: 50px;
        height: 50px;
        background: #000;
    }
    .box1{
        background: #f66;

    }
    </style>
</head>
<body>
    <div id="app">
        <div class="box" v-if="ok">v-if</div>
        <div class="box box1" v-else>v-else</div>
        <div class="box" v-show="ok">v-show</div>
        <hr>
        <div v-if="num%3==0">num是3的倍数</div>
        <div v-else-if="num%5==0">num是5的倍数</div>
        <div v-else-if="num%7==0">num是7的倍数</div>
        <div v-else>num都不是上面的倍数</div>
    </div>
    <script>
        var vm = new Vue({
            el:"#app",
            data:{
                ok:true,
                num: 3,
            }
        })
    </script>

</body>
</html>

<!DOCTYPE html>
<html lang="en">
<head>
    <meta charset="UTF-8">
    <title>Title</title>
    <script src="js/vue.js"></script>
</head>
<body>
    <div id="app">
        <table border="1" width="800px">
            <tr>
                <th>序号</th>
                <th>ID</th>
                <th>姓名</th>
                <th>年龄</th>
            </tr>
            <tr v-for="student,key in student_list">
                <td>{{key+1}}</td>
                <td>{{student.id}}</td>
                <td>{{student.name}}</td>
                <td>{{student.age}}</td>
            </tr>
        </table>
    </div>
<script>
var vm =new Vue({
    el:'#app',
    data:{
        student_list: [
            {'id':1,'name':'小明1','age':13},
            {'id':2,'name':'小明2','age':13},
            {'id':3,'name':'小明3','age':13},
            {'id':4,'name':'小明4','age':13},
            {'id':5,'name':'小明1','age':13},
            {'id':6,'name':'小明1','age':13},
        ]
    }
})

</script>

</body>
</html>

<!DOCTYPE html>
<html lang="en">
<head>
    <meta charset="UTF-8">
    <title>Title</title>
    <script src="js/vue.js"></script>
    <style>
    .orange{
        background: orange;
    }
    </style>
</head>
<body>
    <div id="app">
        <table border="1" width="800px">
            <tr>
                <th>序号</th>
                <th>标题</th>
                <th>价格</th>
            </tr>
            <tr v-for="item,key in goods" :class="item.price>60?'orange':''">
                <td>{{key+1}}</td>
                <td>{{item.name}}</td>
                <td>{{item.price}}</td>
            </tr>
        </table>
    </div>
    <script>
        var vm = new Vue({
            el:"#app",
            data:{
                goods:[
                    {"name":"python入门","price":150},
                    {"name":"python进阶","price":100},
                    {"name":"python高级","price":75},
                    {"name":"python研究","price":60},
                    {"name":"python放弃","price":110},
                ]
            }
        })
    </script>

</body>
</html>

<!DOCTYPE html>
<html lang="en">
<head>
    <meta charset="UTF-8">
    <title>Title</title>
    <script src="js/vue.js"></script>
    <style>
    .win{
        background: #aaa;
        width: 360px;
        height: 160px;
        padding: 20px;
        position: fixed;
        top: 150px;
        left: 0;
        right: 0;
        margin: auto;
    }
    </style>
</head>
<body>
    <div id="table">
        <table border="1" width="600" align="center">
            <tr>
                <td colspan="5">
                    <button @click="show_win=true">add</button>
                </td>
            </tr>
            <tr>
                <th>ID</th>
                <th>title</th>
                <th>number</th>
                <th>price</th>
                <th>operation</th>
            </tr>
            <tr v-for="goods,key in goods_list">
                <td>{{goods.id}}</td>
                <td>{{goods.title}}</td>
                <td>{{goods.number}}</td>
                <td>{{goods.price}}</td>
                <td>
                    <button @click="edit(key)">edit</button>
                    <button @click="del(key)">del</button>
                </td>
            </tr>
        </table>
        <div class="win" v-if="show_win">
            <label>title: <input type="text" v-model="title"></label><br><br>
            <label>number: <input type="text" v-model="number"></label><br><br>
            <label>price: <input type="text" v-model="price"></label><br><br>
            <button @click="save">确定</button>
            <button @click="close">取消</button>
        </div>
    </div>
    <script>
        var vm = new Vue({
            el:"#table",
            data:{
                show_win: false,
                goods_list:[
                    {"id":1,"title":"代码之髓","number":13,"price":78.5},
                    {"id":2,"title":"代码之髓","number":23,"price":78.5},
                    {"id":3,"title":"代码之髓","number":33,"price":78.5},
                    {"id":4,"title":"代码之髓","number":43,"price":78.5},
                ],
                id: 4,
                title:"",
                number:"",
                price:"",
                current:-1, //没有编辑任何的内容
            },
            methods:{
                save(){
                    // ID自增
                    this.id +=1;
                    if(this.current==-1){
                        // 追加成员
                        this.goods_list.push({
                            "id": this.id,
                            "title":this.title,
                            "number":this.number,
                            "price":this.price,
                        });
                    }else{
                        // 编辑成员
                        this.goods_list[this.current].title=this.title;
                        this.goods_list[this.current].number=this.number;
                        this.goods_list[this.current].price=this.price;
                    }
                    this.close();
                },
                close(){
                    // 关闭窗口
                    this.show_win=false;
                    // 重置编辑操作
                    this.current=-1;
                    // 清空窗口中的数据
                    this.title="";
                    this.number="";
                    this.price="";
                },
                del(key){
                    console.log(key);
                    this.goods_list.splice(key,1);
                },
                edit(key){
                    this.current = key;
                    this.title=this.goods_list[key].title;
                    this.number=this.goods_list[key].number;
                    this.price=this.goods_list[key].price;
                    this.show_win=true;
                },
            }
        })
    </script>
</body>
</html>
3.1 过滤器
过滤器,就是vue允许开发者自定义的文本格式化函数,可以使用在两个地方:输出内容和操作数据中。
定义过滤器的方式有两种。
全局过滤器, 通过Vue.filter("过滤器名称",匿名函数)
<p>{{price|RMB}}</p>
Vue.filter("RMB", function(v){
    return "¥"+v;
});

var vm = new Vue({
    el:"#box",
    data:{
            price:30.5}
})
 局部过滤器,直接把过滤器写在当前vm对象中
<p>{{price|RMB}}</p>
var vm = new Vue({
    el:"#box",
    data:{
        price:30.5},
    filters:{
        RMB(v){
            return "¥"+v;
        }}
})

<!DOCTYPE html>
<html lang="en">
<head>
    <meta charset="UTF-8">
    <title>Title</title>
    <script src="js/vue.js"></script>
    <script src="js/filters.js"></script>
</head>
<body>
    <div id="box">
        <p>{{price}}</p>
        <p>{{price2}}</p>
    </div>
    <script>
    // 当我们需要针对data的数据尽心调整成另一个变量,留作后面其他地方进行运算使用时,可以使用计算属性得出一个新的变量
    var vm = new Vue({
        el:"#box",
        data:{
            price:30.5
        },
        // 计算属性
        computed:{
            price2:function(){
                return this.price.toFixed(2);
            }
        }
    })
    </script>
</body>
</html>
侦听属性,可以帮助我们侦听data某个数据的变化,从而做相应的自定义操作。

<!DOCTYPE html>
<html lang="en">
<head>
    <meta charset="UTF-8">
    <title>Title</title>
    <script src="js/vue.js"></script>
    <script src="js/filters.js"></script>
</head>
<body>
    <div id="box">
        数量:<input type="text" v-model="num">
        单价:<input type="text" v-model="price">
        总价:{{total}}
    </div>
    <script>
    var vm = new Vue({
        el:"#box",
        data:{
            num: 0,
            price:30.5,
            total: 0
        },
        watch:{
            num(newval,oldval){
                // console.log("修改后num="+newval);
                // console.log("修改前num="+oldval);
                this.total = this.price * this.num;
            },
            price(){
                this.total = this.price * this.num;
            }
        }
    })
    </script>
</body>
</html>
beforeCreate    # vm对象尚未创建,所以data中的数据是无法操作
created         #  vm对象已经创建完成,但是还没有把数据和视图模板进行绑定
beforeMount    #  已经绑定了视图,但是没有更新视图中的数据
mounted         #  已经把data中的数据替换了模板视图中对应的内容
beforeUpdate    #  更新HTML模板的数据之前
updated         #  更新HTML模板的数据之后

<!DOCTYPE html>
<html lang="en">
<head>
    <meta charset="UTF-8">
    <title>Title</title>
    <script src="js/vue.min.js"></script>
    <script>
    window.onload = function(){
        var vm = new Vue({
            el:"#app",
            data:{
                num:0
            },
            beforeCreate:function(){
                console.log("beforeCreate,vm对象尚未创建,num="+ this.num);  //undefined
                this.name=10; // 此时没有this对象呢,所以设置的name无效,被在创建对象的时候被覆盖为0
            },
            created:function(){
                console.log("created,vm对象创建完成,设置好了要控制的元素范围,num="+this.num );  // 0
                this.num = 20;
            },
            beforeMount:function(){
                console.log( this.$el.innerHTML ); // <p>{{num}}</p>
                console.log("beforeMount,vm对象尚未把data数据显示到页面中,num="+this.num ); // 20
                this.num = 30;
            },
            mounted:function(){
                console.log( this.$el.innerHTML ); // <p>30</p>
                console.log("mounted,vm对象已经把data数据显示到页面中,num="+this.num); // 30
            },
            beforeUpdate:function(){
                // this.$el 就是我们上面的el属性了,$el表示当前vue.js所控制的元素#app
                console.log( this.$el.innerHTML );  // <p>30</p>
                console.log("beforeUpdate,vm对象尚未把更新后的data数据显示到页面中,num="+this.num); // beforeUpdate----31

            },
            updated:function(){
                console.log( this.$el.innerHTML ); // <p>31</p>
                console.log("updated,vm对象已经把过呢更新后的data数据显示到页面中,num=" + this.num ); // updated----31
            },
        });
    }
    </script>
</head>
<body>
    <div id="app">
        <p>{{num}}</p>
        <button @click="num++">按钮</button>
    </div>
</body>
</html>
总结:
在vue使用的过程中,如果要初始化操作,把初始化操作的代码放在 mounted 中执行。
mounted阶段就是在vm对象已经把data数据实现到页面以后。一般页面初始化使用。例如,用户访问页面加载成功以后,就要执行的ajax请求。
另一个就是created,这个阶段就是在 vue对象创建以后,把ajax请求后端数据的代码放进 created
事件冒泡
事件,event,在js中表示用户和浏览器之间进行的一次交互过程
事件在触发时,就会有一个事件对象来记录整个事件发生的过程和发生的位置
从事件发生位置由内及外,根据标签之间父子嵌套关系,逐层往外传播,让父级元素触发同类事件,这种事件的传递方式,就是 事件冒泡
事件冒泡有好,有坏。
好处就是可以利用这种机制,实现事件委托
坏处就是当前元素的父级元素有同类事件,会随着冒泡直接全部执行

<!DOCTYPE html>
<html lang="en">
<head>
    <meta charset="UTF-8">
    <title>Title</title>
</head>
<body  onclick="alert('body')">
    <div onclick="alert('div')">
        <button>按钮</button>
    </div>
</body>
</html>
事件委托
局部变量 let 全局变量 var

<!DOCTYPE html>
<html lang="en">
<head>
    <meta charset="UTF-8">
    <title>Title</title>
</head>
<body>
    <ul id="list">
        <li>111</li>
        <li>222</li>
        <li>3333</li>
        <li>4444</li>
        <li>1111</li>
        <li>1111</li>
        <li>1111</li>
        <li>1111</li>
        <li>1111</li>
        <li>1111</li>
        <li>1111</li>
        <li>1111</li>
        <li>1111</li>
        <li>1111</li>
        <li>1111</li>
    </ul>
    <script>
    var list = document.getElementById("list");
    list.onclick = function(e){
        console.log(this); // 事件绑定的对象
        console.log(e.target);  // 事件的触发点
        // console.log(e)
        let self = e.target;  //局部变量 let 全局变量 var
        console.log(self.innerHTML);
    }
    </script>
</body>
</html>
阻止事件冒泡原生(js)
e.stopPropagation();
e.cancelBubble = true;

<!DOCTYPE html>
<html lang="en">
<head>
    <meta charset="UTF-8">
    <title>Title</title>
</head>
<body>
    <div id="box">
        <button id="btn">按钮</button>
    </div>
    <script>
    var list = document.getElementById("box");
    var btn = document.getElementById("btn");
    list.onclick = function(){
        alert("父元素");
    };

    btn.onclick = function(e){
        alert("按钮");
        e.stopPropagation();
        e.cancelBubble = true;
    }
    </script>
</body>
</html>
阻止事件冒泡
.stop 事件
.prevent a标签事件

<!DOCTYPE html>
<html lang="en">
<head>
    <meta charset="UTF-8">
    <title>Title</title>
    <script src="js/vue.js"></script>
</head>
<body>
    <div id="box" @click="show2">
        <button @click.stop="show">按钮</button>
        <a href="" @click.prevent="show3">a链接</a>
    </div>
    <script>
    var vm = new Vue({
        el:"#box",
        data:{},
        methods:{
            show(){
                // alert("按钮");
            },
            show2(){
                // alert("父元素");
            },
            show3(){
                console.log("一句话");
            }
        }
    })
    </script>
</body>
</html>
yodolist展现数据

<!DOCTYPE html>
<html lang="en">
<head>
    <meta charset="UTF-8">
    <title>todolist</title>
    <script src="js/vue.js"></script>
    <style type="text/css">
        .list_con{
            width:600px;
            margin:50px auto 0;
        }
        .inputtxt{
            width:550px;
            height:30px;
            border:1px solid #ccc;
            padding:0px;
            text-indent:10px;
        }
        .inputbtn{
            width:40px;
            height:32px;
            padding:0px;
            border:1px solid #ccc;
        }
        .list{
            margin:0;
            padding:0;
            list-style:none;
            margin-top:20px;
        }
        .list li{
            height:40px;
            line-height:40px;
            border-bottom:1px solid #ccc;
        }

        .list li span{
            float:left;
        }

        .list li a{
            float:right;
            text-decoration:none;
            margin:0 10px;
        }
    </style>
</head>
<body>
    <div class="list_con" id="app">
        <h2>To do list</h2>
        <input type="text" name="" id="txt1" class="inputtxt">
        <input type="button" name="" value="增加" id="btn1" class="inputbtn">

        <ul id="list" class="list">
            <!-- javascript:; # 阻止a标签跳转 -->
            <li v-for="item in todolist">
                <span>{{item}}</span>
                <a href="javascript:;" class="up"> ↑ </a>
                <a href="javascript:;" class="down"> ↓ </a>
                <a href="javascript:;" class="del">删除</a>
            </li>
        </ul>
    </div>
    <script>
        var vm = new Vue({
            el:"#app",
            data:{
                todolist:[
                    "学习html",
                    "学习css",
                    "学习javascript",
                ]
            }
        });
    </script>
</body>
</html>
yodolist增加数据

<!DOCTYPE html>
<html lang="en">
<head>
    <meta charset="UTF-8">
    <title>todolist</title>
    <script src="js/vue.js"></script>
    <style type="text/css">
        .list_con{
            width:600px;
            margin:50px auto 0;
        }
        .inputtxt{
            width:550px;
            height:30px;
            border:1px solid #ccc;
            padding:0px;
            text-indent:10px;
        }
        .inputbtn{
            width:40px;
            height:32px;
            padding:0px;
            border:1px solid #ccc;
        }
        .list{
            margin:0;
            padding:0;
            list-style:none;
            margin-top:20px;
        }
        .list li{
            height:40px;
            line-height:40px;
            border-bottom:1px solid #ccc;
        }

        .list li span{
            float:left;
        }

        .list li a{
            float:right;
            text-decoration:none;
            margin:0 10px;
        }
    </style>
</head>
<body>
    <div class="list_con" id="app">
        <h2>To do list</h2>
        <input type="text" v-model="text" id="txt1" class="inputtxt">
        <input type="button" @click="add" value="增加" id="btn1" class="inputbtn">

        <ul id="list" class="list">
            <!-- javascript:; # 阻止a标签跳转 -->
            <li v-for="item in todolist">
                <span>{{item}}</span>
                <a href="javascript:;" class="up"> ↑ </a>
                <a href="javascript:;" class="down"> ↓ </a>
                <a href="javascript:;" class="del">删除</a>
            </li>
        </ul>
    </div>
    <script>
        var vm = new Vue({
            el:"#app",
            data:{
                text:"",
                todolist:[
                    "学习html",
                    "学习css",
                    "学习javascript",
                ]
            },
            methods:{
                add(){
                    this.todolist.push(this.text);
                    this.text = "";
                }
            }
        });
    </script>
</body>
</html>
yodolist删除数据

<!DOCTYPE html>
<html lang="en">
<head>
    <meta charset="UTF-8">
    <title>todolist</title>
    <script src="js/vue.js"></script>
    <style type="text/css">
        .list_con{
            width:600px;
            margin:50px auto 0;
        }
        .inputtxt{
            width:550px;
            height:30px;
            border:1px solid #ccc;
            padding:0px;
            text-indent:10px;
        }
        .inputbtn{
            width:40px;
            height:32px;
            padding:0px;
            border:1px solid #ccc;
        }
        .list{
            margin:0;
            padding:0;
            list-style:none;
            margin-top:20px;
        }
        .list li{
            height:40px;
            line-height:40px;
            border-bottom:1px solid #ccc;
        }

        .list li span{
            float:left;
        }

        .list li a{
            float:right;
            text-decoration:none;
            margin:0 10px;
        }
    </style>
</head>
<body>
    <div class="list_con" id="app">
        <h2>To do list</h2>
        <input type="text" v-model="text" id="txt1" class="inputtxt">
        <input type="button" @click="add" value="增加" id="btn1" class="inputbtn">

        <ul id="list" class="list">
            <!-- javascript:; # 阻止a标签跳转 -->
            <li v-for="item,key in todolist">
                <span>{{item}}</span>
                <a href="javascript:;" class="up"> ↑ </a>
                <a href="javascript:;" class="down"> ↓ </a>
                <a href="javascript:;" @click="del(key)" class="del">删除</a>
            </li>
        </ul>
    </div>
    <script>
        var vm = new Vue({
            el:"#app",
            data:{
                text:"",
                todolist:[
                    "学习html",
                    "学习css",
                    "学习javascript",
                ]
            },
            methods:{
                add(){
                    this.todolist.push(this.text);
                    this.text = "";
                },
                del(key){
                    this.todolist.splice(key,1);
                }
            }
        });
    </script>
</body>
</html>
yodolist移动数据

<!DOCTYPE html>
<html lang="en">
<head>
    <meta charset="UTF-8">
    <title>todolist</title>
    <script src="js/vue.js"></script>
    <style type="text/css">
        .list_con{
            width:600px;
            margin:50px auto 0;
        }
        .inputtxt{
            width:550px;
            height:30px;
            border:1px solid #ccc;
            padding:0px;
            text-indent:10px;
        }
        .inputbtn{
            width:40px;
            height:32px;
            padding:0px;
            border:1px solid #ccc;
        }
        .list{
            margin:0;
            padding:0;
            list-style:none;
            margin-top:20px;
        }
        .list li{
            height:40px;
            line-height:40px;
            border-bottom:1px solid #ccc;
        }

        .list li span{
            float:left;
        }

        .list li a{
            float:right;
            text-decoration:none;
            margin:0 10px;
        }
    </style>
</head>
<body>
    <div class="list_con" id="app">
        <h2>To do list</h2>
        <input type="text" v-model="text" id="txt1" class="inputtxt">
        <input type="button" @click="add" value="增加" id="btn1" class="inputbtn">

        <ul id="list" class="list">
            <!-- javascript:; # 阻止a标签跳转 -->
            <li v-for="item,key in todolist">
                <span>{{item}}</span>
                <a href="javascript:;" @click="up(key)" class="up"> ↑ </a>
                <a href="javascript:;" @click="down(key)" class="down"> ↓ </a>
                <a href="javascript:;" @click="del(key)" class="del">删除</a>
            </li>
        </ul>
    </div>
    <script>
        var vm = new Vue({
            el:"#app",
            data:{
                text:"",
                todolist:[
                    "学习html",
                    "学习css",
                    "学习javascript",
                ]
            },
            methods:{
                add(){
                    this.todolist.push(this.text);
                    this.text = "";
                },
                del(key){
                    // splice 万能函数
                    this.todolist.splice(key,1);
                },
                up(key){
                    // 向上移动
                    // splice(删除的开始位置,删除的成员个数, 替换的新数据)
                    if(key===0){
                        return;
                    }
                    ret = this.todolist.splice(key,1)[0];
                    this.todolist.splice(key-1, 0, ret);
                },
                down(key){
                    // 向下移动
                    ret = this.todolist.splice(key,1)[0];
                    this.todolist.splice(key+1, 0, ret);
                }
            }
        });
    </script>
</body>
</html>
vue.js默认没有提供ajax功能的。
所以使用vue的时候,一般都会使用axios的插件来实现ajax与后端服务器的数据交互。
注意,axios本质上就是javascript的ajax封装,所以会被同源策略
下载地址:
https://unpkg.com/axios@0.18.0/dist/axios.js
https://unpkg.com/axios@0.18.0/dist/axios.min.js
axios提供发送请求的常用方法有两个:axios.get() 和 axios.post() 。
增 post
删 delete
改 put/patch put所有字段 /patch单一字段
get请求
// 发送get请求
// 参数1: 必填,字符串,请求的数据接口的url地址,例如请求地址:http://www.baidu.com?id=200
// 参数2:可选,json对象,要提供给数据接口的参数
// 参数3:可选,json对象,请求头信息
axios.get('服务器的资源地址',{ // http://www.baidu.com
params:{
参数名:'参数值', // id: 200,
}
}).then(function (response) { // 请求成功以后的回调函数
console.log("请求成功");
console.log(response.data); // 获取服务端提供的数据
}).catch(function (error) { // 请求失败以后的回调函数
console.log("请求失败");
console.log(error.response); // 获取错误信息
});
post请求
// 发送post请求,参数和使用和axios.get()一样。
// 参数1: 必填,字符串,请求的数据接口的url地址
// 参数2:必填,json对象,要提供给数据接口的参数,如果没有参数,则必须使用{}
// 参数3:可选,json对象,请求头信息
axios.post('服务器的资源地址',{
  username: 'xiaoming',
  password: '123456'
},{
  responseData:"json",
})
.then(function (response) { // 请求成功以后的回调函数
  console.log(response);
})
.catch(function (error) { // 请求失败以后的回调函数
  console.log(error);
});
匿名函数
// 匿名函数
var func = function(response){
    // 函数代码
};

// 箭头函数
var func = (response)=>{
    // 函数代码
}
json是 JavaScript Object Notation 的首字母缩写,单词的意思是javascript对象表示法,这里说的json指的是类似于javascript对象的一种数据格式。
json的作用:在不同的系统平台,或不同编程语言之间传递数据。
JSON对象是字典,列表是数组
json数据对象类似于JavaScript中的对象,但是它的键对应的值里面是没有函数方法的,值可以是普通变量,不支持undefined,值还可以是数组或者json对象。// 原生的js的json对象 var obj = { age:10, sex: '女', work:function(){ return "好好学习", } }
// json数据的对象格式,json数据格式,是没有方法的,只有属性:
{
    "name":"tom",
    "age":18
}

// json数据的数组格式:
["tom",18,"programmer"]
复杂的json格式数据可以包含对象和数组的写法。

{
  "name":"小明",
  "age":200,
  "is_delete": false,
  "fav":["code","eat","swim","read"],
  "son":{
    "name":"小小明",
    "age":100,
    "lve":["code","eat"]
  }
}

// 数组结构也可以作为json传输数据。
json数据可以保存在.json文件中,一般里面就只有一个json对象。
总结:
1. json文件的后缀是.json
2. json文件一般保存一个单一的json数据
3. json数据的属性不能是方法或者undefined,属性值只能:数值[整数,小数,布尔值]、字符串、json和数组
4. json数据只使用双引号、每一个属性成员之间使用逗号隔开,并且最后一个成员没有逗号。
   {
      "name":"小明",
      "age":200,
      "fav":["code","eat","swim","read"],
      "son":{
        "name":"小小明",
        "age":100
      }
    }
工具:postman可以用于测试开发的数据接口。
javascript提供了一个JSON对象来操作json数据的数据转换.
| 参数 | 返回值 | 描述 | |
|---|---|---|---|
| stringify | json对象 | 字符串 | json对象转成字符串 |
| parse | 字符串 | json对象 | 字符串格式的json数据转成json对象 |

<!DOCTYPE html>
<html lang="en">
<head>
    <meta charset="UTF-8">
    <title>axios</title>
    <script src="js/vue.js"></script>
    <script src="js/axios.js"></script>
</head>
<body>
    <script>
    var data = {
        "name":"xiaopmiong",
        "age":13,
        "sex":true
    };

    // 把json对象转换成json字符串
    json_str = JSON.stringify(data);
    console.log()

    // 把json字符串装换成json对象
    data_str = '{"name":"xiaopmiong","age":13,"sex":true}';
    json_obj = JSON.parse(data_str);
    console.log(json_obj);
    </script>
</body>
</html>
数据接口,也叫api接口,表示后端提供操作数据/功能的url地址给客户端使用。
同时在工作中,大部分数据接口都不是手写,而是通过函数库/框架来生成。
ajax的使用必须与服务端程序配合使用,但是目前我们先学习ajax的使用,所以暂时先不涉及到服务端python代码的编写。因此,我们可以使用别人写好的数据接口进行调用。
jQuery将ajax封装成了一个函数$.ajax(),我们可以直接用这个函数来执行ajax请求。
接口地址天气接口http://wthrcdn.etouch.cn/weather_mini?city=城市名称
音乐接口搜索http://tingapi.ting.baidu.com/v1/restserver/ting?method=baidu.ting.search.catalogSug&query=歌曲标题
音乐信息接口http://tingapi.ting.baidu.com/v1/restserver/ting?method=baidu.ting.song.play&songid=音乐ID
jQ版本:

<!DOCTYPE html>
<html lang="en">
<head>
    <meta charset="UTF-8">
    <title>Title</title>
    <script src="js/jquery-1.12.4.js"></script>
    <script>
    $(function(){
        $("#btn").on("click",function(){
            $.ajax({
                // 后端程序的url地址
                url: 'http://wthrcdn.etouch.cn/weather_mini',
                // 也可以使用method,提交数据的方式,默认是'GET',常用的还有'POST'
                type: 'get',
                dataType: 'json',  // 返回的数据格式,常用的有是'json','html',"jsonp"
                data:{ // 设置发送给服务器的数据,如果是get请求,也可以写在url地址的?后面
                    "city":'北京'
                }
            })
            .done(function(resp) {     // 请求成功以后的操作
                console.log(resp);
            })
            .fail(function(error) {    // 请求失败以后的操作
                console.log(error);
            });
        });
    })
    </script>
</head>
<body>
<button id="btn">点击获取数据</button>
</body>
</html>
vue版本:

<!DOCTYPE html>
<html lang="en">
<head>
    <meta charset="UTF-8">
    <title>Title</title>
    <script src="js/vue.js"></script>
    <script src="js/axios.js"></script>
</head>
<body>
    <div id="app">
        <input type="text" v-model="city">
        <button @click="get_weather">点击获取天气</button>
    </div>
    <script>
        let vm = new Vue({
            el:"#app",
            data:{
                city:"",
            },
            methods:{
                get_weather(){
                    // http://wthrcdn.etouch.cn/weather_mini?city=城市名称
                    axios.get("http://wthrcdn.etouch.cn/weather_mini?city="+this.city)
                        .then(response=>{
                            console.log(response);

                        }).catch(error=>{
                            console.log(error.response)
                    });
                  // 上面的参数写法,也可以是下面这种格式:
                  // axios.get("http://wthrcdn.etouch.cn/weather_mini",{
                  //     // get请求的附带参数
                  //     params:{
                  //         "city":"广州",
                  //     }
                  // }).then(response=>{
                  //     console.log(response.data);  // 获取接口数据
                  // }).catch(error=>{
                  //     console.log(error.response); // 获取错误信息
                  // })
                }
            }
        })
    </script>
</body>
</html>
ajax本质上还是javascript,是运行在浏览器中的脚本语言,所以会被受到浏览器的同源策略所限制。

ajax跨域(跨源)方案:后端授权[CORS],jsonp,服务端代理
CORS是一个W3C标准,全称是"跨域资源共享",它允许浏览器向跨源的后端服务器发出ajax请求,从而克服了AJAX只能同源使用的限制。
django的视图
def post(request): response = new Response() response .headers["Access-Control-Allow-Origin"] = "http://localhost:63342" return response;
// 在响应行信息里面设置以下内容:
Access-Control-Allow-Origin: ajax所在的域名地址
Access-Control-Allow-Origin: www.oldboy.cn  # 表示只允许www.oldboy.cn域名的客户端的ajax跨域访问
// * 表示任意源,表示允许任意源下的客户端的ajax都可以访问当前服务端信息
Access-Control-Allow-Origin: *
总结:
0. 同源策略:浏览器的一种保护用户数据的一种安全机制。
   浏览器会限制ajax不能跨源访问其他源的数据地址。
   同源:判断两个通信的地址之间,是否协议,域名[IP],端口一致。

   ajax:  http://127.0.0.1/index.html
   api数据接口:  http://localhost/index

   这两个是同源么?不是同源的。是否同源的判断依据不会根据电脑来判断,而是通过协议、域名、端口的字符串是否来判断。

1. ajax默认情况下会受到同源策略的影响,一旦受到影响会报错误如下:
     No 'Access-Control-Allow-Origin' header is present on the requested resource

2. 解决ajax只能同源访问数据接口的方式:
   1. CORS,跨域资源共享,在服务端的响应行中设置:
      Access-Control-Allow-Origin: 允许访问的域名地址
   2. jsonp
   3. 是否服务端代理
      思路:通过python来请求对应的服务器接口,获取到数据以后,
组件(Component)是自定义封装的功能。在前端开发过程中,经常出现多个网页的功能是重复的,而且很多不同的页面之间,也存在同样的功能。
而在网页中实现一个功能,需要使用html定义功能的内容结构,使用css声明功能的外观样式,还要使用js来定义功能的特效,因此就产生了把一个功能相关的[HTML、css和javascript]代码封装在一起组成一个整体的代码块封装模式,我们称之为“组件”。
所以,组件就是一个html网页中的功能,一般就是一个标签,标签中有自己的html内容结构,css样式和js特效。
vue的组件有两种:默认组件[全局组件] 和 单文件组件

<!DOCTYPE html>
<html lang="en">
<head>
    <meta charset="UTF-8">
    <title>Title</title>
    <script src="js/vue.js"></script>
</head>
<body>
    <div id="page">
        <addnum></addnum>
    </div>

    <script>
        Vue.component("addnum",{
            template:'<p>公共头部<span @click="show">{{mes}}</span></p>',
            data:function () {
                return{
                    mes:"这是文本"
                }
            },
            methods:{
                show(){
                    alert(this.mes)
                }
            }
        });

        var vm =new Vue({
            el:'#page',
            data:{},


        })
    </script>
</body>
</html>
前面学习了普通组件以后,接下来我们继续学习单文件组件则需要提前先安装准备一些组件开发工具。否则无法使用和学习单文件组件。
一般情况下,单文件组件,我们运行在 自动化工具vue-CLI中,可以帮我们编译单文件组件。所以我们需要在系统中先搭建vue-CLI工具,
官网:
Vue CLI 需要 Node.js 8.9 或更高版本 (推荐 8.11.0+)。你可以使用 nvm 或 nvm-windows在同一台电脑中管理多个 Node 版本。
nvm工具的下载和安装: https://www.jianshu.com/p/d0e0935b150a
https://www.jianshu.com/p/622ad36ee020
ubuntu终端查看系统时间,以及日历
修改时区以及时间
查看时区
date -R
修改
tzselect
然后根据提示选择 亚洲, 中国,北京
cp /usr/share/zoneinfo/Asia/Shanghai /etc/localtime
之后拷贝文件, 非root加上sudo
这样再次查看就成功了
如果修改时间的话
sudo date -s MM/DD/YY //修改日期
sudo date -s hh:mm:ss //修改时间
最后更新 CMOS
sudo hwclock --systohc //非常重要,如果没有这一步的话,后面时间还是不准
ubuntu下部署vue
安装node
更新包管理器apt与apt-get
sudo apt update
sudo apt-get update
使用apt包管理器进行下载
sudo apt-get install nodejs         # 下载nodejs
sudo apt-get install npm        #下载npm,它是nodejs的包管理器(nodejs package manager)
升级 npm
npm install npm -g
# npm install -g npm
# npm -g install npm
国内的npm不是很好用,使用cnpm代替npm的日常使用。
升级或安装 cnpm
npm install cnpm -g
你可以使用以下命令来查看所有全局安装的模块:
$ npm list -g
请先安装git,安装命令请参考下面
ubuntu系统
sudo apt-get install git
最新稳定版
$ cnpm install vue
命令行工具
Vue.js 提供一个官方命令行工具,可用于快速搭建大型单页应用。
全局安装 vue-cli
$ cnpm install --global vue-cli
使用 cnpm 安装 webpack:
cnpm install webpack -g
创建一个基于 webpack 模板的新项目
$ vue init webpack my-project
安装记录:
num
注意:安装nvm之前,要确保当前机子中不存在任何版本的node,如果有,则卸载掉
安装命令:
sudo apt-get update
sudo apt install curl
curl -o- https://raw.githubusercontent.com/creationix/nvm/v0.34.0/install.sh | bash
source ~/.bashrc
打开:https://github.com/coreybutler/nvm-windows/releases
安装完成以后,先查看环境变量是否设置好了.
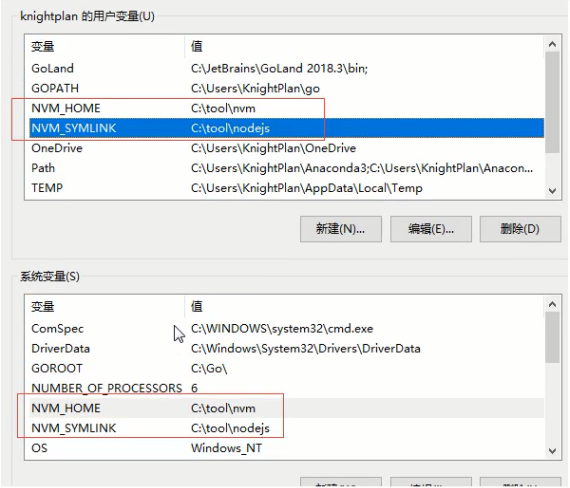
常用的nvm命令
nvm list # 列出目前在nvm里面安装的所有node版本
nvm install node版本号 # 安装指定版本的node.js
nvm uninstall node版本号 # 卸载指定版本的node.js
nvm use node版本号 # 切换当前使用的node.js版本
如果使用nvm工具,则直接可以不用自己手动下载,如果使用nvm下载安装 node的npm比较慢的时候,可以修改nvm的配置文件(在安装根目录下)

# settings.txt
root: C:\tool\nvm    [这里的目录地址是安装nvm时自己设置的地址,要根据实际修改]
path: C:\tool\nodejs
arch: 64
proxy: none
node_mirror: http://npm.taobao.org/mirrors/node/
npm_mirror: https://npm.taobao.org/mirrors/npm/
Node.js是一个新的后端(后台)语言,它的语法和JavaScript类似,所以可以说它是属于前端的后端语言,后端语言和前端语言的区别:
-
运行环境:后端语言一般运行在服务器端,前端语言运行在客户端的浏览器上
-
功能:后端语言可以操作文件,可以读写数据库,前端语言不能操作文件,不能读写数据库。
我们一般安装LTS(长线支持版本 Long-Time Support):
下载地址:https://nodejs.org/en/download/【上面已经安装了nvm,那么这里不用手动安装了】
node.js的版本有两大分支:
官方发布的node.js版本:0.xx.xx 这种版本号就是官方发布的版本
Node.js如果安装成功,可以查看Node.js的版本,在终端输入如下命令:
node -v
使用nvm的相关命令安装node
# 查看官方提供的可安装node版本
nvm ls-remote

# 安装执行版本的node,例如:nvm install v10.15.2
nvm install <version>

# 卸载node版本,例如:nvm uninstall v10.15.2
nvm uninstall <version>

# 查看已安装的node列表
nvm install v10.15.2

# 切换node版本,例如:nvm use v10.15.2
nvm use <version>

# 设置默认版本,如果没有设置,则开机时默认node是没有启动的。
nvm alias default v10.15.2

# 查看当前使用的版本
nvm current
在安装node.js完成后,在node.js中会同时帮我们安装一个npm包管理器npm。我们可以借助npm命令来安装node.js的包。这个工具相当于python的pip管理器。

npm install -g 包名              # 安装模块   -g表示全局安装,如果没有-g,则表示在当前项目安装
npm list                        # 查看当前目录下已安装的node包
npm view 包名 engines            # 查看包所依赖的Node的版本
npm outdated                    # 检查包是否已经过时,命令会列出所有已过时的包
npm update 包名                  # 更新node包
npm uninstall 包名               # 卸载node包
npm 命令 -h                      # 查看指定命令的帮助文档
npm install -g vue-cli
使用vue自动化工具可以快速搭建单页应用项目目录。
该工具为现代化的前端开发工作流提供了开箱即用的构建配置。只需几分钟即可创建并启动一个带热重载、保存时静态检查以及可用于生产环境的构建配置的项目:

// 生成一个基于 webpack 模板的新项目
vue init webpack 项目目录名
例如:
vue init webpack myproject


// 启动开发服务器 ctrl+c 停止服务
cd myproject
npm run dev           # 运行这个命令就可以启动node提供的测试http服务器
src   主开发目录,要开发的单文件组件全部在这个目录下的components目录下
static 静态资源目录,所有的css,js文件放在这个文件夹
dist项目打包发布文件夹,最后要上线单文件项目文件都在这个文件夹中[后面打包项目,让项目中的vue组件经过编译变成js 代码以后,dist就出现了]
node_modules目录是node的包目录,
config是配置目录,
build是项目打包时依赖的目录
src/router   路由,后面需要我们在使用Router路由的时候,自己声明.
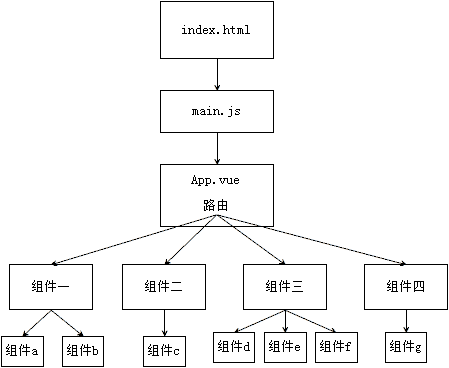
整个项目是一个主文件index.html,index.html中会引入src文件夹中的main.js,main.js中会导入顶级单文件组件App.vue,App.vue中会通过组件嵌套或者路由来引用components文件夹中的其他单文件组件。
组件有两种:普通组件、单文件组件
普通组件的缺点:
-
html代码是作为js的字符串进行编写,所以组装和开发的时候不易理解,而且没有高亮效果。
-
普通组件用在小项目中非常合适,但是复杂的大项目中,如果把更多的组件放在html文件中,那么维护成本就会变得非常昂贵。
-
将一个组件相关的html结构,css样式,以及交互的JavaScript代码从html文件中剥离出来,合成一个文件,这种文件就是单文件组件,相当于一个组件具有了结构、表现和行为的完整功能,方便组件之间随意组合以及组件的重用,这种文件的扩展名为“.vue”,比如:"Home.vue"。
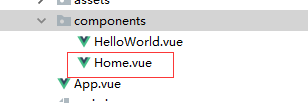
在组件中编辑三个标签,编写视图、vm对象和css样式代码。
<template>
  <div id="Home">
    <span @click="num--" class="sub">-</span>
    <input type="text" size="1" v-model="num">
    <span @click="num++" class="add">+</span>
  </div>
</template>
<script>
  export default {
// 组件名称,将来提供给路由进行页面跳转的
    name:"Home",
    data: function(){
      return {
        num:0,
      }
    }
  }
</script>
<style scoped>
  .sub,.add{
    border: 1px solid red;
    padding: 4px 7px;
  }
</style>
创建Homes.vue

<template>
  <div class="add_num">
      <span @click="num++">+</span>
      <input type="text" size="2" v-model="num">
      <span @click="num--">-</span>
  </div>
</template>

<script>
  export default{
    name:"AddNum",
    data: function(){
      return {
        num: 0,
      }
    }
  }
</script>

<style scoped>
   .add_num{
      font-size: 32px;
   }
</style>
在App.vue组件中调用上面的组件

<template>
  <div id="Home">
    <span @click="num--" class="sub">-</span>
    <input type="text" size="1" v-model="num">
    <span @click="num++" class="add">+</span>
  </div>
</template>


<script>
  export default {
    name:"Home",
    data: function(){
      return {
        num:0,
      }
    }
  }
</script>

<style scoped>
  .sub,.add{
    border: 1px solid red;
    padding: 4px 7px;
  }
</style>
有时候开发vue项目时,页面也可以算是一个大组件,同时页面也可以分成多个子组件.
因为,产生了父组件调用子组件的情况.
例如,我们可以声明一个组件,作为父组件

//  组件中代码必须写在同一个标签中
<template>
    <div id="menu">
      <span>{{msg}}</span>
      <div>hello</div>
  </div>
</template>

<script>
  export default {
    name:"Menu",
    data: function(){
      return {
        msg:"这是Menu组件里面的菜单",
      }
    }
  }
</script>
然后,在父组件中调用上面声明的子组件。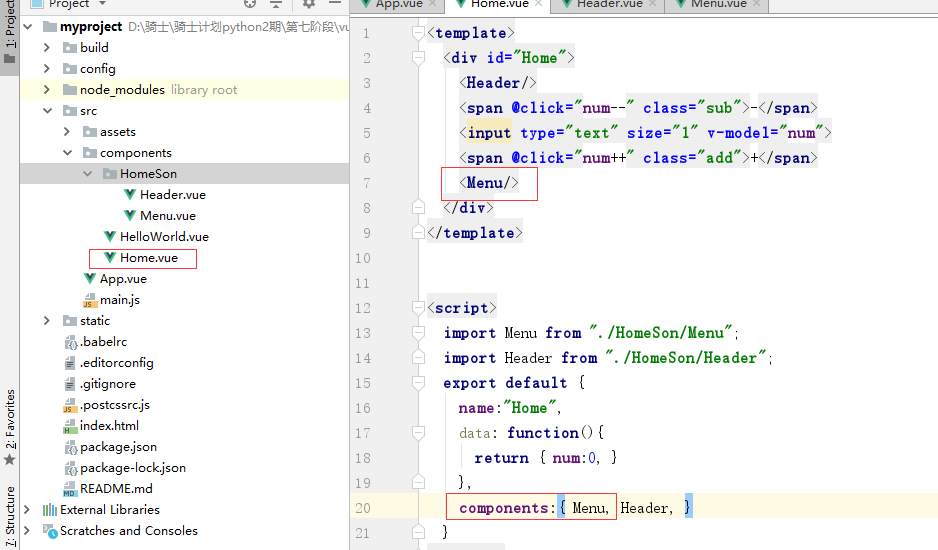
最后,父组件被App.vue调用.就可以看到页面效果.

例如,我们希望把父组件的数据传递给子组件.
可以通过props属性来进行数据传递.
传递数据三个步骤:
1. 在父组件中,调用子组件的组件标签处,使用属性值的方式往下传递数据
<Menu :mynum="num" title="home里面写的数据"/>

# 上面表示在父组件调用Menu子组件的时候传递了2个数据:
  如果要传递变量[变量可以各种类型的数据],属性名左边必须加上冒号:,同时,属性名是自定义的,会在子组件中使用。
  如果要传递普通字符串数据,则不需要加上冒号:
2. 在子组件中接受上面父组件传递的数据,需要在vm组件对象中,使用props属性类接受。
<script>
  export default {
    name:"Menu",
    props:["mynum","title"],
    data: function(){
      return {
        msg:"这是Menu组件里面的菜单",
      }
    }
  }
</script>

// 上面 props属性中表示接受了两个数据。
3. 在子组件中的template中使用父组件传递过来的数据.
<template>
    <div id="menu">
      <span>{{msg}},{{title}}</span>
      <div>hello,{{mynum}}</div>
  </div>
</template>
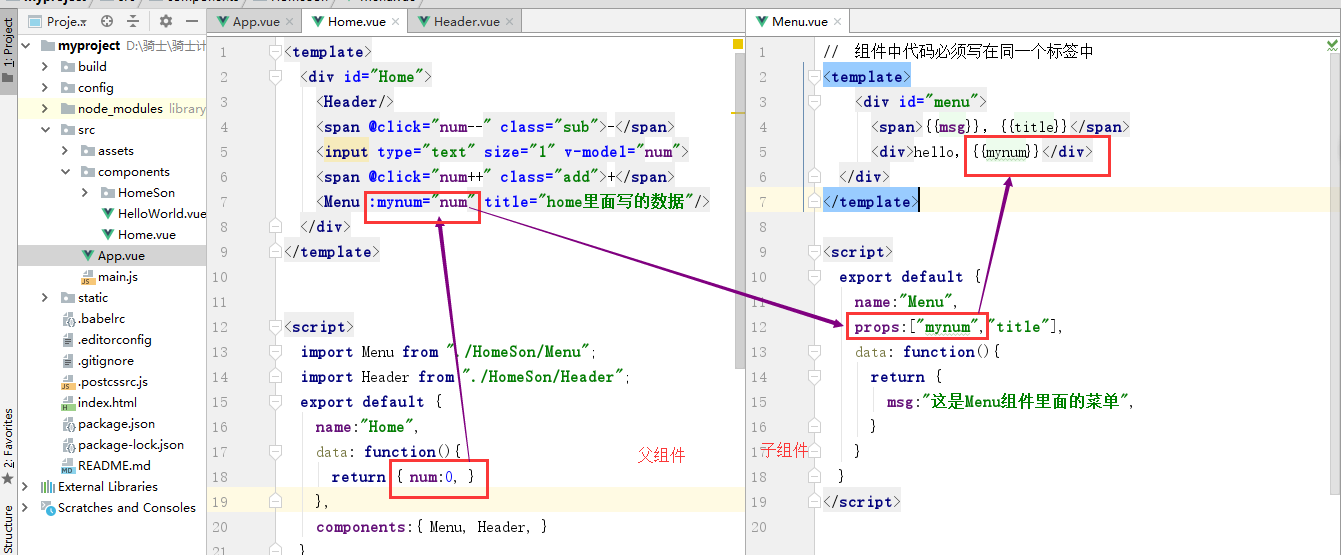
使用父组件传递数据给子组件时, 注意一下几点:
-
传递数据是变量,则需要在属性左边添加冒号.
传递数据是变量,这种数据称之为"动态数据传递"
传递数据不是变量,这种数据称之为"静态数据传递"
-
父组件中修改了数据,在子组件中会被同步修改,但是,子组件中的数据修改了,是不是影响到父组件中的数据.
这种情况,在开发时,也被称为"单向数据流"
<template>
    <div>
      <p>Post的子组件</p>
      <h2>{{fnum}}</h2>
      <p>data={{data}}</p>
      <p>fnum={{fnum}}</p>
      <div><input type="text" v-model="fnum"></div>
    </div>
</template>

<script>
    export default {
        name: "PostSon",
        // 父组件传递数据给子组件: 1. 在父组件中调用子组件的组件名称标签上面声明属性和传递值,2. 在子组件中通过props进行接收
        props:["data","fnum"],  // 接受父组件中传递过来的数据
        // 子组件传递数据给父组件[事件的方式进行传递]:
        watch:{
          fnum(){
            console.log(this.fnum);
            // this.$emit("父元素的自定义事件","要传递的数据");  // 通过this.$emit()方法,子组件可以把数据传递给父组件

            this.$emit("postparentdata",this.fnum);
          }
        }
    }
</script>

<style scoped>

</style>
<template>
    <div>
      <h1>num={{num}}</h1>
      <Son data="我是付组件里面的内容" :fnum="num" @postparentdata="getsondata"></Son>
    </div>

</template>
3. 父组件中,声明一个自定义方法,在事件被调用时,执行的。
<script>
    import Son from "./PostSon"
    export default {
        name: "Post",
        data(){
          return {
            num: 100,
          }
        },
        components:{
          Son:Son,
        },
        methods:{
          getsondata(message){
            console.log("父组件"+message);
            this.num = message;
          }
        }
    }
</script>
默认情况下,我们的项目中并没有对axios包的支持,所以我们需要下载安装。
npm install axios
接着在main.js文件中,导入axios并把axios对象 挂载到vue属性中多为一个子对象,这样我们才能在组件中使用。
// The Vue build version to load with the `import` command
// (runtime-only or standalone) has been set in webpack.base.conf with an alias.
import Vue from 'vue'
import App from './App' // 这里表示从别的目录下导入 单文件组件
import axios from 'axios'; // 从node_modules目录中导入包
Vue.config.productionTip = false

Vue.prototype.$axios = axios; // 把对象挂载vue中

/* eslint-disable no-new */
new Vue({
  el: '#app',
  components: { App },
  template: '<App/>'
});
<script>
  export default{
    。。。
    methods:{
      get_data:function(){
         // 使用axios请求数据
        this.$axios.get("http://wthrcdn.etouch.cn/weather_mini?city=深圳").then((response)=>{
            console.log(response);
        }).catch(error=>{
            console.log(error);
        })
      }
    }
  }
</script>
效果

使用的时候,因为本质上来说,我们还是原来的axios,所以也会收到同源策略的影响。


 浙公网安备 33010602011771号