
前端 BOM和DOM
BOM和DOM 的定义
BOM(Browser Object Model)是指浏览器对象模型,它使 JavaScript 有能力与浏览器进行“对话”。
DOM (Document Object Model)是指文档对象模型,通过它,可以访问HTML文档的所有元素。
BOM
BOM浏览器对象模型
BOM 使 JavaScript 有能力与浏览器进行“对话”。
widow 对象
alert(弹窗)
alert('你点了我一下!')
浏览器显示网页内部内容的高度与宽度


innerHeight   浏览器显示网页内部内容的高度,会随着浏览器窗口变化
innerWidth    浏览器显示网页内部内容的宽度,会随着浏览器窗口变化
location
window对象的子对象中的location
location.href   获取当前url:"https://www.cnblogs.com/clschao/articles/10092991.html"
location.href="URL" // 跳转到指定页面
    示例:location.href = 'http://www.baidu.com';直接跳转到百度
location.reload() 重新加载页面,就是刷新一下页面
计时器相关
(计时器是异步的)
setTimeout计时器
setTimeout计时器,一段时间之后做某些事情
setTimeout('confirm("你好");',3000);  #3秒之后执行前面的js代码
setTimeout(confirm('xxx'),3000);  #如果写的不是字符串,会直接执行
setTimeout(function(){confirm('xxx')},3000);  #最好写成函数

var a = setTimeout(function(){console.log('xxx')},3000);  #a是浏览器来记录计时器的一个随机数字
clearTimeout(a)  #清除计时器,通过这个数字可以清除
setInterval 计时器
setInterval 计时器,每隔一段时间做某些事情
var a = setInterval(function(){
            console.log('xxx')},3000);
history.back()     go(-1)   //回到上一页
history.go(0)               //刷新
history.forward()  go(1)    //去下一页
DOM
选择器
直接查找
document.getElementById           根据ID获取一个标签
document.getElementsByClassName   根据class属性获取(可以获取多个元素,所以返回的是一个数组)
document.getElementsByTagName     根据标签名获取标签合集
示例:
    <div class="c1" id="d1">
        待到将军归来日,朕与将军解战袍!
    </div>

    <div class="c1" id="d2">
        日照香炉生紫烟,遥看瀑布挂前川!
    </div>

    var a = document.getElementById('d1');  # 获取id属性值为d1的标签  拿到的直接是标签对象
    var a = document.getElementsByClassName('c1'); #获取class值为c1的所有标签  拿到的是数组
    var a = document.getElementsByTagName('div');  #获取所有div标签  拿到的是数组
间接查找
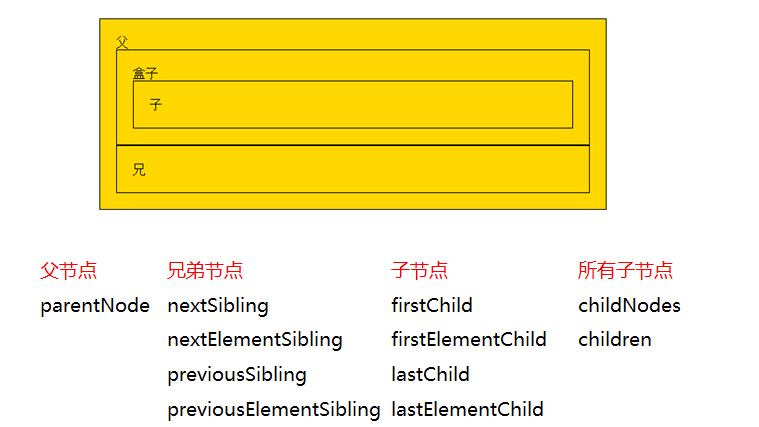
var a = document.getElementById('d1');
a.parentNode  #获取a这个标签的父级标签.(更强大)
a.parentElement; #获取a这个标签的父级标签.
children                 所有子标签
firstElementChild        第一个子标签元素
lastElementChild         最后一个子标签元素
nextElementSibling       下一个兄弟标签元素
previousElementSibling   上一个兄弟标签元素
节点操作
创建节点(创建标签)
    var a = document.createElement('标签名称');
    示例,创建a标签
        var a = document.createElement('a');
    var dd = document.getElementById('dd'); 找到div标签

添加节点
    #添加节点,添加到了最后
    dd.appendChild(a);将创建的a标签添加到dd这个div标签里面的最后.

    #在某个节点前面添加节点
    父级标签.insertBefore(新标签,某个儿子标签)
    示例
        var dd = document.getElementById('dd');  #找到父级标签
        var a = document.createElement('a');   #创建一个新的a标签
        var d2 = dd.children[1];  #找到父级标签下的某个儿子标签
        dd.insertBefore(a,d2);   #将a标签插入到上面这个儿子标签的前面.
删除节点
    dd.removeChild(d2);  父级标签中删除子标签

替换节点
    var dd = document.getElementById('dd');  #找到父级标签
    var a = document.createElement('a');  #创建a标签
    a.innerText = '百度';
    var d1 = dd.children[0];  #找到要被替换的子标签
    dd.replaceChild(a,d1);  #替换
文本操作
d1.innerText; 查看

设置:
    d1.innerText = "<a href=''>百度</a>";
    d1.innerHTML = "<a href=''>百度</a>";  能够识别标签
属性操作
var divEle = document.getElementById("d1");
divEle.setAttribute("age","18")  #比较规范的写法
divEle.getAttribute("age")
divEle.removeAttribute("age")

// 自带的属性还可以直接.属性名来获取和设置,如果是你自定义的属性,是不能通过.来获取属性值的
imgEle.src
imgEle.src="..."
值操作
var inp = document.getElementById('username');
inp.value;  #查看值
inp.value = 'taibai'; #设置值

选择框:
    <select name="city" id="city">
        <option value="1">上海</option>
        <option value="2">北京</option>
        <option value="3">深圳</option>
    </select>

    var inp = document.getElementById('city');
    inp.value;  #查看值
    inp.value = '1';  #设置值
class的操作
var d = document.getElementById('oo');
d.classList;  #获得这个标签的class属性的所有的值
d.classList.add('xx2');  #添加class值
d.classList.remove('xx2'); #删除class值
d.classList.contains('xx2');  #判断是否有某个class值,有返回true,没有返回false
d.classList.toggle('xx2');  #有就删除,没有就增加
css操作
var d = document.getElementById('oo');
d.style.backgroundColor = 'deeppink';  有横杠的css属性,写法要去掉横杠,并且横杠后面的单词首字母大写
d.style.height = '1000px'
事件
事件里面的this
表示当前标签对象
this表示当前标签对象
<div id="d1" class="c1" onclick="f1(this);"></div>
function f1(ths) {
        // var d = document.getElementById('d1');
        // d.style.backgroundColor = 'yellow';
        ths.style.backgroundColor = 'yellow';

        var d = document.getElementById('d2');
        d.style.backgroundColor = 'yellow';
    }
    <div id="d1" class="c1"></div>

    var d = document.getElementById('d1');
    d.onclick = function () {
        this.style.backgroundColor = 'yellow';
        // d.style.backgroundColor = 'yellow'; //this表示当前标签对象
    }
JS是以事件驱动为核心的一门语言
事件的三要素:
事件源,绑定事件,事件驱动程序
(1)获取事件源:document.getElementById(“box”); //类似与ios语言的 UIButton *adBtn = [UIButton buttonWithType:UIButtonTypeCustom];
(2)绑定事件: 事件源box.事件onclick = function(){ 事件驱动程序 };
(3)书写事件驱动程序:关于DOM的操作
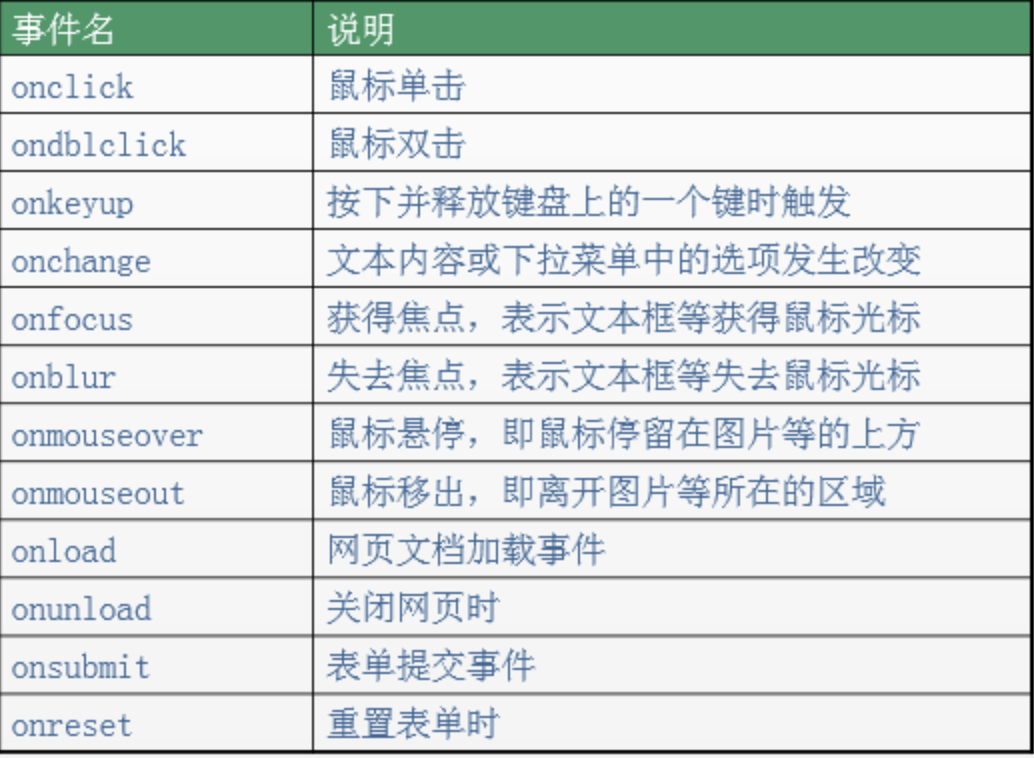
常见事件
1、获取事件源(DOM节点的获取)
获取事件源的常见方式如下:
var div1 = document.getElementById("box1");      //方式一:通过id获取单个标签
var arr1 = document.getElementsByTagName("div1");     //方式二:通过 标签名 获得 标签数组,所以有s
var arr2 = document.getElementsByClassName("hehe");  //方式三:通过 类名 获得 标签数组,所以有s
2、绑定事件的方式
方式一:直接绑定匿名函数
<div id="box1" ></div>

<script type="text/javascript">
    var div1 = document.getElementById("box1");
    //绑定事件的第一种方式
    div1.onclick = function () {
        alert("我是弹出的内容");
    }
</script>
方式二:先单独定义函数,再绑定
<div id="box1" ></div>

<script type="text/javascript">
    var div1 = document.getElementById("box1");
    //绑定事件的第二种方式
    div1.onclick = fn;   //注意,这里是fn,不是fn()。fn()指的是返回值。
    //单独定义函数
    function fn() {
        alert("我是弹出的内容");
    }
</script>
方式三:行内绑定
<!--行内绑定-->
<div id="box1" onclick="fn()"></div>

<script type="text/javascript">

    function fn() {
        alert("我是弹出的内容");
    }

</script>
3、事件驱动程序
  <style>
        #box {
            width: 100px;
            height: 100px;
            background-color: pink;
            cursor: pointer;
        }
    </style>
</head>

<body>

<div id="box" ></div>

<script type="text/javascript">
    var oDiv = document.getElementById("box");
    //点击鼠标时,原本粉色的div变大了,背景变红了
    oDiv.onclick = function () {
        oDiv.style.width = "200px";   //属性值要写引号
        oDiv.style.height = "200px";
        oDiv.style.backgroundColor = "red";   //属性名是backgroundColor,不是background-Color
    }
</script>
onclick事件(单击)
    <div id="d1" class="c1"></div>

    var d = document.getElementById('d1');
    d.onclick = function () {
        d.style.backgroundColor = 'yellow';
    }
定时器例子
<!DOCTYPE html>
<html lang="en">
<head>
  <meta charset="UTF-8">
  <meta http-equiv="x-ua-compatible" content="IE=edge">
  <meta name="viewport" content="width=device-width, initial-scale=1">
  <title>定时器</title>

</head>
<body>

<input type="text" id="timer">
<button id="start">开始</button>
<button id="end">结束</button>


<script>
    var timetag;
    // 1 获取当前时间
    function f1() {
        var showTime = new Date();
        var showLocaleTime = showTime.toLocaleString();
        var inpEle = document.getElementById('timer');
        inpEle.value = showLocaleTime;
    }
    // 2 把时间放进去
    //     2.1 找到strat开始按钮,绑定点击事件
    var startBtn = document.getElementById('start');
    startBtn.onclick = function () {
        //2.2 找到input标签,并将值放到input标签里面
        f1();
        if (timetag === undefined){
            timetag = setInterval(f1,1000);
        }
    };
    // 3 停止时间
    var endBtn = document.getElementById('end');
    endBtn.onclick = function () {
        clearInterval(timetag);
        timetag = undefined;
    }


</script>

</body>
</html>
onchange事件(select)
<select name="" id="jishi">
    <option value="1">太白</option>
    <option value="2">alex</option>
    <option value="3">沛齐</option>

</select>

// onchange事件,内容发生变化时触发的事件
    var s = document.getElementById('jishi');
    s.onchange = function () {
        //this.options  select标签的所有的option标签
        //this.selectedIndex被选中的标签在所有标签中的索引值
        console.log(this.options[this.selectedIndex].innerText + '搓的舒服');
    }


用户名:<input type="text" id="username">

    //input标签绑定onchange事件
    var inp = document.getElementById('username');
    inp.onchange = function () {
        console.log(this.value);
    };
地址
<!DOCTYPE html>
<html lang="zh-CN">
<head>
  <meta charset="UTF-8">
  <meta http-equiv="x-ua-compatible" content="IE=edge">
  <meta name="viewport" content="width=device-width, initial-scale=1">
  <title>select联动</title>
</head>
<body>

<select id="province">
  <option>请选择省:</option>

</select>

<select id="city">
  <option>请选择市:</option>
</select>

<script>
    var data = {"河北省": ["廊坊", "邯郸"], "北京": ["朝阳区", "海淀区"], "山东": ["威海市", "烟台市"]};

    // 1 将省份的数据放到省份的下拉框里面
    //1.1 找到省份下拉框
    var proSelect = document.getElementById('province');
    // 1.2 创建option标签

    //1.3  将数据放到option标签中,并将option标签放到省份下拉框里面
    for (var province in data){
        var proOption = document.createElement('option');
        proOption.innerText = province;
        proSelect.appendChild(proOption);
    }

    //2 选择省份,将被选择的省份的市都放到市的那个下拉框里面
    var citySelect = document.getElementById('city');
    proSelect.onchange = function () {
        citySelect.innerText = '';
        var proText = this.options[this.selectedIndex].innerText;
        var cityData = data[proText];
        for (var cityindex in cityData){
            var cityOption = document.createElement('option');
            cityOption.innerText = cityData[cityindex];
            citySelect.appendChild(cityOption);

        }
    }


</script>

</body>
</html>


select对象.options.selectedindex 被选中的选项在options中的索引位置
<!DOCTYPE html>
<html lang="en">
<head>
    <meta charset="UTF-8">
    <title>Title</title>
    <style>
        div{
            height: 2000px;
        }
        a{
            display: none;
            position: fixed;
            bottom: 20px;
            right:20px;
        }
    </style>
</head>
<body>
    <div></div>
    <a href="#" id="back">回到顶部</a>
</body>
<script>
    //针对获取浏览器的垂直滚动条的位置
    window.onscroll = function () {
        var a = document.getElementById('back')
        console.log(document.documentElement.scrollTop)
        if(document.documentElement.scrollTop>500){
            a.style.display = 'block'
        }else{
            a.style.display = 'none'
        }
    }
</script>
</html>

window.onscoll 在页面的滚动条滚动的时候触发的事件
document.documentElement.scrollTop 针对获取浏览器的垂直滚动条的位置

 浙公网安备 33010602011771号