k8s安装istio
Istio-ServiceMesh解决方案: k8s安装istio
https://www.servicemesher.com/tags/istio/page/3/
https://www.jianshu.com/p/e23e3e74538e
https://time.geekbang.org/article/2355
1 Service Mesh 概念
Service Mesh又译作“服务网格”,作为服务间通信的基础设施层。
Service Mesh 是一个基础设施层,用于处理服务间通信。云原生应用有着复杂的服务拓扑,Service Mesh 保证请求可以在这些拓扑中可靠地穿梭。在实际应用当中,Service Mesh 通常是由一系列轻量级的网络代理组成的,它们与应用程序部署在一起,但应用程序不需要知道它们的存在。
Service Mesh 实际上就是处于 TCP/IP 之上的一个抽象层,它假设底层的 L3/L4 网络能够点对点地传输字节(当然,它也假设网络环境是不可靠的,所以 Service Mesh 必须具备处理网络故障的能力)。
Service mesh 有如下几个特点:
- 应用程序间通讯的中间层;
- 轻量级网络代理;
- 应用程序无感知;
- 解耦应用程序的重试、超时、监控、追踪和服务发现;
2 原理
Service Mesh 基本原理
如果用一句话来解释什么是 Service Mesh,可以将它比作是应用程序或者说微服务间的 TCP/IP,负责服务之间的网络调用、限流、熔断和监控。对于编写应用程序来说一般无须关心 TCP/IP 这一层(比如通过 HTTP 协议的 RESTful 应用),同样使用 Service Mesh 也就无须关系服务之间的那些原来是通过应用程序或者其他框架实现的事情,比如 Spring Cloud、OSS,现在只要交给 Service Mesh 就可以了。
Phil Calçado 在他的这篇博客 Pattern: Service Mesh 中详细解释了 Service Mesh 的来龙去脉:
- 从最原始的主机之间直接使用网线相连
- 网络层的出现
- 集成到应用程序内部的控制流
- 分解到应用程序外部的控制流
- 应用程序的中集成服务发现和断路器
- 出现了专门用于服务发现和断路器的软件包/库,Twitter’s Finagle和 Facebook’s Proxygen。这时候还是集成在应用程序内部
- 出现了专门用于服务发现和断路器的开源软件,如:NetflixOSS ecosystem
- 最后作为微服务的中间层Service Mesh出现
Service Mesh 的架构如下图所示
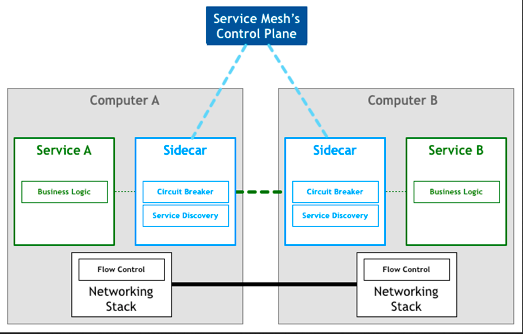
3 解决方案
目前社区Service Mesh的开源解决方案有:Buoyant 公司推出的 Linkerd 和 Google、IBM 等厂商牵头的 Istio。Linkerd 更加成熟稳定些,Istio 功能更加丰富、设计上更为强大,社区相对也更加强大一些。所以普遍认为 Istio 的前景会更好,但是毕竟还处于项目的早期,问题还很多。
4 Istio介绍
Istio是由Google、IBM和Lyft开源的微服务管理、保护和监控框架。Istio为希腊语,意思是”起航“。官方中文文档地址:https://istio.doczh.cn
https://blog.51cto.com/brucewang/2149104
4.1 什么是ISTIO
Istio 是一个用来连接、管理和保护微服务的开放平台。
Istio 提供一种简单的方式来为已部署的服务建立网络,该网络具有负载均衡、服务间认证、监控等功能,而不需要对服务的代码做任何改动。想要让服务支持 Istio,只需要在您的环境中部署一个特殊的 sidecar,使用 Istio 控制平面功能配置和管理代理,拦截微服务之间的所有网络通信。
- HTTP、gRPC、WebSocket 和 TCP 流量的自动负载均衡。
- 通过丰富的路由规则、重试、故障转移和故障注入,可以对流量行为进行细粒度控制。
- 可插入的策略层和配置 API,支持访问控制、速率限制和配额。
- 对出入集群入口和出口中所有流量的自动度量指标、日志记录和跟踪。
- 通过强大的基于身份的验证和授权,在集群中实现安全的服务间通信。
4.2 ISTIO有什么用
Istio 提供了一个完整的解决方案,通过为整个服务网格提供行为洞察和操作控制来满足微服务应用程序的多样化需求。它在服务网络中统一提供了许多关键功能:
- 流量管理。控制服务之间的流量和API调用的流向,使得调用更可靠,并使网络在恶劣情况下更加健壮。
- 服务身份和安全。为网格中的服务提供可验证身份,并提供保护服务流量的能力,使其可以在不同可信度的网络上流转。
- 策略执行。将组织策略应用于服务之间的互动,确保访问策略得以执行,资源在消费者之间良好分配。可以通过通过配置网格而不是修改应用程序代码来完成策略的更改。
- 遥测:了解服务之间的依赖关系,以及它们之间流量的本质和流向,从而提供快速识别问题的能力。
4.3 架构
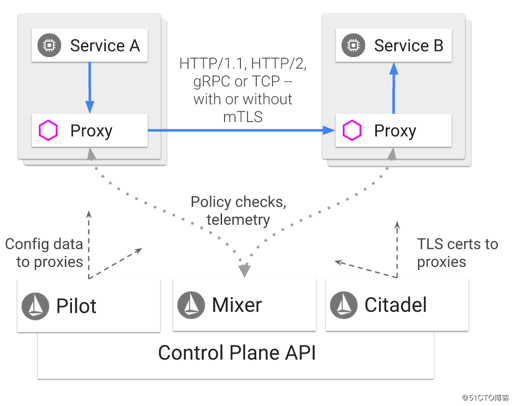
Istio 服务网格逻辑上分为数据平面和控制平面。
- 数据平面由一组以 sidecar 方式部署的智能代理(Envoy)组成。这些代理可以调节和控制微服务及 Mixer 之间所有的网络通信。
- 控制平面负责管理和配置代理来路由流量。此外控制平面配置 Mixer 以实施策略和收集遥测数据。
下图显示了构成每个面板的不同组件:
Envoy
- 动态服务发现
- 负载均衡
- TLS 终止
- HTTP/2 & gRPC 代理
- 熔断器
- 健康检查、基于百分比流量拆分的灰度发布
- 故障注入
- 丰富的度量指标
Envoy 被部署为 sidecar,和对应服务在同一个 Kubernetes pod 中。这允许 Istio 将大量关于流量行为的信号作为属性提取出来,而这些属性又可以在 Mixer 中用于执行策略决策,并发送给监控系统,以提供整个网格行为的信息。
Mixer
Mixer 是一个独立于平台的组件,负责在服务网格上执行访问控制和使用策略,并从 Envoy 代理和其他服务收集遥测数据。代理提取请求级属性,发送到 Mixer 进行评估。
Pilot
Pilot 为 Envoy sidecar 提供服务发现功能,为智能路由(例如 A/B 测试、金丝雀部署等)和弹性(超时、重试、熔断器等)提供流量管理功能。它将控制流量行为的高级路由规则转换为特定于 Envoy 的配置,并在运行时将它们传播到 sidecar。
Citadel
Citadel 通过内置身份和凭证管理可以提供强大的服务间和最终用户身份验证。可用于升级服务网格中未加密的流量,并为运维人员提供基于服务标识而不是网络控制的强制执行策略的能力。从 0.5 版本开始,Istio 支持基于角色的访问控制,以控制谁可以访问您的服务
5 Istio与Kubernetes
http://blog.itpub.net/31543630/viewspace-2213615
Kubernetes 提供了部署、升级和有限的运行流量管理能力;利用service的机制来做服务注册和发现,转发,通过kubeproxy有一定的转发和负载均衡能力。但并不具备上层如熔断、限流降级、调用链治理等能力.
Istio 则很好的补齐了k8s在微服务治理上的这部分能力,同时是基于k8s构建的,但不是像SpringCloud Netflix等完全重新做一套。Istio是谷歌微服务治理上的非常关键的一环。
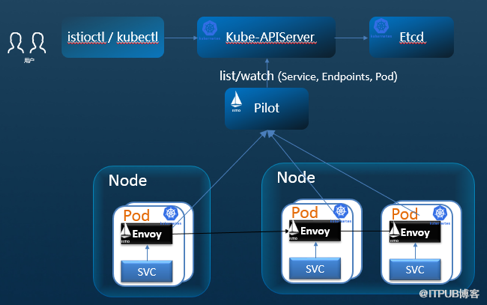
Istio 与k8s紧密结合,包括:Sicecar 运行在k8s pod里,作为一个proxy和业务容器部署在一起,部署过程对用户透明。Mesh中要求业务程序的运行感知不到sidecar的存在,基于k8sd的pod的设计这部分做的更彻底,对用户更透明,用户甚至感知不到部署sidecar的这个过程。试想如果是通过VM上部署一个agent,不会有这么方便。
Pilot 中包含一个controller,通过list/watch kube-apiserver自动发现K8S中的services、endpoints。它通过在Kubernetes里面注册一个controller来监听事件,从而获取Service和Kubernetes的Endpoint以及Pod的关系,但是在转发层面,不再使用kube-proxy转发了,而是将这些映射关系转换成为pilot自己的转发模型,下发到envoy进行转发。

K8s 编排容器服务已经成为一种事实上的标准;因为微服务与容器在轻量、快速部署运维等特征的匹配,微服务运行在容器中也正成为一种标准实践;对于云原生应用,采用Kubernetes构建微服务部署和集群管理能力,采用Istio构建服务治理能力,将逐渐成为应用微服务转型的标准配置。
6 基于k8s安装istio
6.1 k8s环境
基于kubernetes(3):kubeadm安装k8s1.15
# kubectl get nodes
NAME         STATUS   ROLES    AGE   VERSION
k8s-master   Ready    master   26h   v1.15.3
k8s-node-1   Ready    node     25h   v1.15.3
k8s-node-2   Ready    node     25h   v1.15.3
k8s-node-3   Ready    node     25h   v1.15.3
6.2 下载和准备安装
获取最新的Istio安装包
curl -L https://git.io/getLatestIstio | sh -

# curl -L https://git.io/getLatestIstio | sh -
  % Total    % Received % Xferd  Average Speed   Time    Time     Time  Current
                                 Dload  Upload   Total   Spent    Left  Speed
  0     0    0     0    0     0      0      0 --:--:--  0:00:02 --:--:--     0
100  3015  100  3015    0     0    997      0  0:00:03  0:00:03 --:--:-- 12108
Downloading istio-1.3.4 from https://github.com/istio/istio/releases/download/1.3.4/istio-1.3.4-linux.tar.gz ...  % Total% Received % Xferd  Average Speed   Time    Time     Time  Current
                                 Dload  Upload   Total   Spent    Left  Speed
100   614    0   614    0     0    614      0 --:--:-- --:--:-- --:--:--   614
  1 36.3M    1  390k    0     0   2413      0  4:23:25  0:02:45  4:20:40     0
  1 36.3M    1  390k    0     0   2408      0  4:23:58  0:02:46  4:21:12     0


…下载太慢了我按链接wget 了
wget  https://github.com/istio/istio/releases/download/1.3.4/istio-1.3.4-linux.tar.gz

[root@k8s-master istio]# tar -zxf istio-1.3.4-linux.tar.gz
[root@k8s-master istio]# ls
istio-1.3.4  istio-1.3.4-linux.tar.gz
[root@k8s-master istio]# cp -r  istio-1.3.4 /usr/local/istio
[root@k8s-master istio]# echo 'PATH=$PATH:/usr/local/istio/bin:' >>  /etc/profile
进入安装包目录后进入install/kubernetes/目录安装Kubernetes所需yaml文件
[root@k8s-master istio]# cd istio-1.3.4/
[root@k8s-master istio-1.3.4]# ls
bin  install  istio.VERSION  LICENSE  README.md  samples  tools
[root@k8s-master istio-1.3.4]# cd install/
[root@k8s-master install]# ls
consul  gcp  kubernetes  README.md  tools
[root@k8s-master install]# cd  kubernetes/
[root@k8s-master kubernetes]# ls
global-default-sidecar-scope.yaml  istio-demo-auth.yaml  mesh-expansion.yaml  operator
helm                               istio-demo.yaml       namespace.yaml       README.md
[root@k8s-master kubernetes]#
6.3 安装
此处选择默认不启用TLS身份验证的安装方式,启用TLS安装方式的yaml文件为istio-demo-auth.yaml)
kubectl create -f istio-demo.yaml
6.4 确认安装
# kubectl get pod -n istio-system
NAME                                      READY   STATUS      RESTARTS   AGE
grafana-59d57c5c56-x6rqv                  1/1     Running     0          17m
istio-citadel-555bff45bf-nhxbw            1/1     Running     0          17m
istio-egressgateway-7fd45cc845-rd5gs      1/1     Running     0          17m
istio-galley-7f8b6db7d7-9x4rw             1/1     Running     0          17m
istio-grafana-post-install-1.3.4-7frpb    0/1     Completed   0          17m
istio-ingressgateway-64456bb8b-pg2cs      1/1     Running     0          17m
istio-pilot-85894cd4f5-t9n6t              2/2     Running     0          17m
istio-policy-7d8f44db64-8f6xv             2/2     Running     0          17m
istio-security-post-install-1.3.4-rw55q   0/1     Completed   0          17m
istio-sidecar-injector-65d5f8db56-7bk9g   1/1     Running     0          17m
istio-telemetry-85c7c59b86-xgmdl          2/2     Running     0          17m
istio-tracing-795c9c64c4-5f4kd            1/1     Running     0          17m
kiali-8c9d6fbf6-9hp75                     1/1     Running     0          17m
prometheus-7d7b9f7844-p79gv               1/1     Running     0          17m


# kubectl get svc -n istio-system
NAME                        TYPE           CLUSTER-IP       EXTERNAL-IP   PORT(S)                                                                                          AGE
grafana                     ClusterIP      10.110.104.169   <none>        3000/TCP                                                                                          18m
istio-citadel               ClusterIP      10.105.113.216   <none>        8060/TCP,15014/TCP                                                                                          18m
istio-egressgateway         ClusterIP      10.98.158.85     <none>        80/TCP,443/TCP,15443/TCP                                                                                          18m
istio-galley                ClusterIP      10.103.48.216    <none>        443/TCP,15014/TCP,9901/TCP                                                                                          18m
istio-ingressgateway        LoadBalancer   10.110.13.142    <pending>     15020:32111/TCP,80:31380/TCP,443:31390/TCP,31400:31400/TCP,15029:32114/TCP,15030:30450/TCP,15031:31750/TCP,15032:30788/TCP,15443:32083/TCP   18m
istio-pilot                 ClusterIP      10.111.22.59     <none>        15010/TCP,15011/TCP,8080/TCP,15014/TCP                                                                                          18m
istio-policy                ClusterIP      10.102.139.26    <none>        9091/TCP,15004/TCP,15014/TCP                                                                                          18m
istio-sidecar-injector      ClusterIP      10.102.102.11    <none>        443/TCP,15014/TCP                                                                                          18m
istio-telemetry             ClusterIP      10.106.211.184   <none>        9091/TCP,15004/TCP,15014/TCP,42422/TCP                                                                                          18m
jaeger-agent                ClusterIP      None             <none>        5775/UDP,6831/UDP,6832/UDP                                                                                          17m
jaeger-collector            ClusterIP      10.98.254.9      <none>        9411/TCP,14250/TCP,14267/TCP,14268/TCP                                                                                          25h
jaeger-collector-headless   ClusterIP      None             <none>        9411/TCP,14250/TCP,14267/TCP,14268/TCP                                                                                          25h
jaeger-operator             ClusterIP      10.109.247.90    <none>        8383/TCP                                                                                          26h
jaeger-query                ClusterIP      10.111.157.104   <none>        16686/TCP                                                                                          25h
kiali                       ClusterIP      10.107.66.48     <none>        20001/TCP                                                                                          18m
prometheus                  ClusterIP      10.98.18.46      <none>        9090/TCP                                                                                          18m
tracing                     ClusterIP      10.97.13.237     <none>        80/TCP                                                                                          17m
zipkin                      ClusterIP      10.109.176.69    <none>        9411/TCP                                                                                          17m
6.5 运行的组件
grafana
Grafana支持多种不同的时序数据库数据源,Grafana对每种数据源提供不同的查询方法,而且能很好的支持每种数据源的特性。
istio-citadel
实现istio的Citadel功能的组件
istio-egressgateway
控制内部访问外部链接的代理,如果这里没设置规则,Envoy将因为不能识别访问规则而抛弃访问请求。
istio-ingressgateway
控制外部访问内部数据的策略,只有配置后外部(kubernetes集群外)业务才能访问集群内业务。
istio-pilot
ISTIO的pilot组件
istio-policy
ISTIO的策略控制组件
istio-sidecar-injector
提供自动注入功能,这样yaml文件就不需要再手动打补丁注入
istio-telemetry
ISTIO 实现遥测数据的组件
prometheus
替代heapster的一个监控数据收集工具
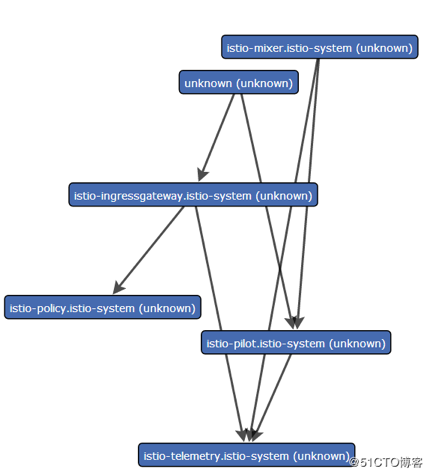
servicegraph
Istio网格中的服务生成一个图。在这个task中,你将安装Servicegraph 插件并使用基于web的界面来查看服务网格的服务图。
tracing,zipkin
服务轨迹跟踪,同时可以记录到业务的访问量等
7 Bookinfo示例
https://www.qikqiak.com/istio-book/install/1.Docker%20for%20Mac%E5%AE%89%E8%A3%85istio.html
https://blog.51cto.com/brucewang/2149104 https://blog.csdn.net/M2l0ZgSsVc7r69eFdTj/article/details/81571517
目前大部分 istio 的使用示例都是使用的官方的 Bookinfo 应用示例:
7.1 Bookinfo 应用分为四个单独的微服务:
- productpage :productpage 微服务会调用 details 和 reviews 两个微服务,用来生成页面。
- details :这个微服务包含了书籍的信息。
- reviews :这个微服务包含了书籍相关的评论。它还会调用 ratings 微服务。
- ratings :ratings 微服务中包含了由书籍评价组成的评级信息。
reviews 微服务有 3 个版本:
- v1 版本不会调用 ratings 服务。
- v2 版本会调用 ratings 服务,并使用 1 到 5 个黑色星形图标来显示评分信息。
- v3 版本会调用 ratings 服务,并使用 1 到 5 个红色星形图标来显示评分信息

这个示例是一个多语言开发的微服务应用。首先有一个 python 实现的 ProductPage 入口应用展示书籍的详细信息和评价,它会调用 Ruby 实现的 Detail 应用获取书籍详情,同时调用 Java 实现的评价应用获取书籍的评价。
上图展示了使用 istio 后,整个应用实际的结构。所有的微服务都和一个 Envoy sidecar 封装到一起,sidecar 拦截所有到达和离开服务的请求。
7.2 部署
首先进入解压的istio目录,执行如下命令:
kubectl apply -f <(istioctl kube-inject -f samples/bookinfo/platform/kube/bookinfo.yaml)
[root@k8s-master istio-1.3.4]# ls
bin  install  istio.VERSION  LICENSE  README.md  samples  tools
[root@k8s-master istio-1.3.4]#  kubectl apply -f <(istioctl kube-inject -f samples/bookinfo/platform/kube/bookinfo.yaml)
service/details created
serviceaccount/bookinfo-details created
deployment.apps/details-v1 created
service/ratings created
serviceaccount/bookinfo-ratings created
deployment.apps/ratings-v1 created
service/reviews created
serviceaccount/bookinfo-reviews created
deployment.apps/reviews-v1 created
deployment.apps/reviews-v2 created
deployment.apps/reviews-v3 created
service/productpage created
serviceaccount/bookinfo-productpage created
deployment.apps/productpage-v1 created
其中 bookinfo.yaml 就是普通的 k8s 的 Deployment 和 Service 的 yaml 文件,而 istioctl kube-inject 会在这个文件的基础上向其中的 Deployment 追加内容,通常会追加一个 initContainer(image:docker.io/istio/proxy_init) 作为 sidecar 的形式与应用的容器运行在同一个 pod 中。
过一会儿就可以看到如下 service 和 pod 启动:
# kubectl get pod
NAME                                      READY   STATUS    RESTARTS   AGE
details-v1-5557659779-hlr52               2/2     Running   0          6m28s
productpage-v1-58f967648c-vhtxx           2/2     Running   0          6m27s
ratings-v1-68c58c7975-6fbkm               2/2     Running   0          6m27s
reviews-v1-9cd479947-p44ln                2/2     Running   0          6m26s
reviews-v2-567f5dcdfb-4klvt               2/2     Running   0          6m27s
reviews-v3-86bdc9c869-24ppb               2/2     Running   0          6m27s

# kubectl get svc
NAME          TYPE        CLUSTER-IP      EXTERNAL-IP   PORT(S)    AGE
details       ClusterIP   10.109.59.71    <none>        9080/TCP   6m40s
productpage   ClusterIP   10.106.157.87   <none>        9080/TCP   6m39s
ratings       ClusterIP   10.107.134.22   <none>        9080/TCP   6m40s
reviews       ClusterIP   10.105.11.68    <none>        9080/TCP   6m39s
现在应用的服务都部署成功并启动了,现在需要在集群外部访问,需要添加一个 istio gateway。 gateway 相当于 k8s 的 ingress controller 和 ingress。它为 HTTP/TCP 流量配置 load balancer,通常在服务网格边缘作为应用的 ingress trafic管理。
然后创建一个 gateway:
|
1
|
kubectl apply -f samples/bookinfo/networking/bookinfo-gateway.yaml |
# kubectl apply -f samples/bookinfo/networking/bookinfo-gateway.yaml
gateway.networking.istio.io/bookinfo-gateway created
The VirtualService "bookinfo" is invalid: []: Invalid value: map[string]interface {}{"apiVersion":"networking.istio.io/v1alpha3", "kind":"VirtualService", "metadata":map[string]interface {}{"annotations":map[string]interface {}{"kubectl.kubernetes.io/last-applied-configuration":"{\"apiVersion\":\"networking.istio.io/v1alpha3\",\"kind\":\"VirtualService\",\"metadata\":{\"annotations\":{},\"name\":\"bookinfo\",\"namespace\":\"default\"},\"spec\":{\"gateways\":[\"bookinfo-gateway\"],\"hosts\":[\"*\"],\"http\":[{\"match\":[{\"uri\":{\"exact\":\"/productpage\"}},{\"uri\":{\"prefix\":\"/static\"}},{\"uri\":{\"exact\":\"/login\"}},{\"uri\":{\"exact\":\"/logout\"}},{\"uri\":{\"prefix\":\"/api/v1/products\"}}],\"route\":[{\"destination\":{\"host\":\"productpage\",\"port\":{\"number\":9080}}}]}]}}\n"}, "creationTimestamp":"2019-11-08T03:23:26Z", "generation":1, "name":"bookinfo", "namespace":"default", "uid":"819111f5-99ec-4db4-8182-dcbbb46e1f93"}, "spec":map[string]interface {}{"gateways":[]interface {}{"bookinfo-gateway"}, "hosts":[]interface {}{"*"}, "http":[]interface {}{map[string]interface {}{"match":[]interface {}{map[string]interface {}{"uri":map[string]interface {}{"exact":"/productpage"}}, map[string]interface {}{"uri":map[string]interface {}{"prefix":"/static"}}, map[string]interface {}{"uri":map[string]interface {}{"exact":"/login"}}, map[string]interface {}{"uri":map[string]interface {}{"exact":"/logout"}}, map[string]interface {}{"uri":map[string]interface {}{"prefix":"/api/v1/products"}}}, "route":[]interface {}{map[string]interface {}{"destination":map[string]interface {}{"host":"productpage", "port":map[string]interface {}{"number":9080}}}}}}}}: validation failure list:
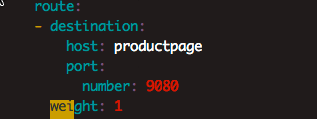
spec.http.route.weight in body is required
我在samples/bookinfo/networking/bookinfo-gateway.yaml 追加了一个
weight: 1
[root@k8s-master istio-1.3.1]# vim  samples/bookinfo/networking/bookinfo-gateway.yaml
[root@k8s-master istio-1.3.1]# kubectl apply -f samples/bookinfo/networking/bookinfo-gateway.yaml
gateway.networking.istio.io/bookinfo-gateway unchanged
virtualservice.networking.istio.io/bookinfo created

#验证 gateway 是否启动成功:

[root@k8s-master istio-1.3.4]# istioctl get gateway
Command "get" is deprecated, Use `kubectl get` instead (see https://kubernetes.io/docs/tasks/tools/install-kubectl)
GATEWAY NAME       HOSTS     NAMESPACE   AGE
bookinfo-gateway   *         default     1m
[root@k8s-master istio-1.3.4]# kubectl get gateway
NAME               AGE
bookinfo-gateway   2m
[root@k8s-master istio-1.3.4]#
官方文档中后面还会去获取 ingress 的 ip 和端口,实际上不需要了,在 service 中我们可以看到有这样的一条 service 信息:
# kubectl get svc -n istio-system | grep istio-ingressgateway
istio-ingressgateway        LoadBalancer   10.110.13.142    <pending>     15020:32111/TCP,80:31380/TCP,443:31390/TCP,31400:31400/TCP,15029:32114/TCP,15030:30450/TCP,15031:31750/TCP,15032:30788/TCP,15443:32083/TCP   19h
这里使用的是 LoadBalancer 类型的服务,实际上是用来对接云服务厂商的,如果我们没有对接云服务厂商的话,可以将这里类型改成 NodePort,但是这样我们要访问我们的服务就得加上 nodePort 端口了,我们这里其实直接使用 localhost 就可以访问到 Bookinfo,在浏览器中打开地址:http://localhost/productpage
也可以通过以下方法验证
#确定Ingress的IP和端口:
#port:
export INGRESS_PORT=$(kubectl -n istio-system get service istio-ingressgateway -o jsonpath='{.spec.ports[?(@.name=="http2")].nodePort}')
# secure port:
export SECURE_INGRESS_PORT=$(kubectl -n istio-system get service istio-ingressgateway -o jsonpath='{.spec.ports[?(@.name=="https")].nodePort}')
#host
export INGRESS_HOST=$(kubectl get po -l istio=ingressgateway -n istio-system -o 'jsonpath={.items[0].status.hostIP}')
# GATEWAY_URL:
export GATEWAY_URL=$INGRESS_HOST:$INGRESS_PORT
#测试 200为正常
curl -o /dev/null -s -w "%{http_code}\n" http://${GATEWAY_URL}/productpage
7.3 测试部署是否成功
可以通过上文的url200
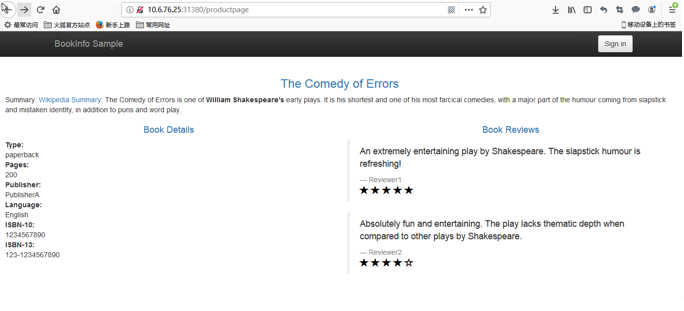
也可以通过页面查看
Bookinfo应用由4个微服务组成,即web微服务页面productpage、页面左边部分为Book Details服务,右边部分为Book Reviews服务, reviews服务目前为v1状态即无星级评分。由于未设置请求路由,多刷新页面几次,请求路由流量会随机的在reviews服务v1、v2、v3中切换。


如果您觉得阅读本文对您有帮助,请点一下“推荐”按钮,您的“推荐”将是我最大的写作动力!欢迎各位转载,但是未经作者本人同意,转载文章之后必须在文章页面明显位置给出作者和原文连接,否则保留追究法律责任的权利。


 浙公网安备 33010602011771号