
Linux学习92 跨平台共享服务-samba服务基础应用
一、概述
1、架构
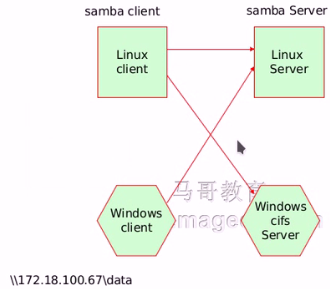
2、smb:Service message block
3、cifs:common internet filesystem
4、samba:Andrew Tridgell
a、功能:
(1)、文件系统共享
(2)、打印机共享
(3)、NetBIOS协议
b、peer/peer(workgroup model)
c、domain model
5、程序环境
a、服务端程序包:samba,samba-common,samba-libs
b、主配置文件:/etc/samba/smb.conf,由samba-common包提供
c、主程序:
nmbd:NetBIOS name server
smbd:SMB/CIFS services
d、Unit File:两个都得启动
smb.service
nmb.service
e、监听的端口:
137/udp,138/udp
139/tcp,445/tcp
6、d:\data\tools:共享,共享名(software)
servicename:
//192.168.10.13/software
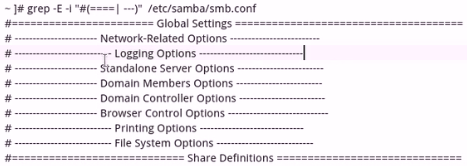
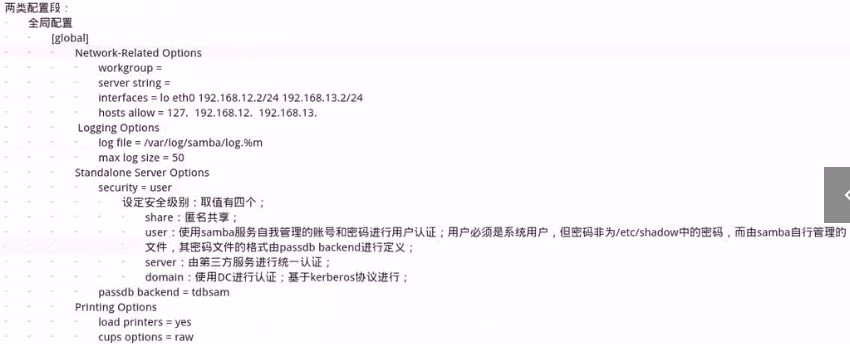
7、主配置文件的配置段
8、客户端程序
a、smbclient:交互式命令行客户端,类似于iftp
b、mount.cifs:挂载cifs文件系统的专用命令
9、samba的配置
a、smb.conf
二、服务安装
1、我们将192.168.10.13作为samba server,将192.168.10.14作为samba client
2、安装
a、我们在192.168.10.14上安装samba client
yum install -y samba-client
b、我们在192.168.10.13上安装samba server
yum install -y samba
3、配置文件
a、我们可以通过yum list installed命令来查看哪些包已经被安装。我们samba服务的配置文件由samba-common来提供
[root@www ~]# rpm -ql samba-common
/etc/logrotate.d
/etc/logrotate.d/samba
/etc/samba
/etc/samba/lmhosts
/etc/samba/smb.conf
/etc/samba/smb.conf.example
/etc/sysconfig/samba
/usr/lib/tmpfiles.d/samba.conf
/usr/share/man/man5/lmhosts.5.gz
/usr/share/man/man5/smb.conf.5.gz
/usr/share/man/man5/smbpasswd.5.gz
/usr/share/man/man7/samba.7.gz
/var/lib/samba
/var/lib/samba/private
/var/log/samba
/var/log/samba/old
/var/run/samba
/var/run/winbindd
[root@www ~]#
b、我们来了解一下samba的配置文件,在/etc/samba/smb.conf中
[root@www samba]# cat smb.conf.example |grep -Ev "^$|^#"
[global]
    workgroup = MYGROUP #工作组
    server string = Samba Server Version %v
;    netbios name = MYSERVER
;    interfaces = lo eth0 192.168.12.2/24 192.168.13.2/24 #监听的网卡地址,可以直接写网卡
;    hosts allow = 127. 192.168.12. 192.168.13. #被允许的网络,也可以写成hosts deny来定义拒绝的hosts
    # log files split per-machine:
    log file = /var/log/samba/log.%m #日志文件
    # maximum size of 50KB per log file, then rotate:
    max log size = 50 #日志超过50M就会滚动了,即生成新日志文件

-----下面的是用于samba自己独立运行时要配置的选项
    security = user #运行于user安全模式下,即用户认证的主机是由samba自己管理认证的。samba用户必须是系统用户。但是密码不是登陆系统的密码,而是自己定义的密码。
    passdb backend = tdbsam
;    security = domain
;    passdb backend = tdbsam
;    realm = MY_REALM
;    password server = <NT-Server-Name>
;    security = user
;    passdb backend = tdbsam
;    domain master = yes
;    domain logons = yes
    # the following login script name is determined by the machine name
    # (%m):
;    logon script = %m.bat
    # the following login script name is determined by the UNIX user used:
;    logon script = %u.bat
;    logon path = \\%L\Profiles\%u
    # use an empty path to disable profile support:
;    logon path =
    # various scripts can be used on a domain controller or a stand-alone
    # machine to add or delete corresponding UNIX accounts:
;    add user script = /usr/sbin/useradd "%u" -n -g users
;    add group script = /usr/sbin/groupadd "%g"
;    add machine script = /usr/sbin/useradd -n -c "Workstation (%u)" -M -d /nohome -s /bin/false "%u"
;    delete user script = /usr/sbin/userdel "%u"
;    delete user from group script = /usr/sbin/userdel "%u" "%g"
;    delete group script = /usr/sbin/groupdel "%g"
;    local master = no
;    os level = 33
;    preferred master = yes
;    wins support = yes
;    wins server = w.x.y.z
;    wins proxy = yes
;    dns proxy = yes
    load printers = yes
    cups options = raw
;    printcap name = /etc/printcap
    # obtain a list of printers automatically on UNIX System V systems:
;    printcap name = lpstat
;    printing = cups
;    map archive = no
;    map hidden = no
;    map read only = no
;    map system = no
;    store dos attributes = yes
[homes]
    comment = Home Directories
    browseable = no
    writable = yes
;    valid users = %S
;    valid users = MYDOMAIN\%S
[printers]
    comment = All Printers
    path = /var/spool/samba
    browseable = no
    guest ok = no
    writable = no
    printable = yes
;    [netlogon]
;    comment = Network Logon Service
;    path = /var/lib/samba/netlogon
;    guest ok = yes
;    writable = no
;    share modes = no
;    [Profiles]
;    path = /var/lib/samba/profiles
;    browseable = no
;    guest ok = yes
;    [public]
;    comment = Public Stuff
;    path = /home/samba
;    public = yes
;    writable = no
;    printable = no
;    write list = +staff
c、我们通过testparm测试参数是否是ok的
[root@www samba]# testparm
Load smb config files from /etc/samba/smb.conf
rlimit_max: increasing rlimit_max (1024) to minimum Windows limit (16384)
Processing section "[homes]"
Processing section "[printers]"
Loaded services file OK.
Server role: ROLE_STANDALONE

Press enter to see a dump of your service definitions

# Global parameters
[global]
    interfaces = lo ens33
    server string = Samba Server Version %v
    workgroup = MYGROUP
    log file = /var/log/samba/log.%m
    max log size = 50
    security = USER
    idmap config * : backend = tdb
    cups options = raw
    hosts allow = 127. 192.168.10.


[homes]
    comment = Home Directories
    browseable = No
    read only = No


[printers]
    comment = All Printers
    path = /var/spool/samba
    browseable = No
    printable = Yes
[root@www samba]#
d、我们来启动服务
[root@www samba]# systemctl start nmb.service smb.service
[root@www samba]#
[root@www samba]# netstat -anpt|grep sm
tcp        0      0 0.0.0.0:139             0.0.0.0:*               LISTEN      12869/smbd
tcp        0      0 0.0.0.0:445             0.0.0.0:*               LISTEN      12869/smbd
tcp6       0      0 :::139                  :::*                    LISTEN      12869/smbd
tcp6       0      0 :::445                  :::*                    LISTEN      12869/smbd
e、现在我们在192.168.10.14中访问服务。可以通过sumbclient或者 mount.cifs来挂载这个文件系统
(1)、我们可以不指定用户,然后就是匿名访问
[root@node2 ~]# smbclient -L 192.168.10.13
Enter SAMBA\root's password:  #密码时敲空格
Anonymous login successful
OS=[Windows 6.1] Server=[Samba 4.6.2]

    Sharename       Type      Comment
    ---------       ----      -------
    IPC$            IPC       IPC Service (Samba Server Version 4.6.2)
Anonymous login successful
OS=[Windows 6.1] Server=[Samba 4.6.2]

    Server               Comment
    ---------            -------

    Workgroup            Master
    ---------            -------
    MYGROUP              WWW
[root@node2 ~]#
(3)、现在我们在192.168.10.13上创建一个用户smbuser并用smbpasswd设置一个samba用户的密码
[root@www samba]# useradd smbuser1
[root@www samba]# smbpasswd -a smbuser1 #-a表示添加这么一个用户,如果不加-a表示前面已经有密码了,要给其改密码
New SMB password:
Retype new SMB password:
Added user smbuser1.
(4)、我们在192.168.10.14上用smbuser1用户登陆
[root@node2 ~]# smbclient -L 192.168.10.13 -U smbuser1
Enter SAMBA\smbuser1's password:
Domain=[WWW] OS=[Windows 6.1] Server=[Samba 4.6.2]

    Sharename       Type      Comment
    ---------       ----      -------
    IPC$            IPC       IPC Service (Samba Server Version 4.6.2)
    smbuser1        Disk      Home Directories
Domain=[WWW] OS=[Windows 6.1] Server=[Samba 4.6.2]

    Server               Comment
    ---------            -------

    Workgroup            Master
    ---------            -------
    H3C                  LYS2359A
    MYGROUP              WWW
[root@node2 ~]#
(5)、现在我们来尝试访问
[root@node2 ~]# smbclient //192.168.10.13/smbuser1 -U smbuser1
Enter SAMBA\smbuser1's password:
Domain=[WWW] OS=[Windows 6.1] Server=[Samba 4.6.2]
smb: \>
[root@node2 ~]# smbclient //192.168.10.13/smbuser1 -U smbuser1
Enter SAMBA\smbuser1's password:
Domain=[WWW] OS=[Windows 6.1] Server=[Samba 4.6.2]
smb: \> ls
  .                                   D        0  Thu May 28 14:02:40 2020
  ..                                  D        0  Thu May 28 14:02:40 2020
  .bash_logout                        H       18  Thu Aug  3 05:11:00 2017
  .bash_profile                       H      193  Thu Aug  3 05:11:00 2017
  .bashrc                             H      231  Thu Aug  3 05:11:00 2017

        17811456 blocks of size 1024. 11438904 blocks available
smb: \> lcd /tmp #切换到本地/tmp目录
smb: \> get .bashrc
getting file \.bashrc of size 231 as .bashrc (28.2 KiloBytes/sec) (average 28.2 KiloBytes/sec)
smb: \> lcd /etc #切换到本地/etc目录
smb: \> put fstab
putting file fstab as \fstab (90.8 kb/s) (average 90.8 kb/s)
smb: \> ls
  .                                   D        0  Thu May 28 14:13:29 2020
  ..                                  D        0  Thu May 28 14:02:40 2020
  .bash_logout                        H       18  Thu Aug  3 05:11:00 2017
  .bash_profile                       H      193  Thu Aug  3 05:11:00 2017
  .bashrc                             H      231  Thu Aug  3 05:11:00 2017
  fstab                               A      465  Thu May 28 14:13:29 2020

        17811456 blocks of size 1024. 11438832 blocks available
smb: \>
(6)、现在我们查看我们192.168.10.13的smbuser1的家目录
[root@www /]# su - smbuser1
hi wohaoshuai
[smbuser1@www ~]$ ll
总用量 4
-rwxr--r-- 1 smbuser1 smbuser1 465 5月  28 14:13 fstab
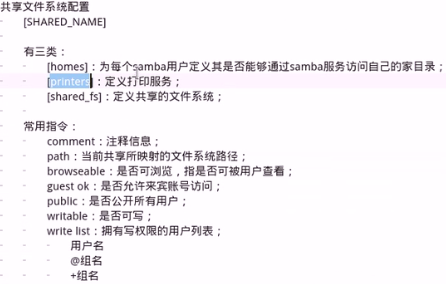
(7)、我们用户的访问权限是定义在我们配置文件的[homes]下的
[root@www /]# cat /etc/samba/smb.conf|grep -EA6 "\[homes\]"
[homes]
    comment = Home Directories
    browseable = no
    writable = yes #是否有写权限,如果设置为no那么就没法上传了
;    valid users = %S
;    valid users = MYDOMAIN\%S

 浙公网安备 33010602011771号