CSS阶段试手作品——CYTUS Ⅱ官网制作
网页Cytus Ⅱ的制作
整体布局#
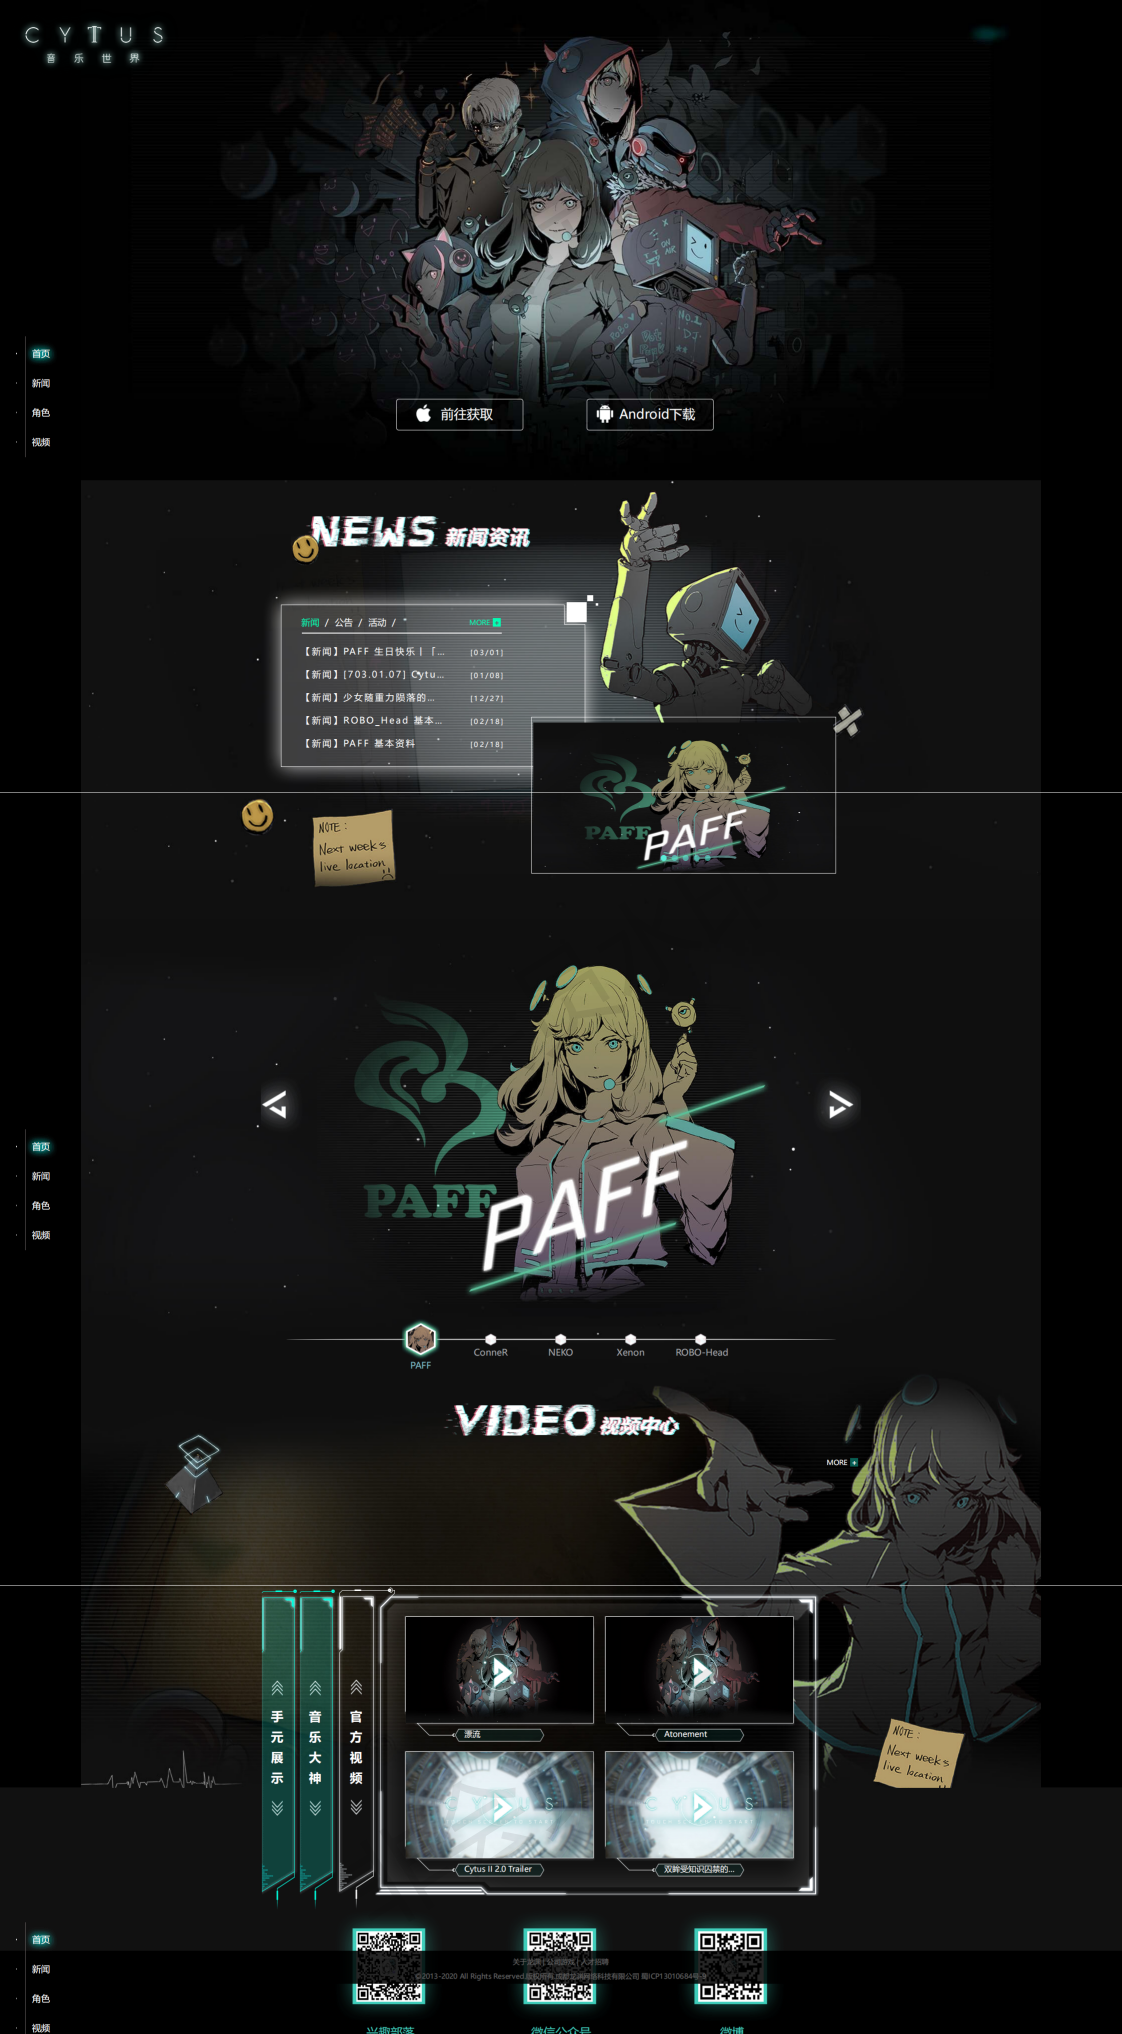
单栏布局,整体按顺序分为以下几个板块:
页首下载、新闻表单、角色轮播图、视频、页尾以及侧边栏
要尽可能把自己的所有知识用上,所以可能会有和原网页写法不同,但基本样式差不多
页首下载#
背景图片#
.head { width: 100%; height: 960px; background: url(../image/headimg.jpg) no-repeat; background-position: center top; }
左上角的logo#
在html中直接使用img标签
.head .logo { margin-left: 1%; margin-top: 1%; }
下载盒子#
这里直接使用了flex布局中的justify-content属性,用于两个链接的居中
.head .download { display: flex; margin-top: 640px; justify-content: center; width: 100%; height: 88px; }
双设备下载链接#
苹果和安卓缩略图使用icomoon的字体图标,设定圆角实线白边框,然后稍微调整一下链接位置
.head .download .iphone { width: 254px; height: 63px; margin-right: 152px; font-size: 26px; color: #FFFFFF; border: 1px #FFFFFF solid; border-radius: 5px; text-align: center; line-height: 63px; } .head .download .android { width: 254px; height: 63px; left: 50%; font-size: 26px; color: #FFFFFF; border: 1px #FFFFFF solid; border-radius: 5px; text-align: center; line-height: 63px; }
页首下载板块完成
新闻表#
新闻框#
新闻框的制作似乎要用到JS Dom节点操作属性,之后学习了js后进行优化,现在是静态实现
精灵图的使用#
精灵图的使用可以减少网页所加载的图片数量,优化了访问速度,精灵图的使用也就是background-position的使用,一般会将精灵图在css中单独写个类选择器,在html标签要使用的时候加上选择器名称并设置其background-position属性即可。
轮播图展示#
参考实现,依旧是js的代码,虽然暂时写了出来,但是不能够完全理解。
以下是参考的例子
<!DOCTYPE html> <html> <head> <meta charset="utf-8"> <title>轮播图效果</title> <style type="text/css"> body { padding: 0; margin: 0; } .box { width: 1920px; height: 1080px; position: relative; margin-left: 60px; } .box-img { position: absolute; top: 0px; left: 0px; overflow: hidden; opacity: 0; transition: all 1.5s; } .box-img:nth-child(1) { opacity: 1; } .box .box-img img { width: 100%; height: 100%; } .box-left { position: absolute; width: 35px; height: 70px; background-color: #00000000; color: #000000; z-index: 100; top: 505px; border-radius: 0 5px 5px 0; text-align: center; line-height: 4.375rem; font-size: 27px; left: 0; } .box-left:hover { background-color: #00000050; color: #FFFFFF; } .box-right { position: absolute; width: 35px; height: 70px; background-color: #00000000; color: #000000; z-index: 100; top: 505px; border-radius: 5px 0 0 5px; text-align: center; line-height: 4.375rem; font-size: 27px; right: 0; } .box-right:hover { background-color: #00000050; color: #FFFFFF; } .box .box-set { position: absolute; bottom: 40px; right: 900px; } .box .box-set ul { padding: 0; margin: 0; list-style: none; } .box .box-set li { float: left; width: 16px; height: 16px; border-radius: 100%; background-color: #CCCCCC; margin-right: 10px; } .box .box-set li:nth-child(1) { background-color: #FFFFFF; } .box .box-set li:hover { background-color: #ffffff; } </style> </head> <body> <div class="box"> <div class="box-img"><img src="image/冬日雪景%20雪地%20木栅栏%20树木%20日落%20风景壁纸(1920x1080).jpg" alt=""></div> <div class="box-img"><img src="image/zzx.jpg" alt=""></div> <div class="box-img"><img src="image/怀表.jpg" alt=""></div> <div class="box-img"><img src="image/21140732673.jpg" alt=""></div> <div class="box-img"><img src="image/a5f735becc3790ec88fc8a4036ca65fa.jpg" alt=""></div> <div class="box-img"><img src="image/star%20wars.jpg" alt=""></div> <div class="box-left"><</div> <div class="box-right">></div> <div class="box-set"> <ul> <li class="button"></li> <li class="button"></li> <li class="button"></li> <li class="button"></li> <li class="button"></li> <li class="button"></li> </ul> </div> </div> <script type="text/javascript" src="./jquery-3.6.0.min.js"></script> <script type="text/javascript"> $(function() { var index = 0;//index表示当前图片的序号 var count;//count表示图片开始自动进行轮播 startInterval(); buttonchange(); function startInterval() { count = setInterval(function() { index++; if (index == $(".box-img").length) index = 0; $(".box-img").css("opacity", "0"); $(".box-img").eq(index).css("opacity", "1"); buttonchange(); }, 4000) } function buttonchange() { $(".button").css("background-color", "#CCC"); $(".button").eq(index).css("background-color", "#FFF"); } $(".box-left").click(function() { clearInterval(count); index--; if (index == 0) index == $(".box-img").length; $(".box-img").css("opacity", "0"); $(".box-img").eq(index).css("opacity", "1"); buttonchange(); startInterval(); }) $(".box-right").click(function() { clearInterval(count); index++; if (index == $(".box-img").length) index = 0; $(".box-img").css("opacity", "0"); $(".box-img").eq(index).css("opacity", "1"); buttonchange(); startInterval(); }) $(".button").click(function() { clearInterval(count); var bindex = $(this).index(); index = bindex; $(".box-img").css("opacity", "0"); $(".box-img").eq(index).css("opacity", "1"); buttonchange(); startInterval(); }) }) </script> </body> </html>
与原官网相比增加了左右按钮
角色展示#
角色展示同样是使用和上面相同的js轮播图,添加了在点击角色名字时文字颜色会改变
点击出现人物头像同时字体下移未实现
视频中心#
视频中心的弹出框仅仅是写出了样式,并未完全实现


【推荐】国内首个AI IDE,深度理解中文开发场景,立即下载体验Trae
【推荐】编程新体验,更懂你的AI,立即体验豆包MarsCode编程助手
【推荐】抖音旗下AI助手豆包,你的智能百科全书,全免费不限次数
【推荐】轻量又高性能的 SSH 工具 IShell:AI 加持,快人一步
· 无需6万激活码!GitHub神秘组织3小时极速复刻Manus,手把手教你使用OpenManus搭建本
· Manus爆火,是硬核还是营销?
· 终于写完轮子一部分:tcp代理 了,记录一下
· 别再用vector<bool>了!Google高级工程师:这可能是STL最大的设计失误
· 单元测试从入门到精通